


版权声明
笔记出自《Spring 开发指南》一书。
Spring 初探
前面我们简单介绍了 Spring 的基本组件和功能,现在我们来看一个简单示例:
- Person接口
Person接口定义了一个 say 的方法,在其不同的实现中实现了各自的 say 逻辑。1 /** 2 * @author X 3 */ 4 public interface Person { 5 6 public void say(); 7 }
- Person接口的两个实现
 1 /**
 2  * @author X
 3  */
 4 public class Man implements Person {
 5
 6     private String word;
 7
 8     public String getWord() {
 9         return word;
10     }
11
12     public void setWord(String word) {
13         System.out.println("执行了Set");
14         this.word = word;
15     }
16
17     @Override
18     public void say() {
19         System.out.println("一个男人委屈的说:" + word);
20     }
21 }
 1 /**
 2  * @author X
 3  */
 4 public class Woman implements Person {
 5
 6     private String word;
 7
 8     public String getWord() {
 9         return word;
10     }
11
12     public void setWord(String word) {
13         this.word = word;
14     }
15
16     @Override
17     public void say() {
18         System.out.println("一个女人委屈的说:" + word);
19     }
20 }
- Spring配置文件(bean.xml)
 1 <?xml version="1.0" encoding="UTF-8"?>
 2 <beans xmlns="http://www.springframework.org/schema/beans"
 3        xmlns:xsi="http://www.w3.org/2001/XMLSchema-instance"
 4        xsi:schemaLocation="http://www.springframework.org/schema/beans http://www.springframework.org/schema/beans/spring-beans.xsd">
 5
 6     <bean id="TheAction" class="Man">
 7         <property name="word">
 8             <value>一百块钱都不给我还打我</value>
 9         </property>
10     </bean>
11 </beans>
- 调用代码
 1 import org.springframework.context.ApplicationContext;
 2 import org.springframework.context.support.FileSystemXmlApplicationContext;
 3
 4 /**
 5  * @author X
 6  */
 7 public class Run {
 8     public static void main(String[] args) {
 9
10         ApplicationContext ac = new FileSystemXmlApplicationContext("D:\\Study\\study-spring\\src\\main\\resources\\bean.xml");
11
12         Person action = (Person) ac.getBean("TheAction");
13         action.say();
14     }
15 }
运行结果如下图所示:
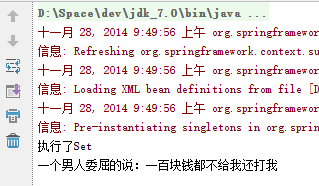
怎么样,是不是很简单?通过这个简单的例子,我们可以看到,我们在实例化Person的时候,根本无需知道它是如何实现的。在编码中,我们只需要去关心接口就可以了,而无需关心它的创建过程,因为这件事 Spring 已经帮我们做掉了。如果你想了解更多,推荐你去了解控制反转(IOC)和依赖注入(DI)的概念。


 3838
3838

 被折叠的 条评论
为什么被折叠?
被折叠的 条评论
为什么被折叠?
 到【灌水乐园】发言


