


一.SpringMVC概述
MVCII模式实现的框架技术
Model--业务模型(Biz,Dao...)
View--jsp及相关的jquery框架技术(easyui)
Contraller--DispatcherServlet以及控制器组件
二.控制器组件
1).DispatherServlet
2).xxx-servlet.xml文件
3).转向模型ModelAndView类
4).相应的Aop组件和拦截器组件
三.springMvc的开发步骤
1.在当前工程引入spring组件包
2.编写实体类以及业务类
3.编写控制器类
4.配置xxx-servlet.xml文件
5.在web.xml中配置spring的启动和中文转码的过滤器
6.在applicationContext.xml中配置注解扫描包
四.springMVC的运行流程
1).用户请求传递给DispatcherSevlet(请求路径通过@RequestMapping进行配置)
2).DispatcherSevlet将请求转发给动作模型(控制器组件)
3).动作模型开始处理用户请求的数据(调用业务模型进行处理)
4).根据业务模型处理的结果通过ModelAndView组件将响应的目标路径传递给客户端
顺便贴个图(这个图是从一个叫“java我人生”的博客拿过来的)个人觉得很好。

五.实例这个实例讲述了springmvc的配置
阅读下面这个实例,你要具备hibernate知识,spring知识
项目包结构如下图:
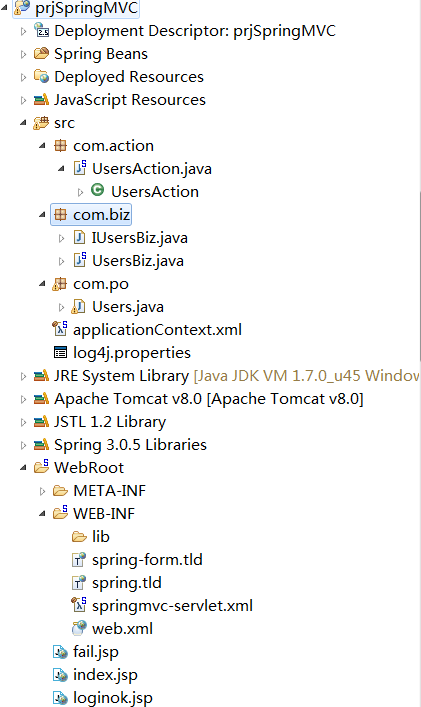
第一步加入spring的组件在src下生成applicationContext.xml文件;
第二步建立如图包;
第三步在com.po包中建立实体类Users,代码如下:
package com.po;

import java.io.Serializable;

public class Users implements Serializable {
	private String uname;// 用户名
	private String passwd;// 密码

	public String getUname() {
		return uname;
	}

	public void setUname(String uname) {
		this.uname = uname;
	}

	public String getPasswd() {
		return passwd;
	}

	public void setPasswd(String passwd) {
		this.passwd = passwd;
	}

}
然后在com.biz包中新建IUsersBiz接口和实现类,代码如下:
package com.biz;

import com.po.Users;

public interface IUsersBiz {
	/**
	 * 检查用户
	 * @param us
	 * @return
	 */
	public boolean check(Users us);
}
package com.biz;

import org.springframework.stereotype.Service;

import com.po.Users;
@Service("UsersBiz")
public class UsersBiz implements IUsersBiz {
	/**
	 * 检查用户名和密码是否合法,合法返回true,否则返回false。
	 */
	@Override
	public boolean check(Users us) {
		if (us != null) {
			if (us.getUname() != null || us.getUname().trim().equals("")
					&& us.getPasswd() != null
					|| us.getPasswd().trim().equals("")) {
				return true;
			}

		}
		return false;
	}

}
再然后在com.action中新建UsersAction类,代码如下:
package com.action;

import javax.annotation.Resource;
import javax.servlet.http.HttpServletRequest;
import javax.servlet.http.HttpServletResponse;

import org.springframework.stereotype.Controller;
import org.springframework.web.bind.annotation.RequestMapping;
import org.springframework.web.servlet.ModelAndView;

import com.biz.IUsersBiz;
import com.po.Users;
@Controller
public class UsersAction {
	@Resource(name="UsersBiz")
	private IUsersBiz iuBiz;

	public IUsersBiz getIuBiz() {
		return iuBiz;
	}

	public void setIuBiz(IUsersBiz iuBiz) {
		this.iuBiz = iuBiz;
	}
	/******SpringMvc的执行方法*******/
	@RequestMapping(value="check_Users.do")
	public ModelAndView check(HttpServletRequest request, HttpServletResponse response, Users us) {
		ModelAndView mv = new ModelAndView();

		boolean flag = iuBiz.check(us);
		if(flag) {
			//将us放入request作用域中
			request.setAttribute("us", us);
			//跳转页面
			mv.setViewName("loginok.jsp");
		} else {
			mv.setViewName("fail.jsp");
		}
		return mv;
	}


}
代码中加黑的:@RequestMapping作说明:
@RequestMapping
RequestMapping是一个用来处理请求地址映射的注解,可用于类或方法上。用于类上,表示类中的所有响应请求的方法都是以该地址作为父路径。
RequestMapping注解有六个属性,下面我们把她分成三类进行说明。
1、 value, method;
value: 指定请求的实际地址,指定的地址可以是URI Template 模式(后面将会说明);
method: 指定请求的method类型, GET、POST、PUT、DELETE等;
2、 consumes,produces;
consumes: 指定处理请求的提交内容类型(Content-Type),例如application/json, text/html;
produces: 指定返回的内容类型,仅当request请求头中的(Accept)类型中包含该指定类型才返回;
3、 params,headers;
params: 指定request中必须包含某些参数值是,才让该方法处理。
headers: 指定request中必须包含某些指定的header值,才能让该方法处理请求。
ModelAndView表示:
返回的视图只是逻辑名,则需要借助Spring提供的视图解析器(ViewResoler)在Web应用中查找View对象,从而将响应结果渲染给客户。
第四步applicationContext.xml配置:
<?xml version="1.0" encoding="UTF-8"?>
<beans
	xmlns="http://www.springframework.org/schema/beans"
	xmlns:tx="http://www.springframework.org/schema/tx"
	xmlns:aop="http://www.springframework.org/schema/aop"
	xmlns:context="http://www.springframework.org/schema/context"
	xmlns:xsi="http://www.w3.org/2001/XMLSchema-instance"
	xmlns:p="http://www.springframework.org/schema/p"
	xsi:schemaLocation="
		http://www.springframework.org/schema/beans
		http://www.springframework.org/schema/beans/spring-beans-3.0.xsd

		http://www.springframework.org/schema/tx
		http://www.springframework.org/schema/tx/spring-tx-3.0.xsd

		http://www.springframework.org/schema/aop
		http://www.springframework.org/schema/aop/spring-aop-3.0.xsd

		http://www.springframework.org/schema/context
		http://www.springframework.org/schema/context/spring-context-3.0.xsd

		"
		default-autowire="byName"
		>
		<!-- 织入注解通知配置 -->
		<context:annotation-config></context:annotation-config>
		<!-- 注入要扫描的组件包 -->
		<context:component-scan base-package="com.biz"></context:component-scan>
		<context:component-scan base-package="com.action"></context:component-scan>

</beans>
第五步web.xml配置:
关键配置DispatcherServlet、CharacterEncodingFilter
<?xml version="1.0" encoding="UTF-8"?>
<web-app xmlns:xsi="http://www.w3.org/2001/XMLSchema-instance" xmlns="http://java.sun.com/xml/ns/javaee" xsi:schemaLocation="http://java.sun.com/xml/ns/javaee http://java.sun.com/xml/ns/javaee/web-app_2_5.xsd" id="WebApp_ID" version="2.5">
  <display-name>prjSpringMVC</display-name>
  <welcome-file-list>
    <welcome-file>index.html</welcome-file>
    <welcome-file>index.htm</welcome-file>
    <welcome-file>index.jsp</welcome-file>
    <welcome-file>default.html</welcome-file>
    <welcome-file>default.htm</welcome-file>
    <welcome-file>default.jsp</welcome-file>
  </welcome-file-list>
  <!-- Spring的启动配置 -->
  <listener>
    <listener-class>org.springframework.web.context.ContextLoaderListener</listener-class>
  </listener>
  <context-param>
    <param-name>contextConfigLocation</param-name>
    <param-value>classpath:applicationContext.xml</param-value>
  </context-param>

   <filter>
        <filter-name>GBK</filter-name>
        <filter-class>org.springframework.web.filter.CharacterEncodingFilter</filter-class>
    	<init-param>
    		<param-name>encoding</param-name>
    		<param-value>utf-8</param-value>
    	</init-param>
    </filter>
    <filter-mapping>
        <filter-name>GBK</filter-name>
        <url-pattern>/*</url-pattern>
    </filter-mapping>

    <servlet>
        <servlet-name>springmvc</servlet-name>
        <servlet-class>org.springframework.web.servlet.DispatcherServlet</servlet-class>
   		<init-param>
   			<param-name>springmvc</param-name>
   			<param-value>/WEB-INF/springmvc-servlet.xml</param-value>
   		</init-param>
    </servlet>
    <servlet-mapping>
        <servlet-name>springmvc</servlet-name>
        <url-pattern>*.do</url-pattern>
    </servlet-mapping>

</web-app>
第六步:login.jsp\loginok.jsp\fail.jsp
1.login.jsp
<body>
    用户登录<br>
   <form action="check_Users.do" method="post">
   		账号:<input type="text" name="uname"/><br>
   		密码:<input type="password" name="passwd"/><br>
   		<input type="submit" value="确定"/>
   </form>
  </body>
2.loginok.jsp
<body>
    用户名:${us.uname }<br/>
    密码:${us.passwd }
  </body>
3.fail.jsp
<body>
    登录失败 <br>
  </body>
好啦看看效果:


最后说明一下,这个例子虽然很简单,但是其中的springmvc配置很重要!!!!


 539
539

 被折叠的 条评论
为什么被折叠?
被折叠的 条评论
为什么被折叠?
 到【灌水乐园】发言


