


 Spring是一个开源框架,用于简化企业级应用开发。它通过依赖注入和面向接口编程实现组件间的解耦。本文介绍了Spring的基本概念、配置方式及依赖注入的多种方法。
Spring
简介
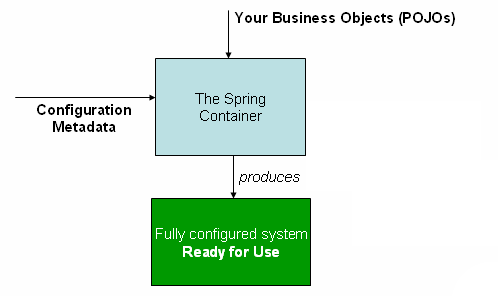
Spring是一个开放源代码的设计层面框架,他解决的是业务逻辑层和其他各层的松耦合问题,因此它将面向接口的编程思想贯穿整个系统应用。轻量级非入侵式框架,简化企业级应用开发,IOC(DI)、AOPring容器框架。
使用方法
<!-- server.xml-->
<?xml version="1.0" encoding="UTF-8"?>
<beans xmlns="http://www.springframework.org/schema/beans"
    xmlns:xsi="http://www.w3.org/2001/XMLSchema-instance"
    xsi:schemaLocation="http://www.springframework.org/schema/beans
        http://www.springframework.org/schema/beans/spring-beans.xsd">

    <!-- services -->

    <bean id="petStore" class="org.springframework.samples.jpetstore.services.PetStoreServiceImpl">
        <property name="accountDao" ref="accountDao"/>
        <property name="itemDao" ref="itemDao"/>
        <!-- additional collaborators and configuration for this bean go here -->
    </bean>

    <!-- more bean definitions for services go here -->
</beans>
<!-- dao.xml -->
<?xml version="1.0" encoding="UTF-8"?>
<beans xmlns="http://www.springframework.org/schema/beans"
xmlns:xsi="http://www.w3.org/2001/XMLSchema-instance"
xsi:schemaLocation="http://www.springframework.org/schema/beans
http://www.springframework.org/schema/beans/spring-beans.xsd">
<bean id="accountDao"
class="org.springframework.samples.jpetstore.dao.jpa.JpaAccountDao">
<!-- additional collaborators and configuration for this bean go here -->
</bean>
<bean id="itemDao" class="org.springframework.samples.jpetstore.dao.jpa.JpaItemDao">
<!-- additional collaborators and configuration for this bean go here -->
</bean>
<!-- more bean definitions for data access objects go here -->
</beans>/ create and configure beans
ApplicationContext context = new ClassPathXmlApplicationContext("services.xml", "daos.xml");
// retrieve configured instance
PetStoreService service = context.getBean("petStore", PetStoreService.class);
// use configured instance
List<String> userList = service.getUsernameList();Bean概述
Spring 的Loc容器管理一个或多个bean,这些bean使用容器给定的配置,在容器中,这些bean会被定义为BeanDefinition对象将包含:
- Bean实现的类全类名
- Bean的行为元素,作用域,生命周期回调等
- 引用bean执行其工作所需的其他bean,这些引用也称为协作者或依赖关系。
- 在新创建的对象中要设置的其他配置设置,例如,管理连接池的bean中要使用的连接数,或池的大小限制。
Bean定义属性
| Property | Explained in… |
|---|---|
| class | Instantiating beans |
| name | Naming beans |
| scope | Bean scopes |
| constructor arguments | Dependency Injection |
| properties | Dependency Injection |
| autowiring mode | Autowiring collaborators |
| lazy-initialization mode | Lazy-initialized beans |
| initialization method | Initialization callbacks |
| destruction method | Destruction callbacks |
构造实例化
<bean id="exampleBean" class="examples.ExampleBean"/>

<bean name="anotherExample" class="examples.ExampleBeanTwo"/>
静态工厂实例化
<bean id="clientService"
    class="examples.ClientService"
    factory-method="createInstance"/>
public class ClientService {
private static ClientService clientService = new ClientService();
private ClientService() {}
public static ClientService createInstance() {
return clientService;
}
}工厂实例化
<!-- the factory bean, which contains a method called createInstance() -->
<bean id="serviceLocator" class="examples.DefaultServiceLocator">
    <!-- inject any dependencies required by this locator bean -->
</bean>

<!-- the bean to be created via the factory bean -->
<bean id="clientService"
    factory-bean="serviceLocator"
    factory-method="createClientServiceInstance"/>
public class DefaultServiceLocator {
private static ClientService clientService = new ClientServiceImpl();
public ClientService createClientServiceInstance() {
return clientService;
}
}一个工厂多个工厂方法
<bean id="serviceLocator" class="examples.DefaultServiceLocator">
    <!-- inject any dependencies required by this locator bean -->
</bean>

<bean id="clientService"
    factory-bean="serviceLocator"
    factory-method="createClientServiceInstance"/>

<bean id="accountService"
    factory-bean="serviceLocator"
    factory-method="createAccountServiceInstance"/>
public class DefaultServiceLocator {
private static ClientService clientService = new ClientServiceImpl();
private static AccountService accountService = new AccountServiceImpl();
public ClientService createClientServiceInstance() {
return clientService;
}
public AccountService createAccountServiceInstance() {
return accountService;
}
}依赖注入
依赖注入(Dependency injection)是一个对象定义其依赖关系的过程,也就是说,与之协作的其他对象,如通过构造参数、工厂参数、属性等,将在本对象构造后或从工厂方法返回后进行注入。这个过程从根本上说就是bean本身的逆过程,bean本身通过类的构造或服务定位控制其他依赖对象的实例化或位置。
构造器注入
下面的例子说明,通过构造器注入了一个依赖,这个依赖中的逻辑部分被注入方式隐藏,即这个只需注入依赖即可完成对应功能实现。
public class SimpleMovieLister {

    // the SimpleMovieLister has a dependency on a MovieFinder
    private MovieFinder movieFinder;

    // a constructor so that the Spring container can inject a MovieFinder
    public SimpleMovieLister(MovieFinder movieFinder) {
        this.movieFinder = movieFinder;
    }

    // business logic that actually uses the injected MovieFinder is omitted...
}
xml编写方式
构造器注入的参数是已知类型的bean时,在构造参数上不需要指定参数的类型,直接进行引用即可。
package x.y;

public class Foo {

    public Foo(Bar bar, Baz baz) {
        // ...两个构造参数
    }
}
<beans>
<bean id="foo" class="x.y.Foo">
<constructor-arg ref="bar"/>
<constructor-arg ref="baz"/>
</bean>
<!-- 声明这个bean -->
<!-- -->
<bean id="bar" class="x.y.Bar"/>
<bean id="baz" class="x.y.Baz"/>
</beans>当注入的参数是简单类型,即无法确定类型的时候,可以进行类型指定或者参数的索引位置指定或参数名称指定。
package examples;

public class ExampleBean {

    // Number of years to calculate the Ultimate Answer
    private int years;

    // The Answer to Life, the Universe, and Everything
    private String ultimateAnswer;

    public ExampleBean(int years, String ultimateAnswer) {
        this.years = years;
        this.ultimateAnswer = ultimateAnswer;
    }
}
<bean id="exampleBean" class="examples.ExampleBean">
<constructor-arg type="int" value="7500000"/>
<constructor-arg type="java.lang.String" value="42"/>
</bean>
----------------------------------------------------------
<bean id="exampleBean" class="examples.ExampleBean">
<constructor-arg index="0" value="7500000"/>
<constructor-arg index="1" value="42"/>
</bean>
----------------------------------------------------------
<bean id="exampleBean" class="examples.ExampleBean">
<constructor-arg name="years" value="7500000"/>
<constructor-arg name="ultimateAnswer" value="42"/>
</bean>属性注入
下面示例中,依赖使用了一个属性,而这个属性的注入方式是使用的类中的set方法完成的。
public class SimpleMovieLister {

    // the SimpleMovieLister has a dependency on the MovieFinder
    private MovieFinder movieFinder;

    // a setter method so that the Spring container can inject a MovieFinder
    public void setMovieFinder(MovieFinder movieFinder) {
        this.movieFinder = movieFinder;
    }

    // business logic that actually uses the injected MovieFinder is omitted...
}属性注入示例,可以书写引用属性也可以使用字引用标签的方式。
<bean id="exampleBean" class="examples.ExampleBean">
    <!-- setter injection using the nested ref element -->
    <property name="beanOne">
        <ref bean="anotherExampleBean"/>
    </property>

    <!-- setter injection using the neater ref attribute -->
    <property name="beanTwo" ref="yetAnotherBean"/>
    <property name="integerProperty" value="1"/>
</bean>

<bean id="anotherExampleBean" class="examples.AnotherBean"/>
<bean id="yetAnotherBean" class="examples.YetAnotherBean"/>
public class ExampleBean {
private AnotherBean beanOne;
private YetAnotherBean beanTwo;
private int i;
public void setBeanOne(AnotherBean beanOne) {
this.beanOne = beanOne;
}
public void setBeanTwo(YetAnotherBean beanTwo) {
this.beanTwo = beanTwo;
}
public void setIntegerProperty(int i) {
this.i = i;
}
}此示例使用构造器方式实现上面的属性注入方式,用于对比两种注入方式。
public class ExampleBean {

    private AnotherBean beanOne;

    private YetAnotherBean beanTwo;

    private int i;

    public ExampleBean(
        AnotherBean anotherBean, YetAnotherBean yetAnotherBean, int i) {
        this.beanOne = anotherBean;
        this.beanTwo = yetAnotherBean;
        this.i = i;
    }
}
<bean id="exampleBean" class="examples.ExampleBean">
<!-- constructor injection using the nested ref element -->
<constructor-arg>
<ref bean="anotherExampleBean"/>
</constructor-arg>
<!-- constructor injection using the neater ref attribute -->
<constructor-arg ref="yetAnotherBean"/>
<constructor-arg type="int" value="1"/>
</bean>
<bean id="anotherExampleBean" class="examples.AnotherBean"/>
<bean id="yetAnotherBean" class="examples.YetAnotherBean"/>详细依赖及配置
直接给定值
直接给定的如初始值、字符串等。
<bean id="myDataSource" class="org.apache.commons.dbcp.BasicDataSource" destroy-method="close">
    <!-- results in a setDriverClassName(String) call -->
    <property name="driverClassName" value="com.mysql.jdbc.Driver"/>
    <property name="url" value="jdbc:mysql://localhost:3306/mydb"/>
    <property name="username" value="root"/>
    <property name="password" value="masterkaoli"/>
</bean>

<!-- 还可以引入P命名空间来简化<property>标签的编写  这有那么一点点秀 -->
<beans xmlns="http://www.springframework.org/schema/beans"
    xmlns:xsi="http://www.w3.org/2001/XMLSchema-instance"
    xmlns:p="http://www.springframework.org/schema/p"
    xsi:schemaLocation="http://www.springframework.org/schema/beans
    http://www.springframework.org/schema/beans/spring-beans.xsd">

    <bean id="myDataSource" class="org.apache.commons.dbcp.BasicDataSource"
        destroy-method="close"
        p:driverClassName="com.mysql.jdbc.Driver"
        p:url="jdbc:mysql://localhost:3306/mydb"
        p:username="root"
        p:password="masterkaoli"/>

</beans>
引用其他
在需要注入的位置直接添加引用属性或引用标签既可以
    <constructor-arg>
        <ref bean="anotherExampleBean"/>
    </constructor-arg>

    <!-- constructor injection using the neater ref attribute -->
    <constructor-arg ref="yetAnotherBean"/>
父子容器,用子容器中的bean代理父容器中的bean
<!-- in the parent context -->
<bean id="accountService" class="com.foo.SimpleAccountService">
    <!-- insert dependencies as required as here -->
</bean>

<!-- in the child (descendant) context -->
<bean id="accountService" <!-- bean name is the same as the parent bean -->
    class="org.springframework.aop.framework.ProxyFactoryBean">
    <property name="target">
        <ref parent="accountService"/> <!-- notice how we refer to the parent bean -->
    </property>
    <!-- insert other configuration and dependencies as required here -->
</bean>
内部创建
可以在bean的property标签内继续创建新的bean,内部bean可以没有id属性
<bean id="outer" class="...">
    <!-- instead of using a reference to a target bean, simply define the target bean inline -->
    <property name="target">
        <bean class="com.example.Person"> <!-- this is the inner bean -->
            <property name="name" value="Fiona Apple"/>
            <property name="age" value="25"/>
        </bean>
    </property>
</bean>
集合类型赋值
<bean id="moreComplexObject" class="example.ComplexObject">
    <!-- results in a setAdminEmails(java.util.Properties) call -->
    <property name="adminEmails">
        <props>
            <prop key="administrator">administrator@example.org</prop>
            <prop key="support">support@example.org</prop>
            <prop key="development">development@example.org</prop>
        </props>
    </property>
    <!-- results in a setSomeList(java.util.List) call -->
    <property name="someList">
        <list>
            <value>a list element followed by a reference</value>
            <ref bean="myDataSource" />
        </list>
    </property>
    <!-- results in a setSomeMap(java.util.Map) call -->
    <property name="someMap">
        <map>
            <entry key="an entry" value="just some string"/>
            <entry key ="a ref" value-ref="myDataSource"/>
        </map>
    </property>
    <!-- results in a setSomeSet(java.util.Set) call -->
    <property name="someSet">
        <set>
            <value>just some string</value>
            <ref bean="myDataSource" />
        </set>
    </property>
</bean>
属性值合并为集合
<beans>
    <bean id="parent" abstract="true" class="example.ComplexObject">
        <property name="adminEmails">
            <props>
                <prop key="administrator">administrator@example.com</prop>
                <prop key="support">support@example.com</prop>
            </props>
        </property>
    </bean>
    <bean id="child" parent="parent">
        <property name="adminEmails">
            <!-- the merge is specified on the child collection definition -->
            <props merge="true"><!-- 这里将会合并 例如 setAdminEmils 传入一个map -->
                <prop key="sales">sales@example.com</prop>
                <prop key="support">support@example.co.uk</prop>
            </props>
        </property>
    </bean>
<beans>
强类型集合,当集合中的数据需要进行类型转换时,spring将自动完成类型转换工作
public class Foo {

    private Map<String, Float> accounts;

    public void setAccounts(Map<String, Float> accounts) {
        this.accounts = accounts;
    }
}
<beans>
<bean id="foo" class="x.y.Foo">
<property name="accounts">
<map>
<entry key="one" value="9.99"/>
<entry key="two" value="2.75"/>
<entry key="six" value="3.99"/>
</map>
</property>
</bean>
</beans>空值规定
空参数视为空字符串,null标签处理null值
<bean class="ExampleBean">
    <property name="email" value=""/>
</bean>

<bean class="ExampleBean">
    <property name="email">
        <null/>
    </property>
</bean>
C&P属性标签
<beans xmlns="http://www.springframework.org/schema/beans"
    xmlns:xsi="http://www.w3.org/2001/XMLSchema-instance"
    xmlns:c="http://www.springframework.org/schema/c"
    xmlns:p="http://www.springframework.org/schema/p"
    xsi:schemaLocation="http://www.springframework.org/schema/beans
        http://www.springframework.org/schema/beans/spring-beans.xsd">

    <bean id="bar" class="x.y.Bar"/>
    <bean id="baz" class="x.y.Baz"/>

    <!-- traditional declaration -->
    <bean id="foo" class="x.y.Foo">
        <constructor-arg ref="bar"/>
        <constructor-arg ref="baz"/>
        <constructor-arg value="foo@bar.com"/>
          <property name="email" value="foo@bar.com"/>
    </bean>

    <!-- c-namespace declaration -->
    <bean id="foo" class="x.y.Foo" c:bar-ref="bar" c:baz-ref="baz" c:email="foo@bar.com" p:email="foo@bar.com"/>

</beans>
提前加载
意思就是说,我这个bean在实例化前,你还得给我准备好我依赖的bean
<bean id="beanOne" class="ExampleBean" depends-on="manager"/>
<bean id="manager" class="ManagerBean" />
懒加载
<bean id="lazy" class="com.foo.ExpensiveToCreateBean" lazy-init="true"/>
<bean name="not.lazy" class="com.foo.AnotherBean"/>

<!--  容器级别的懒加载 -->
<beans default-lazy-init="true">
    <!-- no beans will be pre-instantiated... -->
</beans>
方法注入
查找方式,使用cglib动态代理方式,生成代理子类
package fiona.apple;

// no more Spring imports!

public abstract class CommandManager {

    public Object process(Object commandState) {
        // grab a new instance of the appropriate Command interface
        Command command = createCommand();
        // set the state on the (hopefully brand new) Command instance
        command.setState(commandState);
        return command.execute();
    }

    // okay... but where is the implementation of this method?
    protected abstract Command createCommand();
}
<!-- a stateful bean deployed as a prototype (non-singleton) -->
<bean id="myCommand" class="fiona.apple.AsyncCommand" scope="prototype">
<!-- inject dependencies here as required -->
</bean>
<!-- commandProcessor uses statefulCommandHelper -->
<bean id="commandManager" class="fiona.apple.CommandManager">
<lookup-method name="createCommand" bean="myCommand"/>
<!-- 还可以使用@Lookup("myCommand") 注解标注上面类中的方法 -->
</bean>
任意方法替换方式
public class MyValueCalculator {

    public String computeValue(String input) {
        // some real code...
    }

    // some other methods...
}
/**
 * meant to be used to override the existing computeValue(String)
 * implementation in MyValueCalculator
 */
public class ReplacementComputeValue implements MethodReplacer {

    public Object reimplement(Object o, Method m, Object[] args) throws Throwable {
        // get the input value, work with it, and return a computed result
        String input = (String) args[0];
        ...
        return ...;
    }
}
<bean id="myValueCalculator" class="x.y.z.MyValueCalculator">
<!-- arbitrary method replacement -->
<replaced-method name="computeValue" replacer="replacementComputeValue">
<arg-type>String</arg-type>
</replaced-method>
</bean>
<bean id="replacementComputeValue" class="a.b.c.ReplacementComputeValue"/>作用域
| 模式 | 描述 |
|---|---|
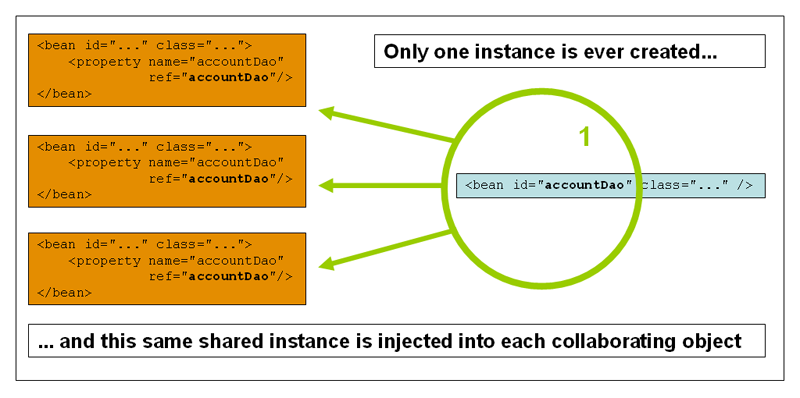
| singleton | 单例模式 |
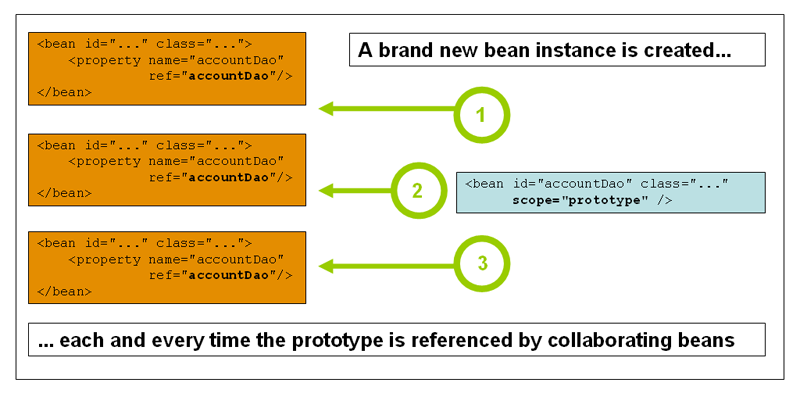
| prototype | 原型模式、多例模式 |
| request | 每一个http请求都会创建一个单例的bean,仅web应用 |
| session | 在session的生命周期中存在,仅web应用 |
| application | ServletContext生命周期中存在,仅web应用 |
| websocket | WebSocket生命周期存在,仅web应用 |
单例模式
原型模式


 9582
9582

 被折叠的 条评论
为什么被折叠?
被折叠的 条评论
为什么被折叠?
 到【灌水乐园】发言


