


 本文详细介绍了前端开发中常用的布局技巧,包括居中对齐、浮动菜单制作等,并通过实例展示了如何利用HTML、CSS和JavaScript实现点赞按钮、返回顶部及模态框等功能。
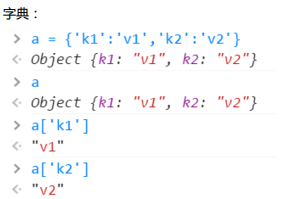
居中 line-hight 是上下
text-line 是左右
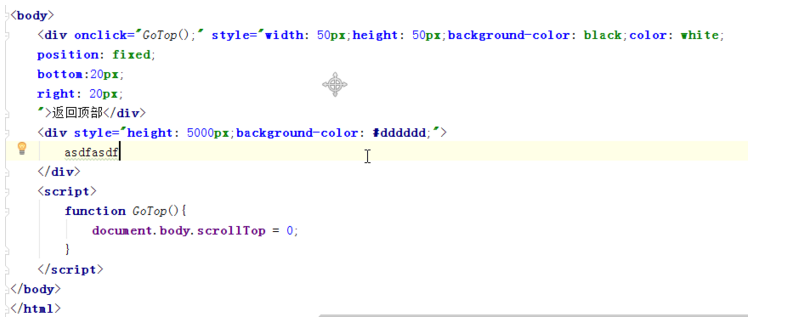
实现一个返回顶部的功能:
1 先写好CSS
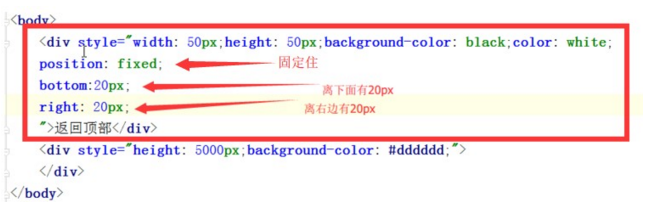
2 写动作JS
写一个悬浮菜单:
<!DOCTYPE html>
<html lang="en">
<head>
    <meta charset="UTF-8">
    <title>Title</title>
    <style>
        .pg-header{
            margin: 0 auto;
            height: 48px;
            width:980px;
            background-color: aquamarine;
            color: coral;
            position: fixed;
            top: 0;
            left: 20px;
            right: 20px;
            line-height: 48px;
            text-align: center;
        }
        .pg-body{
            margin: 0 auto;
            background-color: #dddddd;
            width:980px;
            height: 5000px;
            margin-top: 50px;
        }
    </style>
</head>
<body>
    <div class="pg-header">此处为菜单</div>
    <div class="pg-body">此处为内容</div>
</body>
</html>
效果:
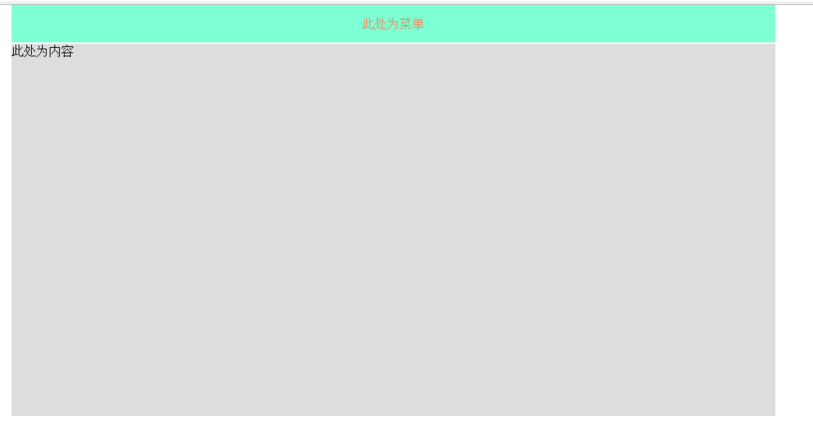
上下滚动菜单始终固定在顶部
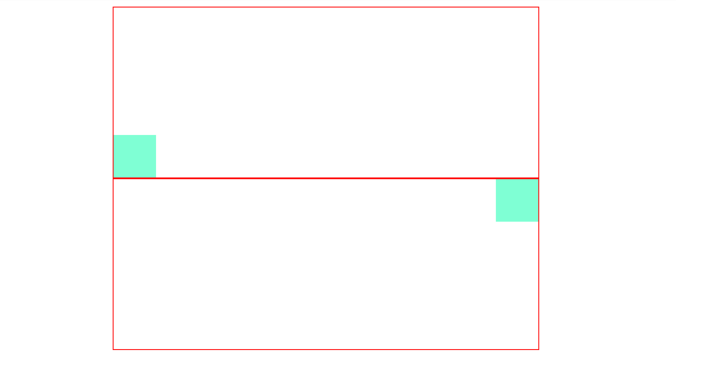
实现一个点赞按钮的效果:
<!DOCTYPE html>
<html lang="en">
<head>
    <meta charset="UTF-8">
    <title>Title</title>
</head>
<body>
    <div style="position: relative;width: 500px;height: 200px;border: 1px solid red; margin: 0 auto;">
        <div style="position: absolute;left: 0;bottom: 0;width: 50px;height: 50px;background-color: aquamarine"></div>
    </div>
    <div style="position: relative;width: 500px;height: 200px;border: 1px solid red; margin: 0 auto;">
        <div style="position: absolute;right: 0;top: 0;width: 50px;height: 50px;background-color: aquamarine"></div>
    </div>
</body>
</html>
效果:
实现一个遮罩层,就是平时的弹出选择框,即模态框:
加透明度:
opacity 设置遮罩层的透明度 0-1 的范围
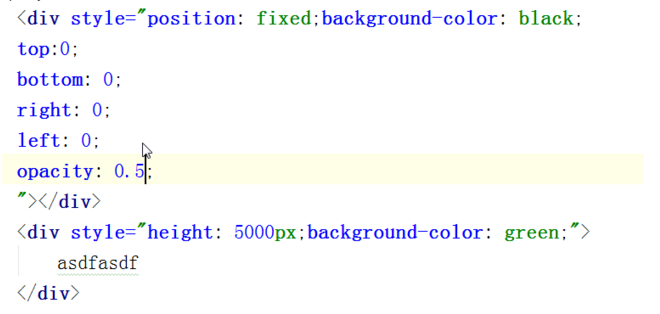
三层
设置一个值,谁的大谁在上面:
z-index
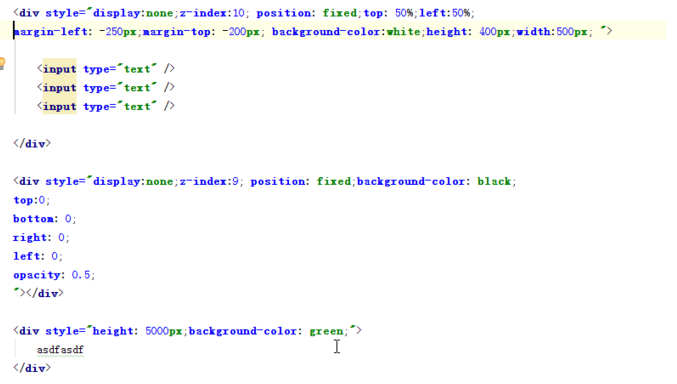
实践:
<!DOCTYPE html>
<html lang="en">
<head>
    <meta charset="UTF-8">
    <title>Title</title>
</head>
<body>
    <div style="background-color: white;
    /*display: none;*/
    z-index: 10;
    position: fixed;
    height: 400px;
    width: 500px;
    top: 50%;
    left: 50%;
    margin-left: -250px;
    margin-top: -200px;
    border: 1px brown;
    ">
        <div style="display: inline">姓名</div><input type="text"/>
        <div style="display: inline">密码</div><input type="text"/>
    </div>
    <div style="background-color: blue;
    /*display: none;*/
    position: fixed;
    z-index: 9;
    top:0;
    bottom: 0;
    left: 0;
    right: 0;
    opacity: 0.5;"></div>

    <div style="height: 5000px;background-color: coral;"> hehhehhehe</div>
</body>
</html>
效果:
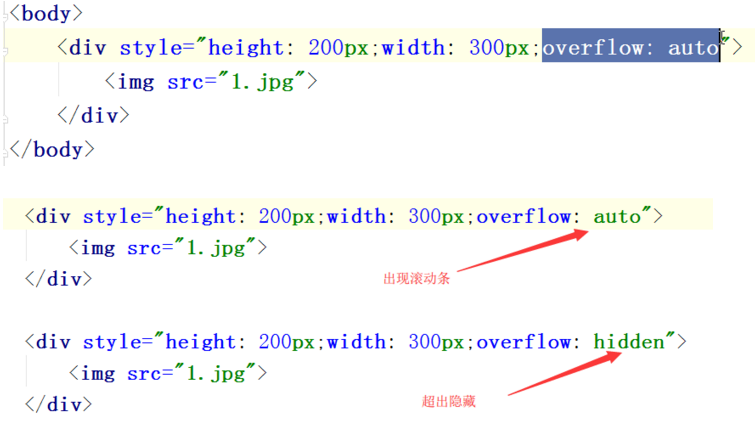
图片的问题:
overflow
可以设置隐藏或者自动生成滚动条
设置上右下左的间隔:
伪类:
鼠标移到后应用:
当鼠标移到当前标签上时,就会使得下面的css生效
hover
实践:
<!DOCTYPE html>
<html lang="en">
<head>
<meta charset="UTF-8">
<title>Title</title>
<style>
.pg-header{
position: fixed; /* 设置为固定位置*/
right: 0; /*距离右边0*/
left: 0; /*距离左边0*/
top: 0; /*距离上边0*/
height: 48px; /*高度为48像素*/
background-color: #2459a2; /*背景颜色*/
line-height: 48px; /*设置上下居中,和高度一样才能居中*/
}
.pg-body{
margin-top: 50px; /*设置距离顶部50像素,避免menu挡住body*/
}
.w{
width: 980px; /*全局宽度 980像素*/
margin: 0 auto; /*自动居中*/
}
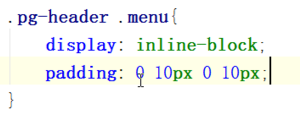
.pg-header .menu{
display: inline-block; /*设置标签为行内块级混合标签,可以设置高度和宽度*/
padding: 0 10px 0 10px; /*设置标签上下左右的距离*/
color: white; /*字体颜色*/
}
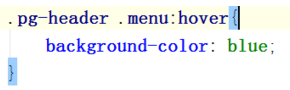
.pg-header .menu:hover{ /*此属性是当鼠标移动到此时应用*/
background-color: dodgerblue; /*背景颜色*/
}
</style>
</head>
<body>
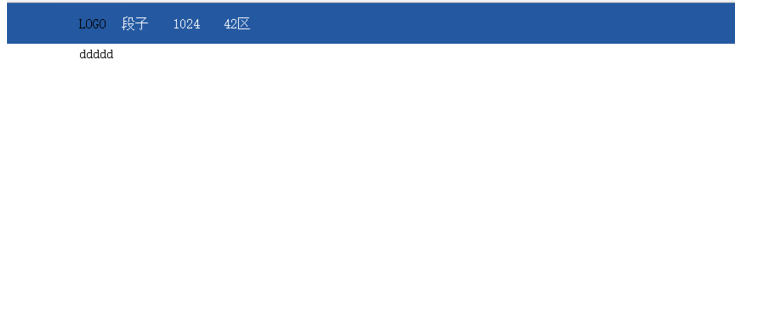
<div class="pg-header">
<div class="w">
<a class="logo">LOGO</a>
<a class="menu">段子</a>
<a class="menu">1024</a>
<a class="menu">42区</a>
</div>
</div>
<div class="pg-body">
<div class="w">ddddd</div>
</div>
</body>
</html>

渐变色 就是一个非常细的图片一直自动堆叠
高度增加 也是自动堆叠
控制图片怎么堆叠,使用下面的

其实图标都是只用一个图,然后通过调整
就能显示一个图片不同的位置
实践:
<body>
    <div style="height: 100px;"></div>
    <div style="height: 20px;width:20px;background-image: url(icon_18_118.png);border: 1px solid red"></div>
</body>
显示不同位置:
<body>
    <div style="height: 100px;"></div>
    <div style="height: 20px;
    width:20px;
    background-image: url(icon_18_118.png);
    background-position-x: 0px;
    background-position-y: -58px;
    border: 1px solid red"></div>
</body>

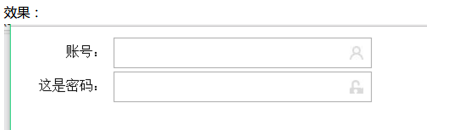
相对的位置,如点赞的图案:
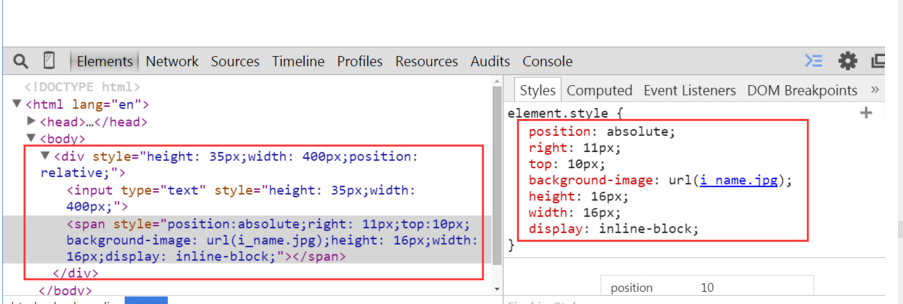
有个问题,图片会挡住输入,修改后就好了

实践:
<!DOCTYPE html>
<html lang="en">
<head>
    <meta charset="UTF-8">
    <title>Title</title>
</head>
<body>
    <div class="user-input" style="padding: 5px;">
        <div style="display: inline-block;width: 100px;text-align: right;">账号:</div>
        <div style="display: inline-block;width: 300px;height:30px;position: relative;">
            <input type="text" style="height: 30px;
            width: 270px;
            padding-right: 30px"></input>
            <span style="position:absolute;
            right: 6px;
            top:10px;
            background-image: url(user.jpg);
            height: 16px;
            width: 16px;
            display: inline-block"></span>
        </div>
    </div>
    <div class="passwd-input" style="padding: 5px;">
        <div style="display: inline-block;width: 100px;text-align: right;">这是密码:</div>
        <div style="display: inline-block;width: 300px;height:30px;position: relative;">
            <input type="text" style="height: 30px;
            width: 270px;
            padding-right: 30px"></input>
            <span style="position:absolute;
            right: 6px;
            top:10px;
            background-image: url(i_pwd.jpg);
            height: 16px;
            width: 16px;
            display: inline-block"></span>
        </div>
    </div>
</body>
</html>
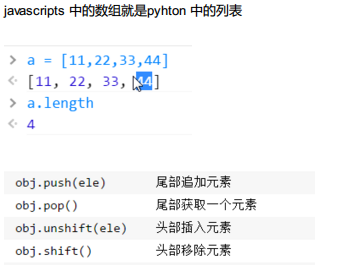
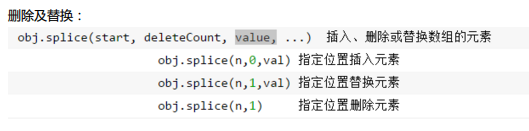
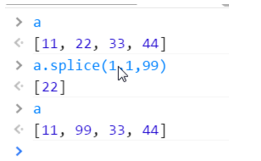
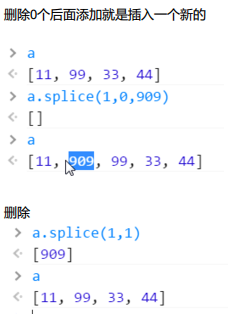
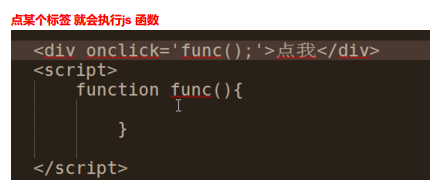
开始 javascript
一门独立的语言
和java没半毛钱关系
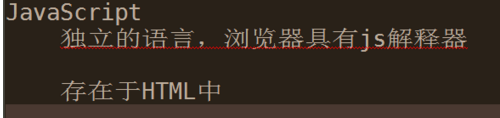
helloworld
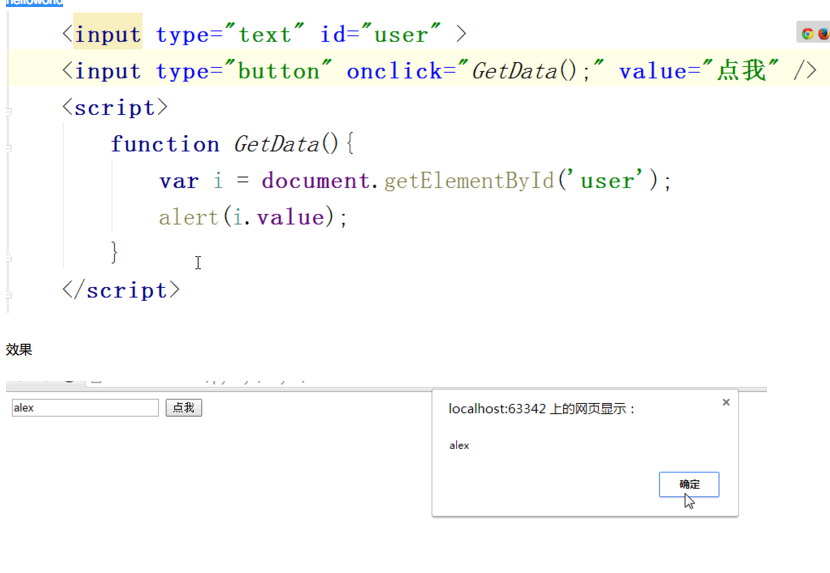
写代码的位置,两种形式:
1在html 文件中:
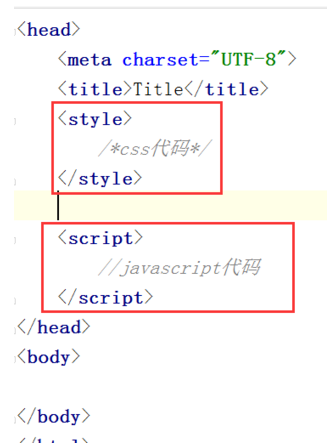
2 单独文件,引入到html文件中:
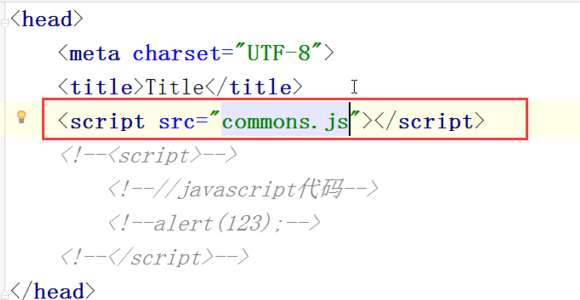
先执行js 从上往下读运行
js没有完成之前 网页就一直等待js完成,这样对用户就不友好
解决办法就是把js放在html尾部
写在body 内部的最下面:


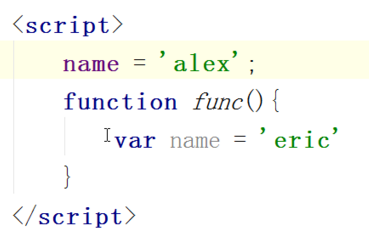
写的时候先写 var
斟酌以后确实是全局,再去掉var
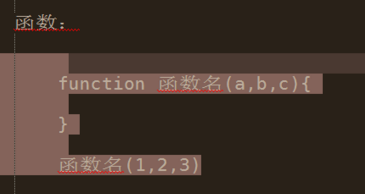
定义函数:
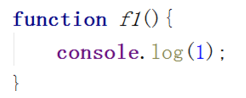
在控制台打印日志:
console.log(1)
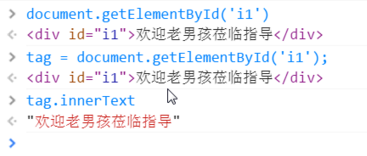
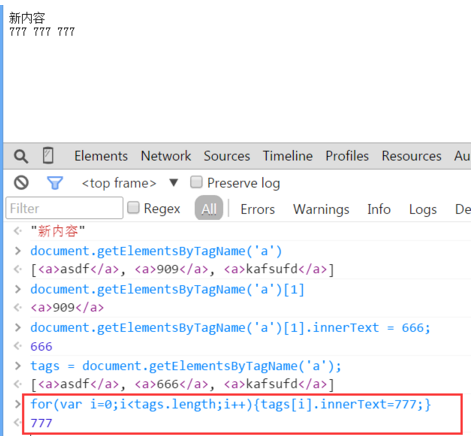
根据id找到内容:
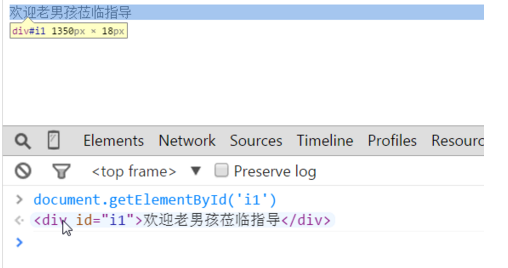
获取内容:
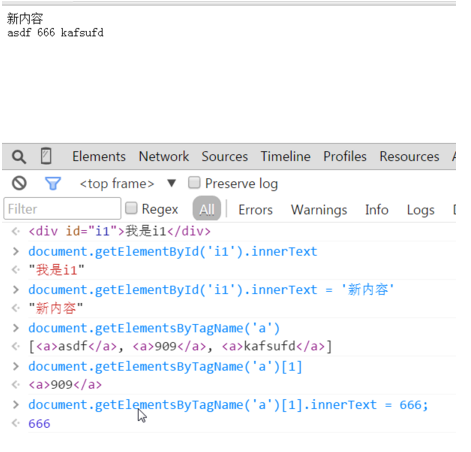
获取子列表:
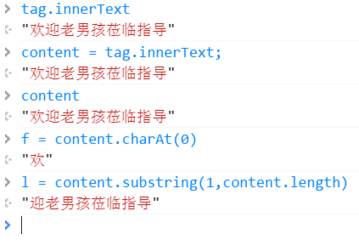
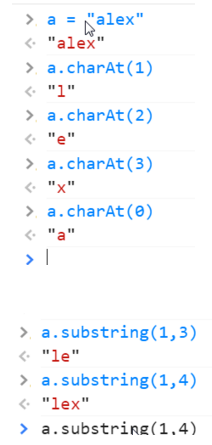
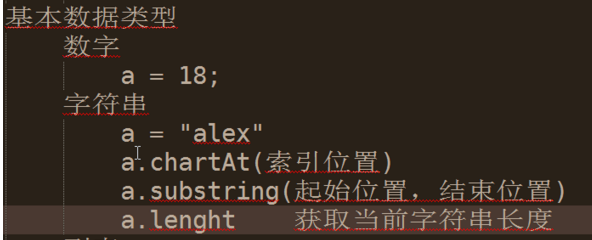
拼接字符串:
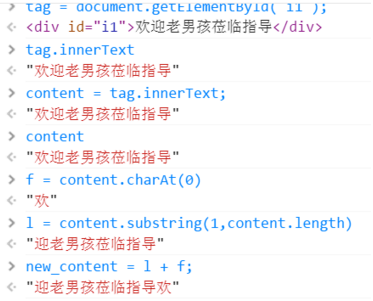
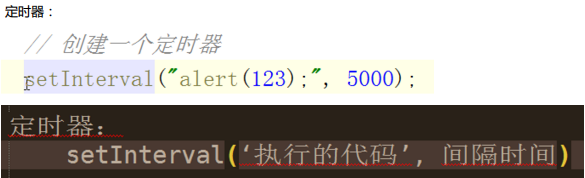
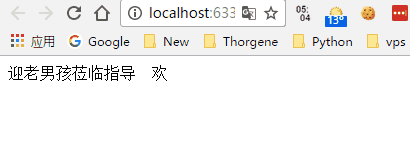
做一个滚动条效果:
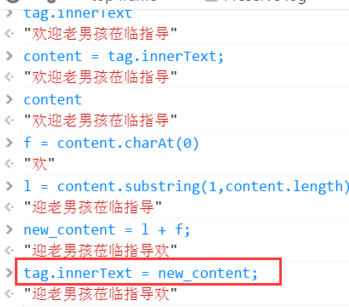

实践:
<!DOCTYPE html>
<html lang="en">
<head>
<meta charset="UTF-8">
<title>Title</title>
<script>
function func() {
var tag = document.getElementById('i1');
var content = tag.innerText;
var f = content.charAt(0);
var l = content.substring(1,content.length)
var new_content = l + f;
tag.innerText = new_content;
}
setInterval('func()',500);
</script>
</head>
<body>
<div id="i1">欢迎老男孩莅临指导 </div>
</body>
</html>
效果:
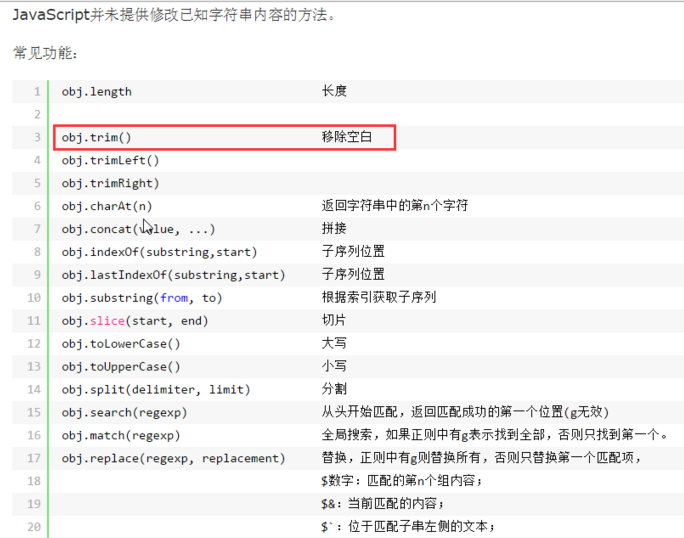


join 添加分隔符
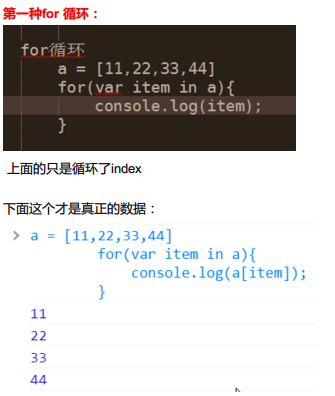
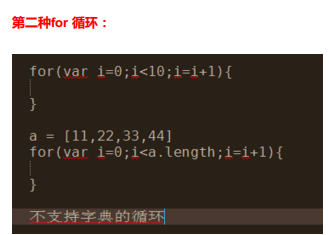
循环:
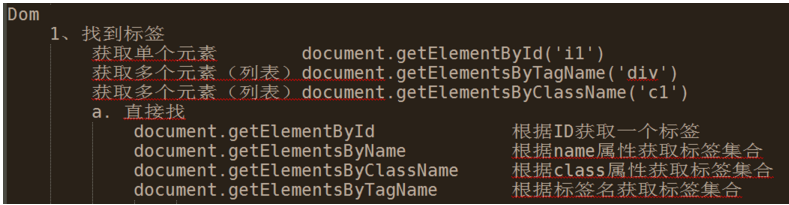
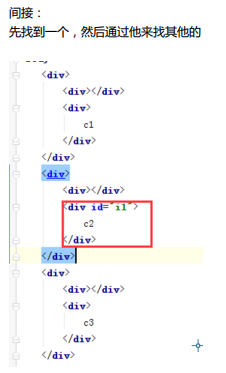
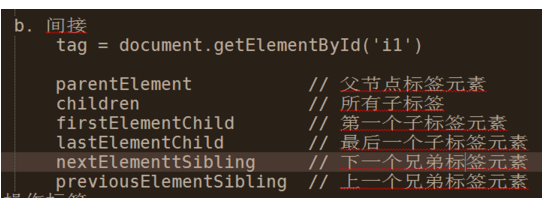
DOM
做了一个动作就是把文档转换为一个对象
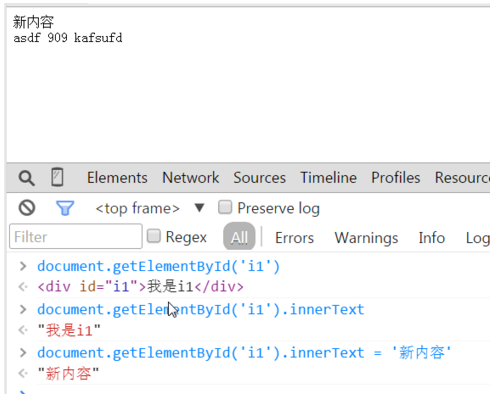
改变数据:
document.getElementById('i1').innerText = 'new数据'
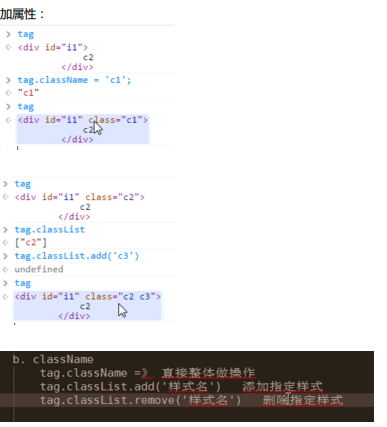
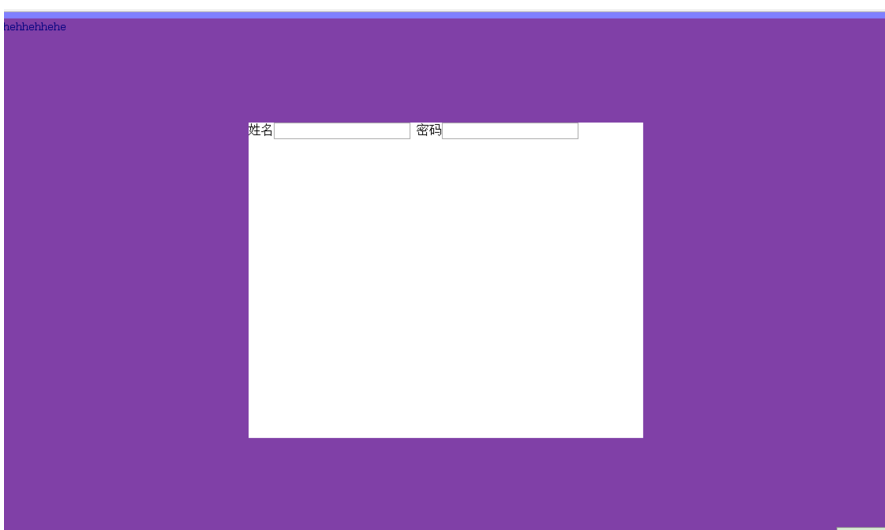
实现模态框:
<!DOCTYPE html>
<html lang="en">
<head>
    <meta charset="UTF-8">
    <title>Title</title>
    <style>
        .hide{
            display: none;
        }
        .c1{
            position: fixed;
            left: 0;
            right: 0;
            top: 0;
            bottom: 0;
            background-color: black;
            opacity: 0.6;
            z-index: 9;
        }
        .c2{
            width: 500px;
            height: 400px;
            background-color: white;
            position: fixed;
            left: 50%;
            right: 50%;
            top: 50%;
            margin-left: -250px;
            margin-top: -100px;
            z-index: 10;
        }
    </style>
</head>
<body>
    <div>
        <input type="button" value="添加" onclick="ShowModel();"/>
    </div>
    <!--遮罩层 -->
    <div id="i1" class="c1 hide"></div>
    <!-- 弹出窗-->
    <div id="i2" class="c2 hide">
        <p>
            <input type="text"/>
            <input type="text"/>
        </p>
        <p>
            <input type="button" value="取消" onclick="HideModel();"/>
            <input type="button" value="确定" onclick="HideModel();"/>
        </p>
    </div>
    <script>
        function ShowModel() {
            document.getElementById('i1').classList.remove('hide')
            document.getElementById('i2').classList.remove('hide')
        }
        function HideModel() {
            document.getElementById('i1').classList.add('hide')
            document.getElementById('i2').classList.add('hide')
        }
    </script>
</body>
</html>
效果:
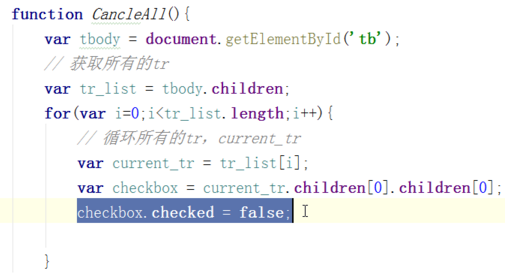
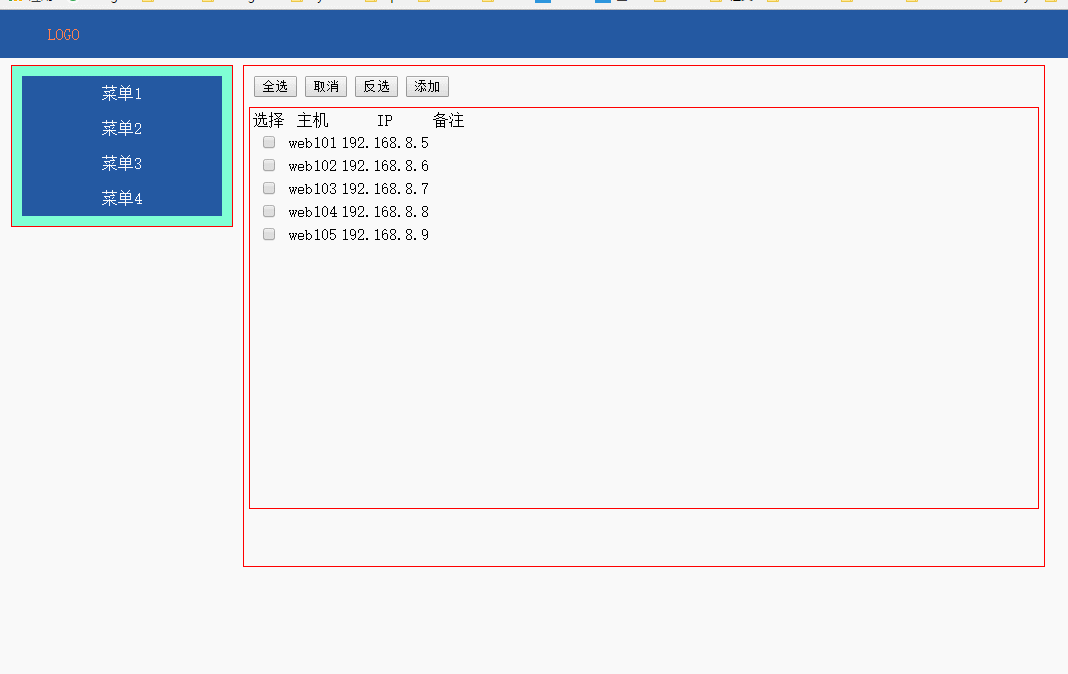
实现一个全选和取消的功能:

分号必须要加,因为线上的时候会把js文件成为一行,必须用分好来断句, 生成一行就是为了节约空间,有专门的压缩工具
实现一个后台管理的简单页面,需要点击菜单显示菜单,可以全选,反选,可以点击有模态框效果:
<!DOCTYPE html>
<html lang="en">
<head>
    <meta charset="UTF-8">
    <title>管理</title>
    <style>
        .pg-header{
            margin: 0 auto;
            height: 48px;
            /*width:980px;*/
            background-color: #2459a2;
            color: coral;
            position: fixed;
            top: 0;
            left: 0;
            right: 0;
            line-height: 48px;
            z-index: 10;
        }
        .pg-header .logo{
            display: inline-block;
            margin-left: 50px;
        }
        .pg-body{
            margin-top: 50px;
            width:1080px;
            height: 2000px;
        }
        .pg-body .menu{
            text-align: center;
            width:200px;
            border: 1px solid red;
            padding: 10px;
            background-color: aquamarine;
            float: left;
            margin: 5px;
        }
        .pg-body .menu .every-menu{
            text-align: center;
            display: inline-block;
            border: 1px solid red;
            width: 180px;
            height: 50px;
            margin: 5px;
            padding: 2px;
            line-height: 50px;
        }
        .pg-body .info{
            float: left;
            margin: 5px;
            border: 1px solid red;
            width: 800px;
            height: 500px;
        }
        .pg-body .info .info-menu{
            margin: 10px;
        }
        .pg-body .info-body{
            margin: 5px;
            /*width: 650px;*/
            height: 400px;
            border: 1px solid red;
            text-align: center;
        }
        .go-header{
            position: fixed;
            bottom:20px;
            right:20px;
            width: 80px;
            height: 80px;
            background-color: coral;
            color: white;
            z-index: 11;
            cursor: pointer;
        }
        .hide{
            display: none;
        }
        .c1{
            position: fixed;
            left: 0;
            right: 0;
            top: 0;
            bottom: 0;
            background-color: black;
            opacity: 0.6;
            z-index: 9;
        }
        .c2{
            width: 500px;
            height: 400px;
            background-color: white;
            position: fixed;
            left: 50%;
            right: 50%;
            top: 50%;
            margin-left: -250px;
            margin-top: -100px;
            z-index: 10;
        }
        .hide-menu{
            display: none;
        }
        .item .header{
            height: 35px;
            background-color: #2459a2;
            color: white;
            line-height: 35px;
        }

    </style>
</head>
<body>
    <div class="pg-header">
        <a class="logo">LOGO</a>
    </div>

    <div class="go-header" onclick="GoTop();">
        <img src="back_top.png" alt="美女" title="返回顶部">
    </div>

    <!--遮罩层 -->
    <div id="i1" class="c1 hide"></div>
    <!-- 弹出窗-->
    <div id="i2" class="c2 hide">
        <p>
            <div style="margin: 5px;">
                <div style="display: inline-block;width: 60px;text-align: right">IP:</div>
                <input type="text"/>
            </div>
            <div style="margin: 5px;">
                <div style="display: inline-block;width: 60px;text-align: right">主机:</div>
                <input type="text"/>
            </div>
        </p>
        <p>
            <div style="display: inline-block;width: 200px;text-align: center">
                <input type="button" value="取消" onclick="HideModel();"/>
                <input type="button" value="确定" onclick="HideModel();"/>
            </div>
        </p>
    </div>


    <div class="pg-body">
        <div class="menu">
            <div class="item">
                <div id='m1' class="header" onclick="ChangeMenu('m1');">菜单1</div>
                <div class="content hide-menu">
                    <div>内容1</div>
                    <div>内容1</div>
                    <div>内容1</div>
                </div>
            </div>
            <div class="item">
                <div id='m2' class="header" onclick="ChangeMenu('m2');">菜单2</div>
                <div class="content hide-menu">
                    <div>内容2</div>
                    <div>内容2</div>
                    <div>内容2</div>
                </div>
            </div>
            <div class="item">
                <div id='m3' class="header" onclick="ChangeMenu('m3');">菜单3</div>
                <div class="content hide-menu">
                    <div>内容3</div>
                    <div>内容3</div>
                    <div>内容3</div>
                </div>
            </div>
            <div class="item">
                <div id='m4' class="header" onclick="ChangeMenu('m4');">菜单4</div>
                <div class="content hide-menu">
                    <div>内容4</div>
                    <div>内容4</div>
                    <div>内容4</div>
                </div>
            </div>
        </div>


        <div class="info">
            <div class="info-menu">
                <input type="button" value="全选" onclick="CheckAll();"> </input>
                <input type="button" value="取消" onclick="CancleAll();"> </input>
                <input type="button" value="反选" onclick="ReCheckAll();"> </input>
                <input type="button" value="添加" onclick="ShowModel();"> </input>
            </div>
            <div class="info-body">
                <div>
                    <table>
                        <thead>
                            <tr>
                                <td>选择</td>
                                <td>主机</td>
                                <td>IP</td>
                                <td>备注</td>
                            </tr>
                        </thead>
                        <tbody  id="tb">
                            <tr>
                                <td><input type="checkbox"/></td>
                                <td>web101</td>
                                <td>192.168.8.5</td>
                                <td></td>
                            </tr>
                            <tr>
                                <td><input type="checkbox"/></td>
                                <td>web102</td>
                                <td>192.168.8.6</td>
                                <td></td>
                            </tr>
                            <tr>
                                <td><input type="checkbox"/></td>
                                <td>web103</td>
                                <td>192.168.8.7</td>
                                <td></td>
                            </tr>
                            <tr>
                                <td><input type="checkbox"/></td>
                                <td>web104</td>
                                <td>192.168.8.8</td>
                                <td></td>
                            </tr>
                            <tr>
                                <td><input type="checkbox"/></td>
                                <td>web105</td>
                                <td>192.168.8.9</td>
                                <td></td>
                            </tr>
                        </tbody>
                    </table>
                </div>
            </div>
        </div>
        <div style="clear: both;"></div>
    </div>
<script>
    function CheckAll() {
        var tbody = document.getElementById('tb');
        var tr_list = tbody.children;
        for (var i = 0; i < tr_list.length; i++) {
            var curren_tr = tr_list[i];
            var checkbox = curren_tr.children[0].children[0];
            checkbox.checked = true;
        }
    }

    function CancleAll() {
        var tbody = document.getElementById('tb');
        var tr_list = tbody.children;
        for (var i = 0; i < tr_list.length; i++) {
            var curren_tr = tr_list[i];
            var checkbox = curren_tr.children[0].children[0];
            checkbox.checked = false;
        }
    }

    function ReCheckAll() {
        var tbody = document.getElementById('tb');
        var tr_list = tbody.children;
        for (var i = 0; i < tr_list.length; i++) {
            var curren_tr = tr_list[i];
            var checkbox = curren_tr.children[0].children[0];
            if (checkbox.checked) {
                checkbox.checked = false;
            }else{
                checkbox.checked = true;
            }
        }
    }

    function GoTop() {
        document.body.scrollTop = 0;
    }

    function ShowModel() {
        document.getElementById('i1').classList.remove('hide')
        document.getElementById('i2').classList.remove('hide')
    }

    function HideModel() {
        document.getElementById('i1').classList.add('hide')
        document.getElementById('i2').classList.add('hide')
    }

    function ChangeMenu(nid){
            var current_header = document.getElementById(nid);
            var item_list = current_header.parentElement.parentElement.children;
            for(var i=0;i<item_list.length;i++){
                var current_item = item_list[i];
                current_item.children[1].classList.add('hide-menu');
            }
            current_header.nextElementSibling.classList.remove('hide-menu');
    }
</script>
</body>
</html>
效果:


 1107
1107

 被折叠的 条评论
为什么被折叠?
被折叠的 条评论
为什么被折叠?
 到【灌水乐园】发言


