


 本文详细介绍Nginx服务器的安装步骤,包括依赖组件pcre、openssl和zlib的安装,以及Nginx的编译配置选项。此外,还介绍了如何进行Nginx的基本管理和监控,包括使用命令控制Nginx的运行状态、设置Nginx为开机启动及使用图形化工具nginx-RRDstats进行监控。
Nginx ("engine x") 是一个高性能的 HTTP 和反向代理服务器,也是一个 IMAP/POP3/SMTP 代理服务器。 Nginx 是由 Igor Sysoev 为俄罗斯访问量第二的 Rambler.ru 站点开发的,第一个公开版本0.1.0发布于2004年10月4日。其将源代码以类BSD许可证的形式发布,因它的稳定性、丰富的功能集、示例配置文件和低系统资源的消耗而闻名。
Nginx作为Http服务器,有以下几项基本特征:
1 处理静态文件,索引文件以及自动索引,打开文件描述符缓冲。
2 无缓存的反向代理加速,简单的负载均衡和容错
3 模块化的结构,包括gzipping,byte ranges,chunked responses以及SSI-filter等filter,如果由FastCGI或其它代理服务器处理蛋液中存在的多个SSI,则这项处理可以并行运行,而不需要相互等待。
4 支持SSL和TLSSNI。
1.0.安装前准备工作
1.nginx依赖以下模块:1. gzip模块需要 zlib 库 2.rewrite模块需要 pcre 库 3.ssl 功能需要openssl库
2.编译环境gcc g++ 开发库之类的需要提前装好,centos平台编译环境使用如下指令:
yum -y install gcc automake autoconf libtool make
yum install gcc gcc-c++
3.选定源码目录 /usr/local/
1.1.安装pcre
1. 获取pcre编译安装包,在http://www.pcre.org/上可以获取当前最新的版本 wget ftp://ftp.csx.cam.ac.uk/pub/software/programming/pcre/pcre-8.37.tar.gz
2. 解压缩tar -zxvf pcre-8.37.tar.gz包。 3. 进入解压缩目录,执行./configure。 4. make & make install
1.2.安装openssl
1. 获取openssl编译安装包,在http://www.openssl.org/source/上可以获取当前最新的版本。
wget https://www.openssl.org/source/openssl-1.0.1t.tar.gz
2. 解压缩tar -zxvf openssl-xx.tar.gz包。 3. 进入解压缩目录,执行./config。 4. make & make install
1.3.安装zlib
1. 获取zlib编译安装包,在http://www.zlib.net/上可以获取当前最新的版本。 wget http://zlib.net/zlib-1.2.8.tar.gz
2. 解压缩tar -zxvf zlib-1.2.8.tar.gz包。 3. 进入解压缩目录,执行./configure。 4. make & make install
1.4.安装nginx
1. 获取nginx,在http://nginx.org/en/download.html上可以获取当前最新的版本。 wget http://nginx.org/download/nginx-1.4.2.tar.gz
2. 解压缩nginx-xx.tar.gz包。 3. 进入解压缩目录,执行./configure 4. make & make install
2.nginx编译选项
--prefix=定义一个目录,存放服务器上的文件 ,也就是nginx的安装目录。默认使用path/usr/local/nginx。--sbin-path=设置nginx的可执行文件的路径,默认为pathprefix/sbin/nginx--conf-path=设置在nginx.conf配置文件的路径。nginx允许使用不同的配置文件启动,通过命令行中的-c选项。默认为pathprefix/conf/nginx.conf--pid-path=path 设置nginx.pid文件,将存储的主进程的进程号。安装完成后,可以随时改变的文件名 , 在nginx.conf配置文件中使用 PID指令。默认情况下,文件名 为prefix/logs/nginx.pid--error-log-path=设置主错误,警告,和诊断文件的名称。安装完成后,可以随时改变的文件名 ,在nginx.conf配置文件中 使用 的error_log指令。默认情况下,文件名 为pathprefix/logs/error.log--http-log-path=设置主请求的HTTP服务器的日志文件的名称。安装完成后,可以随时改变的文件名 ,在nginx.conf配置文件中 使用 的access_log指令。默认情况下,文件名 为pathprefix/logs/access.log--user=设置nginx工作进程的用户。安装完成后,可以随时更改的名称在nginx.conf配置文件中 使用的 user指令。默认的用户名是nobody。name--group=设置nginx工作进程的用户组。安装完成后,可以随时更改的名称在nginx.conf配置文件中 使用的 user指令。默认的为非特权用户。name--with-select_module--without-select_module 启用或禁用构建一个模块来允许服务器使用select()方法。该模块将自动建立,如果平台不支持的kqueue,epoll,rtsig或/dev/poll。--with-poll_module--without-poll_module启用或禁用构建一个模块来允许服务器使用poll()方法。该模块将自动建立,如果平台不支持的kqueue,epoll,rtsig或/dev/poll。--without-http_gzip_module— 不编译压缩的HTTP服务器的响应模块。编译并运行此模块需要zlib库。--without-http_rewrite_module不编译重写模块。编译并运行此模块需要PCRE库支持。--without-http_proxy_module— 不编译http_proxy模块。--with-http_ssl_module— 使用https协议模块。默认情况下,该模块没有被构建。建立并运行此模块的OpenSSL库是必需的。--with-pcre=— 设置PCRE库的源码路径。PCRE库的源码(版本4.4 - 8.30)需要从PCRE网站下载并解压。其余的工作是Nginx的./ configure和make来完成。正则表达式使用在location指令和 ngx_http_rewrite_module 模块中。path--with-pcre-jit—编译PCRE包含“just-in-time compilation”(1.1.12中, pcre_jit指令)。--with-zlib=—设置的zlib库的源码路径。要下载从 zlib(版本1.1.3 - 1.2.5)的并解压。其余的工作是Nginx的./ configure和make完成。ngx_http_gzip_module模块需要使用zlib 。path--with-cc-opt=— 设置额外的参数将被添加到CFLAGS变量。例如,当你在FreeBSD上使用PCRE库时需要使用:parameters--with-cc-opt="-I /usr/local/include。.如需要需要增加select()支持的文件数量:--with-cc-opt="-D FD_SETSIZE=2048".--with-ld-opt=—设置附加的参数,将用于在链接期间。例如,当在FreeBSD下使用该系统的PCRE库,应指定:parameters--with-ld-opt="-L /usr/local/lib".
3.运行和控制Nginx
-c </path/to/config> 为 Nginx 指定一个配置文件,来代替缺省的。
-t 不运行,而仅仅测试配置文件。nginx 将检查配置文件的语法的正确性,并尝试打开配置文件中所引用到的文件。
-v 显示 nginx 的版本。
-V 显示 nginx 的版本,编译器版本和配置参数。
-s 参数包含四个命令分别是 stop/quit/reopen/reload
主进程可以处理以下的信号:
TERM, INT 快速关闭
QUIT 从容关闭
HUP 重载配置 用新的配置开始新的工作进程 从容关闭旧的工作进程
USR1 重新打开日志文件
USR2 平滑升级可执行程序。
WINCH 从容关闭工作进程
ps -ef |grep nginx ps -aux | grep nginx
kill -QUIT nginx主进程号
nginx 快速停止命令,立刻关闭nginx进程
ps -ef |grep nginx
kill -TERM nginx主进程号
如果以上命令不管用,可以强制停止
kill -9 nginx主进程号
查看端口
netstat -tnlp | grep 80
重启服务-s 参数包含四个命令分别是 stop/quit/reopen/reload
将Nginx设置为开机自动启动
sudo /usr/local/nginx/nginx
/usr/local/nginx/nginx -s reload 从新加载服务 (-s 参数包含四个命令分别是 stop/quit/reopen/reload)
nginx开机自动启动
echo "/usr/local/nginx/sbin/nginx -c /usr/local/nginx/conf/nginx.conf" >> /etc/rc.local
chkconfig nginx on
使用server命令启动nginx服务
#!/bin/bash
#
# chkconfig: - 85 15
# description: Nginx is a World Wide Web server.
# processname: nginx
nginx=/usr/local/nginx/sbin/nginx
conf=/usr/local/nginx/conf/nginx.conf
case $1 in
start)
echo -n "Starting Nginx"
$nginx -c $conf
echo " done"
;;
stop)
echo -n "Stopping Nginx"
killall -9 nginx
echo " done"
;;
test)
$nginx -t -c $conf
;;
reload)
echo -n "Reloading Nginx"
ps auxww | grep nginx | grep master | awk '{print $2}' | xargs kill -HUP
echo " done"
;;
restart)
$0 stop
$0 start
;;
show)
ps -aux|grep nginx
;;
*)
echo -n "Usage: $0 {start|restart|reload|stop|test|show}"
;;
esac
server命令的代码
创建命令如下,手先跳转到/etc/init.d下创建nginx启动脚本文件,命令如下;
1 cd /etc/init.d/
2 vim nginx 创建一个新的nginx文件,将上面的命令代码copy到里面,然后保存
修改脚本权限,命令如下:chmod 755 nginx
将脚本文件加入到chkconfig中 chkconfig --add nginx
设置nginx开机在3和5级别自动启动 chkconfig --level 35 nginx on
测试nginx脚本文件是否能够正常使用,命令如下,我均已测试,全部可以使用。
1 /etc/init.d/nginx restart
2 /etc/init.d/nginx reload
3 /etc/init.d/nginx stop
4.可能遇到的错误和一些帮助信息
4.1编译pcre错误
libtool: compile: unrecognized option `-DHAVE_CONFIG_H'
libtool: compile: Try `libtool --help' for more information.
make[1]: *** [pcrecpp.lo] Error 1
make[1]: Leaving directory `/usr/local/src/pcre-8.34'
make: *** [all] Error 2
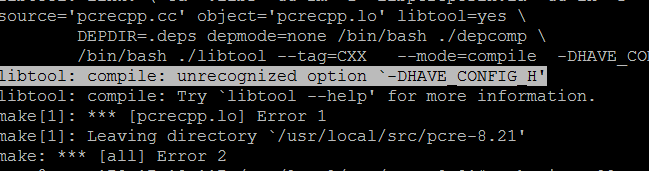
解决办法:安装g++,别忘了重新configure
apt-get install g++
apt-get install build-essential
make clean
./configure
make
4.2 make出错
make: *** No rule to make target `build', needed by `default'. Stop.
./configure: error: SSL modules require the OpenSSL library.
You can either do not enable the modules, or install the OpenSSL library
into the system, or build the OpenSSL library statically from the source
with nginx by using --with-openssl=<path> option.
解决方法
ubuntu下 apt-get install openssl apt-get install libssl-dev
centos下 yum -y install openssl openssl-devel
/usr/local/nginx/sbin/nginx: error while loading shared libraries: libcrypto.so.1.1: cannot open shared object file: No such file or directory
[root@localhost nginx-1.4.2]# ldd $(which /usr/local/nginx/sbin/nginx)
linux-vdso.so.1 => (0x00007ffef1363000)
libpthread.so.0 => /lib64/libpthread.so.0 (0x00007f52c0081000)
libcrypt.so.1 => /lib64/libcrypt.so.1 (0x00007f52bfe4a000)
libpcre.so.1 => /lib64/libpcre.so.1 (0x00007f52bfbe8000)
libcrypto.so.1.1 => not found
libz.so.1 => /lib64/libz.so.1 (0x00007f52bf9d2000)
libc.so.6 => /lib64/libc.so.6 (0x00007f52bf610000)
/lib64/ld-linux-x86-64.so.2 (0x00007f52c02b6000)
libfreebl3.so => /lib64/libfreebl3.so (0x00007f52bf40d000)
libdl.so.2 => /lib64/libdl.so.2 (0x00007f52bf209000)
解决方法:上面右边说明在系统在/lib64/的文件夹调用时找不到 libcrypto.so.1.1。所在要创建一个软连接。
那么libcrypto.so.1.1要从那里软连接去呢?
1./usr/local/lib64/libcrypto.so.1.1(根据路径有/usr/local/lib/ /usr/local/lib64 系统有32位和64位之分,)
2.可能就在/lib64/,只是文件名不一样。
[root@localhost nginx-1.4.2]# ln -s /usr/local/lib64/libcrypto.so.1.1 /lib64/libcrypto.so.1.1
[root@localhost nginx-1.4.2]# ln -s /lib64/libcrypto.so.0.0.1 /lib64/libcrypto.so.1.1
4.4执行(/usr/local/nginx/sbin/nginx -t)的时候出错了,报没有权限的错误。如图所示:

根据错误提示,我们就能够看出来,是说/usr/local/nginx下没有权限,解决办法也很简单
chmod -R 777 /usr/local/nginx
5、开启nginx的监控
1)、nginx简单状态监控
在nginx.conf中添加如下代码即可监控nginx当前的状态,然后访问http://serverip/status即可访问
本模块默认是不会编译进Nginx的,如果你要使用该模块,则要在编译安装Nginx时指定:./configure –with-http_stub_status_module
location /status {
stub_status on;
access_log off;
}
|
1
2
3
4
|
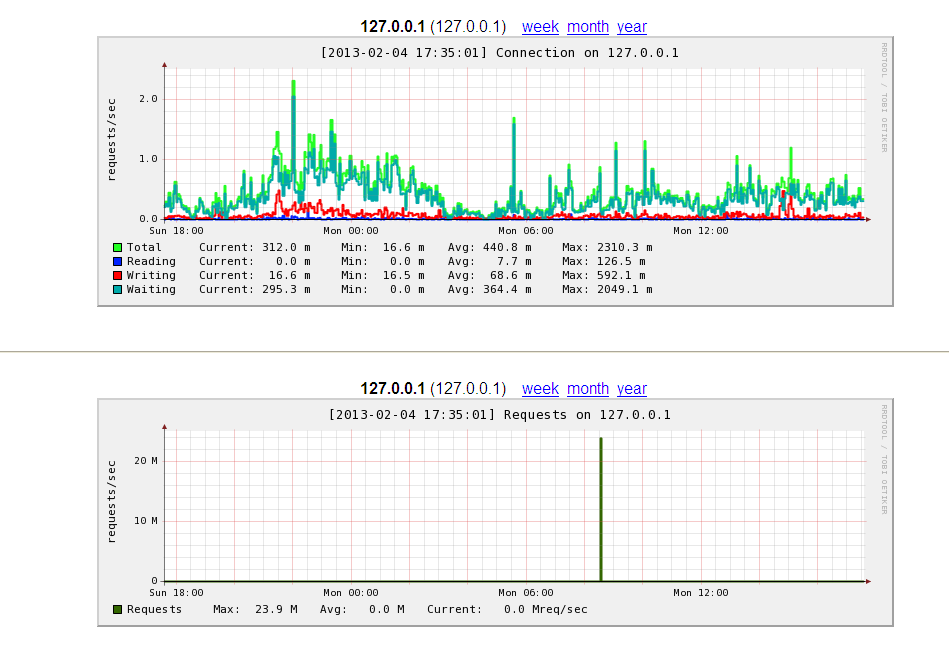
Active connections: 16
server accepts handled requests
191226 191226 305915
Reading: 0 Writing: 1 Waiting: 15
|
ctive connections: 对后端发起的活动连接数.
Server accepts handled requests: Nginx总共处理了24个连接,成功创建24次握手(证明中间没有失败的),总共处理了129个请求.
Reading: Nginx 读取到客户端的Header信息数.
Writing: Nginx 返回给客户端的Header信息数.
Waiting: 开启keep-alive的情况下,这个值等于 active – (reading + writing),意思就是Nginx已经处理完成,正在等候下一次请求指令的驻留连接.
注意的,本模块默认是不会编译进Nginx的,如果你要使用该模块,则要在编译安装Nginx时指定:
|
1
|
.
/configure
–with-http_stub_status_module
|
查看已安装的 Nginx 是否包含 stub_status 模块
|
1
|
#/usr/local/nginx/sbin/nginx -V
|
|
1
2
|
TLS SNI support disabled
configure arguments: --prefix=/usr/local/nginx --user=www --group=www --with-http_stub_status_module --with-file-aio --with-http_ssl_module
|
2)、nginx的图形化监控-nginx-RRD stats
nginx-rrd是nginx官方推荐的一款Nginx监控工具,利用nginx-rrd可以很方便的生成图表,便于我们查看。
a、运行环境(centos):
在安装前需要安装好rrdtool这个画图工具和相应的perl模块,可以先运行:
|
1
|
yum
install
rrdtool libhtml-parser-perl libwww-perl librrds-perl librrd2-dev
|
确保rrdtool和相应的perl被安装上。
b、安装配置
下载:
|
1
|
wget http:
//soft
.vpser.net
/status/nginx-rrd/nginx-rrd-0
.1.4.tgz
|
解压:
|
1
|
tar
zxvf nginx-rrd-0.1.4.tgz
|
进入nginx-rrd目录,
|
1
|
cd
nginx-rrd-0.1.4/
|
复制主程序:
|
1
|
cp
usr
/sbin/
*
/usr/sbin
|
复制配置文件
|
1
|
cp
etc
/nginx-rrd
.conf
/etc
|
复制定时执行文件:
|
1
|
cp
etc
/cron
.d
/nginx-rrd
.
cron
/etc/cron
.d
|
创建nginx-rrd生成目录:
|
1
2
3
|
mkdir
/home/wwwroot/nginx
&&
mkdir
/home/wwwroot/nginx/rrd
cp
html
/index
.php
/home/wwwroot/nginx
|
编辑/home/wwwroot/nginx/index.php修改登录密码
|
1
2
3
4
5
6
|
<?php
header(
"Content-Type: text/html; charset=utf-8"
);
$password
=
"admin"
;
.........
|
编辑配置文件nginx-rrd.conf,修改完成后如下:
|
1
2
3
4
5
6
7
8
9
10
11
12
13
|
#####################################################
#
# dir where rrd databases are stored
RRD_DIR="/home/wwwroot/nginx-rrd/";
# dir where png images are presented
WWW_DIR="/home/wwwroot/nginx/";
# process nice level
NICE_LEVEL="-19";
# bin dir
BIN_DIR="/usr/sbin";
# servers to test
# server_utl;server_name
SERVERS_URL="http://127.0.0.1/status;127.0.0.1"
|
多个server,可以SERVERS_URL中空格分开,前部分为nginx_status的地址,后面为被监控主机的域名。
SEVERS_URL 格式
注意,nginx.conf虚拟主机server{}中,需要已经加入:
|
1
2
3
4
|
location /status {
stub_status on;
access_log off;
}
|
以上设置就完成,可以自行运行一下:/usr/sbin/nginx-collect ,启动收集程序。cron会15分钟生成一次数据。
如果没有定时执行生成数据,可以在/etc/crontab最后面加上:
|
1
2
|
* * * * * root /usr/sbin/nginx-collect
*/15 * * * * root /usr/sbin/nginx-graph
|
然后输入然后访问http://serverip/nginx/即可访问。


 531
531

 被折叠的 条评论
为什么被折叠?
被折叠的 条评论
为什么被折叠?
 到【灌水乐园】发言


