


 本文介绍了HTTP基本认证的工作流程,并提供了一个使用Java实现的Servlet示例代码,展示了如何处理和验证客户端发送的Base64编码的用户名密码信息,以及在成功认证后如何利用session管理用户状态。
大家在登录网站的时候,大部分时候是通过一个表单提交登录信息。
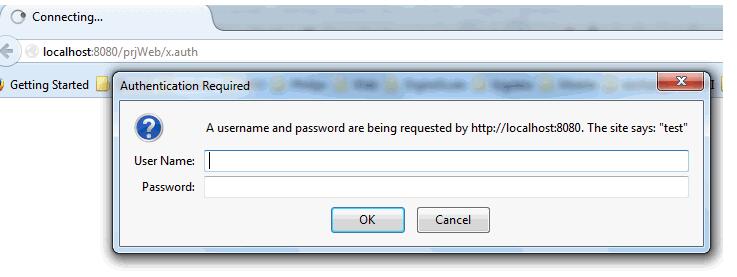
但是有时候浏览器会弹出一个登录验证的对话框,如下图,这就是使用HTTP基本认证。
下面来看看一看这个认证的工作过程:
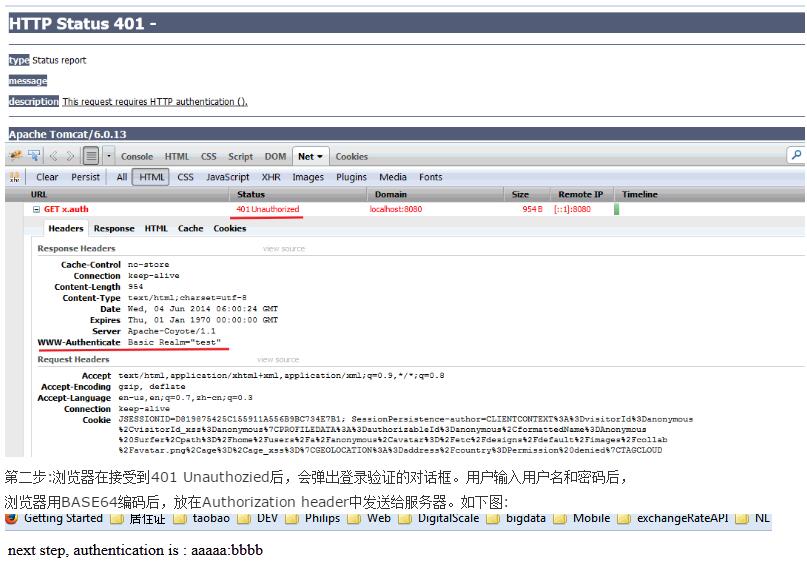
第一步:客户端发送http request 给服务器,服务器验证该用户是否已经登录验证过了,如果没有的话,
服务器会返回一个401 Unauthozied给客户端,并且在Response 的 header "WWW-Authenticate" 中添加信息。
如下图。
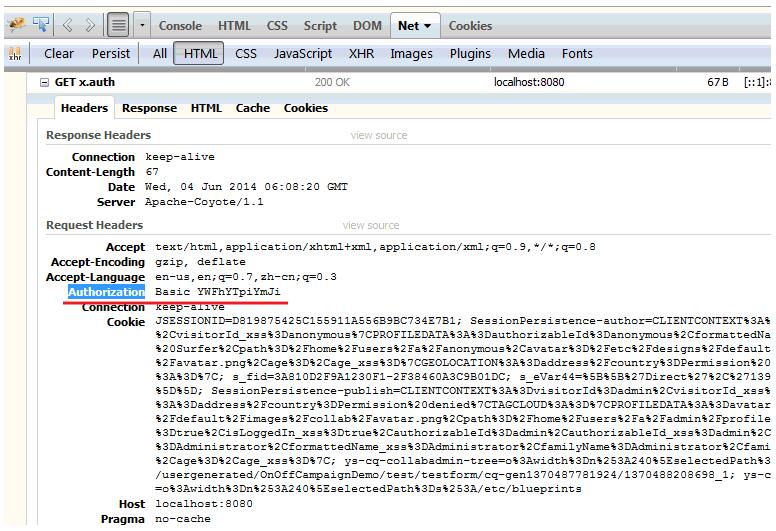
第三步: 服务器将Authorization header中的用户名密码取出,进行验证, 如果验证通过,将根据请求,发送资源给客户端。
下面来看一个JAVA的示例代码
import java.io.IOException;
import java.io.PrintWriter;
import javax.servlet.http.HttpServlet;
import javax.servlet.http.HttpServletRequest;
import javax.servlet.http.HttpServletResponse;
import sun.misc.BASE64Decoder;
public class HTTPAuthServlet extends HttpServlet {
public void doGet(HttpServletRequest request, HttpServletResponse response) throws IOException {
String sessionAuth = (String) request.getSession().getAttribute("auth");
if (sessionAuth != null) {
System.out.println("this is next step");
nextStep(request, response);
} else {
if(!checkHeaderAuth(request, response)){
response.setStatus(401);
response.setHeader("Cache-Control", "no-store");
response.setDateHeader("Expires", 0);
response.setHeader("WWW-authenticate", "Basic Realm=\"test\"");
}
}
}
private boolean checkHeaderAuth(HttpServletRequest request, HttpServletResponse response) throws IOException {
String auth = request.getHeader("Authorization");
System.out.println("auth encoded in base64 is " + getFromBASE64(auth));
if ((auth != null) && (auth.length() > 6)) {
auth = auth.substring(6, auth.length());
String decodedAuth = getFromBASE64(auth);
System.out.println("auth decoded from base64 is " + decodedAuth);
request.getSession().setAttribute("auth", decodedAuth);
return true;
}else{
return false;
}
}
private String getFromBASE64(String s) {
if (s == null)
return null;
BASE64Decoder decoder = new BASE64Decoder();
try {
byte[] b = decoder.decodeBuffer(s);
return new String(b);
} catch (Exception e) {
return null;
}
}
public void nextStep(HttpServletRequest request, HttpServletResponse response) throws IOException {
PrintWriter pw = response.getWriter();
pw.println(" next step, authentication is : " + request.getSession().getAttribute("auth") + "
");
pw.println("
");
}
public void doPost(HttpServletRequest request, HttpServletResponse response) throws IOException {
doGet(request, response);
}
}
当request第一次到达服务器时,服务器没有认证的信息,服务器会返回一个401 Unauthozied给客户端。
认证之后将认证信息放在session,以后在session有效期内就不用再认证了。
以上就是小编为大家带来的HTTP基本认证(Basic Authentication)的JAVA实例代码全部内容了,希望大家多多支持脚本之家~


 7739
7739

 被折叠的 条评论
为什么被折叠?
被折叠的 条评论
为什么被折叠?
 到【灌水乐园】发言


