


 本文详细介绍了Java中AutoMapper的使用,包括配置映射规则、Profile的用法、最佳实践、扁平化映射、指定映射字段、验证配置、自定义解析器和类型转换器以及空值替换和条件映射等核心功能。通过实例展示了如何在实际项目中高效地运用AutoMapper。
AutoMapper是对象到对象的映射工具。在完成映射规则之后,AutoMapper可以将源对象转换为目标对象。
配置AutoMapper映射规则
AutoMapper是基于约定的,因此在实用映射之前,我们需要先进行映射规则的配置。
public class Source
{
public int SomeValue { get; set; }
public string AnotherValue { get; set; }
}
public class Destination
{
public int SomeValue { get; set; }
}
在上面的代码中,我们定义了两个类,我们需要将Source类的对象映射到Destination类的对象上面。要完成这个操作,我们需要对AutoMapper进行如下配置:
Mapper.CreateMap();
进行一下测试:
Source src = new Source() { SomeValue = 1, AnotherValue = "2" };
Destination dest = Mapper.Map(src);
ObjectDumper.Write(dest);
我们可以在控制台看到dest对象的属性值:
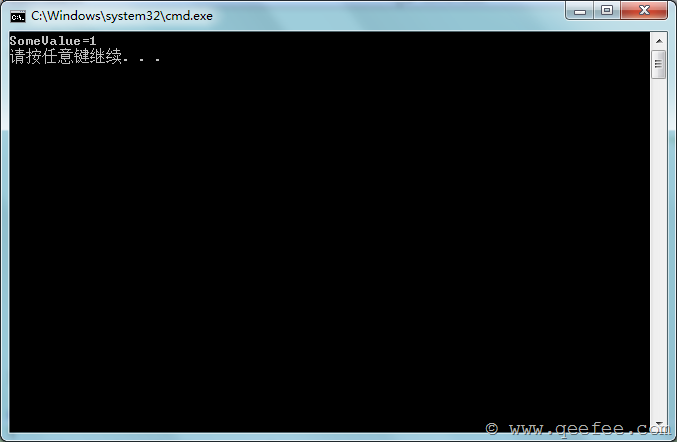
这样我们就完成了一个简单的AutoMapper映射。
Profile的用法
Profile提供了一个命名的映射类,所有继承自Profile类的子类都是一个映射集合。
我们来看一下Profile的用法,这个例子中仍然使用上面的Source类和Destination类。
public class SourceProfile : Profile
{
protected override void Configure()
{
CreateMap();
}
}
我们可以再Profile中重写Configure方法,从而完成映射规则的配置。从Profile初始化Mapper规则:
Mapper.Initialize(x => x.AddProfile());
在一个Profile中,我们可以完成多个、更复杂的规则的约定:
public class Destination2
{
public int SomeValue { get; set; }
public string AnotherValue2 { get; set; }
}
public class SourceProfile : Profile
{
protected override void Configure()
{
//Source->Destination
CreateMap();
//Source->Destination2
CreateMap().ForMember(d => d.AnotherValue2, opt =>
{
opt.MapFrom(s => s.AnotherValue);
});
}
}
AutoMapper最佳实践
这段内容将讨论AutoMapper的规则写在什么地方的问题。
在上一段中,我们已经知道了如何使用AutoMapper进行简单的对象映射,但是,在实际的项目中,我们会有很多类进行映射(从Entity转换为Dto,或者从Entity转换为ViewModel等),这么多的映射如何组织将成为一个问题。
首先我们需要定义一个Configuration.cs的类,该类提供AutoMapper规则配置的入口,它只提供一个静态的方法,在程序第一次运行的时候调用该方法完成配置。
当有多个Profile的时候,我们可以这样添加:
public class Configuration
{
public static void Configure()
{
Mapper.Initialize(cfg =>
{
cfg.AddProfile();</
 最低0.47元/天 解锁文章


 511
511

 被折叠的 条评论
为什么被折叠?
被折叠的 条评论
为什么被折叠?
 到【灌水乐园】发言


