


 本文是模拟Vue响应式原理的学习笔记。介绍了学习目标与准备工作,阐述数据驱动、响应式核心原理,包括Vue 2.x用Object.defineProperty和Vue 3.x用Proxy实现数据劫持。还讲解了发布订阅模式和观察者模式,并总结了两种模式的区别。
本文使用 Zhihu On VSCode 创作并发布
前言:Starting from this, there will always be a long way to go
不知不觉在拉勾大前端训练营学习已经两月有余,始终相信每一分坚持和努力都不会被辜负
模拟VUE响应式原理学习笔记
学习目标与准备工作
- 目标
- 模拟一个最小版本的 Vue
- 响应式原理在面试的常问问题
- 学习别人优秀的经验,转换成自己的经验
- 实际项目中出问题的原理层面的解决
- 给 Vue 实例新增一个成员是否是响应式的?
- 给属性重新赋值成对象,是否是响应式的?
- 为学习 Vue 源码做铺垫
- 准备工作
- 数据驱动
- 响应式的核心原理
- 发布订阅模式和观察者模式
数据驱动
数据响应式、双向绑定、数据驱动
- 数据响应式
- 数据模型仅仅是普通的 JavaScript 对象,而当我们修改数据时,视图会进行更新,避免了繁琐的 DOM 操作,提高开发效率
- 双向绑定
- 数据改变,视图改变;视图改变,数据也随之改变
- 我们可以使用 v-model 在表单元素上创建双向数据绑定
- 数据驱动是 Vue 最独特的特性之一
- 开发过程中仅需要关注数据本身,不需要关心数据是如何渲染到视图
响应式核心原理
- Vue 2.x
- 查看官网说明,可以了解到vue2.x实现响应式原理的核心是
Object.defineProperty()数据劫持
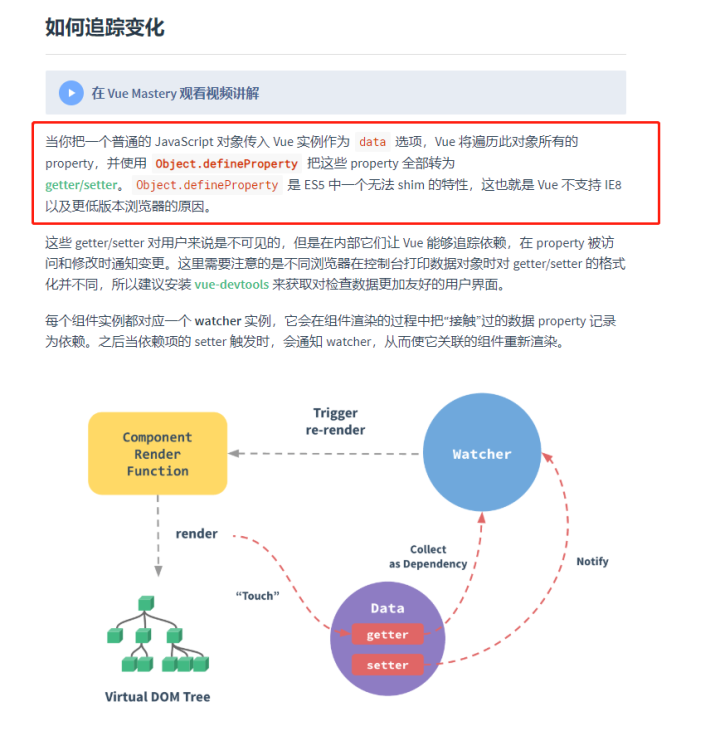
- MDN中关于
Object.defineProperty()的定义 - 模拟vue的data选项
<!DOCTYPE html>
<html lang="en">
<head>
<meta charset="UTF-8">
<meta name="viewport" content="width=device-width, initial-scale=1.0">
<title>单个属性</title>
</head>
<body>
<div id="app" >hello</div>
</body>
<script>
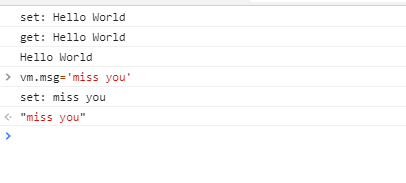
let data={msg:'hello'}
let vm={}
Object.defineProperty(vm,'msg',{
//可枚举(可遍历)
enumerable: true,
//可配置(可以delete,可以使用defineProperty重新定义)
configurable: true,
//获取值得时候执行
get: function() {
console.log('get:',data.msg)
return data.msg
},
//设置值得时候执行
set: function(newValue) {
console.log('set:',newValue)
if(data.msg === newValue){
return
}
data.msg = newValue
//更新dom
document.querySelector("#app").textContent=data.msg
}
})
vm.msg='Hello World'
console.log(vm.msg)
</script>
</html>
- MDN中关于
- 如果有一个对象中多个属性需要转换 getter/setter 如何处理?
遍历对象属性,使用Object.defineProperty将对象的属性挂载到vm上,并转换成getter和setter
<!DOCTYPE html>
<html lang="en">
<head>
<meta charset="UTF-8">
<meta name="viewport" content="width=device-width, initial-scale=1.0">
<title>多个属性</title>
</head>
<body>
<div id="app" >hello</div>
</body>
<script>
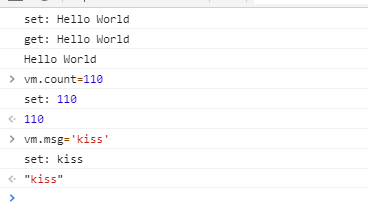
let data={
msg:'hello',
count:10
}
let vm={}
proxyData(data)
function proxyData(data) {
//遍历属性
Object.keys(data).forEach(key=>{
//将data的属性挂载到vm上,并设置getter和setter
Object.defineProperty(vm, key, {
//可枚举(可遍历)
enumerable: true,
//可配置(可以delete,可以使用defineProperty重新定义)
configurable: true,
//获取值得时候执行
get: function () {
console.log('get:', data.key)
return data.key
},
//设置值得时候执行
set: function (newValue) {
console.log('set:', newValue)
if (data.key === newValue) {
return
}
data.key = newValue
//更新dom
document.querySelector("#app").textContent = data.key
}
})
})
}
vm.msg='Hello World'
console.log(vm.msg)
</script>
</html>
- 如果有一个对象中多个属性需要转换 getter/setter 如何处理?
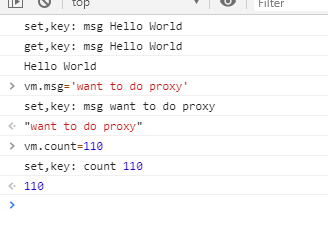
- Vue 3.x
- MDN中的Proxy数据劫持
- Proxy直接监听对象,而非属性,因此在把多个属性转换成getter和setter时不需循环
- Proxy是ES6中新增的,IE不支持,性能由浏览器优化,更优于defineProperty
- 模拟代码
<!DOCTYPE html>
<html lang="en">
<head>
<meta charset="UTF-8">
<meta name="viewport" content="width=device-width, initial-scale=1.0">
<title>vue3数据劫持</title>
</head>
<body>
<div id="app" >hello</div>
</body>
<script>
let data={
msg:'hello',
count:10
}
let vm= new Proxy(data,{
//当访问vm的成员会被执行
get(target,key){
console.log('get,key:',key,target[key]);
return target[key];
},
//当设置vm的成员会被执行
set(target,key,newValue){
console.log('set,key:',key,newValue);
if(target[key]===newValue){
return
}
target[key]=newValue
document.querySelector('#app').textContent=target[key]
}
})
vm.msg='Hello World'
console.log(vm.msg)
</script>
</html>
发布订阅模式
- 发布/订阅模式
- 订阅者
- 发布者
- 信号中心
我们假定,存在一个"信号中心",某个任务执行完成,就向信号中心"发布"(publish)一个信
号,其他任务可以向信号中心"订阅"(subscribe)这个信号,从而知道什么时候自己可以开始执
行。这就叫做"发布/订阅模式"(publish-subscribe pattern)
- Vue 的自定义事件以及node中的事件机制都是基于发布订阅模式
- 兄弟组件通信过程
// eventBus.js
// 事件中心
let eventHub = new Vue()
// ComponentA.vue
// 发布者
addTodo: function () {
// 发布消息(事件)
eventHub.$emit('add-todo', { text: this.newTodoText })
this.newTodoText = ''
}
// ComponentB.vue
// 订阅者
created: function () {
// 订阅消息(事件)
eventHub.$on('add-todo', this.addTodo)
} - 模拟 Vue 自定义事件的实现
class EventEmitter {
constructor() {
// { eventType: [ handler1, handler2 ] }
this.subs = {}
}
// 订阅通知
$on(eventType, handler) {
this.subs[eventType] = this.subs[eventType] || []
this.subs[eventType].push(handler)
}
// 发布通知
$emit(eventType) {
if (this.subs[eventType]) {
this.subs[eventType].forEach((handler) => {
handler()
})
}
}
}
// 测试
var bus = new EventEmitter()
// 注册事件
bus.$on('click', function () {
console.log('click')
})
bus.$on('click', function () {
console.log('click1')
})
// 触发事件
bus.$emit('click')
观察者模式
- 观察者(订阅者) -- Watcher
- update():当事件发生时,具体要做的事情
- 目标(发布者) -- Dep
- subs 数组:存储所有的观察者
- addSub():添加观察者
- notify():当事件发生,调用所有观察者的 update() 方法
- 没有事件中心
// 目标(发布者)
// Dependency
class Dep {
constructor() {
// 存储所有的观察者
this.subs = []
}
// 添加观察者
addSub(sub) {
if (sub && sub.update) {
this.subs.push(sub)
}
}
// 通知所有观察者
notify() {
this.subs.forEach((sub) => {
sub.update()
})
}
}
// 观察者(订阅者)
class Watcher {
update() {
console.log('update')
}
}
// 测试
let dep = new Dep()
let watcher = new Watcher()
dep.addSub(watcher)
dep.notify()
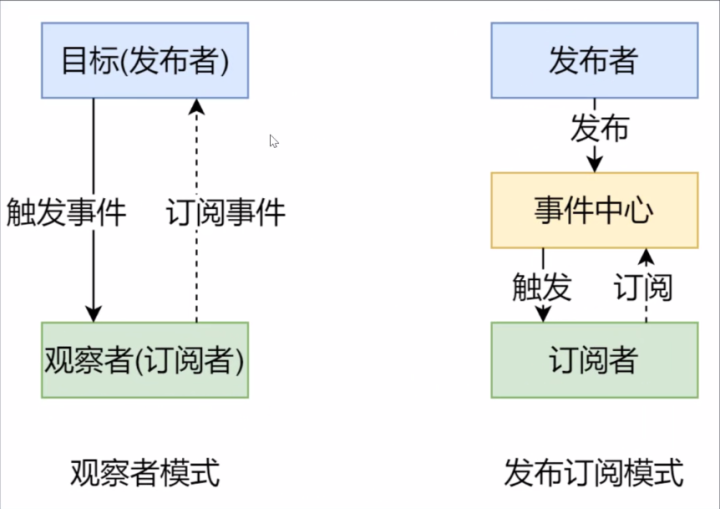
总结两种模式区别
- 观察者模式是由具体目标调度,比如当事件触发,Dep 就会去调用观察者的方法,所以观察者模式的订阅者与发布者之间是存在依赖的。
- 发布/订阅模式由统一调度中心调用,因此发布者和订阅者不需要知道对方的存在。
模拟响应式源码
class Compiler {
    constructor(vm) {
        this.el = vm.$el
        this.vm = vm
        this.compile(this.el)
    }
    // 编译模板,处理文本节点和元素节点
    compile(el) {
        let childNodes = el.childNodes
        Array.from(childNodes).forEach((node) => {
            // 处理文本节点
            if (this.isTextNode(node)) {
                this.compileText(node)
            } else if (this.isElementNode(node)) {
                // 处理元素节点
                this.compileElement(node)
            }

            // 判断node节点,是否有子节点,如果有子节点,要递归调用compile
            if (node.childNodes && node.childNodes.length) {
                this.compile(node)
            }
        })
    }
    // 编译元素节点,处理指令
    compileElement(node) {
        // console.log(node.attributes)
        // 遍历所有的属性节点
        Array.from(node.attributes).forEach((attr) => {
            // 判断是否是指令
            let attrName = attr.name
            if (this.isDirective(attrName)) {
                // v-text --> text
                attrName = attrName.substr(2)
                let key = attr.value
                if (attrName.startsWith('on')) {
                    const event = attrName.replace('on:', '') // 获取事件名
                    // 事件更新
                    return this.eventUpdate(node, key, event)
                }
                this.update(node, key, attrName)
            }
        })
    }

    update(node, key, attrName) {
        let updateFn = this[attrName + 'Updater']
        updateFn && updateFn.call(this, node, this.vm[key], key)
    }
    eventUpdate(node, key, event) {
        this.onUpdater(node, key, event)
    }

    // 处理 v-text 指令
    textUpdater(node, value, key) {
        node.textContent = value
        new Watcher(this.vm, key, (newValue) => {
            node.textContent = newValue
        })
    }
    // v-model
    modelUpdater(node, value, key) {
        node.value = value
        new Watcher(this.vm, key, (newValue) => {
            node.value = newValue
        })
        // 双向绑定
        node.addEventListener('input', () => {
            this.vm[key] = node.value
        })
    }
    // 处理 v-html 指令
    htmlUpdater(node, value, key) {
        node.innerHTML = value
        new Watcher(this.vm, key, (newValue) => {
            node.innerHTML = newValue
        })
    }
    // 处理 v-on 指令
    onUpdater(node, key, event) {
        node.addEventListener(event, (e) => this.vm[key](e))
    }
    // 编译文本节点,处理差值表达式
    compileText(node) {
        // console.dir(node)
        // {{  msg }}
        let reg = /{{(.+?)}}/
        let value = node.textContent
        if (reg.test(value)) {
            let key = RegExp.$1.trim()
            node.textContent = value.replace(reg, this.vm[key])

            // 创建watcher对象,当数据改变更新视图
            new Watcher(this.vm, key, (newValue) => {
                node.textContent = newValue
            })
        }
    }
    // 判断元素属性是否是指令
    isDirective(attrName) {
        return attrName.startsWith('v-')
    }
    // 判断节点是否是文本节点
    isTextNode(node) {
        return node.nodeType === 3
    }
    // 判断节点是否是元素节点
    isElementNode(node) {
        return node.nodeType === 1
    }
}


 被折叠的 条评论
为什么被折叠?
被折叠的 条评论
为什么被折叠?
 到【灌水乐园】发言


