


There is a ton of options when it comes to client-side frameworks, and often it can be a little confusing for beginners to choose from a wide range of choices. Often these choices boil down to Angular, React, and Vue. “So, which is the best choice?”, you may ask. I can’t help but give you the clichéd answer that there isn’t really the best choice. Just pick one and learn it thoroughly, would be the best advice to give, because all the three choices eventually boil down to very similar working strategies.
关于客户端框架,有很多选择,对于初学者来说,从众多选择中进行选择通常会有些混乱。 这些选择通常归结为Angular,React和Vue。 “那么,哪个是最佳选择?” ,您可能会问。 我不禁给你一个陈词滥调的答案,那就是真的没有最好的选择 。 最好选择一个,并对其进行彻底的学习,这将是最好的建议,因为这三个选择最终都归结为非常相似的工作策略。
In case you have made up your mind to start learning React, I shall do my best to give you a thorough introduction of the same!
如果您已下定决心开始学习React,那么我将尽力为您全面介绍React!
One of the reasons why React can seem weird to a beginner is that there isn’t a separation of concerns in terms of writing HTML and writing React code. This can seem awkward for most beginners, because when building any application’s client-side, we usually use a template engine like EJS, Handlebars, Mustache, and so on. So the shift to a client-side library which merges the use of HTML and JavaScript can be a little tough!
对于初学者来说,React看起来很奇怪的原因之一是,在编写HTML和编写React代码方面没有关注的分离。 对于大多数初学者来说,这似乎很尴尬,因为在构建任何应用程序的客户端时,我们通常使用模板引擎,例如EJS,Handlebars,Mustache等。 因此,转向将 HTML和JavaScript 合并使用的客户端库可能会有些困难!
The very first concept to start with React is called JSX, which stands for JavaScript XML. Basically, JSX allows us to write HTML within React itself. Although there are a few changes, in order to write JSX (which is what every React component eventually renders) you just need to know the basic tags of HTML!
从React开始的第一个概念称为JSX ,代表JavaScript XML。 基本上,JSX允许我们在React本身内编写HTML。 尽管有一些更改,但是要编写JSX(这是每个React组件最终呈现的内容),您只需要了解HTML的基本标记即可!
You can go through the following article from the official docs, in order to familiarize yourself with the concept of converting the HTML tags into JSX code for React to render.
您可以阅读官方文档中的以下文章,以熟悉将HTML标签转换为JSX代码以进行React渲染的概念。
Now that we understand how to write JSX, let’s try to understand how React can help us build the User Interface (UI) of an application.
现在我们了解了如何编写JSX,让我们尝试了解React如何帮助我们构建应用程序的用户界面(UI)。
React (and most other client-side frameworks) primarily work by rendering components. This enables a developer to build one component, and re-use it multiple times as required. This is a powerful advantage over using a template engine, because you no longer have to worry about writing code to build all parts of the UI! To illustrate this, consider the example of Youtube’s homepage.
React( 和大多数其他客户端框架)主要通过渲染组件来工作。 这使开发人员可以构建一个组件,并根据需要多次使用它。 与使用模板引擎相比,这是一个强大的优势,因为您不再需要担心编写代码来构建所有组件。 用户界面的一部分! 为了说明这一点,请考虑以Youtube主页为例。
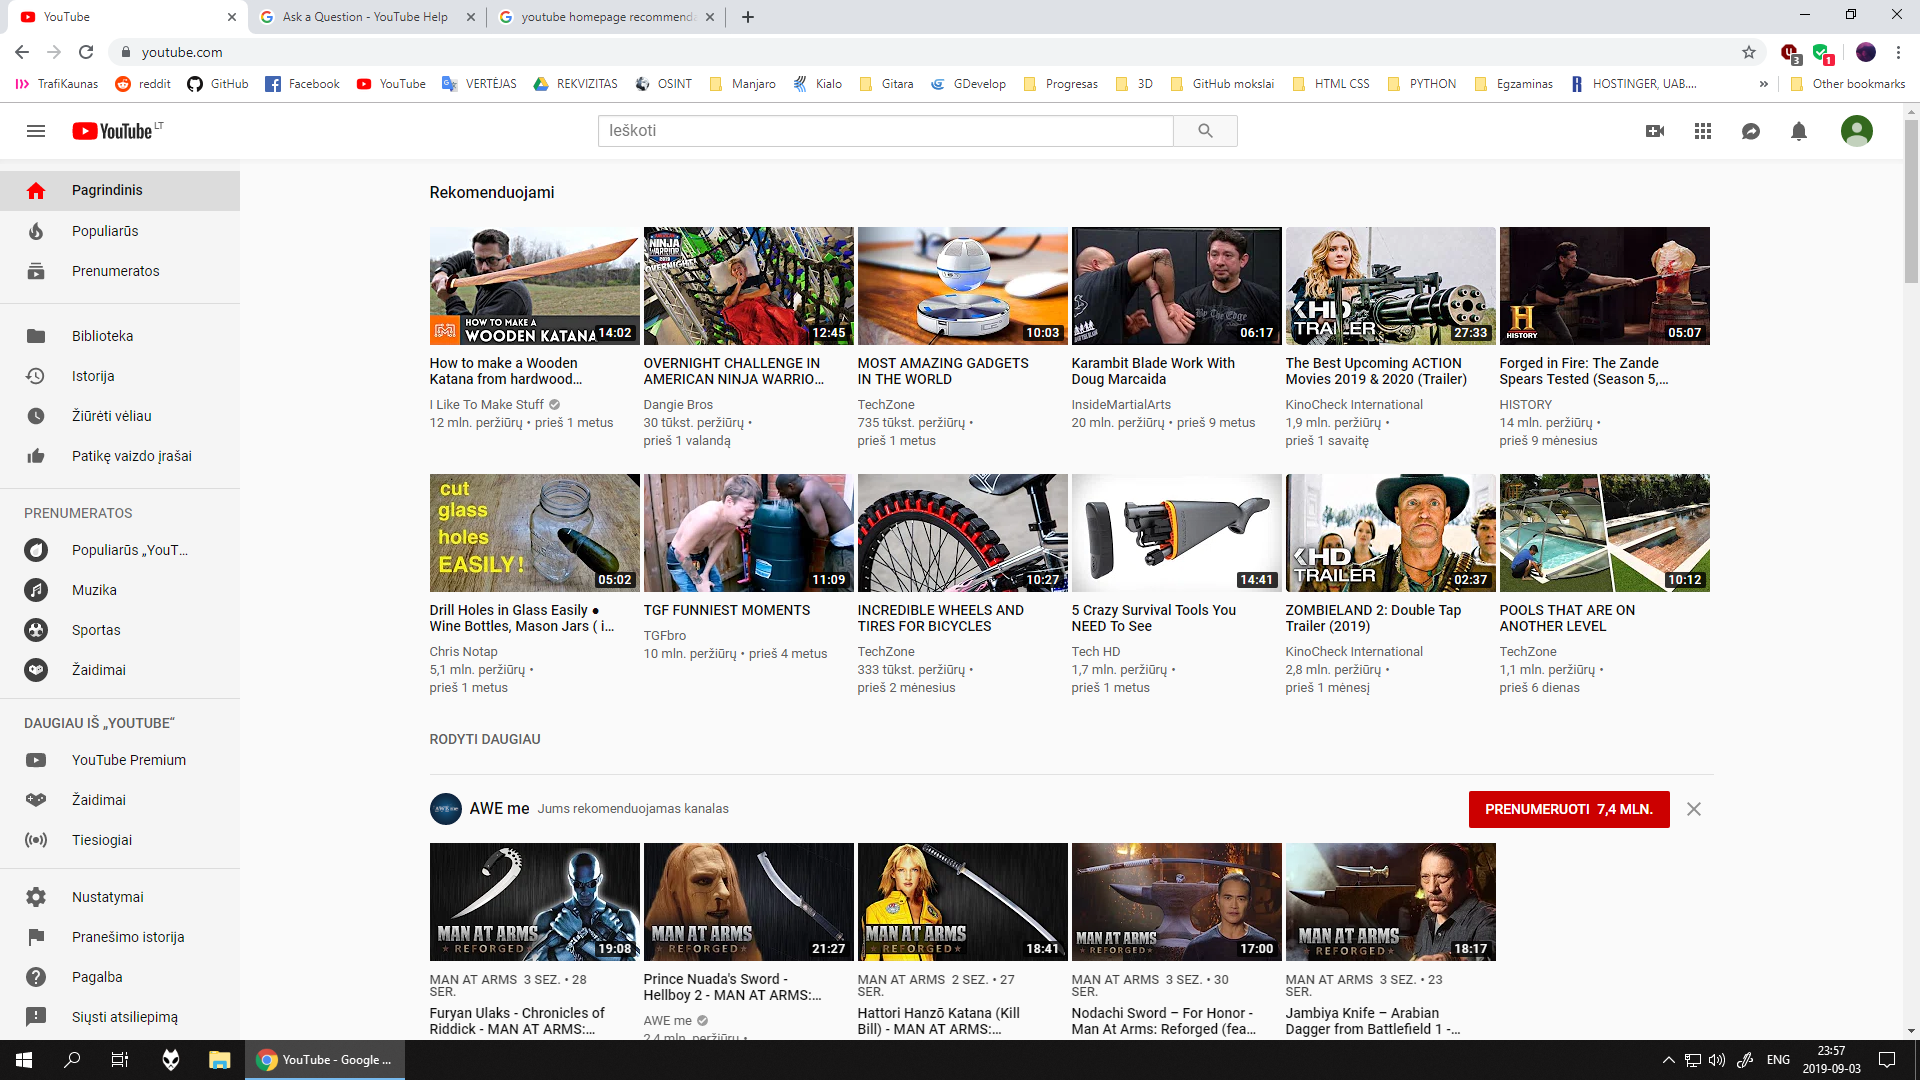
Here, notice how all the video suggestion cards have a similar structure to them. A thumbnail, a title below the thumbnail, the channel name below that, and some more details towards the bottom of the card. Using a client side library like React, you can build a generic component to display all of the above, and re-use that same component multiple times.
在这里,请注意所有视频建议卡的结构如何。 缩略图 ,缩略图下方的标题 ,下面的频道名称 ,并朝卡的底部的 更多细节 。 使用像React这样的客户端库,您可以构建一个通用组件来显示以上所有内容,并多次重复使用同一组件。
To leverage this concept, it is important to start thinking of the UI as a structured collection of components. These components can also communicate with one another asynchronously, which can save you some costly page reloads!
要利用此概念,重要的是开始将UI视为组件的结构化集合。 这些组件也可以彼此异步通信,从而可以节省一些昂贵的页面重新加载!
“But, how do I build these components?”, you may wonder. Building components mainly comes down to understanding what you want to render for the user, at that instant of time. If you can visualize the end result before you start writing the code, it can make your job a little easier.
“但是,我如何构建这些组件?”,您可能会怀疑。 构建组件主要是为了了解您想在那个瞬间为用户呈现什么。 如果您可以在开始编写代码之前可视化最终结果,则可以使您的工作更加轻松。
React offers two ways to define the components. You can either choose to build a class-based component, or you can build a functional component. As the names suggest, the former uses the concept of ES6 Javascript classes (if you are not familiar with it, click here to learn about it) and the latter uses plain-old Javascript functions.
React提供了两种定义组件的方法。 您可以选择构建基于类的组件 ,也可以构建功能组件 。 顾名思义,前者使用ES6 Javascript类的概念(如果您不熟悉, 请单击此处以了解它),而后者则使用普通的Javascript 函数 。
In case you aren’t able to decide which type of component you should learn first, I would suggest that you learn about functional components, because it is a little more forgiving towards folks with a lesser knowledge of JavaScript classes. You can go through the following article to write your very first component, be it class-based or function-based.
如果您不能决定应该先学习哪种类型的组件,我建议您学习功能组件,因为对于那些对JavaScript类了解较少的人,它更宽容。 您可以阅读以下文章来编写您的第一个组件,无论是基于类还是基于函数。
Now that you are aware of the concept of components, the next important aspect to understand is that of the state of a component.
现在您已经知道了组件的概念,接下来要了解的重要方面是组件状态 。
The state of any component refers to all the data that a component needs to store, in order for it to work as expected. In simpler terms, think of the state as a reservoir of data that every component holds. In case the state of a component changes, React will automatically trigger the component to be re-rendered with the updated state!
任何组件的状态都是指组件需要存储以使其按预期工作所需的所有数据。 用简单的话来说,将状态视为每个组件都拥有的数据的存储库。 万一组件的状态发生变化,React会自动触发以更新后的状态重新渲染组件!
There are two ways to set the state of the component, depending on the type of component you choose to build. Although you can just stick to using one type of component for every app, I would suggest that you go through both approaches, as it helps you better judge as to which component is more suited for the current application.
有两种方法可以设置组件的状态,具体取决于您选择构建的组件的类型。 尽管您可以坚持为每个应用程序使用一种类型的组件,但是我建议您同时使用这两种方法,因为它可以帮助您更好地判断哪个组件更适合当前应用程序。
Use the following two articles to set the state for a class-based component and a functional component, respectively.
使用以下两篇文章分别设置基于类的组件和功能组件的状态。
Let’s take a look at what all we have learnt until now, shall we? We learnt that React renders components. We learnt that the entire UI can be built using various components. We also learnt that the components can have their own state. But how will all our components talk to one another? We will need some mechanism to let the components transfer data to each other, right?
让我们看看到目前为止所学到的知识,对吧? 我们了解到React渲染了组件。 我们了解到可以使用各种组件来构建整个UI。 我们还了解到,组件可以具有自己的状态 。 但是,我们所有的组件将如何互相通信? 我们将需要某种机制让组件之间相互传输数据,对吗?
This is where we come across another important feature of React, called props. If you have worked with HTML, this concept is very easy to comprehend. Look at the following tag, wherein we use an attribute.
在这里,我们遇到了React的另一个重要功能,即props 。 如果您使用过HTML,则很容易理解这个概念。 看下面的标签,其中我们使用attribute 。
<img src="some/image.png" alt="sample image" >
<img src="some/image.png" alt="sample image" >
Here we are setting properties of the tag, by specifying attributes such as src(source) and alt(alternate text). Similarly, in order to send some data from one component to another, we set them as properties(props) of the component being rendered (the child component).
在这里,我们设置标签的性质 ,通过指定属性,诸如SRC(源)和alt(替代文本)。 类似地,为了将一些数据从一个组件发送到另一个组件,我们将它们设置为正在渲染的组件(子组件)的属性(props ) 。
Another simple analogy to understand props is that of function arguments. They are essential for the proper working of the function, but not all functions need them. Similarly, we can have components(of any type) with and without props.
理解道具的另一个简单类比是函数参数 。 它们对于功能的正常工作必不可少,但并非所有功能都需要它们。 类似地,我们可以具有(带有)道具的组件(任何类型)。
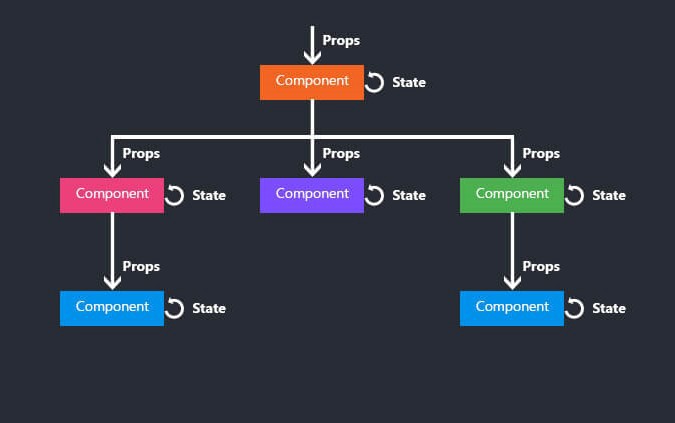
The above image illustrates how React Components are able to use the concepts of state and props. An important detail to understand here is that a component can alter its state, but its props are immutable(read-only). This just means that a parent component is responsible for setting the props of its child component, and the child component cannot change them.
上图显示了React Components如何能够使用state和props的概念。 这里要了解的一个重要细节是,组件可以更改其状态,但是其属性是不可变的(只读)。 这仅意味着父组件负责设置其子组件的道具,而子组件无法更改它们。
Having said all this, there are can always be a case wherein a component neither needs a state nor props! So don’t assume that every component that you build in React needs to have a state, or that it needs props. You can go through the following article for a more robust introduction to the concept of props.
说了这么多,总有一种情况,组件既不需要状态,也不需要道具! 因此,不要以为在React中构建的每个组件都需要有一个状态,或者它不需要道具。 您可以阅读下面的文章,以更全面地介绍道具的概念。
All the concepts I have listed up until now form the basics of React, but there’s much more to it!
到目前为止,我列出的所有概念都构成了React的基础,但还有更多内容!
The concepts of React are best understood only after you actually try them out yourself. In order to do that, open the CLI of your choice and navigate to the folder you want to start writing React code in. After you do so, type the following shell command
只有在您实际尝试过React的概念后,才能最好地理解它们。 为此,请打开您选择的CLI并导航至您要开始在其中写入React代码的文件夹。完成后,键入以下shell命令
npx create-react-app <your-app-name>
npx create-react-app <your-app-name>
Note that you will need to have installed Node.js and npm in your local machine, in order to execute this shell command. If not, then go here and download Node. You can check if the installation was complete, by typing the shell command node -v or npm -v which should return a valid version number.
请注意,您将需要在本地计算机上安装Node.js和npm才能执行此shell命令。 如果不是, 请转到此处并下载Node。 您可以通过键入shell命令node -v或npm -v来检查安装是否完成,该命令应返回有效的版本号。
Here, executing npx <command> when <command> isn’t already in your $PATH will automatically install a package with that name from the npm registry for you, and invoke it. In short, it lets you execute a command without having to explicitly download a pre-requisite file/tool for your local machine.
在这里,当<command>不在您的$PATH时执行npx <command>将自动从npm注册表中安装具有该名称的软件包,并调用它。 简而言之,它使您可以执行命令,而不必显式下载本地计算机的必备文件/工具。
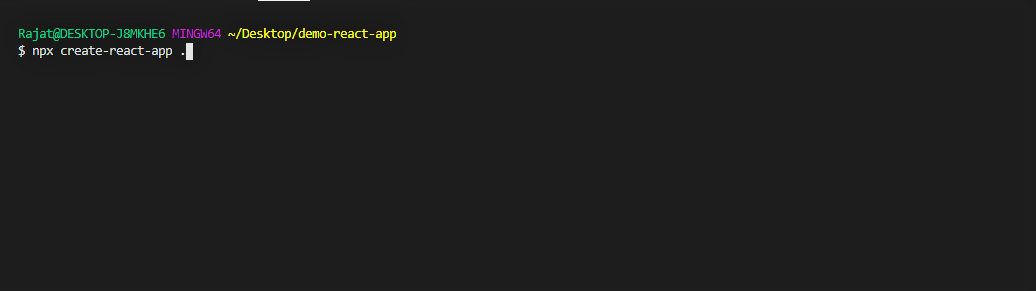
Also, note that your ‘app-name’ must be in lower case and can be seperated by a hyphen. So you can just name a folder as your app-name and run the following shell command npx create-react-app . which creates an app of the same name as your current folder.
另外,请注意,您的“应用名称”必须为小写字母,并且可以用连字符分隔。 因此,您可以将文件夹命名为您的应用程序名称,然后运行以下shell命令npx create-react-app . 它会创建一个与您当前文件夹同名的应用。
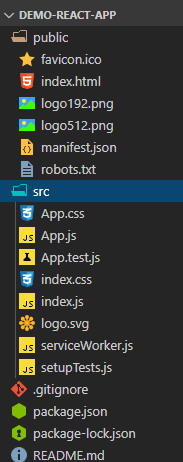
This command can take a while to finish downloading all the files. Once it finishes downloading all the files, you can open the folder in a code-editor of you choice, and see a list of files similar to the ones in the below image.
此命令可能需要一段时间才能完成所有文件的下载。 完成所有文件的下载后,您可以在您选择的代码编辑器中打开该文件夹,并查看与下图相似的文件列表。
You can type npm start to test that your react app is up and running! You can follow the steps in the next section to clean up the folder and start writing React code.
您可以输入npm start来测试您的React应用是否已启动并正在运行! 您可以按照下一部分中的步骤清理文件夹并开始编写React代码。
In case you want to clean up the folders that create-react-app downloads, you can start by typing the shell command rm -rf .git in the CLI to remove the git repo that create-react-app creates for you. After this, you can start with your own git workflow. Check out this article to learn how to setup a basic git workflow, in case you do not know how to do so.
如果要清理create-react-app下载的文件夹,可以从在CLI中键入shell命令rm -rf .git ,以删除create-react-app为您create-react-app的git repo。 之后,您可以从自己的git工作流程开始。 如果您不知道如何操作,请查看本文以了解如何设置基本的git工作流程。
After you do so, you can choose to delete all the files in the public directory, except the files index.html and manifest.json
之后,您可以选择删除public目录中的所有文件, 但文件index.html和manifest.json 除外。
In the src directory, you can go ahead and delete the files App.test.js , index.css , logo.svg . Unless you want to set up tests for your app, or you plan on converting this app into a PWA, you can also go ahead and delete the files serviceWorker.js and setupTests.js .
在src目录中,您可以继续删除App.test.js , index.css , logo.svg文件。 除非你想设置为测试您的应用程序,或者你打算在这个应用程序转换成PWA ,你还可以继续和删除文件serviceWorker.js和setupTests.js 。
Now you have a bare-bones folder with the basic requirements to start working with React. But you can also cleanup your index.html file by deleting the unwanted comments. Note that in case you chose to delete the serviceWorker.js file, make sure that you comment out the following lines from your index.js file.
现在,您有了一个基本文件夹,其中包含开始使用React的基本要求。 但是,您也可以通过删除不需要的注释来清理index.html文件。 请注意,如果您选择删除serviceWorker.js文件,请确保从index.js文件中注释掉以下几行。

Also make sure to adjust the imports in the files that are left in your folder, to remove the lines that are trying to import the deleted files!
另外,请确保调整文件夹中剩余文件的导入,以删除试图导入已删除文件的行!
But, in case you feel overwhelmed by these changes, you can choose not to fiddle with any of these files (i.e, not delete them) and only change the App.js file!
但是,如果您对这些更改感到不知所措,则可以选择不摆弄任何这些文件(即,不删除它们),而仅更改App.js文件!
One last feature to understand before you can go ahead and learn the more advanced topics in React, is that of the parent-child relation between the various components. For example, when you bootstrap your React app using create-react-app only the component from the index.js file is being rendered by React. The index.js file is further invoking the App.js component! This is very important to realize early on, because at the end of the day, any application you build using React, will be a single page application. But that doesn’t mean that you can only render one parent component!
在继续学习React的更高级主题之前,需要了解的最后一个功能是各个组件之间的父子关系。 例如,当您使用create-react-app引导React应用程序时,React只会呈现index.js文件中的组件。 index.js文件正在进一步调用App.js组件! 这对于尽早实现非常重要,因为最终,使用React构建的任何应用程序都将是一个单页应用程序。 但这并不意味着您只能渲染一个父组件!
In case all this seems a little confusing, go through the following article to understand the meaning of a single page application.
如果这一切看起来有些混乱,请阅读以下文章,以了解单页应用程序的含义。
Lastly, if you feel like a video tutorial with a more hands-on approach to learning will help you learn the basics of React a little better, then do check out the following free course. But do note that it does not include the latest concepts of React hooks (i.e, the use of functional components)
最后,如果您觉得带有更多动手学习方法的视频教程可以帮助您更好地学习React的基础知识,那么请查看以下免费课程。 但请注意,它不包括React挂钩的最新概念(即,使用功能组件)
Once you feel comfortable with the basic concepts of React, you can go ahead and learn about React Router to integrate it with you current server-side tech stack and build full stack applications. Or you can learn the more advanced topics in React. You can also check out the following article to help you gauge the topics you might need to use!
一旦对React的基本概念感到满意,就可以继续学习React Router,以将其与当前服务器端技术堆栈集成并构建完整的堆栈应用程序。 或者,您可以在React中学习更高级的主题 。 您还可以查看以下文章,以帮助您评估可能需要使用的主题!
翻译自: https://medium.com/swlh/a-guide-to-learn-react-js-b4d3e890feea


 被折叠的 条评论
为什么被折叠?
被折叠的 条评论
为什么被折叠?
 到【灌水乐园】发言


