


terraform s3
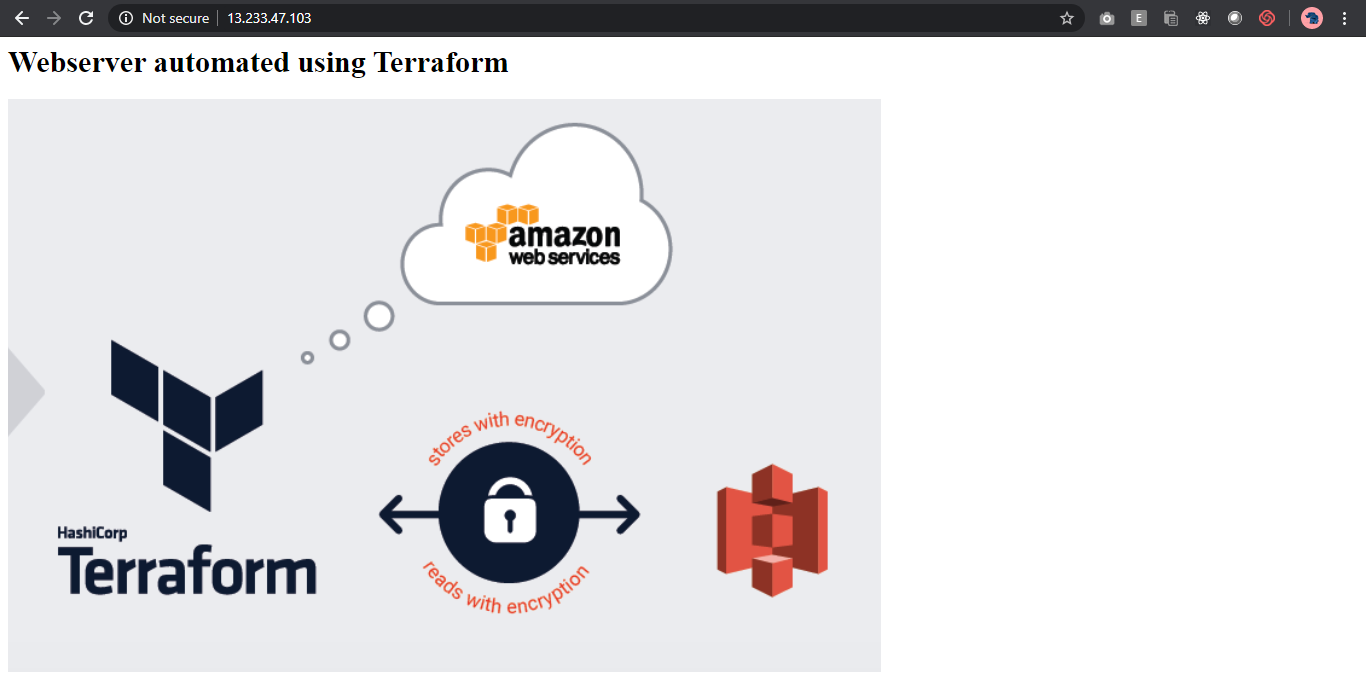
Launching wordpress in AWS using EFS rather than EBS for storage services.
使用EFS而非EBS在AWS中启动wordpress进行存储服务。
任务 (Task)
- Create the key and security group which allow the port 80. 创建允许端口80使用的密钥和安全组。
- Launch EC2 instance. 启动EC2实例。
- In this Ec2 instance use the key and security group which we have created in step 1. 在此Ec2实例中,使用我们在步骤1中创建的密钥和安全组。
- Launch one Volume using the EFS service and attach it in your vpc, then mount that volume into /var/www/html 使用EFS服务启动一个卷并将其附加到您的vpc中,然后将该卷安装到/ var / www / html
- Developer have uploded the code into github repo also the repo has some images. 开发人员已将代码升级到github仓库中,仓库也有一些图像。
- Copy the github repo code into /var/www/html 将github repo代码复制到/ var / www / html
- Create S3 bucket, and copy/deploy the images from github repo into the s3 bucket and change the permission to public readable. 创建S3存储桶,然后将图像从github存储库复制/部署到s3存储桶中,并将权限更改为公共可读。
- Create a Cloudfront using s3 bucket(which contains images) and use the Cloudfront URL to update in code in /var/www/html 使用s3存储桶(包含图像)创建Cloudfront,并使用Cloudfront URL在/ var / www / html中的代码中进行更新
NOTE: Here I used EFS for storage in Wordpress instance.In my previous article “Webserver deployment on AWS using Terraform”, I used EBS. If you read my previous article, you can skip to EFS part. And if you didn’t,no worries.I explained everything in detail present in the above task .
注意 :在这里,我使用EFS在Wordpress实例中进行存储。在上一篇文章“使用Terraform在AWS上部署Web服务器”中,我使用了EBS。 如果阅读我的上一篇文章,则可以跳到EFS部分。 如果您不这样做,请不用担心。我详细解释了上述任务中的所有内容。
先决条件 (Prerequisites)
- AWS account AWS账户
- AWS CLI V2 in your host 主机中的AWS CLI V2
- Terraform installed in your host 主机中已安装Terraform
First u need to create a profile using AWS CLI
首先,您需要使用AWS CLI创建配置文件
aws configure --profile <name>Provide your name or any name of your wish at <name>
在<名称>中提供您的姓名或您希望的任何名称
For detailed info : Click Here
有关详细信息: 单击此处
启动脚本 (Starting the script)
I created four variables in the script. With the help of variables, anybody can run this script in any region.
我在脚本中创建了四个变量。 借助变量,任何人都可以在任何区域中运行此脚本。
variable "region" { default = "ap-south-1" }
variable "profile" { default = "default" }
variable "availability_zone" { default = "ap-south-1a" }
variable "key_name" { default = "kkey" }
By using these variables, we can select our profile, region and availability zone in which we want to deploy our infrastructure. Here I used default variables so it doesn’t prompts in command line.
通过使用这些变量,我们可以选择我们要在其中部署基础结构的配置文件,区域和可用性区域。 在这里,我使用了默认变量,因此它不会在命令行中提示。
Make sure your key_name is unique from your other keys as we are going to create the key here in our code.
确保您的key_name与其他密钥是唯一的,因为我们将在代码中创建密钥。
provider "aws" {
  profile = var.profile
  region  = var.region
}
Here, our provider is aws. We passed our profile and region using variables.
在这里,我们的提供者是aws。 我们使用变量传递了配置文件和区域。
NOTE:- Before running the script, we have to run terraform init to install plugins. Running this at the beginning is enough.
注意 :-在运行脚本之前,我们必须运行terraform init来安装插件。 在一开始就运行它就足够了。
创建密钥和安全组,以允许端口80和端口22 (Create the key and security group which allow the port 80 and port 22)
resource "tls_private_key" "key" {
 algorithm = "RSA"
 rsa_bits = "4096"
}
resource "aws_key_pair" "generated_key" {
 key_name = var.key_name
 public_key = tls_private_key.key.public_key_openssh
}
resource "local_file" "key_file" {
 content = tls_private_key.key.private_key_pem
 filename = "${var.key_name}.pem"
 file_permission = 0400
}
We need two resources to create key-pair. They are tls_private_key and aws_key_pair. Here we used RSA algorithm for our key. We passed key_name variable for the key_name parameter in aws_key_pair resource.
我们需要两种资源来创建密钥对。 它们是tls_private_key和aws_key_pair 。 在这里,我们使用RSA算法作为密钥。 我们在aws_key_pair资源中为key_name参数传递了key_name变量。
Also, we used local_file resource to download our key file in our local system.
另外,我们使用local_file资源将密钥文件下载到本地系统中。
使用默认VPC和子网 (Using Default VPC and Subnet)
We use default VPC and subnet provided by AWS
我们使用AWS提供的默认VPC和子网
resource "aws_default_vpc" "default" {
  tags = {
    Name = "Default VPC"
  }
}
resource "aws_default_subnet" "default_az1" {
  availability_zone = var.availability_zonetags = {
    Name = "Default subnet for ap-south-1a"
  }
}
NOTE : When we destroy resource using terraform destroy command, default resources wont be destroyed.
注意 :当我们使用terraform destroy命令销毁资源时,默认资源将不会被销毁。
Here we used two default resources. They are aws_default_vpc and aws_default_subnet
在这里,我们使用了两个默认资源。 它们是aws_default_vpc和aws_default_subnet
创建允许端口22和80的安全组 (Create Security group which allow ports 22 and 80)
In our security group we allowed two ports for inbound traffic. We allowed port 22 for ssh connection. And then we allowed port 80 for http access.
在我们的安全组中,我们允许两个端口用于入站流量。 我们允许端口22进行ssh连接。 然后我们允许端口80进行http访问。
resource "aws_security_group" "sg1" {
  vpc_id = aws_default_vpc.default.id
  name   = "allow_ssh_http"

  lifecycle {
    create_before_destroy = true
  }ingress {
    from_port   = 22
    to_port     = 22
    protocol    = "tcp"
    cidr_blocks = ["0.0.0.0/0"]
  }

  ingress {
    from_port   = 80
    to_port     = 80
    protocol    = "tcp"
    cidr_blocks = ["0.0.0.0/0"]
  }
  egress {
    from_port = 0
    to_port   = 0
    protocol  = "-1"
    cidr_blocks = ["0.0.0.0/0"]
  }
}
创建EC2实例 (Creating EC2 instance)
We can create an EC2 instance using aws_instance resource .
我们可以使用aws_instance resource创建一个EC2实例。
resource "aws_instance" "web_ec2" {
  ami = "ami-0447a12f28fddb066" //Linux 2 AMI[Free tier eligible]
  instance_type          = "t2.micro"
  key_name               = aws_key_pair.generated_key.key_name
  availability_zone      = var.availability_zone
  subnet_id = aws_default_subnet.default_az1.id
  vpc_security_group_ids = [aws_security_group.sg1.id]connection {
    type        = "ssh"
    user        = "ec2-user"
    host        = aws_instance.web_ec2.public_ip
    private_key = tls_private_key.key.private_key_pem
    timeout     = "10m"
  }provisioner "remote-exec" {
    inline = [
      "sudo yum install httpd git -y",
      "sudo systemctl start httpd",
      "sudo systemctl enable httpd",
      "sudo yum install amazon-efs-utils -y",
      "sudo yum install nfs-utils -y",   ]
  }

  //depends_on=[aws_security_group.sg1]
   tags = {
    name = "webserver-ec2-instance"
  }
}
After launching ec2 instance, we used connection block to ssh into our instance.
启动ec2实例后,我们使用连接块ssh进入我们的实例。
Terraform provides provisioners for running os specific commands. There are two types of provisioners.
Terraform提供了用于运行os特定命令的供应商。 有两种类型的预配器。
- local-exec 本地执行
- remote-exec 远程执行
We use “local-exec” provisioner to run commands on our local host. We use “remote-exec” to run commands on our remote host.
我们使用“ local-exec”供应器在本地主机上运行命令。 我们使用“ remote-exec”在我们的远程主机上运行命令。
In above code, we used “remote-exec” provisioner to run commands for installing git and httpd.
在上面的代码中,我们使用“ remote-exec”资源调配器来运行用于安装git和httpd的命令。
After installing, we started httpd server .For using EFS, your instance need to install amazon-efs-utils and nfs-utils.
安装后,我们启动了httpd服务器。要使用EFS,您的实例需要安装amazon-efs-utils和nfs-utils。
什么是Amazon Elastic File System(EFS)? (What is Amazon Elastic File System(EFS)?)
EBS is a Block Storage while EFS is a file storage. EFS is fully managed NFS file system. We prefer EFS over EBS for hosting because EFS is centralized in nature. Amazon EFS is designed to provide massively parallel shared access to thousands of Amazon EC2 instances.
EBS是块存储,而EFS是文件存储。 EFS是完全托管的NFS文件系统。 与EBS相比,我们更倾向于使用EFS进行托管,因为EFS本质上是集中式的。 Amazon EFS旨在提供对数千个Amazon EC2实例的大规模并行共享访问。
For example, if we have two wordpress instances, we need to create two EBS volumes and then attach it to the instances. Also the two EBS volumes are independent. So, there is no synchronization of data. So, its not at all suitable for hosting.
例如,如果我们有两个wordpress实例,则需要创建两个EBS卷,然后将其附加到这些实例。 另外,两个EBS卷是独立的。 因此,没有数据同步。 因此,它根本不适合托管。
But in the case of EFS, it is a regional service storing data within and across multiple Availability Zones (AZs) for high availability and durability. So all your wordpress instances can connect to one single EFS system.
但是对于EFS,它是一种区域服务,可在多个可用区(AZ)之内和之间存储数据,以实现高可用性和持久性。 因此,您所有的wordpress实例都可以连接到一个单一的EFS系统。
NOTE: EFS depends on VPC and Security Groups. Here, I am using default VPC which is already created for every region.So, here my EFS is only dependent on security group.
注意 :EFS取决于VPC和安全组。 在这里,我使用的是已为每个区域创建的默认VPC。因此,这里的EFS仅取决于安全组。
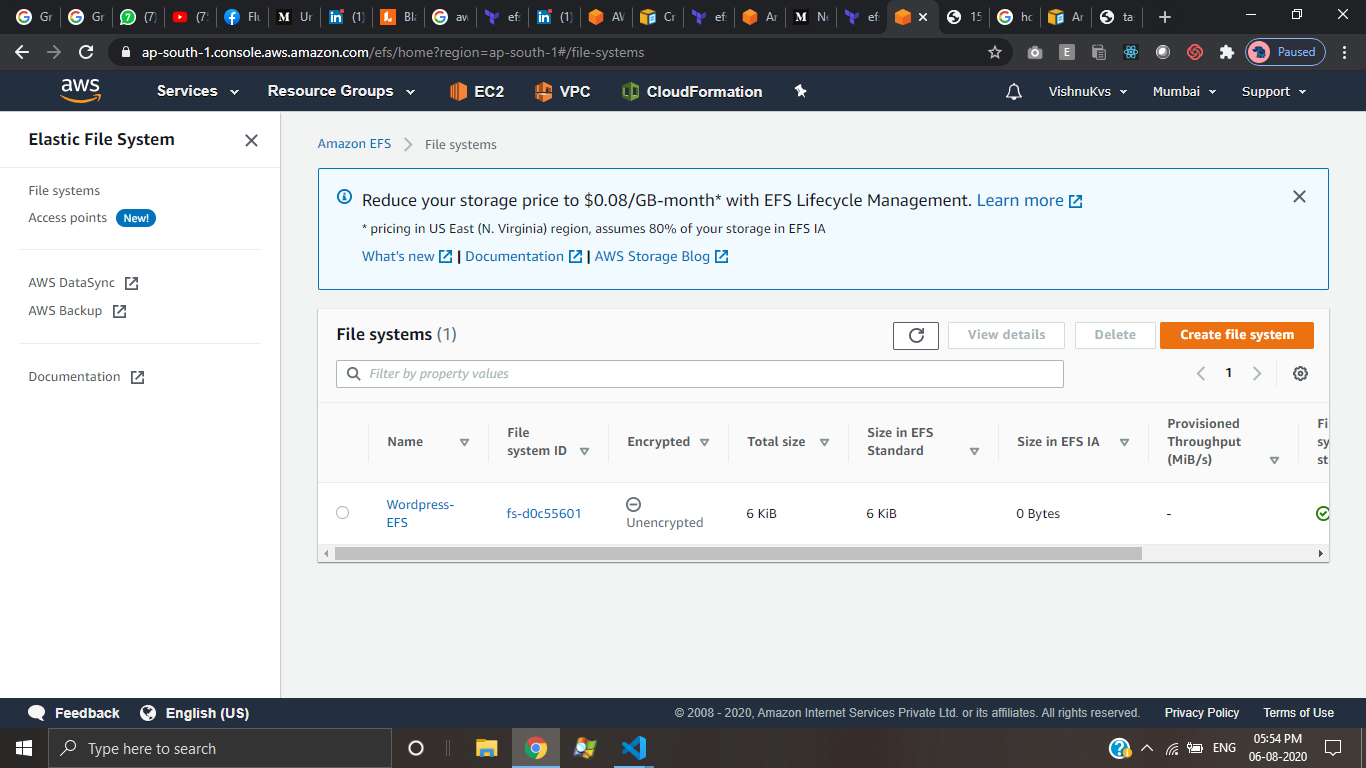
创建EFS (Creating EFS)
resource "aws_efs_file_system" "efs" {
  creation_token = "w_efs"
  depends_on     = [aws_security_group.sg1]
  tags = {
    Name = "Wordpress-EFS"
  }
}
将EFS附加到EC2 (Attaching EFS to EC2)
resource "aws_efs_mount_target" "mount_efs" {
  depends_on = [aws_efs_file_system.efs, aws_instance.web_ec2]file_system_id = aws_efs_file_system.efs.id
  subnet_id      = aws_default_subnet.default_az1.id
}
从github将代码下载到EFS中 (Downloading code into EFS from github)
First you have to login into instance, configure efs with efs_file_system id and then install code from github.
首先,您必须登录到实例,使用efs_file_system id配置efs,然后从github安装代码。
resource "null_resource" "newlocal" {
  depends_on = [
    aws_efs_mount_target.mount_efs,
    aws_instance.web_ec2,
  ]connection {
    type        = "ssh"
    user        = "ec2-user"
    private_key = tls_private_key.key.private_key_pem
    host        = aws_instance.web_ec2.public_ip
  }provisioner "remote-exec" {
    inline = [
      "sudo chmod ugo+rw /etc/fstab",
      "sudo echo '${aws_efs_file_system.efs.id}:/ /var/www/html efs tls,_netdev' >> /etc/fstab",
      "sudo mount -a -t efs,nfs4 defaults",
      "sudo rm -rf /var/www/html/*",
      "sudo git clone https://github.com/Vishnukvsvk/LW-TASK1.git /var/www/html",]
  }
}
创建S3存储桶并将对象上传到其中 (Creating S3 bucket and uploading objects to it)
Creating the bucket
创建桶
resource "aws_s3_bucket" "bucket1" {
  bucket        = "task1-myimage"
  acl           = "public-read"
  force_destroy = true
}
After creating, to upload objects, first we clone the repository in our local system and upload it to S3 bucket
创建对象后,要上传对象,首先需要在本地系统中克隆存储库,然后将其上传到S3存储桶
resource "null_resource" "git_download" {
  provisioner "local-exec" {
    command = "git clone https://github.com/Vishnukvsvk/LW-TASK1.git Folder1"
  }
provisioner "local-exec" {
    when    = destroy
    command = "rmdir Folder1 /s /q"
  }
}
resource "aws_s3_bucket_object" "image_upload" {
  key        = "image1.png"
  bucket     = aws_s3_bucket.bucket1.bucket
  source     = "Folder1/task1image.png"
  acl        = "public-read"
  content_type = "image/png"
  depends_on   = [aws_s3_bucket.bucket1, null_resource.git_download]}
使用S3存储桶(包含图像)创建Cloudfront (Create a Cloudfront using S3 bucket(which contains images))
Terraform code for CloudFront Distribution
CloudFront分发的Terraform代码
locals {
  s3_origin_id = "S3-task1-myimage"
}
resource "aws_cloudfront_distribution" "s3_distribution" {
  //Origin Settings
  origin {
    domain_name = "${aws_s3_bucket.bucket1.bucket_domain_name}"
    origin_id   = "${local.s3_origin_id}"}
     enabled         = true
     is_ipv6_enabled = true
   restrictions {
    geo_restriction {
      restriction_type = "none"
    }
  }
default_cache_behavior {
    allowed_methods  = ["DELETE", "GET", "HEAD", "OPTIONS", "PATCH", "POST", "PUT"]
    cached_methods   = ["GET", "HEAD"]
    target_origin_id = "${local.s3_origin_id}"
    forwarded_values {
      query_string = falsecookies {
        forward = "none"
      }
    }
    viewer_protocol_policy = "allow-all"}
    viewer_certificate {
    cloudfront_default_certificate = true
  }

depends_on = [aws_s3_bucket.bucket1]}NOTE: Specify /image1.png or ant object name at end of cloudfront url if you want to view it.
注意 :如果要查看,请在cloudfront URL的末尾指定/image1.png或ant对象名称。
使用Cloudfront URL更新index.html (Updating index.html with Cloudfront URL)
NOTE: We need a resource for provisioner. Here, we need to connect to ec2 and update the file. So we used a provisioner and for that we need a resource. So we used null_resource
注意 :我们需要供应者资源。 在这里,我们需要连接到ec2并更新文件。 因此,我们使用了预配器,为此我们需要资源。 所以我们使用了null_resource
resource "null_resource" "update_link" {
    connection {
    type        = "ssh"
    user        = "ec2-user"
    private_key = tls_private_key.key.private_key_pem
    host        = aws_instance.web_ec2.public_ip
    port        = 22
  }provisioner "remote-exec" {
    inline = [
        "sudo chmod 777 /var/www/html -R",
        "sudo echo \"<img src='http://${aws_cloudfront_distribution.s3_distribution.domain_name}/${aws_s3_bucket_object.image_upload.key}'>\" >> /var/www/html/index.html",
    ]
  }
  depends_on = [aws_cloudfront_distribution.s3_distribution]
}
检查输出 (Checking outputs)
In order to get values like instance_id,volume_id etc, we can use outputs.
为了获得诸如instance_id,volume_id等的值,我们可以使用输出。
Here are some which I used.
这是我用过的一些东西。
output "vpc_" {
    value = aws_default_vpc.default.id
}
output "subnet_" {
    value = aws_default_subnet.default_az1.id
}
output "publicip_" {
  value = aws_instance.web_ec2.public_ip
}
output "ec2_" {
  value = aws_instance.web_ec2.id
}
output "domainname_" {
  value = aws_s3_bucket.bucket1.bucket_domain_name
}
最终输出 (Final Output)
这个项目的Github链接 :- (Github link for this project:-)
https://github.com/Vishnukvsvk/Terraform-Aws-ServerDeployment
https://github.com/Vishnukvsvk/Terraform-Aws-ServerDeployment
重要做法: (Important practices:-)
Run terraform validate after completing the code to check for any errors
完成代码后运行terraform validate以检查是否有任何错误
- Remember null_resource is created first and then other resources are created next in alphabetical order. 请记住,首先创建null_resource,然后再按字母顺序创建其他资源。
So, use depends_on in resources which are dependent to maintain order
因此,在依赖于维护顺序的资源中使用depends_on
- Provide unique key_name. 提供唯一的key_name。
- CloudFront distribution takes more time for creating.So dont add any connection block in it.Use null resource for additional blocks and make it dependent on CloudFront distribution. CloudFront分配会花费更多的时间来创建,因此不要在其中添加任何连接块,对其他块使用空资源并使其依赖于CloudFront分配。
Thank you Vimal Sir for this amazing task.
谢谢Vimal先生所做的这项艰巨的任务。
To connect with me in linkedin : Click Here
在linkedin上与我联系: 单击此处
terraform s3


 9
9

 被折叠的 条评论
为什么被折叠?
被折叠的 条评论
为什么被折叠?
 到【灌水乐园】发言


