


 本文详细介绍了如何在AWS的EC2实例上部署并配置一个包含4个节点的Hadoop分布式文件系统(HDFS)。通过遵循教程,读者可以学习到在云端搭建大数据处理环境的关键步骤。
aws上部署hadoop
Installing Hadoop on AWS EC2 Instance
在AWS EC2实例上安装Hadoop
We will try to create an image from an existing AWS EC2 instance after installing Java and Hadoop on it. If there is no instance created yet, create one and login to the instance using this article.
在其上安装Java和Hadoop之后,我们将尝试从现有的AWS EC2实例创建映像。 如果尚未创建任何实例,请使用本文创建一个实例并登录到该实例。
安装Java和Hadoop (Install Java And Hadoop)
Its always a good way to upgrade the repositories first.
apt-get updatedownloads the package lists from the repositories and "updates" them to get information on the newest versions of packages and their dependencies.它始终是首先升级存储库的好方法。
apt-get update从存储库下载软件包列表,并“更新”它们以获取有关软件包的最新版本及其依赖项的信息。
$ sudo apt-get update && sudo apt-get dist-upgrade安装OpenJDK (Install OpenJDK)
- Installing latest java. 安装最新的Java。
$ sudo apt-get install openjdk-8-jdk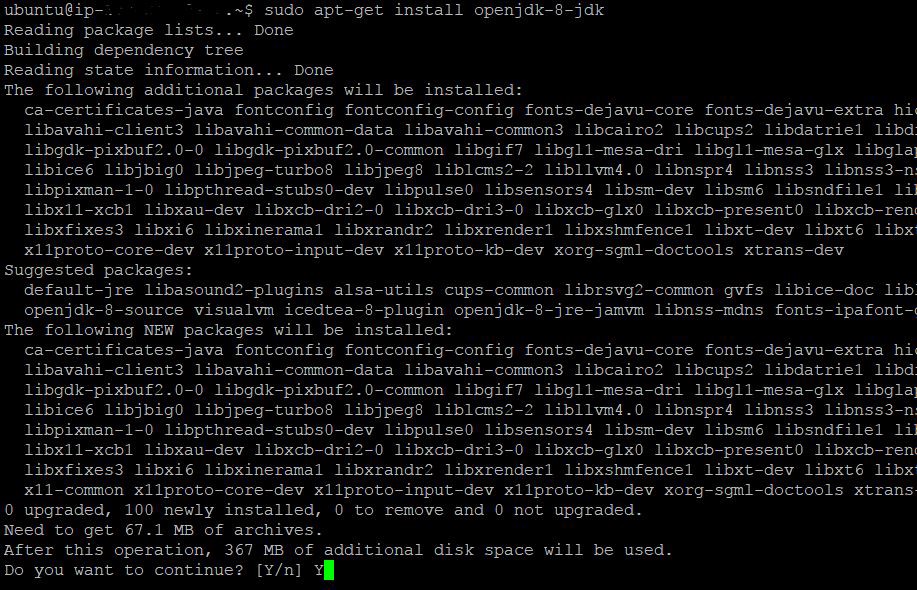
安装Hadoop (Installing Hadoop)
Download Hadoop from one of these mirrors. Select appropriate version number. Below command will download gzip file and copies it to Downloads directory, which is created using -P paramter.
从这些镜像之一下载Hadoop。 选择适当的版本号。 下面的命令将下载gzip文件并将其复制到使用-P参数创建的Downloads目录。
$ wget http://apache.mirrors.tds.net/hadoop/common/hadoop-2.8.1/hadoop-2.8.1.tar.gz -P ~/Downloads
We will now try to extract it to
/usr/local.现在,我们将尝试将其提取到
/usr/local.
$ sudo tar zxvf ~/Downloads/hadoop-* -C /usr/local- Renaming the hadoop-* to hadoop under /usr/local directory. 将hadoop- *重命名为/ usr / local目录下的hadoop。
$ sudo mv /usr/local/hadoop-* /usr/local/hadoopNow the Java and Hadoop are installed. We will declare the environmental variables in the instance, which helps applications locate hadoop.
现在已经安装了Java和Hadoop。 我们将在实例中声明环境变量,这有助于应用程序定位hadoop。
设置环境变量 (Setting up Environmental Variables)
- To know where the java is installed (where the java executable is), execute the below command. Path may be different for you. 要知道java的安装位置(java可执行文件所在的位置),请执行以下命令。 路径可能对您来说有所不同。

- Open .bashrc file in your home directory with your favorite editor. Include the below lines . 用您喜欢的编辑器打开主目录中的.bashrc文件。 包括以下几行。
$ vi ~/.bashrcFor Java:
对于Java:
export JAVA_HOME=/usr/lib/jvm/java-8-openjdk-amd64
export PATH=$PATH:$JAVA_HOME/bin
For Hadoop:
对于Hadoop:
export HADOOP_HOME=/usr/local/hadoop
export PATH=$PATH:$HADOOP_HOME/bin
For Hadoop Configuration directory:
对于Hadoop配置目录:
export HADOOP_CONF_DIF=/usr/local/hadoop/etc/hadoopFor reflecting to current session with out restarting.
用于反映当前会话而无需重新启动。
source ~/.bashrcCheck whether the environmental variables are available or not.
检查环境变量是否可用。
创建图像 (Creating an Image)
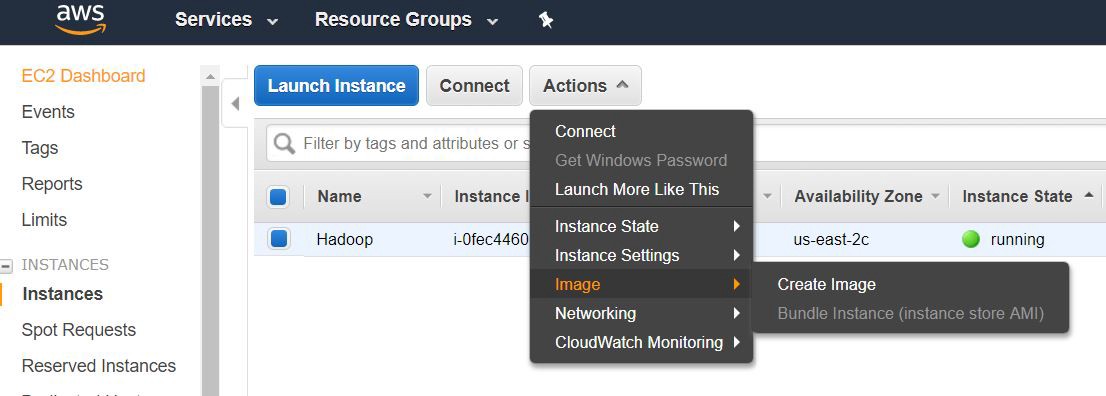
- We will create an image from AWS console, with all the above configurations. This helps us in creating nodes in hadoop cluster with out repeating the above steps for each node. 我们将使用上述所有配置从AWS控制台创建映像。 这有助于我们在hadoop集群中创建节点,而无需为每个节点重复上述步骤。
- On EC2 management console, select “Instances” under INSTANCES. And then “Actions” -> “Image” -> “Create Image” 在EC2管理控制台上,在“实例”下选择“实例”。 然后是“操作”->“图像”->“创建图像”
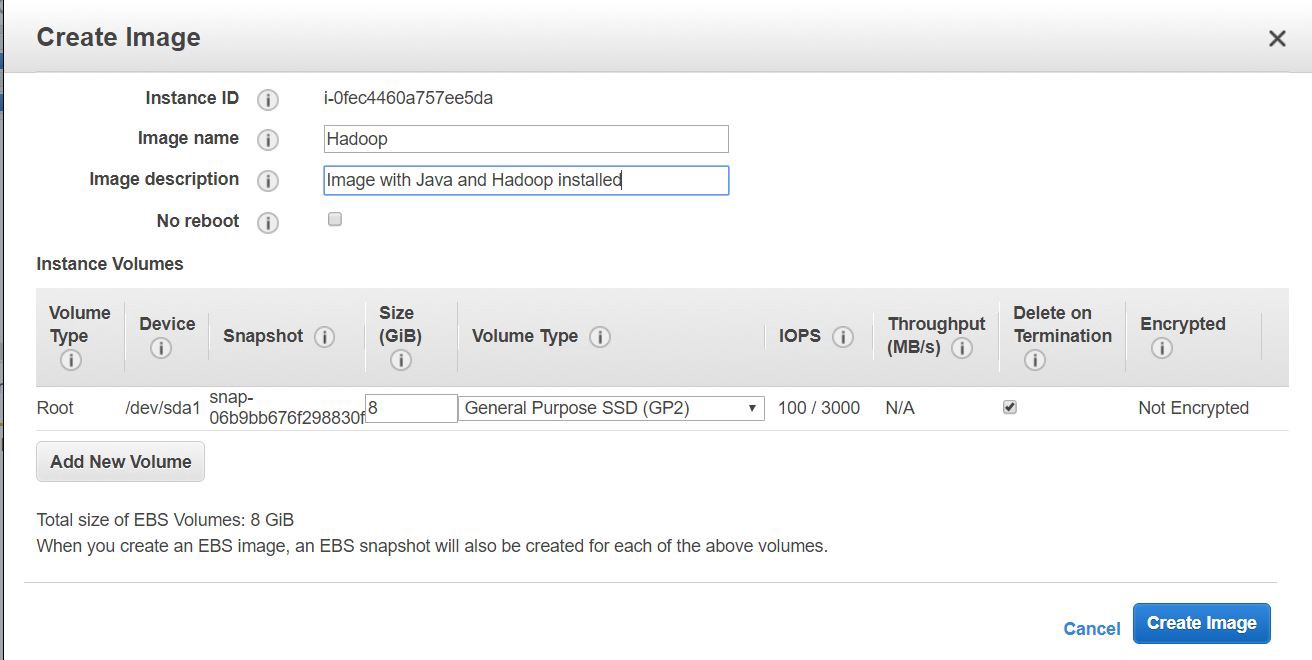
- Provide any name, description and click on “Create Image”. 提供任何名称,描述,然后单击“创建图像”。
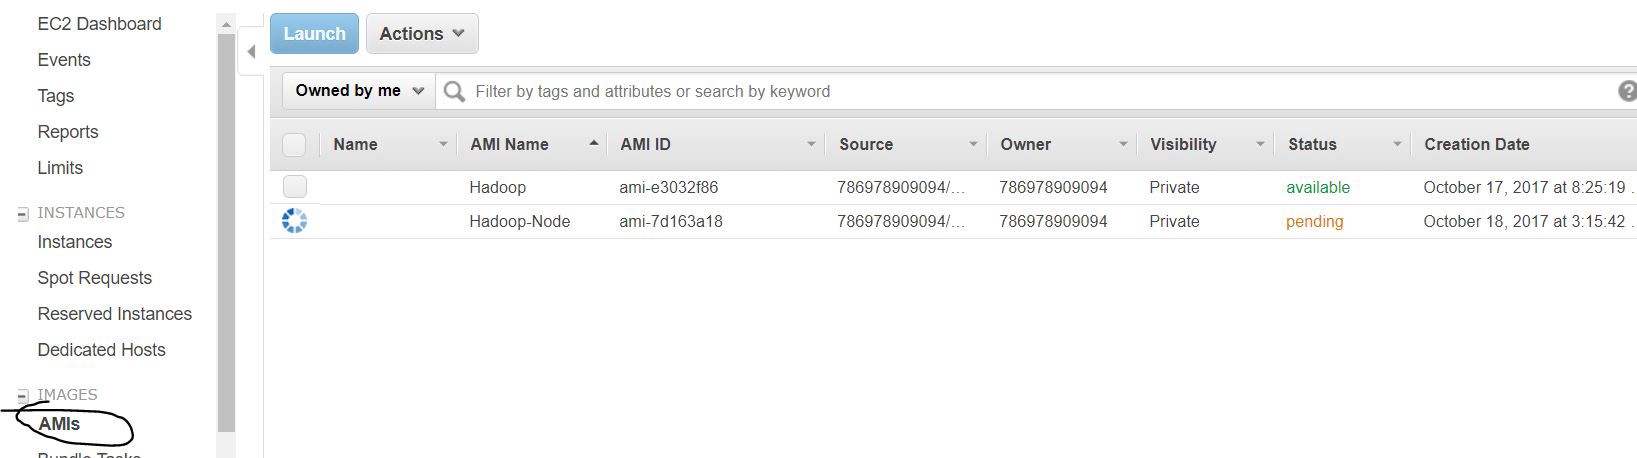
- You will be able to find the created image under IMAGES -> “AMIs”. 您将可以在图像->“ AMI”下找到创建的图像。
从创建的映像设置群集节点 (Setting up Cluster Nodes from the Image Created)
- You have created an image with Java and Hadoop installed, which you can use it to create nodes in the cluster. Select the created image and click “Launch” 您已经创建了安装了Java和Hadoop的映像,您可以使用它在集群中创建节点。 选择创建的图像,然后单击“启动”
- Choose an Instance Type according to the requirement. Here we stick the default t2.micro instance type. Click on “Next: Configure Instance Details” 根据需求选择一个实例类型。 在这里,我们保留默认的t2.micro实例类型。 单击“下一步:配置实例详细信息”
- Change the “Number of instances” from 1 to 4 in Configure Instance Details. Out of 4 (NameNode -1 , DataNodes-3). 在“配置实例详细信息”中将“实例数”从1更改为4。 4个(NameNode -1和DataNodes-3)中。
- Default storage. Click on “Next: Add Tags” 默认存储。 点击“下一步:添加标签”
- Optional: Create a rule with Name as Key and “Hadoop Cluster” as Value and click on “Next: Configure Security Group” 可选:创建一个名称为键,“ Hadoop群集”为值的规则,然后单击“下一步:配置安全组”
- Select “All Traffic” from the dropdown and click on “Review and Launch”. And then Launch with key pair already created. 从下拉列表中选择“所有流量”,然后单击“查看并启动”。 然后使用已创建的密钥对启动。
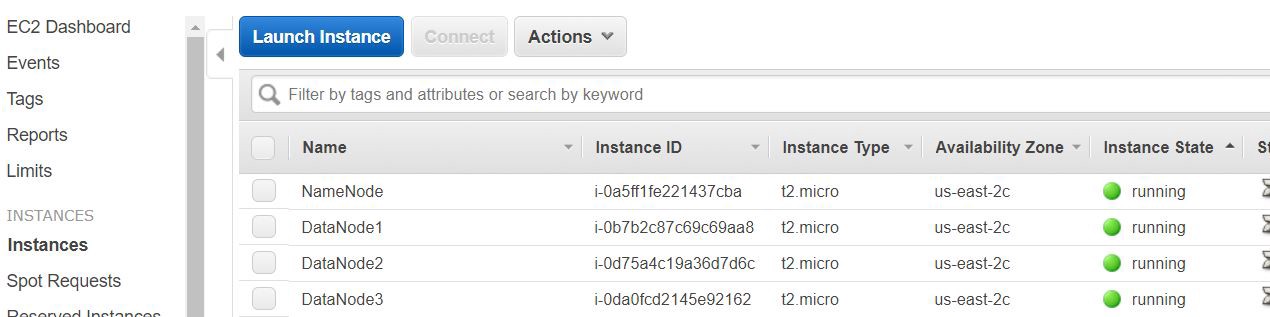
- Instances will be created as shown below. I have edited the Names for each node. 实例将如下所示创建。 我已经为每个节点编辑了名称。
Let’s create a SSH config file to log in to the instances easily. On your computer we could use either Putty (as showed here) or GIT BASH (ensure it is installed). I will be using GIT BASH here.
让我们创建一个SSH配置文件以轻松登录到实例。 在您的计算机,我们可以使用两种腻子(如显示这里 )或GIT BASH(确保已安装)。 我将在这里使用GIT BASH。
$ touch ~/.ssh/config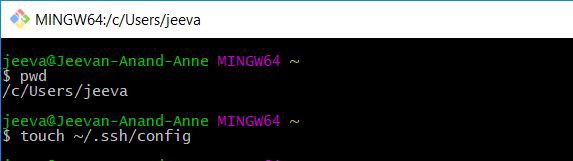
- Edit the config file. 编辑配置文件。
vi ~/.ssh/config- Copy the below lines to the file. (Probably you need click on the middle button of mouse to paste in the file) 将以下行复制到文件中。 (可能需要单击鼠标的中键以粘贴到文件中)
Host namenode
  HostName ec2-18-216-40-160.us-east-2.compute.amazonaws.com
  User ubuntu
  IdentityFile ~/.ssh/MyLab_Machine.pemHost datanode1
  HostName ec2-18-220-65-115.us-east-2.compute.amazonaws.com
  User ubuntu
  IdentityFile ~/.ssh/MyLab_Machine.pemHost datanode2
  HostName ec2-52-15-229-142.us-east-2.compute.amazonaws.com
  User ubuntu
  IdentityFile ~/.ssh/MyLab_Machine.pemHost datanode3
  HostName ec2-18-220-72-56.us-east-2.compute.amazonaws.com
  User ubuntu
  IdentityFile ~/.ssh/MyLab_Machine.pem
This file lets SSH associate a shorthand name with a hostname, a user, and the private key, so you don’t have to type those in each time. This is assuming your private key
MyLab_Machine.pemis in.ssh. If it isn't be sure to move or copy it there:cp key_file ~/.ssh/MyLab_Machine.pem. Now you can log into the NameNode with just$ ssh namenode. Also, copy the config file to the NameNode.该文件允许SSH将快捷方式名称与主机名,用户和私钥相关联,因此您不必每次都键入它们。 假设您的私钥
MyLab_Machine.pem位于.ssh。 如果不确定要移动或复制到那里:cp key_file ~/.ssh/MyLab_Machine.pem。 现在,您只需使用$ ssh namenode登录到NameNode。 另外,将配置文件复制到NameNode。
$ scp ~/.ssh/config namenode:~/.ssh
- We need to make sure the NameNode can connect to each DataNode over ssh without typing a password. You’ll do this by creating a public key for the NameNode and adding it to each DataNode. 我们需要确保NameNode可以通过ssh连接到每个DataNode,而无需输入密码。 为此,您将为NameNode创建一个公钥并将其添加到每个DataNode中。
- Log in to NameNode, create a public key using ssh-keygen and copy it to authorized_keys. 登录到NameNode,使用ssh-keygen创建一个公共密钥,并将其复制到authorized_keys。
$ ssh namenode
$ ssh-keygen -f ~/.ssh/id_rsa -t rsa -P ""
$ cat ~/.ssh/id_rsa.pub >> ~/.ssh/authorized_keys- In order to login to the each DataNode without a password from NameNode. Copy the authorized_keys to each DataNode. 为了登录到每个DataNode而没有来自NameNode的密码。 将authorized_keys复制到每个DataNode。
$ ssh datanode1 'cat >> ~/.ssh/authorized_keys' < ~/.ssh/id_rsa.pub
$ ssh datanode2 'cat >> ~/.ssh/authorized_keys' < ~/.ssh/id_rsa.pub
$ ssh datanode3 'cat >> ~/.ssh/authorized_keys' < ~/.ssh/id_rsa.pub- Try logging into DataNodes and test if you are able to login without a password. 尝试登录到DataNodes并测试是否可以在没有密码的情况下登录。
配置集群 (Configuring the Cluster)
Cluster-wide configuration:
集群范围内的配置:
First, you’ll deal with the configuration on each node, then get into specific configurations for the NameNode and DataNodes. On each node, go to the Hadoop configuration folder, you should be able to get there with
$ cd $HADOOP_CONF_DIRsince we set that in.bashrcearlier. When editing these configuration files, you'll need root access so remember to use$ sudo. In the configuration folder, editcore-site.xml:首先,您将处理每个节点上的配置,然后进入NameNode和DataNodes的特定配置。 在每个节点上,转到Hadoop配置文件夹,您应该可以使用
$ cd $HADOOP_CONF_DIR到达那里,因为我们之前在.bashrc设置。 编辑这些配置文件时,您需要root用户访问权限,因此请记住使用$ sudo。 在配置文件夹中,编辑core-site.xml:
<configuration>
  <property>
    <name>fs.defaultFS</name>
    <value>hdfs://<your namenode public dns name>:9000</value>
  </property>
</configuration>
This configuration
fs.defaultFStells the cluster nodes which machine the NameNode is on and that it will communicate on port 9000 which is for hdfs.此配置
fs.defaultFS告诉群集节点NameNode所在的机器,并且它将在用于hdfs的端口9000上进行通信。On each node, in
yarn-site.xmlyou set options related to YARN, the resource manager:在每个节点上的
yarn-site.xml,设置与资源管理器YARN相关的选项:
<configuration><!— Site specific YARN configuration properties -->  <property>
    <name>yarn.nodemanager.aux-services</name>
    <value>mapreduce_shuffle</value>
  </property>
  <property>
    <name>yarn.resourcemanager.hostname</name>
    <value><your namenode public dns name></value>
  </property>
</configuration>- Similarly with fs.defaultFS, yarn.resourcemanager.hostname sets the machine that the resource manager runs on. 与fs.defaultFS类似,yarn.resourcemanager.hostname设置运行资源管理器的计算机。
On each node, copy
mapred-site.xmlfrommapred-site.xml.template在每个节点上,复制
mapred-site.xml从mapred-site.xml.template
$ sudo cp mapred-site.xml.template mapred-site.xml- Add below to the mapred-site.xml 在下面添加到mapred-site.xml
<configuration>
  <property>
    <name>mapreduce.jobtracker.address</name>
    <value><your namenode public dns name>:54311</value>
  </property>
  <property>
    <name>mapreduce.framework.name</name>
    <value>yarn</value>
  </property>
</configuration>
Again,
mapreduce.jobtracker.addresssets the machine the job tracker runs on, and the port it communicates with. The other option heremapreduce.framework.namesets MapReduce to run on YARN.再次,
mapreduce.jobtracker.address设置运行作业跟踪器的机器以及与其通信的端口。 这里的另一个选项mapreduce.framework.name将MapReduce设置为在YARN上运行。
NameNode specific configuration:
NameNode的特定配置:
Now, NameNode specific configuration, these will all be configured only on the NameNode. First, add the DataNode hostnames to
/etc/hosts. You can get the hostname for each DataNode by entering$ hostname, or$ echo $(hostname)on each DataNode.现在,特定于NameNode的配置,这些都将仅在NameNode上进行配置。 首先,将DataNode主机名添加到
/etc/hosts。 您可以通过在每个DataNode上输入$ hostname或$ echo $(hostname)来获取每个DataNode的$ echo $(hostname)。Now edit
/etc/hostsand include these lines:现在编辑
/etc/hosts并包括以下几行:
<namenode_IP> namenode_hostname
<datanode1_IP> datanode1_hostname
<datanode2_IP> datanode2_hostname
<datanode3_IP> datanode3_hostname
127.0.0.1 localhost
Edit
hdfs-site.xmlfile on NameNode as below:如下所示在NameNode上编辑
hdfs-site.xml文件:
<configuration>
  <property>
    <name>dfs.replication</name>
    <value>3</value>
  </property>
  <property>
    <name>dfs.namenode.name.dir</name>
    <value>file:///usr/local/hadoop/data/hdfs/namenode</value>
  </property>
</configuration>dfs.replicationsets how many times each data block is replicated across the cluster.dfs.namenode.name.dirsets the directory for storing NameNode data (.fsimage). You’ll also have to create the directory to store the data.dfs.replication设置每个数据块在整个集群中被复制多少次。dfs.namenode.name.dir设置用于存储NameNode数据的目录(.fsimage)。 您还必须创建目录来存储数据。
$ sudo mkdir -p $HADOOP_HOME/data/hdfs/namenodeNext, you’ll create the
mastersfile inHADOOP_CONF_DIR. Themastersfile sets which machine the secondary namenode runs on. In your case, you'll have the secondary NameNode run on the same machine as the NameNode, so editmasters, add the hostname of NameNode (Note: Not the public hostname, but the hostname you get from$ hostname). Typically though, you would have the secondary NameNode run on a different machine than the primary NameNode.接下来,您将在
HADOOP_CONF_DIR创建masters文件。masters文件设置了辅助名称节点在哪台计算机上运行。 在您的情况下,您将使辅助NameNode与NameNode在同一台计算机上运行,因此请编辑masters,添加NameNode的主机名( 注意:不是公共主机名,而是从$ hostname获得的$ hostname)。 但是,通常,您将使次要NameNode与主要NameNode在不同的计算机上运行。Next, edit the
slavesfile inHADOOP_CONF_DIR, this file sets the machines that are DataNodes. Inslaves, add the hostnames of each datanode (Note: Again, not the public hostname, but$ hostnamehostnames). Theslavesfile might already contain a linelocalhost, you should remove it, otherwise the NameNode would run as a DataNode too. It should look like this:接下来,在
HADOOP_CONF_DIR编辑slaves文件,该文件设置为DataNodes的计算机。 在slaves,添加每个数据节点的主机名( 注意:同样,不是公共主机名,而是$ hostname主机名)。slaves文件可能已经包含localhost行,应该将其删除,否则NameNode也将作为DataNode运行。 它看起来应该像这样:
datanode1_hostname
datanode2_hostname
datanode3_hostname
Finally on the NameNode, change the owner of
HADOOP_HOMEtoubuntu最后在NameNode上,将
HADOOP_HOME的所有者更改为ubuntu
$ sudo chown -R ubuntu $HADOOP_HOMEDataNode specific configura:
DataNode特定的配置:
Edit
HADOOP_CONF_DIR/hdfs-site.xmlon each DataNode:在每个DataNode上编辑
HADOOP_CONF_DIR/hdfs-site.xml:
<configuration>
  <property>
    <name>dfs.replication</name>
    <value>3</value>
  </property>
  <property>
    <name>dfs.datanode.data.dir</name>
    <value>file:///usr/local/hadoop/data/hdfs/datanode</value>
  </property>
</configuration>- Again, this sets the directory where the data is stored on the DataNodes. And again, create the directory on each DataNode. Also change the owner of the Hadoop directory. 同样,这将设置数据存储在DataNodes上的目录。 再次,在每个DataNode上创建目录。 还要更改Hadoop目录的所有者。
$ sudo mkdir -p $HADOOP_HOME/data/hdfs/datanode
$ sudo chown -R ubuntu $HADOOP_HOME
启动Hadoop集群 (Launch Hadoop Cluster)
- On the NameNode, format the file system, then start HDFS. 在NameNode上,格式化文件系统,然后启动HDFS。
$ hdfs namenode -format
$ $HADOOP_HOME/sbin/start-dfs.sh- Start YARN. 启动YARN。
$- Start the job history server. 启动作业历史记录服务器。
$ $HADOOP_HOME/sbin/mr-jobhistory-daemon.sh start historyserver- To see the Java processes (Hadoop daemons for instance), enter 要查看Java进程(例如Hadoop守护程序),请输入
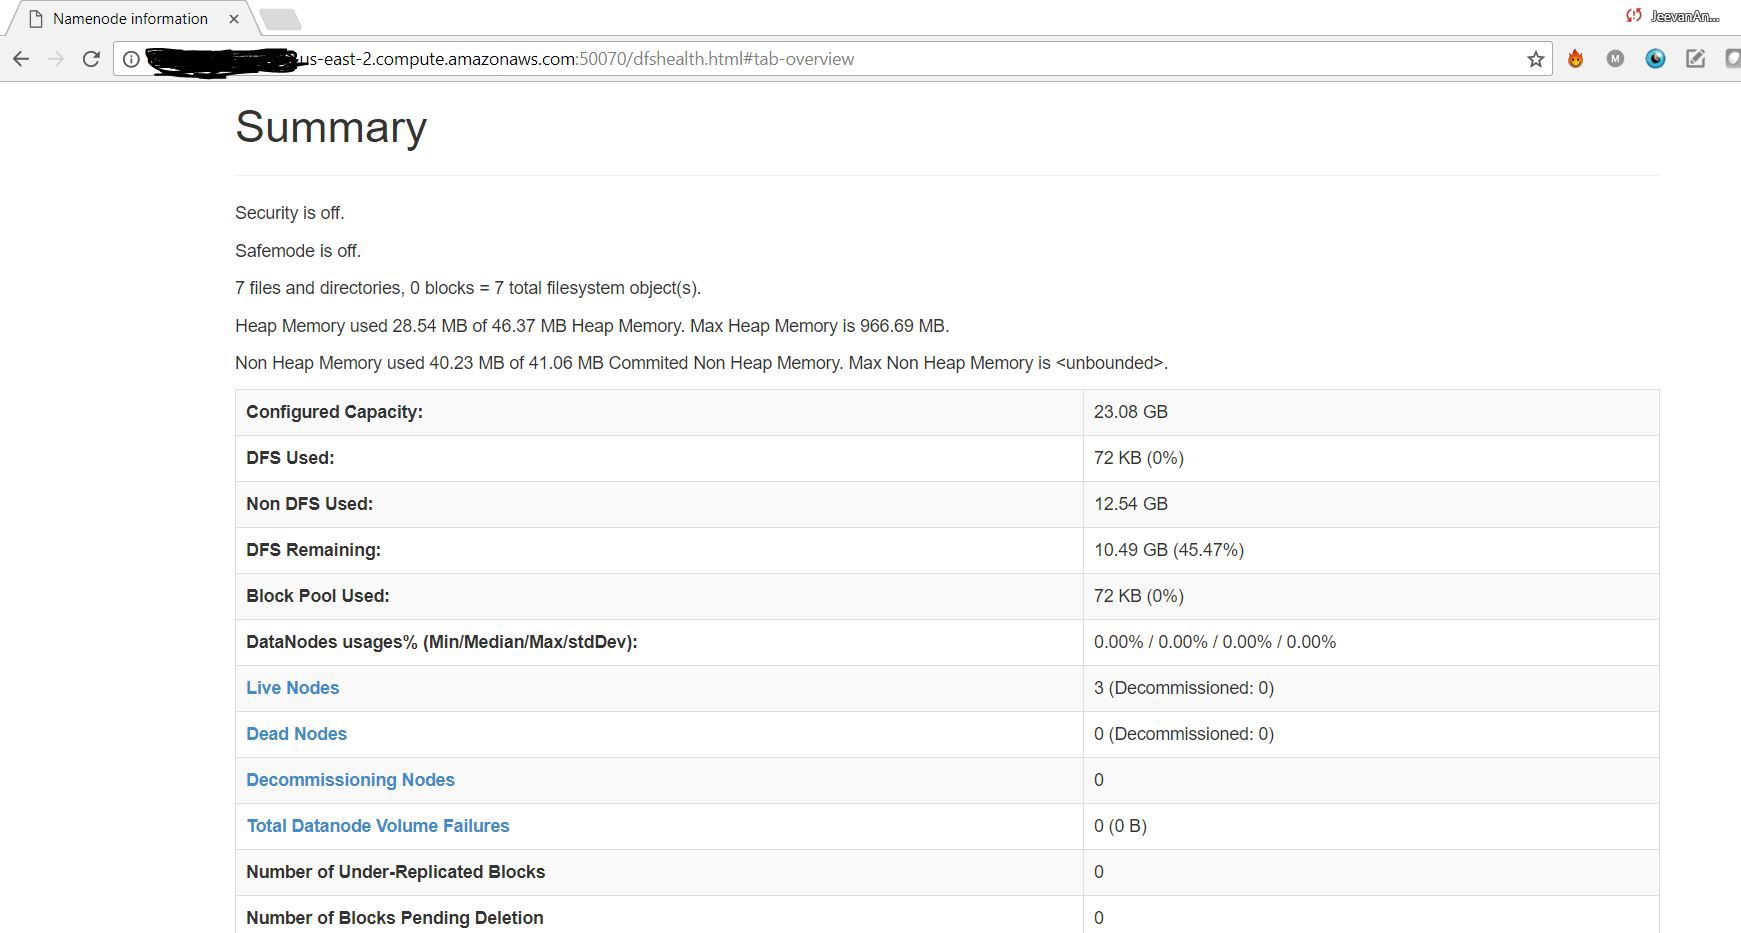
$jpsYou can access the NameNode WebUI.
您可以访问NameNode WebUI。
翻译自: https://medium.com/ai-in-plain-english/setup-4-node-hadoop-cluster-on-aws-ec2-instances-afb0e9a67334
aws上部署hadoop


 被折叠的 条评论
为什么被折叠?
被折叠的 条评论
为什么被折叠?
 到【灌水乐园】发言


