


flutter 布局
Recently, I’ve decided to focus on Flutter fundamentals. This time I’m trying to understand a little better “how the Layout system works,” answering questions like:
最近,我决定专注于Flutter基础知识。 这次,我试图更好地理解“布局系统的工作原理”,回答以下问题:
- The size of my Widget doesn’t look right, what’s happening? 我的小部件的大小看起来不合适,这是怎么回事?
- I only want to put my Widget in a specific position, but there isn’t any property to control that, why? 我只想将Widget放置在特定位置,但是没有任何属性可以控制它,为什么呢?
I keep seeing terms like
BoxConstraints,RenderBox, andSize. How is it all related?我不断看到类似的术语
BoxConstraints,RenderBox和Size。 它们之间有什么关系?- It would be possible to have a general idea of how does the layout system works? 对布局系统如何工作有一个大概的了解?
This article doesn’t mean to be an in-depth and detailed description of everything above. But we’ll get a good overview of the most important things, trying to visualize whatever is possible.
本文并不意味着对以上所有内容进行深入而详细的描述。 但是,我们将对最重要的内容进行很好的概述,尝试将可能的一切可视化。
“两阶段”布局系统和约束 (“Two Phases” Layout System and Constraints)
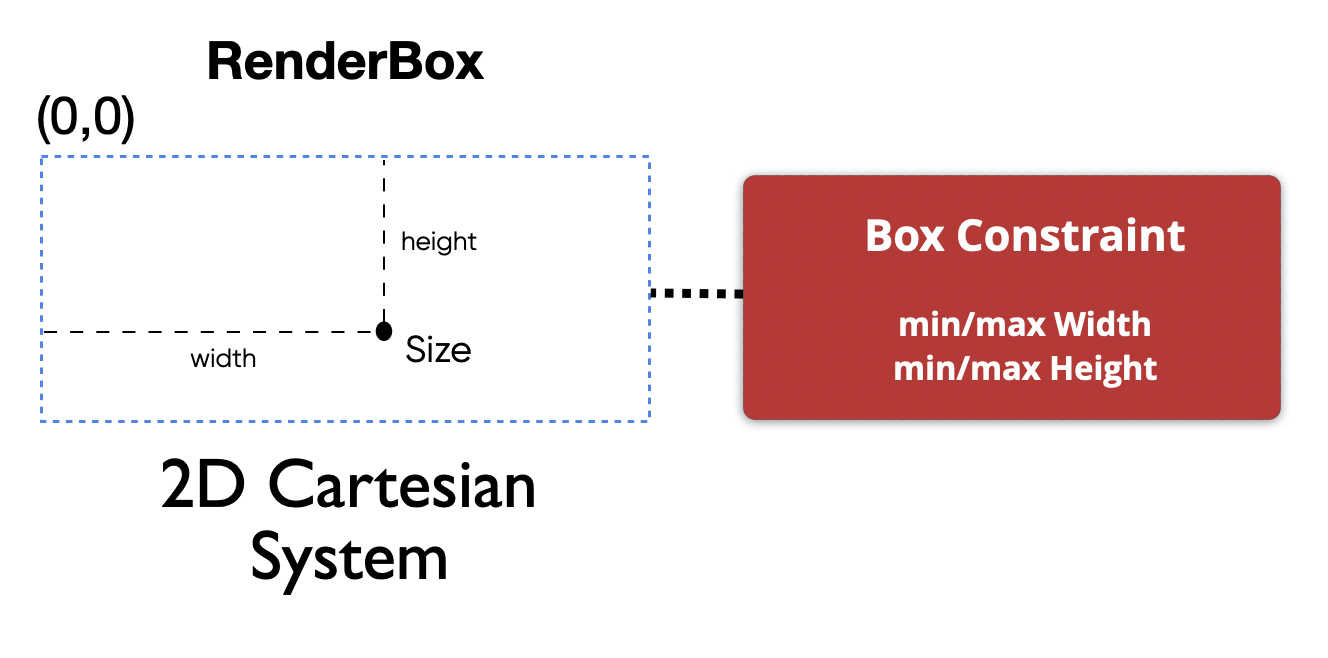
First things first, Widgets are the building blocks of Flutter SDK, but they aren’t responsible for drawing themselves into the screen. Every Widget is associated with a RenderBox object that is responsible for that. These boxes are a 2D Cartesian coordinate system, with Size expressed as the offset from the origin point. Every RenderBox will also be associated with a BoxConstraints object, that holds four values: max|min width, and max|min height. A RenderBox can choose to have any Size it wants, but it must respect those values/constraints. The size/position a Widget has depends purely on these RenderBox’s properties. The same way Widgets build a Widget three, RenderBoxes make a render three.
首先,小部件是Flutter SDK的构建块,但它们不负责将自身绘制到屏幕中。 每个小部件都与负责此操作的RenderBox对象相关联。 这些框是2D直角坐标系,其Size表示为距原点的偏移。 每个RenderBox还将与一个BoxConstraints对象相关联,该对象包含四个值: max | min width和max | min height 。 RenderBox可以选择具有任何所需的Size ,但是它必须遵守这些值/约束。 小部件的大小/位置完全取决于这些RenderBox的属性。 窗口小部件生成窗口小部件三的方法相同,RenderBoxes将渲染三生成。
We can think of Flutter’s layout system as a 2-phase system. During the first phase, the framework walks down the render tree passing BoxConstraints objects from Parent to child(s) recursively. It gives parents a way to opine/enforce their children’s Size, updating these constraints as they like. In other words, this is the phase responsible for propagating the constraining information, letting everyone know about its max/min size possible.
我们可以将Flutter的布局系统视为两阶段系统。 在第一阶段,框架递归地将渲染树从BoxConstraints递归传递给Child。 它为父母提供了一种调整/增强孩子的Size ,可以根据需要更新这些限制。 换句话说,这是负责传播约束信息的阶段,让每个人知道其最大/最小大小。
Once done, the second phase starts. This time, every RenderBox passes back to its Parent the Size it has chosen. The Parent collects the Size of all its children, and then It uses this geometric information to position each one correctly inside its own Cartesian system. It is the phase responsible for sizing and positioning where parents know how big each child will be, and where they’ll be placed.
完成后,第二阶段开始。 这次,每个RenderBox将其选择的Size传递回RenderBox 。 父级收集所有子级的Size ,然后使用此几何信息将每个子级正确定位在自己的笛卡尔系统内。 这个阶段负责确定大小和位置,在此阶段,父母知道每个孩子的身材以及将被安置在哪里。
So, in the end, what does all that mean?
那么,这到底意味着什么?
It means that Parents are responsible for defining/limiting/constraining their children’s size and positioning them relative to its coordinate system. In other words, a Widget can choose its size, but it must always respect the constraints received from its Parent. Furthermore, a Widget doesn’t know its position on the screen, but its Parent does.
这意味着父母有责任定义/限制/约束孩子的尺寸,并将其相对于其坐标系定位。 换句话说,小部件可以选择其大小,但是它必须始终遵守从其父级收到的约束。 此外,小部件不知道其在屏幕上的位置,但是其父级知道。
If you have a problem with a Widget’s size or position, try to look at (update) its Parent.
如果您对小部件的大小或位置有疑问,请尝试查看(更新)其小部件。
例 (Example)
Ok, let’s visualize all that, trying to understand what is happening through an example. But before, here are some terms that may be useful when debugging constraints:
好的,让我们可视化所有内容,尝试通过示例了解正在发生的事情。 但是在此之前,以下是一些在调试约束时可能有用的术语:
If max(w|h) = min (w|h), that is tightly constrained.
如果 max(w | h)= min(w | h) ,它受到严格限制。
If min(w|h) = 0, we have a loose constraint.
如果min(w | h)= 0 ,则约束宽松 。
If max(w|h) != infinite, the constraint is bounded.
如果max(w | h)!= infinite ,则约束为有界。
If max(w|h) = infinite, the constraint is unbounded.
如果max(w | h)= infinite ,则约束不受限制。
If min(w|h) = infinite, is just said to be infinite
如果min(w | h)= infinite ,则说是无限的
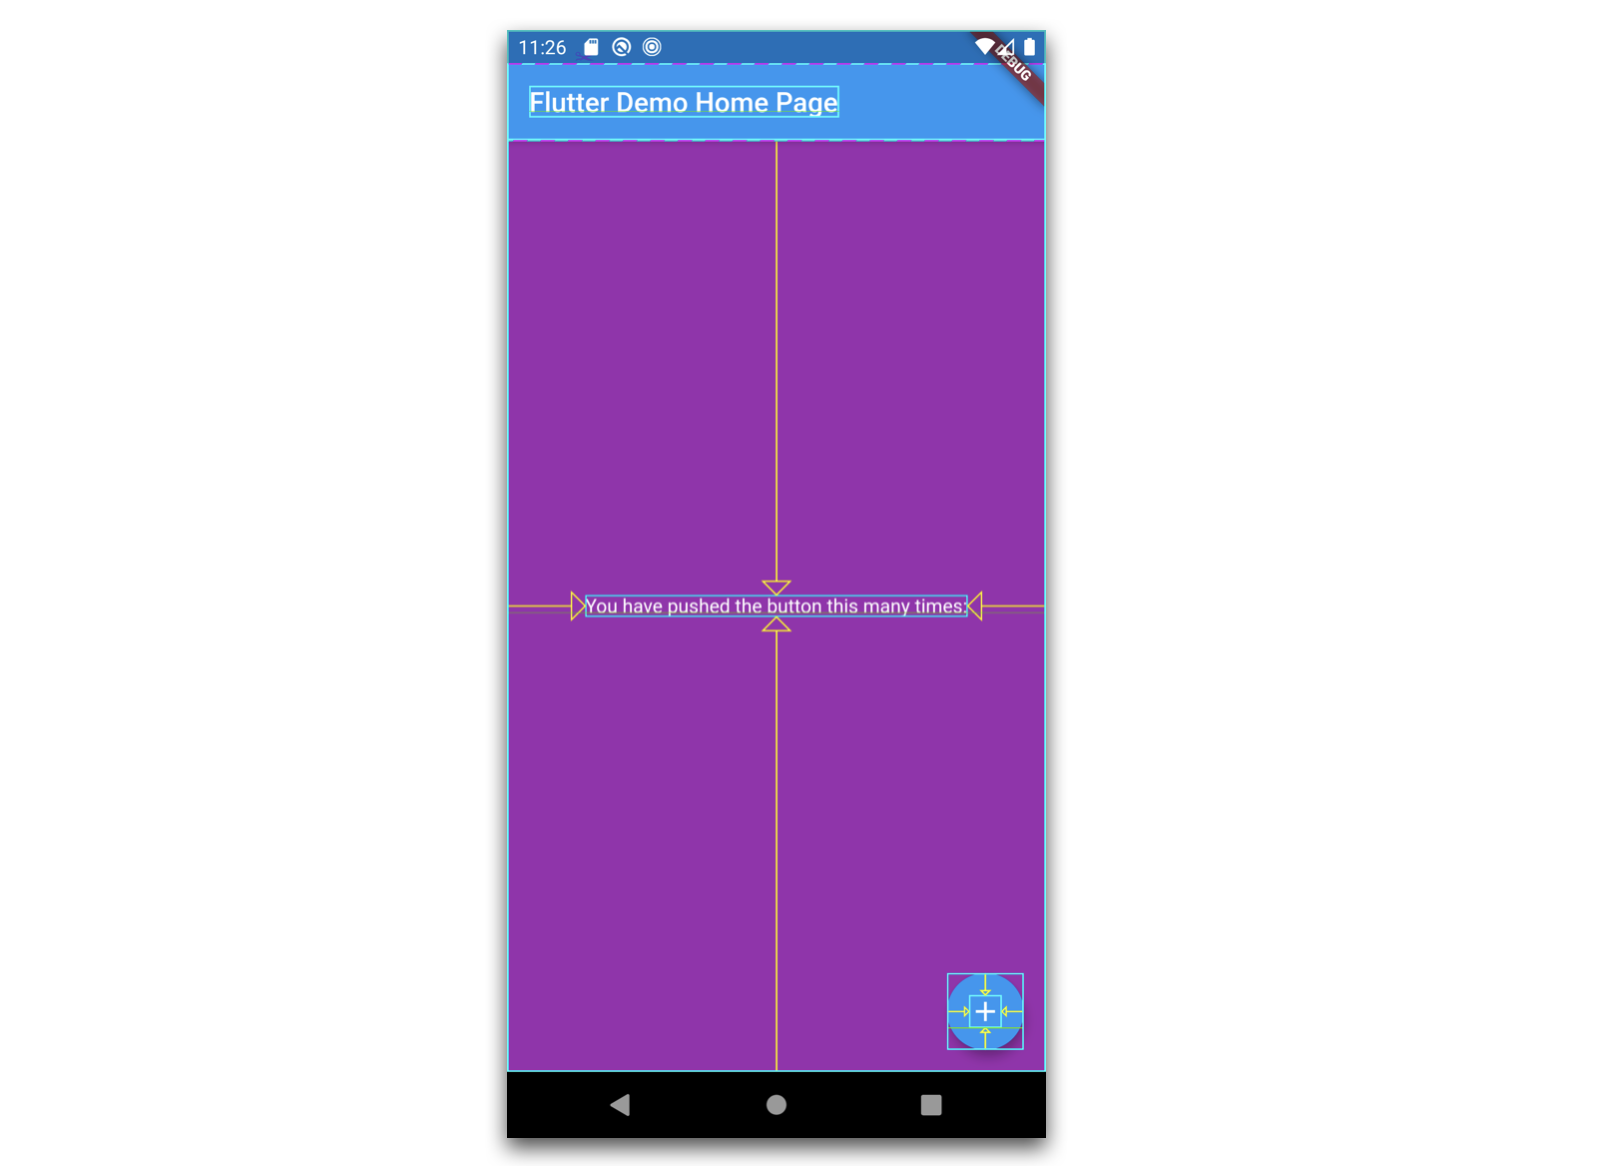
The app we’ll be using is a slide modified version of the initial app template. In general, you have two easy ways to check a widget RenderBox, and it’s properties:
我们将使用的应用是初始应用模板的幻灯片修改版本。 通常,您有两种简单的方法来检查窗口小部件RenderBox及其属性:
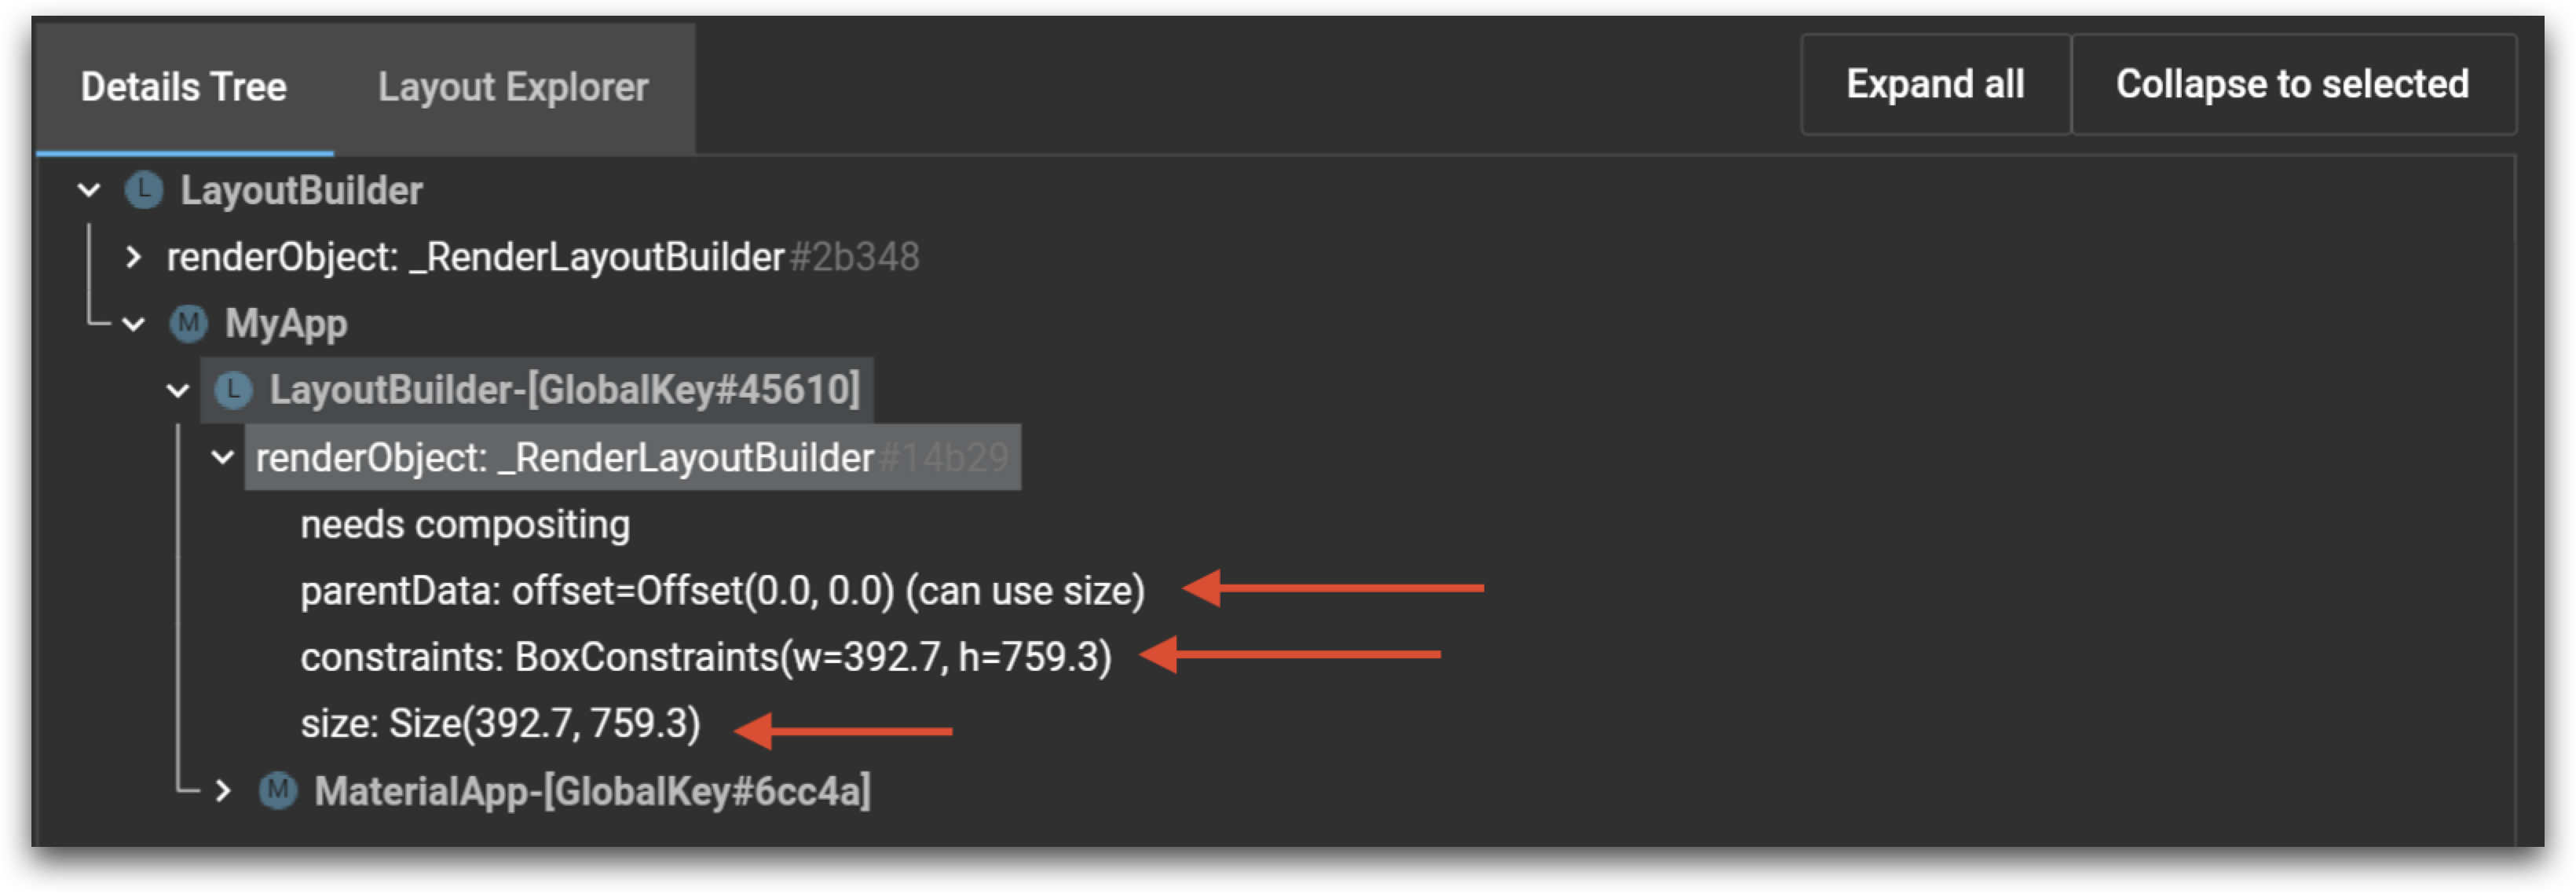
Doing by code: We can intercept the
BoxConstraintspropagation during the layout system first phase using LayoutBuilder, and check the constraints. Then, after the second phase finishes, we use keys to get the widget’sRenderBoxand be able to checkSize,Position.通过代码执行:我们可以使用
BoxConstraints在布局系统第一阶段拦截BoxConstraints传播,并检查约束。 然后,在第二阶段完成后,我们使用键来获取小部件的RenderBox并能够检查Size和Position。- Or using the DevTools Widget Inspector: 或使用DevTools窗口小部件检查器:
import 'package:flutter/material.dart';


GlobalKey _keyMyApp = GlobalKey();
GlobalKey _keyMaterialApp = GlobalKey();
GlobalKey _keyHomePage = GlobalKey();
GlobalKey _keyScaffold = GlobalKey();
GlobalKey _keyAppbar = GlobalKey();
GlobalKey _keyCenter = GlobalKey();
GlobalKey _keyFAB = GlobalKey();
GlobalKey _keyText = GlobalKey();


void printConstraint(String name, BoxConstraints c) {
  print(
    'CONSTRAINT of $name: min(w=${c.minWidth.toInt()},h=${c.minHeight.toInt()}) max(w=${c.maxWidth.toInt()},h=${c.maxHeight.toInt()})',
  );
}


void printSizes() {
  printSize('MyApp', _keyMyApp);
  printSize('MaterialApp', _keyMaterialApp);
  printSize('HomePage', _keyHomePage);
  printSize('Scaffold', _keyScaffold);
  printSize('Appbar', _keyAppbar);
  printSize('Center', _keyCenter);
  printSize('Text', _keyText);
  printSize('FAB', _keyFAB);
}


void printSize(String name, GlobalKey key) {
  final RenderBox renderBox = key.currentContext.findRenderObject();
  final size = renderBox.size;
  print("SIZE of $name: w=${size.width.toInt()},h=${size.height.toInt()}");
}


void printPositions() {
  printPosition('MyApp', _keyMyApp);
  printPosition('MaterialApp', _keyMaterialApp);
  printPosition('HomePage', _keyHomePage);
  printPosition('Scaffold', _keyScaffold);
  printPosition('Appbar', _keyAppbar);
  printPosition('Center', _keyCenter);
  printPosition('Text', _keyText);
  printPosition('FAB', _keyFAB);
}


void printPosition(String name, GlobalKey key) {
  final RenderBox renderBox = key.currentContext.findRenderObject();
  final position = renderBox.localToGlobal(Offset.zero);
  print("POSITION of $name: $position ");
}


void main() {
  runApp(LayoutBuilder(
    builder: (context, constraints) {
      printConstraint('MyApp', constraints);
      return MyApp();
    },
  ));
}


class MyApp extends StatelessWidget {
  @override
  Widget build(BuildContext context) {
    return LayoutBuilder(
      key: _keyMyApp,
      builder: (context, constraints) {
        printConstraint('MaterialApp', constraints);
        return MaterialApp(
          key: _keyMaterialApp,
          title: 'Flutter Demo',
          theme: ThemeData(
            primarySwatch: Colors.blue,
            visualDensity: VisualDensity.adaptivePlatformDensity,
          ),
          home: LayoutBuilder(
            builder: (context, constraints) {
              printConstraint('HomePage', constraints);
              return HomePage(
                key: _keyHomePage,
                title: 'Flutter Demo Home Page',
              );
            },
          ),
        );
      },
    );
  }
}


class HomePage extends StatefulWidget {
  HomePage({Key key, this.title}) : super(key: key);
  final String title;


  @override
  _HomePageState createState() => _HomePageState();
}


class _HomePageState extends State<HomePage> {
  int _counter = 0;


  void _incrementCounter() {
    setState(() {
      _counter++;
    });
  }


  @override
  void initState() {
    WidgetsBinding.instance.addPostFrameCallback(_afterLayout);
    super.initState();
  }


  void _afterLayout(_) {
    printSizes();
    printPositions();
  }


  @override
  Widget build(BuildContext context) {
    return LayoutBuilder(builder: (context, constraints) {
      printConstraint('Scaffold', constraints);
      return Scaffold(
        backgroundColor: Colors.purple,
        key: _keyScaffold,
        appBar: AppBar(
          key: _keyAppbar,
          title: Text(widget.title),
        ),
        body: LayoutBuilder(
          builder: (context, constraints) {
            printConstraint('Center', constraints);
            return Center(
              key: _keyCenter,
              child: LayoutBuilder(builder: (context, constraints) {
                printConstraint('Text', constraints);
                return Text(
                  'You have pushed the button this many times:',
                  key: _keyText,
                  style: TextStyle(color: Colors.white),
                );
              }),
            );
          },
        ),
        floatingActionButton: LayoutBuilder(
          builder: (context, constraints) {
            printConstraint('FAB', constraints);
            return FloatingActionButton(
              key: _keyFAB,
              onPressed: printSizes,
              tooltip: 'Increment',
              child: Icon(Icons.add),
            );
          },
        ),
      );
    });
  }
}
Let's go step by step and see what's happening (we'll ignore LayoutBuilders here).
让我们一步一步来看看发生了什么(在这里我们将忽略LayoutBuilders )。
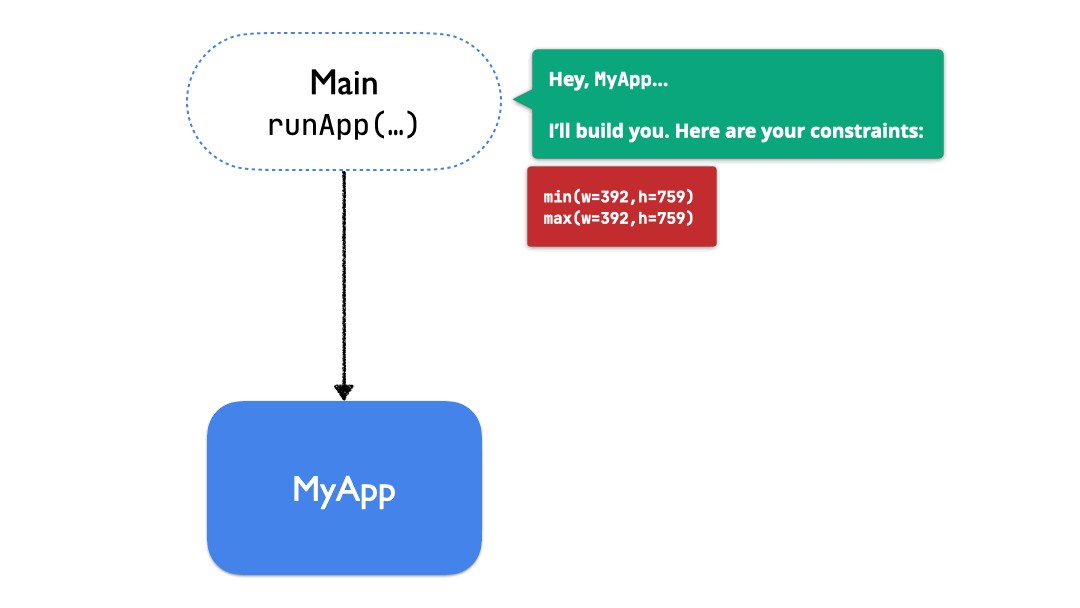
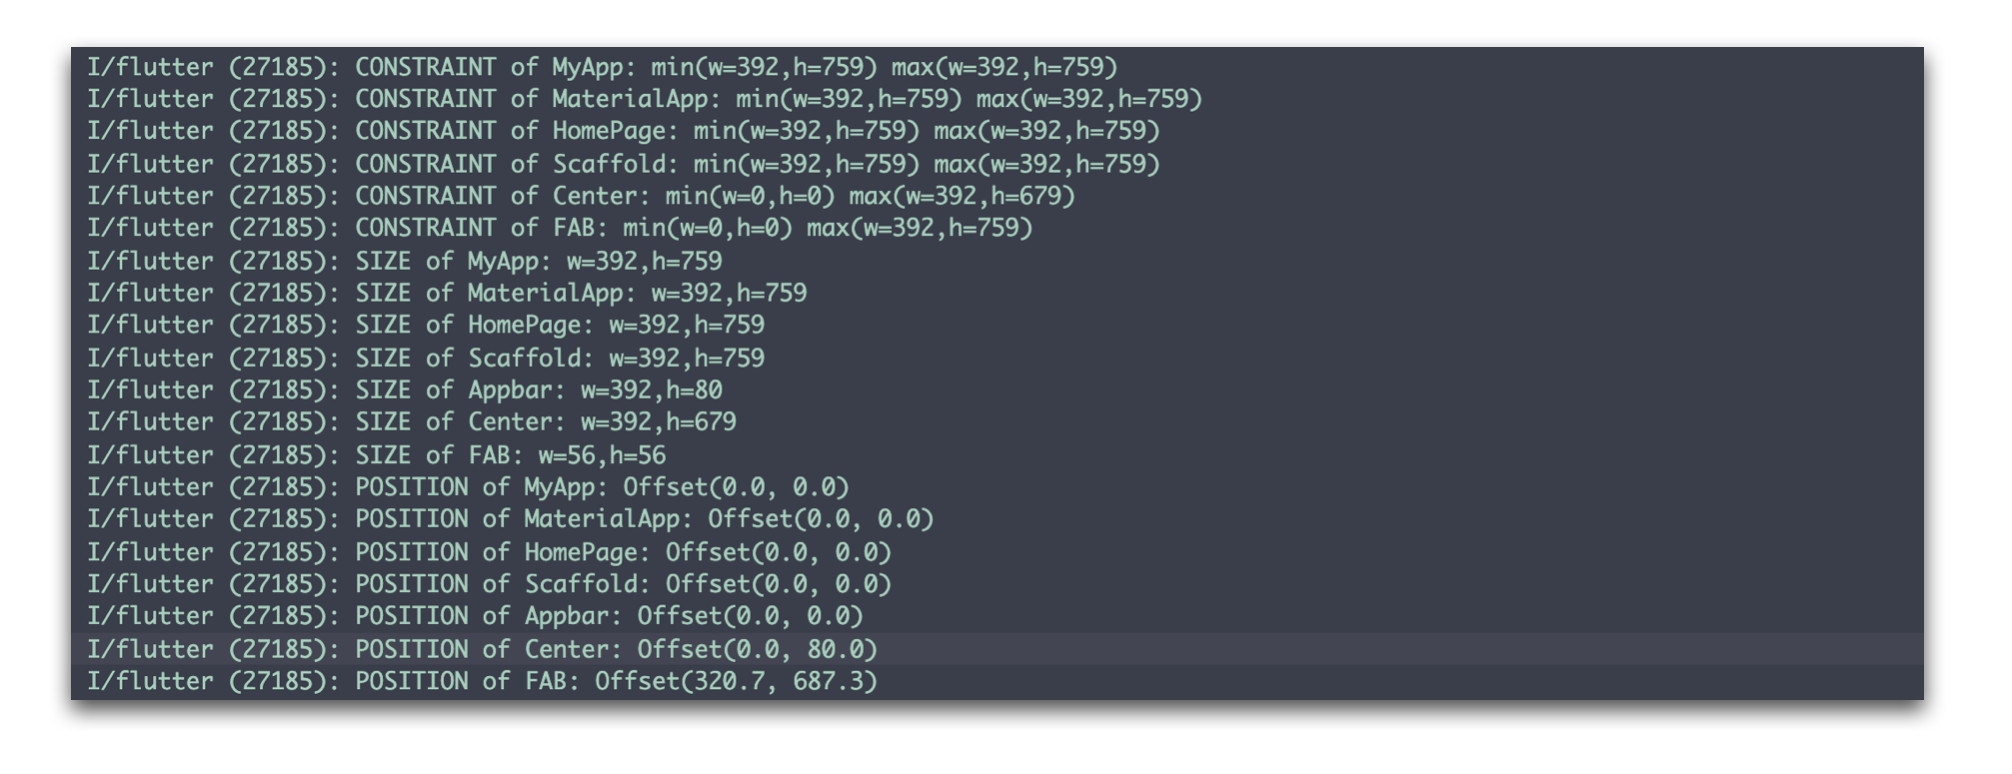
The first thing that happens in our example is the main executing runApp(..). This function checks the screen current size (in our case 392:759), and then it creates a BoxConstraints object holding the constraints that will be sent to our first widget (MyApp). Note that max|min width and height are all equals; therefore, runApp uses a tight constraint — by doing so, MyApp will have no choice when choosing its size besides filling the full space available on the screen.
在我们的示例中发生的第一件事是main执行runApp(..) 。 此函数检查屏幕当前大小( 在我们的示例中为392:759 ),然后创建一个BoxConstraints对象,该对象包含将发送到我们的第一BoxConstraints部件( MyApp )的约束。 注意max | min的宽度和高度都相等 ; 因此, runApp使用了严格的约束-通过这样做, MyApp除了选择屏幕上的可用空间外,在选择其大小时将别无选择。
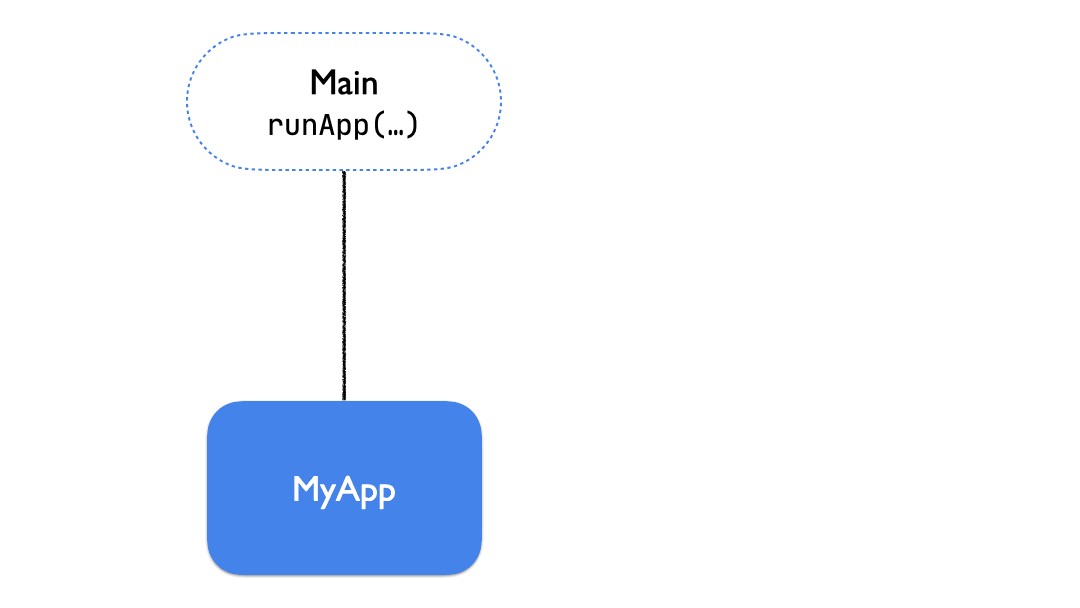
The constraints are then propagated down the Widget tree. MyApp , MaterialApp , HomePage , and Scaffold are all informed about the same tight constraints. So all will be forced to fill the full screen. Each widget has a chance to inform a different BoxConstraints to its child (still respecting the one it has received). But, in this case, they have chosen not to do that.
然后将约束向下传播到Widget树。 MyApp , MaterialApp , HomePage和Scaffold都被告知相同的严格约束。 因此,所有人将被迫填满整个屏幕。 每个小部件都有机会向其子项通知不同的BoxConstraints (仍然尊重已收到的子项)。 但是,在这种情况下,他们选择不这样做。
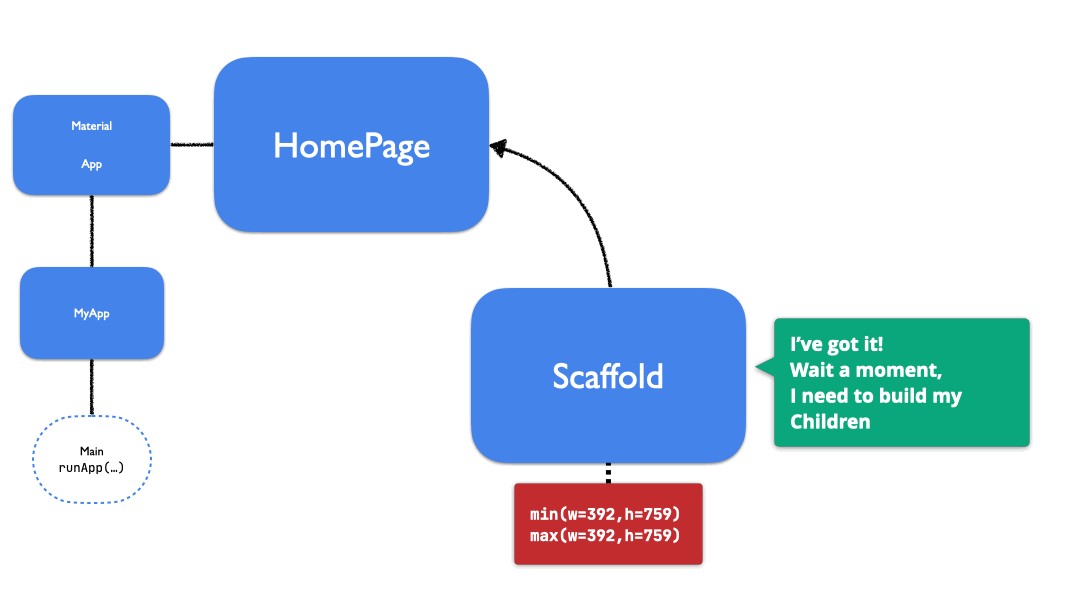
Now things start to get more interesting. Scaffold informs AppBar about about the BoxConstraints it must use, but, this time, it uses a loose constraint (min h = 0). It gives AppBar a chance to choose any height it wants, but it must still use width = 390.
现在事情开始变得越来越有趣。 Scaffold告知AppBar有关必须使用的BoxConstraints ,但是这次,它使用了宽松的约束(min h = 0)。 它使AppBar有机会选择所需的任何高度,但仍必须使用width = 390。
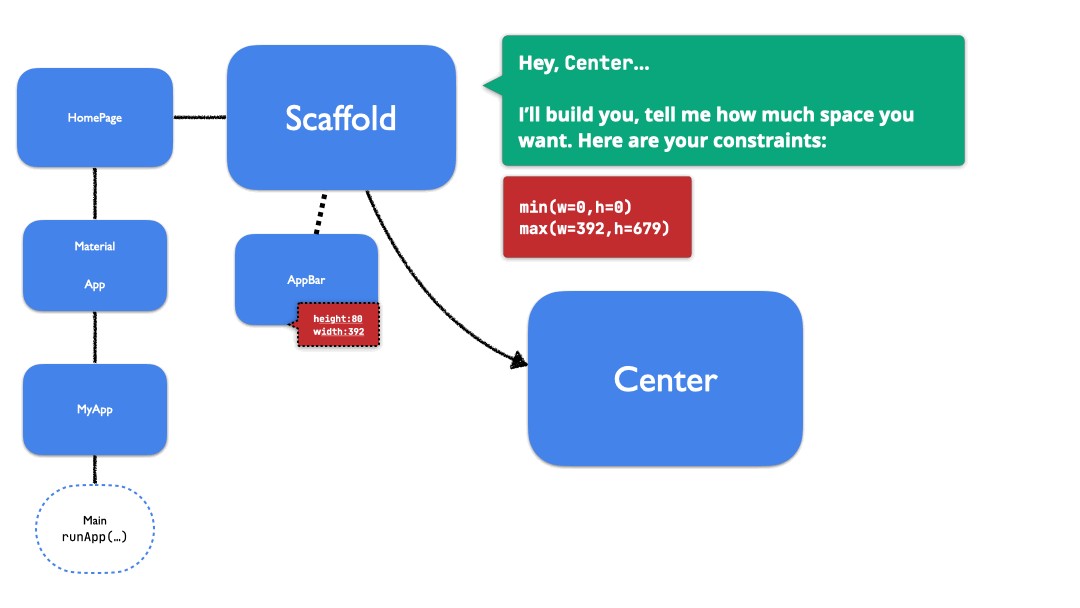
AppBar is a special kind of widget called PreferredSizeWidget. This type of widgets won't impose any constraints on its child. If you try to use LayoutBuilder to get Title 's constraints, you'll get an error. Instead, AppBar responds to Scaffold with a preferred/default size: height = 80, width = 392 (forced by the received constraints)
AppBar是一种特殊的小部件,称为PreferredSizeWidget 。 这种类型的小部件不会对其子级施加任何约束。 如果尝试使用LayoutBuilder获取Title的约束,则会出现错误。 相反, AppBar会使用首选/默认大小来响应Scaffold : height = 80 , width = 392 (受收到的约束强制)
After getting AppBar 's Size, Scaffold goes on to its next child: Center
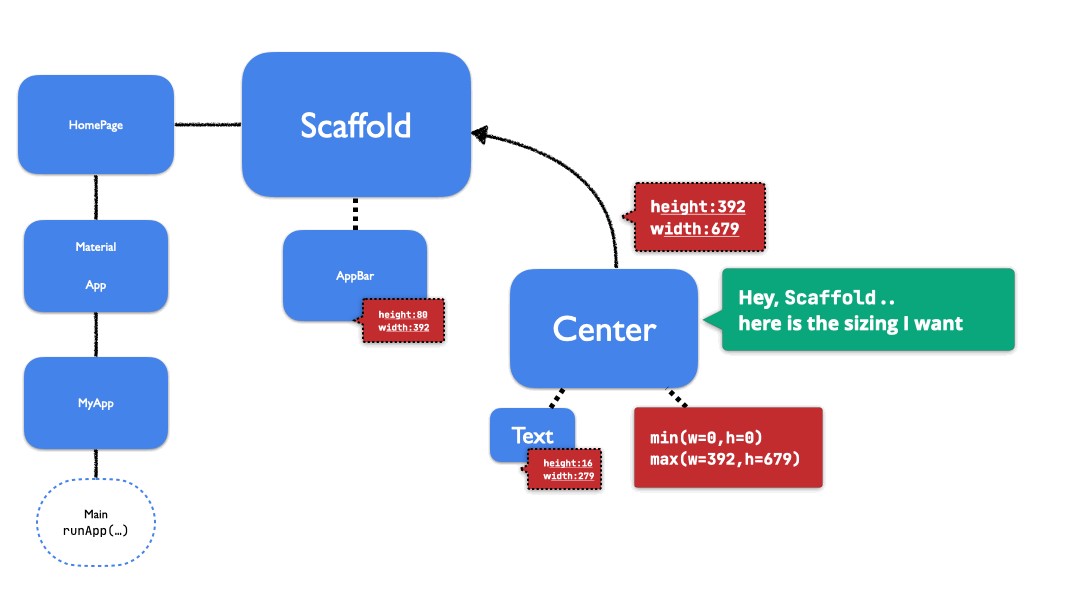
获得AppBar的Size , Scaffold继续下一个子项: Center
Ok, a lot of things going on here. Let's try to understand:
好的,这里发生了很多事情。 让我们尝试了解:
ScaffoldinformsCenterits constraints, letting it choose any size between 0 < w < 392 and 0 < h < 697. Note that max height is 759 (screen max height) minus 80 (height that AppBar has chosen)Scaffold告知Center其约束,让其选择0 <w <392和0 <h <697之间的任意大小。请注意,最大高度是759(屏幕最大高度)减去80(AppBar选择的高度)Centergoes to its child,Text, forwarding the same constraints/Center转到其子Text,转发相同的约束/Textpicks a Size that is enough to show its data (279:16), and answer backCenter.Text选择的大小足以显示其数据(279:16),然后回答Center。With that geometric information
(Size)on hands,Centercan correctly positionTextinside its Cartesian system. As a parent, theCenterhas the right to choose its child position, and, in this case, it decides to centralize it.借助手上的几何信息
(Size ),Center可以在其笛卡尔系统内正确定位Text。 作为父母,Center有权选择其子职位,在这种情况下,它决定将其集中。
The flow goes on:
流程继续:
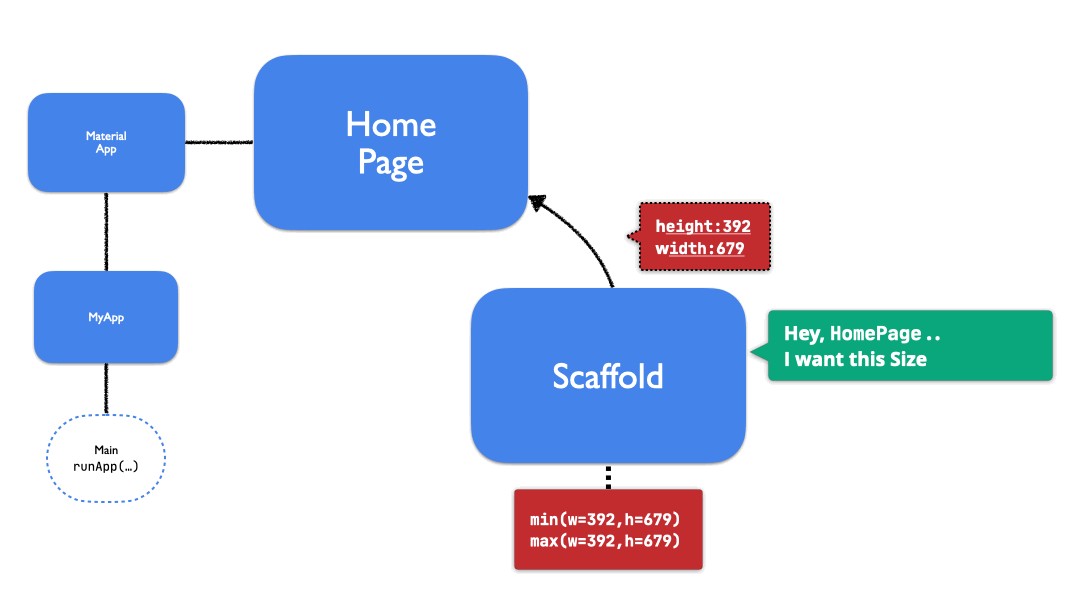
Then the
Centerchooses a Size for itself, but instead of only picking an "enough" size (likeTextdid), It decides to be as big as possible, accordingly the constraints it has received.然后,
Center为自己选择一个大小,而不是仅选择一个“足够”的大小(如“Text一样),而是决定尽可能大,因此受到了限制。ScaffoldreceivesCenterwanted size, and the flow goes on in direction to its last-child:FABScaffold收到Center所需的尺寸,并且流程继续向其最后一个孩子:FABFABreceives the constraints and gives back toScaffoldits preferred size (56:56)FAB收到约束,然后将其首选大小返回给Scaffold(56:56)Finally,
Scaffoldhas all the geometric information it needs to position each child inside its Cartesian system too.最后,
Scaffold还具有将每个孩子定位在其笛卡尔系统内所需的所有几何信息。
Lastly, the process is repeated for all widget above Scaffold :
最后,对Scaffold以上的所有小部件重复该过程:
- The Size information continues to be propagated up the render tree. Size信息继续沿渲染树传播。
- Every widget uses this information to position each child inside the Cartesian System. 每个小部件都使用此信息将每个孩子放置在笛卡尔系统内。
ScaffoldanswerHomePage, that answersMaterialApp, that in turn answerMyApp. Until if finally reachMainagain.Scaffold回答HomePage,回答MaterialApp,反过来回答MyApp。 直到最后再次到达Main。Mainget this "final" widget and ultimately bind it into the screen.Main获取此“最终”窗口小部件,并将其最终绑定到屏幕中。
The RenderBox tree is finally bound on the screen. We have a running app.
RenderBox树最终绑定在屏幕上。 我们有一个正在运行的应用程序。
有趣的事情 (Something interesting to remember)
- A Widget doesn't know its position on the screen; its parent does. 小部件不知道其在屏幕上的位置; 它的父母呢。
- A Widget can choose the Size it wants to have, but it must be according to its parent’s limits. 小部件可以选择想要的大小,但必须根据其父级的限制。
- The constraints are propagated down, and the Size up. 约束向下传播,而大小向上传播。
- Try to learn that constraints terms, they may be useful later. 尝试了解约束条件,它们可能在以后有用。
I hope all this has helped you understand a better how the Flutter layout system works. If this post cast🧙♂️ a small light 💡 on this shadow, please, consider following me on Twitter too:
我希望所有这些都可以帮助您更好地了解Flutter布局系统的工作方式。 如果这篇文章在此阴影上投射了一点点光芒,请也考虑在Twitter上关注我:
Twitter️ 推特
翻译自: https://itnext.io/flutter-layout-system-overview-c70bbe9ba909
flutter 布局


 8698
8698

 被折叠的 条评论
为什么被折叠?
被折叠的 条评论
为什么被折叠?
 到【灌水乐园】发言


