


 本文探讨深度学习的基础概念,并通过实例讲解如何利用这些概念进行狗品种的分类任务,涵盖了机器学习、深度学习和人工智能的知识,采用Python编程语言实现。
深度学习的基本概念概念
This blog post is part of the Udacity Data Scientist Nanodegree program.
这篇博客文章是Udacity数据科学家纳米学位计划的一部分。
介绍 (Introduction)
The World Canine Organization (FCI) is currently listing more than 300 officially recognised dog breeds. Over thousands of years, mankind has managed to create an impressive diversity of canine phenotypes and an almost uncanny range of physical and behavioural characteristics of their faithful four-legged friends. However, apart from cynology scholars, dog breeders and some proven dog lovers most people shrug their shoulders in a clueless gesture, when asked to name the breed of a randomly presented dog, at least when it is not exactly a representative of one of the most popular and well known breeds like Dachshund, German Shepard or pug. If you are one of the few people who finds it slightly embarrassing not being able to identify dogs like a cynologist, you are probably pleased to learn that there might be a technical solution. Because thankfully, the aspiring and astonishing field of Deep Learning and artificial neural networks provides powerful concepts and methods for addressing this sort of classification tasks.
世界犬类组织( FCI )目前列出了300多种官方认可的犬种。 几千年来,人类成功地创造了令人印象深刻的犬类表型多样性,以及其忠实四足朋友的身体和行为特征近乎不可思议的范围。 但是,除了犬儒学界的学者,狗繁殖者和一些公认的爱犬者之外,大多数人以无知的姿势耸了耸肩,当被问及随机出现的狗的名字时,至少当它不完全代表其中一只时,是这样。达克斯猎犬,德国谢泼德或哈巴狗等著名的著名犬种。 如果您是为数不多的无法像犬儒学家一样识别狗的人感到尴尬的人之一,您可能会很高兴得知可能存在技术解决方案。 值得庆幸的是,深度学习和人工神经网络的抱负和令人惊讶的领域提供了解决此类分类任务的强大概念和方法。
In this project we will develop ideas for a dog identification app using deep learning concepts. The software is intended to accept any user-supplied image as input. If a dog is detected in the image, it will provide an estimate of the dog’s breed. If a human is detected, it will provide an estimate of the dog breed that is most resembling.
在这个项目中,我们将使用深度学习概念为狗识别应用程序开发思路。 该软件旨在接受任何用户提供的图像作为输入。 如果在图像中检测到狗,它将提供狗的品种的估计值。 如果检测到人,它将提供最相似的犬种的估计。
Our project involves the following steps which will be covered in detail in the subsequent sections of this blog post.
我们的项目涉及以下步骤,将在本博客文章的后续部分中详细介绍。
Step 0: Import Datasets
步骤0:导入数据集
Step 1: Detect Humans
步骤1:侦测人类
Step 2: Detect Dogs
第2步:检测狗
Step 3: Create a CNN to Classify Dog Breeds (from Scratch)
第3步:创建CNN对狗的品种进行分类(从头开始)
Step 4: Use a CNN to Classify Dog Breeds (using Transfer Learning)
步骤4:使用CNN对狗的品种进行分类(使用转移学习)
Step 5: Create a CNN to Classify Dog Breeds (using Transfer Learning)
第5步:创建CNN对狗的品种进行分类(使用转移学习)
Step 6: Write your Algorithm
第6步:编写算法
Step 7: Test Your Algorithm
步骤7:测试算法
步骤0:导入数据集(Step 0: Import Datasets)
Obviously, to be able to build an algorithm intended to identify dogs we will need some “dog data”. A lot of it. Thankfully, for this project Udacity is providing a decent number of dog images including the corresponding breed labels. Concretely, the image data comprises 8351 dog images and 133 separate dog breed names.
显然,为了能够构建用于识别狗的算法,我们需要一些“狗数据”。 很多。 值得庆幸的是,对于这个项目,Udacity提供了大量的狗像,包括相应的品种标签。 具体地,图像数据包括8351只狗图像和133个单独的狗品种名称。
Since the app has the additional task to assign the most resembling dog breed to a given human face, we also need a dataset with human faces. The dataset provided by Udacity includes 13233 images from the labeled faces in the wild dataset.
由于该应用具有将最相似的犬种分配给给定的人脸的附加任务,因此我们还需要具有人脸的数据集。 Udacity提供的数据集包含来自野生数据集中标记面部的13233张图像。
步骤1:侦测人类 (Step 1: Detect Humans)
This seems to be a somewhat surprising step in the development of a dog identification app, but it is necessary for its extra job to assign the most resembling dog breed to a given human face.
这似乎是狗识别应用程序开发中令人惊讶的一步,但将其最相似的狗品种分配给给定的人脸是其额外工作所必需的。
In order to detect human faces in images we will use OpenCV’s implementation of Haar feature-based cascade classifiers. The approach of this classifier is based on the concept of Haar-like features, which is widely used in the field of object recognition because of its convincing calculation speed.
为了检测图像中的人脸,我们将使用OpenCV基于Haar特征的级联分类器的实现。 该分类器的方法基于类似Haar的特征的概念,由于其令人信服的计算速度而被广泛用于对象识别领域。
After instantiating a new pre-trained classifier, an image is loaded and converted to grayscale. Applying the classifier to the image gives us the bounding boxes of detected human faces.
实例化新的预训练分类器后,将图像加载并转换为灰度。 将分类器应用于图像,可以为我们提供检测到的人脸的边界框。
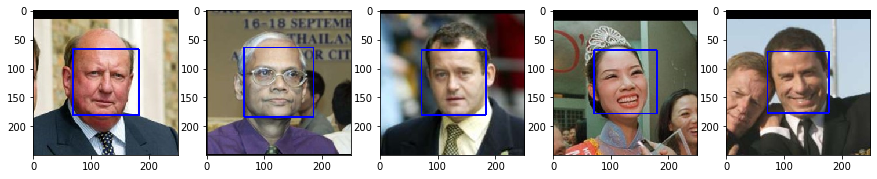
Here are a few examples from the labeled faces in the wild dataset used in this project after running them through our cascade classifier:
以下是通过级联分类器运行它们后,在此项目中使用的野生数据集中带标签的面Kong的一些示例:
Assessing the human detector
评估人体探测器
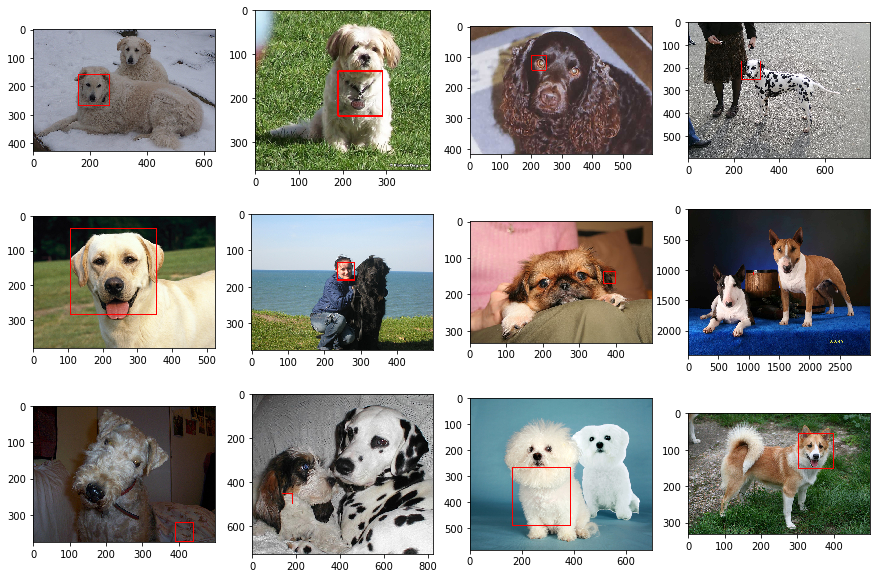
Let’s now take a look at how the classifier performs with the pictures from our datasets. We apply the algorithm to 100 of our dog images and are curious to explore the 12 pictures in which the classifier interestingly identified human content. We are slightly disappointed to hardly find any bizarre and uncanny human features in the depicted dogs’ faces that could have fooled our algorithm
现在,让我们看一下分类器如何处理数据集中的图片。 我们将该算法应用于100张狗图像,并好奇地探索分类器有趣地识别出人类内容的12张图片。 令我们有些失望的是,在所描绘的狗的脸上几乎没有发现任何可能愚弄我们算法的奇异而怪诞的人类特征
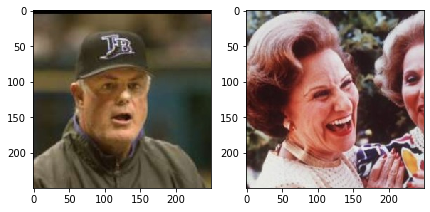
Conversely, the classifier missed human faces in the following 2 of the 100 samples of human pictures used in our assessment:
相反,分类器在我们评估中使用的100张人体图片样本中的以下2张中遗漏了人脸:
Still, our classifier seems reliable enough to give it a go in our project.
不过,我们的分类器似乎足够可靠,可以在我们的项目中使用。
第2步:检测狗 (Step 2: Detect Dogs)
Now that we have a pretty decent algorithm to detect human faces in images we surely want to build a similar function for dog detection. Unfortunately, at the moment there is no comparable “dog detector” available for OpenCV’s CascadeClassifiers. Therefore, we choose another approach by employing an image classification model which has been pre-trained on the vast image database of ImageNet. More specifically, we will use the high-level deep learning API Keras to load the ResNet-50 convolutional neural network and run images through this model. For a specific image the network predicts probabilites for each of 1000 image categories in total. We attribute a positive dog detection to an image, if the model assigns the maximum probability to one of the 118 dog related categories.
现在,我们有了一个相当不错的算法来检测图像中的人脸,我们当然希望为狗检测建立一个类似的功能。 不幸的是,目前没有可用于OpenCVCascadeClassifiers的类似“狗检测器”。 因此,我们通过采用已经在ImageNet的庞大图像数据库中预先训练的图像分类模型来选择另一种方法。 更具体地说,我们将使用高级深度学习API Keras加载ResNet-50卷积神经网络并通过该模型运行图像。 对于特定图像,网络可以预测总共1000个图像类别中每个类别的概率。 如果模型将最大概率分配给118个与狗相关的类别之一,则我们将阳性狗检测归因于图像。
The source code below lists the functions used to preprocess the image data and run them through ResNet-50 model.
下面的源代码列出了用于预处理图像数据并通过ResNet-50模型运行它们的功能。
Assessing the dog detector
评估狗探测器
How does the ResNet-50 dog detector perform on our image datasets? We are going to test this with the source code below.
ResNet-50狗探测器在我们的图像数据集上如何表现? 我们将使用下面的源代码对其进行测试。
We obtain a compelling 100% accuracy with our dog images, but Frank Solich might be worried that the only dog, that one of the most groundbreaking deep learning network models spotted in a human image dataset, was in a portrait of him:
我们的狗图像获得了令人信服的100%准确性,但弗兰克·索里奇(Frank Solich)可能会担心,唯一的狗是在人像数据集中发现的最具突破性的深度学习网络模型之一,他的肖像是:

第3步:创建CNN对狗的品种进行分类(从头开始) (Step 3: Create a CNN to Classify Dog Breeds (from Scratch))
Now we will come to the really interesting part and tackle the implementation of the app’s principal task to tell the correct dog breed label from an image of a dog. We could make things easy and just use the pre-trained model from step two and predict the dog breed labels defined in the categories of the ImageNet dataset. But of course it’s much more exciting, interesting and educational to build our own solution, so here we go! Before we start building our own classifier, a few words about convolutional neural networks.
现在,我们将介绍真正有趣的部分,并解决应用程序主要任务的实现,以从狗的图像中分辨出正确的狗的品种标签。 我们可以使事情变得简单,只需使用第二步中的预训练模型并预测在ImageNet数据集类别中定义的狗的品种标签。 但是,当然,构建我们自己的解决方案会更加令人兴奋,有趣并且更具教育意义,所以我们开始吧! 在开始建立自己的分类器之前,请先介绍一下卷积神经网络。
Convolutional neural networks (CNNs) are a class of deep neural networks primarily used in the analysis of images. To a certain extent, the design of convolution networks was inspired by the way in which a mammal’s brain processes visual impressions. Translation invariance and shared weights are mostly cited to explain the advantages of CNNs over using other types of neural networks in image analysis. The architecture of a convolution network involves the use of multiple hidden layers that perform mathematical convolution operations on their input.
卷积神经网络(CNN)是一类深层神经网络,主要用于图像分析。 在某种程度上,卷积网络的设计受到哺乳动物大脑处理视觉印象的方式的启发。 通常引用平移不变性和权重共享来解释CNN在图像分析中相对于使用其他类型的神经网络的优势。 卷积网络的体系结构涉及使用多个隐藏层,这些隐藏层在其输入上执行数学卷积操作。
First try
第一次尝试
A typical example of the structure of a CNN is provided by Udacity, which suggests the following model for use in the present step.
CNN结构的典型示例由Udacity提供,该示例建议在本步骤中使用以下模型。
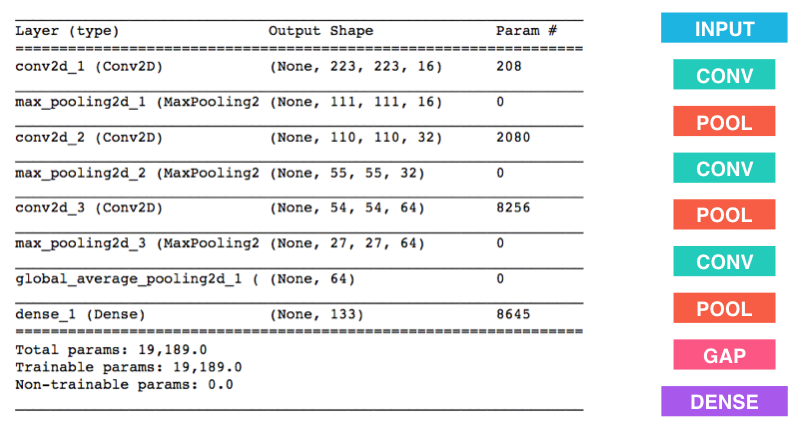
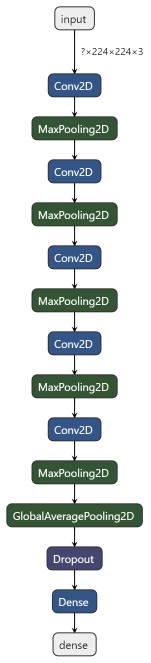
So we have an input layer into which image data are fed and a total of three pairs of convolutional and pooling layers before a fully connected “dense” layer produces an output. Convolutional layers consist of a set of filters of a certain height and width, while the pooling layers have the task of reducing the dimension of the input. Typically, the number of filters in each convolutional layer increases while the dimensionality of the processed data decreases. Because the performance of a model typically increases with increasing depth, we add two additional stages to the model proposed by Udacity.
因此,在完全连接的“密集”层产生输出之前,我们有一个输入层供图像数据输入,总共有三对卷积层和池化层。 卷积层由一组具有一定高度和宽度的过滤器组成,而合并层的任务是减小输入的尺寸。 通常,每个卷积层中的过滤器数量增加,而处理数据的维数减少。 由于模型的性能通常会随着深度的增加而增加,因此我们向Udacity提出的模型增加了两个额外的阶段。
The source code for creating our model with the Keras library looks like this:
使用Keras库创建模型的源代码如下所示:
Before producing an output we insert an additional dropout layer which randomly deactivates some of the neurons. The use of dropout layers is a common regularisation method to prevent overfitting of the training data.
在产生输出之前,我们插入一个附加的滤除层,该滤除层会随机禁用一些神经元。 辍学层的使用是一种常见的正则化方法,可以防止训练数据过度拟合。
Finally, our first model looks like in the following graph:
最后,我们的第一个模型如下图所示:
Let’s now train our model by running our training set through our network 30 times:
现在,让我们通过网络运行30次训练集来训练模型:
Let’s take a look at the progress our training made in each epoch:
让我们来看看我们的训练在每个时代取得的进展:
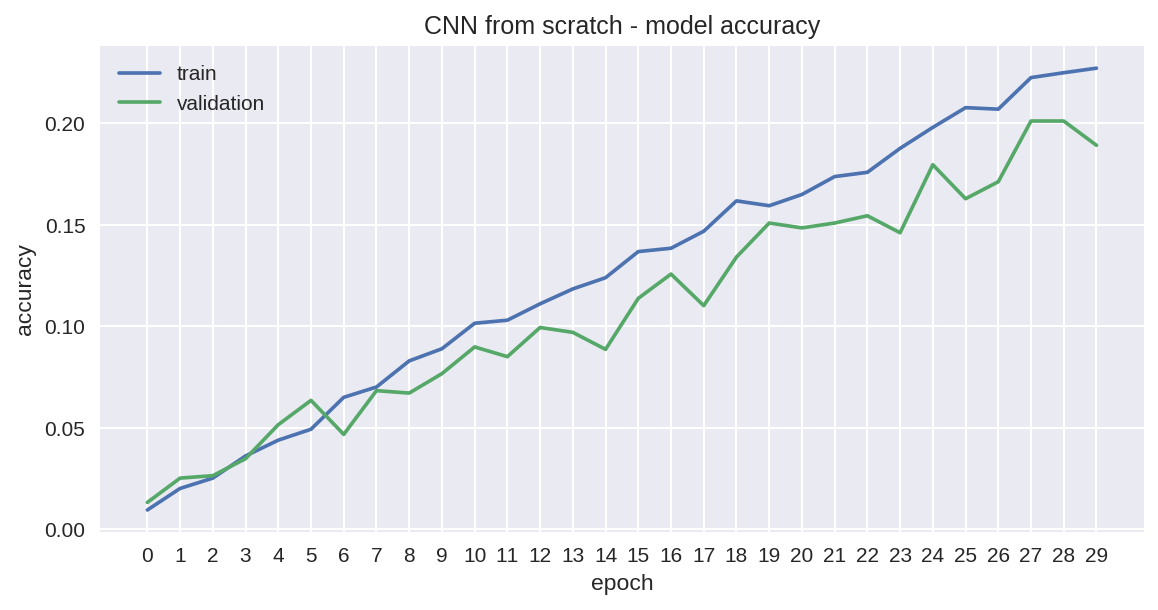
We can see an almost linear increase in accuracy, and by the end of the training we obtain roughly 23 % with our training set with rather moderate overfitting effects, meaning the accuracy for our validation set is clearly lagging behind but not that much. Our additional test with the test data gives an accuracy of 16.5 %.
我们可以看到准确性几乎呈线性增长,到训练结束时,我们的训练集获得了大约23%的效果,并且具有相当适度的过拟合效果,这意味着我们的验证集的准确性显然落后了,但没有那么多。 我们的附加测试以及测试数据得出的准确度为16.5%。
Not bad, but certainly not accurate enough for a serious application, so let’s see if we can do any better.
还不错,但是对于一个严肃的应用程序肯定不够准确,所以让我们看看我们是否可以做得更好。
Second try with AlexNet
第二次尝试与AlexNet
Now we’re going to try again with a true classic in the world of CNN models. AlexNet is a CNN model that outclassed its competitors in the 2012 ImageNet Large Scale Visual Recognition Challenge and introduced some groundbreaking new concepts, such as the ReLU activation function and the use of dropout layers to prevent overfitting. The general structure of the model is as follows:
现在,我们将在CNN模型的世界中再次尝试真正的经典。 AlexNet是一种CNN模型,在2012年ImageNet大规模视觉识别挑战赛中超越了竞争对手,并引入了一些具有开创性的新概念,例如ReLU激活功能和使用辍学层来防止过度拟合。 该模型的一般结构如下:

Let’s implement an AlexNet model with the Keras library:
让我们用Keras库实现一个AlexNet模型:
As in the first attempt, we run our training data 30 times through our network and achieve the following progress.
与第一次尝试一样,我们通过网络运行了30次训练数据,并取得了以下进展。
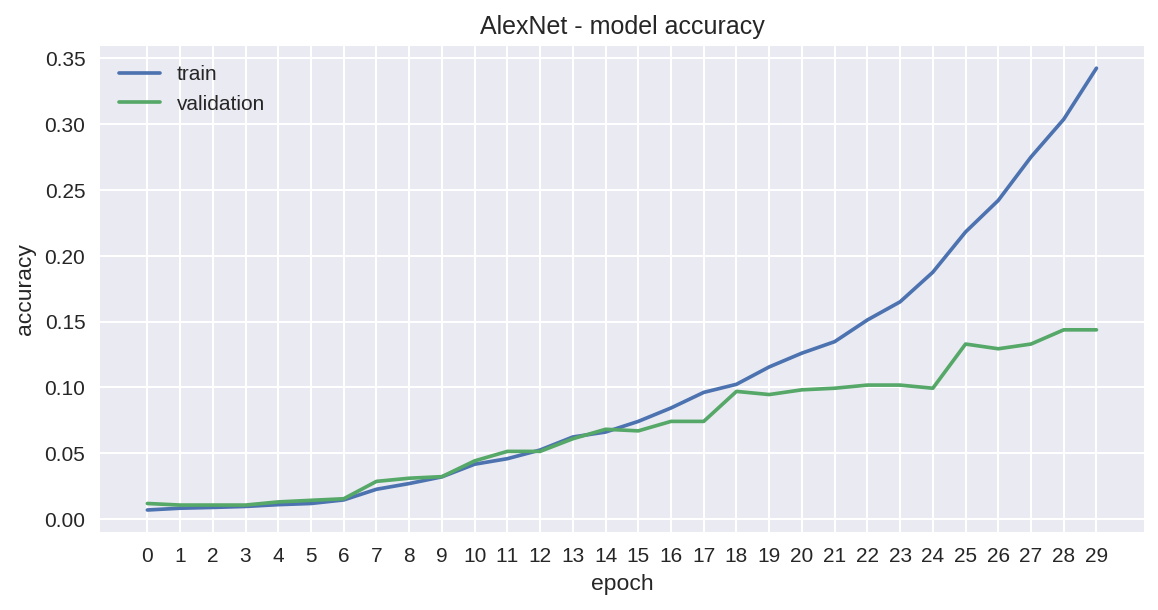
So, wow, the accuracy of the training set is literally shooting upwards toward the end beating the results from our first attempt, but, oh dear, what is happening with the validation curve??? We are clearly dealing with an overfitting problem.
所以,哇,训练集的准确性从头到尾都在不断上升,超过了我们第一次尝试的结果,但是,亲爱的,验证曲线发生了什么? 显然,我们正在解决过度拟合的问题。
3rd try. Tackling overfitting with data augmentation
第三次尝试。 通过数据增强解决过度拟合
In addition to using dropout layers, we can use another popular method to get our problem under control. Data augmentation is a a technique to increase the diversity of the training set by applying random transformations such as image rotation, image shifting, varying image brightness and image flipping. So let’s try this method in our next attempt:
除了使用辍学层之外,我们还可以使用另一种流行的方法来控制问题。 数据增强是一种通过应用随机变换(例如图像旋转,图像移位,变化的图像亮度和图像翻转)来增加训练集的多样性的技术。 因此,让我们在下一次尝试中尝试此方法:
Ok, and now let’s check the progress history:
好的,现在让我们检查进度历史记录:
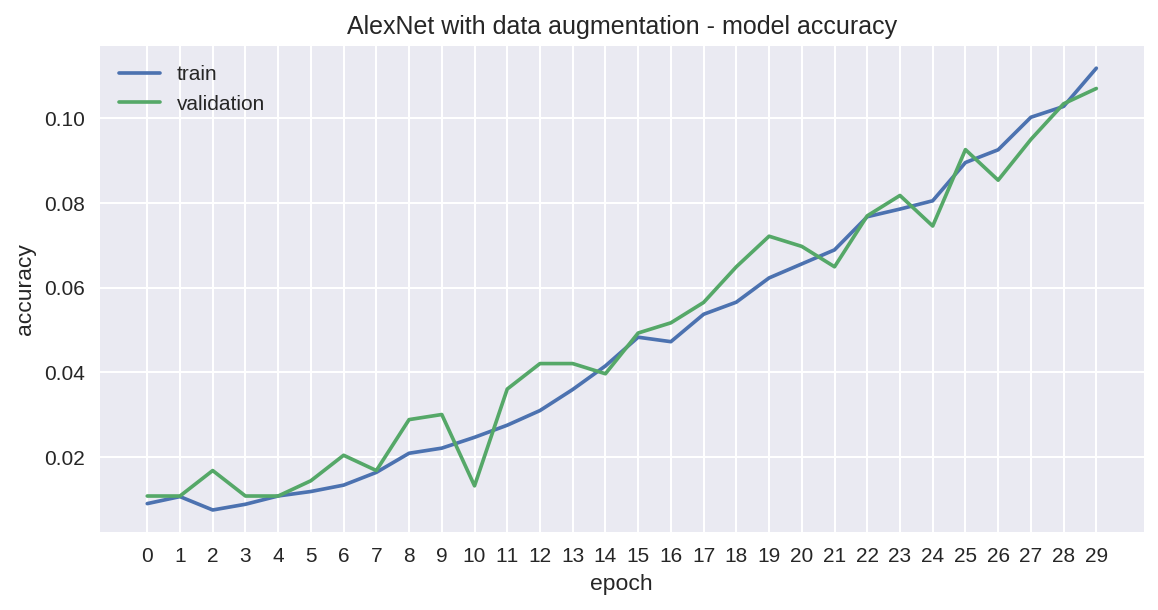
Yep, that looks much better now, even if avoiding the overfitting issue was clearly at the expense of the accuracy levels, so that we only achieve 10.9 % with our test dataset. But if we compare the trajectory of the two graphs from our first and third attempt, AlexNet seems to have a steeper curve and could soon overtake the model from our first try in additional epochs.
是的,现在看起来好多了,即使避免过度拟合问题显然是以准确性水平为代价的,因此我们的测试数据集仅达到10.9%。 但是,如果我们从第一次和第三次尝试中比较两个图形的轨迹,AlexNet似乎会出现一条陡峭的曲线,并且可能很快会在其他时期超过我们第一次尝试的模型。
But all in all, the approach using a CNN model, that we build from scratch, seems to be quite complex, tedious and time-consuming, which requires a lot of patience and a lot of computing power. So, let’s look at a better method in the next step.
但总而言之,我们从头开始构建的使用CNN模型的方法似乎非常复杂,繁琐且耗时,需要大量的耐心和大量的计算能力。 因此,让我们在下一步中看一个更好的方法。
步骤4:使用CNN对狗的品种进行分类(使用转移学习) (Step 4: Use a CNN to Classify Dog Breeds (using Transfer Learning))
The general idea behind transfer learning is the fact that it is much easier to teach specialized skills to a subject that already has basic knowledge in the specific domain. There are a lot of neural network models out there that already specialize in image recognition and have been trained on a huge amount of data. Our strategy now is to take advantage of such pre-trained networks and our plan can be outlined as follows:
转移学习背后的总体思想是,向已经在特定领域具有基础知识的学科教授专业技能要容易得多。 现在有很多神经网络模型已经专门研究图像识别,并且已经对大量数据进行了训练。 我们现在的策略是利用这种经过预先训练的网络,我们的计划可以概括如下:
- find a network model pre-trained for a general image classification task 查找针对一般图像分类任务进行预训练的网络模型
- load the model with the pre-trained weights用预先训练的权重加载模型
- drop the “top of the model”, i. e. the section with the fully connected layers, because the specific task of a model is generally defined by this part of the network删除“模型顶部”(即具有完全连接的层的部分),因为模型的特定任务通常由网络的这一部分定义
run the new data through the convolutional part of the pre-trained model. (this is also called feature extraction and the output of this step is also called bottleneck features.)
通过预训练模型的卷积部分运行新数据。 (这也称为要素提取,此步骤的输出也称为瓶颈要素。)
create a new network to define the specific task at hand and train it with the output (the bottleneck features) of the previous step.
创建一个新网络来定义手头的特定任务,并将其与上一步的输出(瓶颈功能)一起训练。
As we will see in a moment, the structure of the model into which we stuff the bottleneck features can usually be quite simple because a large part of the training work has already been done by the pre-trained model. In step 4 of this project Udacity is providing some kind of blueprint for this strategy by having already fed our images dataset into a pre-trained VGG16 model (another classic in the field of CNN models for image classification) and making available the output as bottleneck features, which we can now feed into a very simple training network that essentially consists of just one global average pooling layer and a final dense output layer.
正如我们稍后将看到的那样,我们将瓶颈特征填充到其中的模型的结构通常可以非常简单,因为大部分训练工作已经由预训练的模型完成。 在该项目的第4步中,Udacity通过将我们的图像数据集输入到经过预先训练的VGG16模型(CNN模型领域中用于图像分类的另一种经典方法)并将输出作为瓶颈来提供这种策略的蓝图功能,我们现在可以将其引入一个非常简单的训练网络,该网络实际上仅由一个全局平均池化层和最后一个密集输出层组成。
The following source code loads the bottleneck features, defines the top layers for our specific classification task, and trains these new layers with the bottleneck features:
以下源代码加载了瓶颈功能,为我们的特定分类任务定义了顶层,并使用瓶颈功能训练了这些新层:
Again, let’s take a look at the progress history:
再次,让我们看一下进度历史记录:
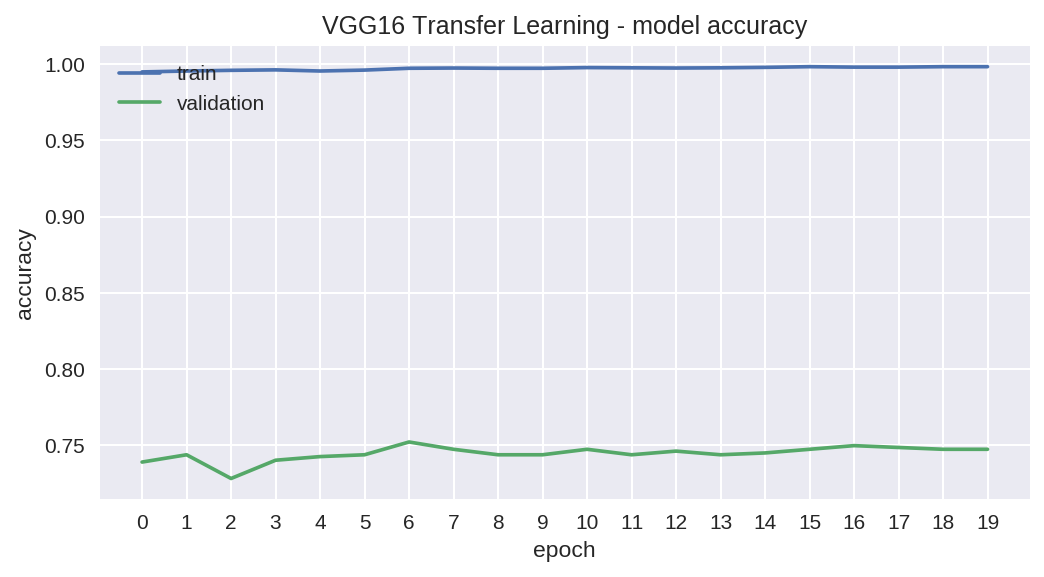
Apart from the rapid training speed we observe a remarkable performance in terms of accuracy and achieve about 75 % with our test data, albeit at the expense of an obvious overfitting problem.
除了快速的训练速度外,我们还观察到了卓越的准确性,并通过我们的测试数据获得了大约75%的成绩,尽管这是以明显的过度拟合问题为代价的。
第5步:创建CNN对狗的品种进行分类(使用转移学习) (Step 5: Create a CNN to Classify Dog Breeds (using Transfer Learning))
We will now take step 4 as a template and define our own CNN using transfer learning. We choose InceptionV3 as the network that should provide us with the features for our training layers. Inception is another high performing model on the ImageNet dataset and its power lies in the fact that the network could be designed much deeper than other models by introducing subnetworks called inception modules.
现在,我们将步骤4作为模板,并使用转移学习定义自己的CNN。 我们选择InceptionV3作为应为我们的培训层提供功能的网络。 Inception是ImageNet数据集上的另一个高性能模型,其强大之处在于,通过引入称为Inception模块的子网,可以比其他模型更深入地设计网络。
The source code looks quite similar to the one from step 4:
源代码看起来与步骤4中的代码非常相似:
To prevent the overfitting issues we observed in step 4, we inserted an additional dropout layer and added batch normalization before the output layer.
为了防止我们在步骤4中观察到的过拟合问题,我们在输出层之前插入了一个附加的辍学层,并添加了批量归一化。
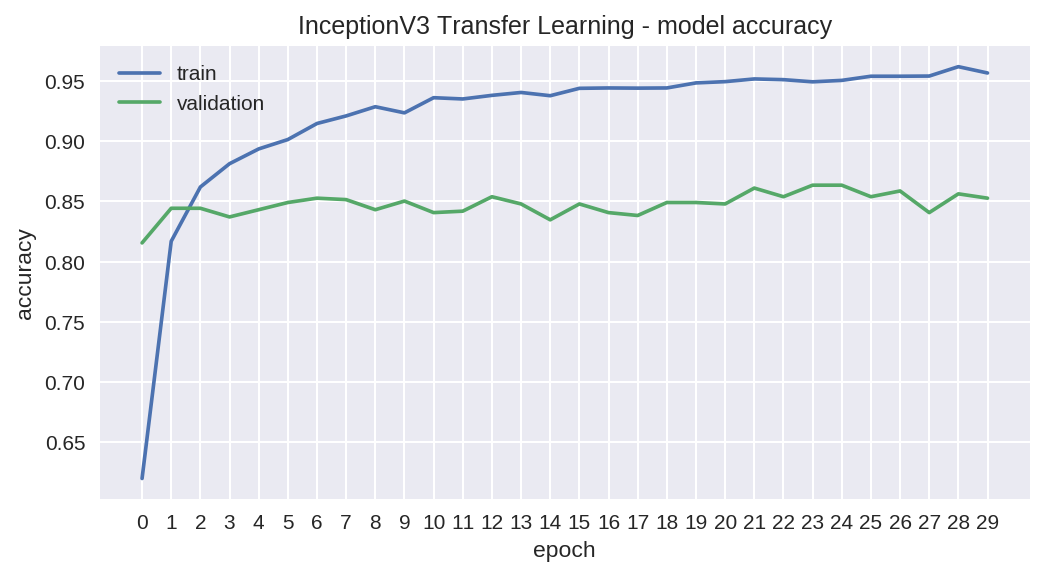
As we can see from the progress history, we still have some overfitting problems, but we also notice another improvement of accuracy. We achieve 83 % accuracy with our test data.
从进度历史记录中可以看出,我们仍然存在一些过拟合的问题,但是我们还注意到了准确性的另一个改进。 我们的测试数据可达到83%的准确度。
To make our model even better, we could consider the following options:
为了使我们的模型更好,我们可以考虑以下选项:
- using data augmentation to prevent overfitting 使用数据扩充来防止过度拟合
- adding layers to our simple training model在我们的简单训练模型中增加层次
- getting more training data获得更多训练数据
But for now, we are quite satisfied with the results from our latest attempt and use them in the algorithm we are going to write and test in the following steps.
但是就目前而言,我们对最新尝试的结果感到非常满意,并将其用于将在以下步骤中编写和测试的算法中。
第6步:编写算法 (Step 6: Write your Algorithm)
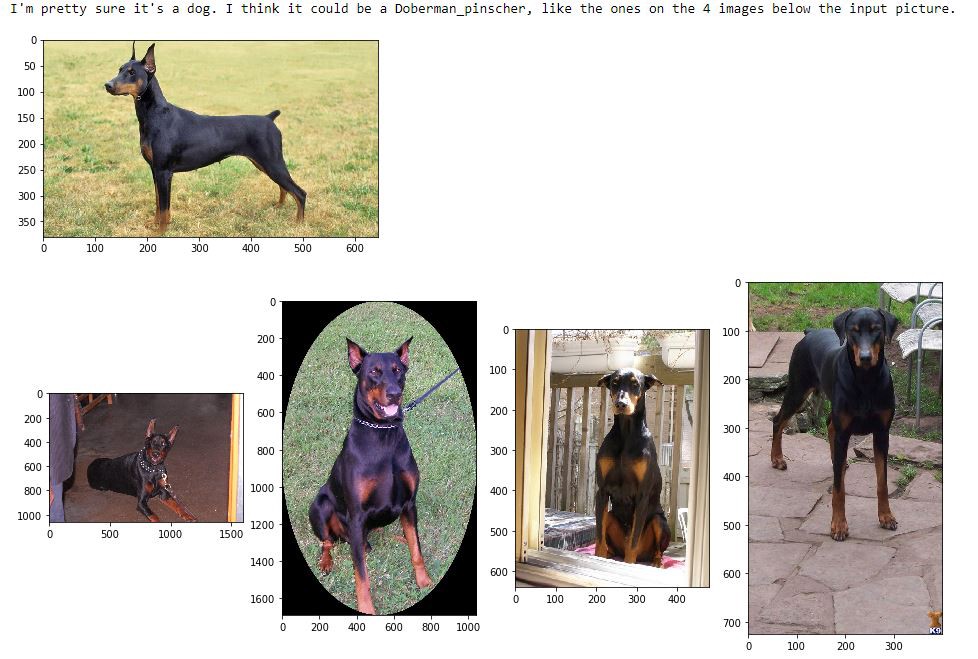
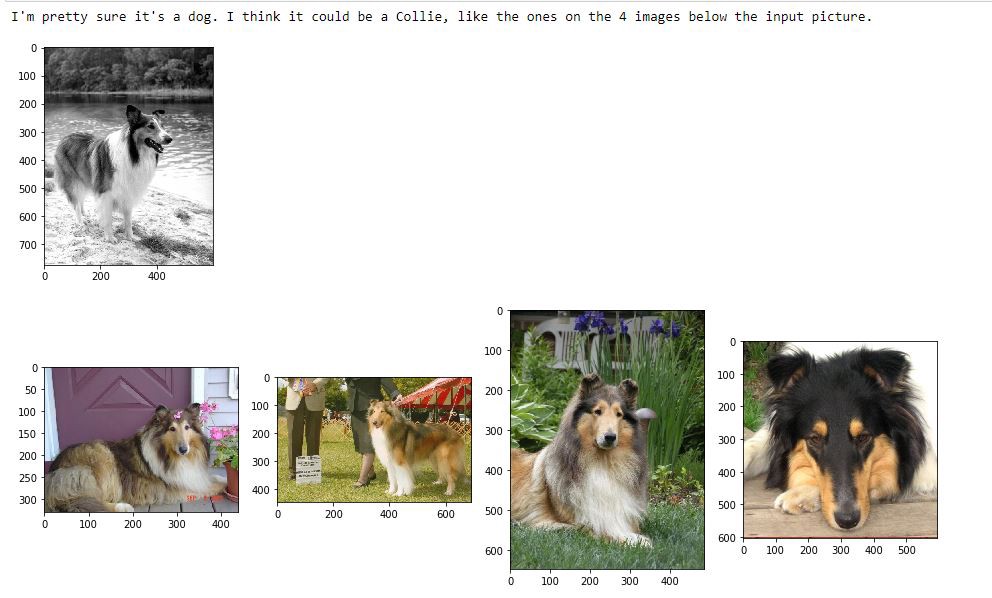
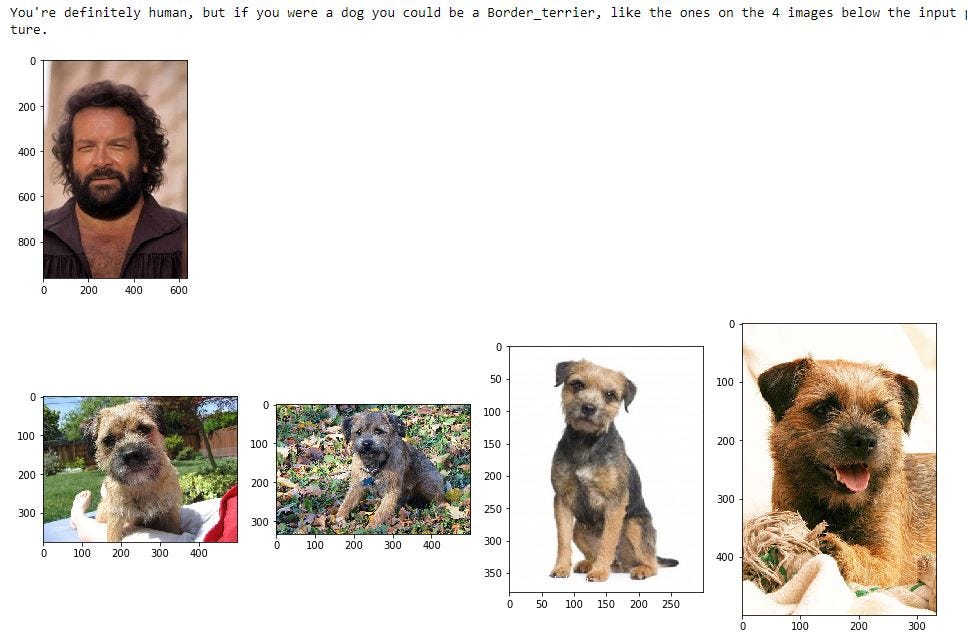
So, let’s now collect the achievements and findings from the previous steps and write an algorithm that takes an image of a dog or a human und spits out a dog breed along with 4 sample images of the specific breed.
因此,让我们现在收集前面步骤中的成就和发现,并编写一种算法,该算法可以拍摄狗或人的图像,然后吐出狗的品种以及特定品种的4个样本图像。
步骤7:测试算法 (Step 7: Test your Algorithm)
Finally, let’s test our algorithm with a few test images.
最后,让我们用一些测试图像来测试我们的算法。
Conclusion
结论
In this project we developed several approaches for the development of an app for the identification of dog breeds, and we achieved our best results with the application of a transfer learning model. We obtained an accuracy of 83% in our tests. We also learned how to build convolution networks from scratch, which was a very educational undertaking, even though we soon realized that there are significantly more promising methods, particularly with the application of transfer learning.
在该项目中,我们开发了几种方法来开发用于识别犬种的应用程序,并且通过使用转移学习模型获得了最佳结果。 我们在测试中获得了83%的准确性。 我们还学会了如何从头开始构建卷积网络,这是一项非常具有教育意义的工作,尽管我们很快意识到,存在着很多更有前途的方法,尤其是在转移学习的应用中。
However, we still see several options to further improve our algorithm in the future:
但是,我们仍然看到未来可以进一步改进算法的几种选择:
- We could gather more training data. 我们可以收集更多的训练数据。
- We could employ data augmentation to prevent overfitting. 我们可以采用数据扩充来防止过度拟合。
- We could add more layers to make our model more complex and hopefully more powerful. 我们可以添加更多的层来使我们的模型更复杂,并且希望更强大。
- We could extend our training time and add more epochs to the training. 我们可以延长培训时间,并为培训增加更多的时期。
But all in all, the accuracy levels from our tests, along with the tests with specific sample images, suggest that we already have a serious model we could work with in a real app.
但是总而言之,我们的测试以及特定样本图像的测试的准确性水平表明,我们已经有了一个可以在实际应用中使用的严肃模型。
The source code for this project was written in Python in a Jupyter Notebook and is making use of the popular deep learning libraries TensorFlow and Keras. You can find it in the corresponding github repository.
该项目的源代码是用Jupyter Notebook中的Python编写的,并利用了流行的深度学习库TensorFlow和Keras 。 您可以在相应的github存储库中找到它。
Some of the source code has been provided by Udacity in this repository.
Udacity在此存储库中提供了一些源代码。
翻译自: https://medium.com/@normannexo/dog-breed-classification-using-deep-learning-concepts-23213d67936c
深度学习的基本概念概念


 被折叠的 条评论
为什么被折叠?
被折叠的 条评论
为什么被折叠?
 到【灌水乐园】发言


