


 本文介绍了如何利用AWS CloudFront为Web应用程序提供额外的安全层。通过引用外部资源,详细探讨了CloudFront在保护网站免受攻击和提高性能方面的作用。
cloudfront
Cybersecurity is a hot topic now. If you search on Google about how to protect your website, you may find many buzzwords, IDS, IPS, WAF, DDoS, Proxy, you name it. You may think protecting your website is difficult and expensive and it is worthless to invest in security if your website is not critical.
网络安全是当今的热门话题。 如果您在Google上搜索有关如何保护自己的网站的信息,则可能会找到许多流行词,IDS,IPS,WAF,DDoS,代理。 您可能会认为保护您的网站既困难又昂贵,如果您的网站不重要,那么在安全性上进行投资是毫无价值的。
网络攻击比您想象的更普遍 (Cyberattack is more common than you think)
A human hacker may not bother sneaking into your website and change the headline of your homepage. But in most cases, your website would be hacked by a bot which constantly guessing your login password. They can even inject code redirecting your customers to some malicious websites. The frequency of these hacks and the impact on your business are much higher than you think.
骇客可能不会费心潜入您的网站并更改首页标题。 但是在大多数情况下,您的网站会遭到不断不断猜测您的登录密码的漫游器的攻击。 他们甚至可以注入代码将您的客户重定向到某些恶意网站。 这些黑客攻击的频率及其对您业务的影响比您想象的要高得多。
使用Amazon CloudFront保护您的网站 (Using Amazon CloudFront to protect your website)
Amazon CloudFront is a CDN service which allows us to delivers web content through the AWS network. By doing so, we can lower the traffic to the server as CloudFront will cache the content. We can also hide the webserver and prevent it from direct attack.
Amazon CloudFront是一项CDN服务,使我们能够通过AWS网络交付Web内容。 这样,由于CloudFront将缓存内容,因此我们可以降低到服务器的流量。 我们还可以隐藏Web服务器并防止其受到直接攻击。
We don’t have to place the server in AWS to use CloudFront. In this article, I am going to walk you through on how to set up CloudFront as a reverse proxy to your existing website.
我们不必将服务器放置在AWS中即可使用CloudFront。 在本文中,我将引导您逐步了解如何将CloudFront设置为现有网站的反向代理。
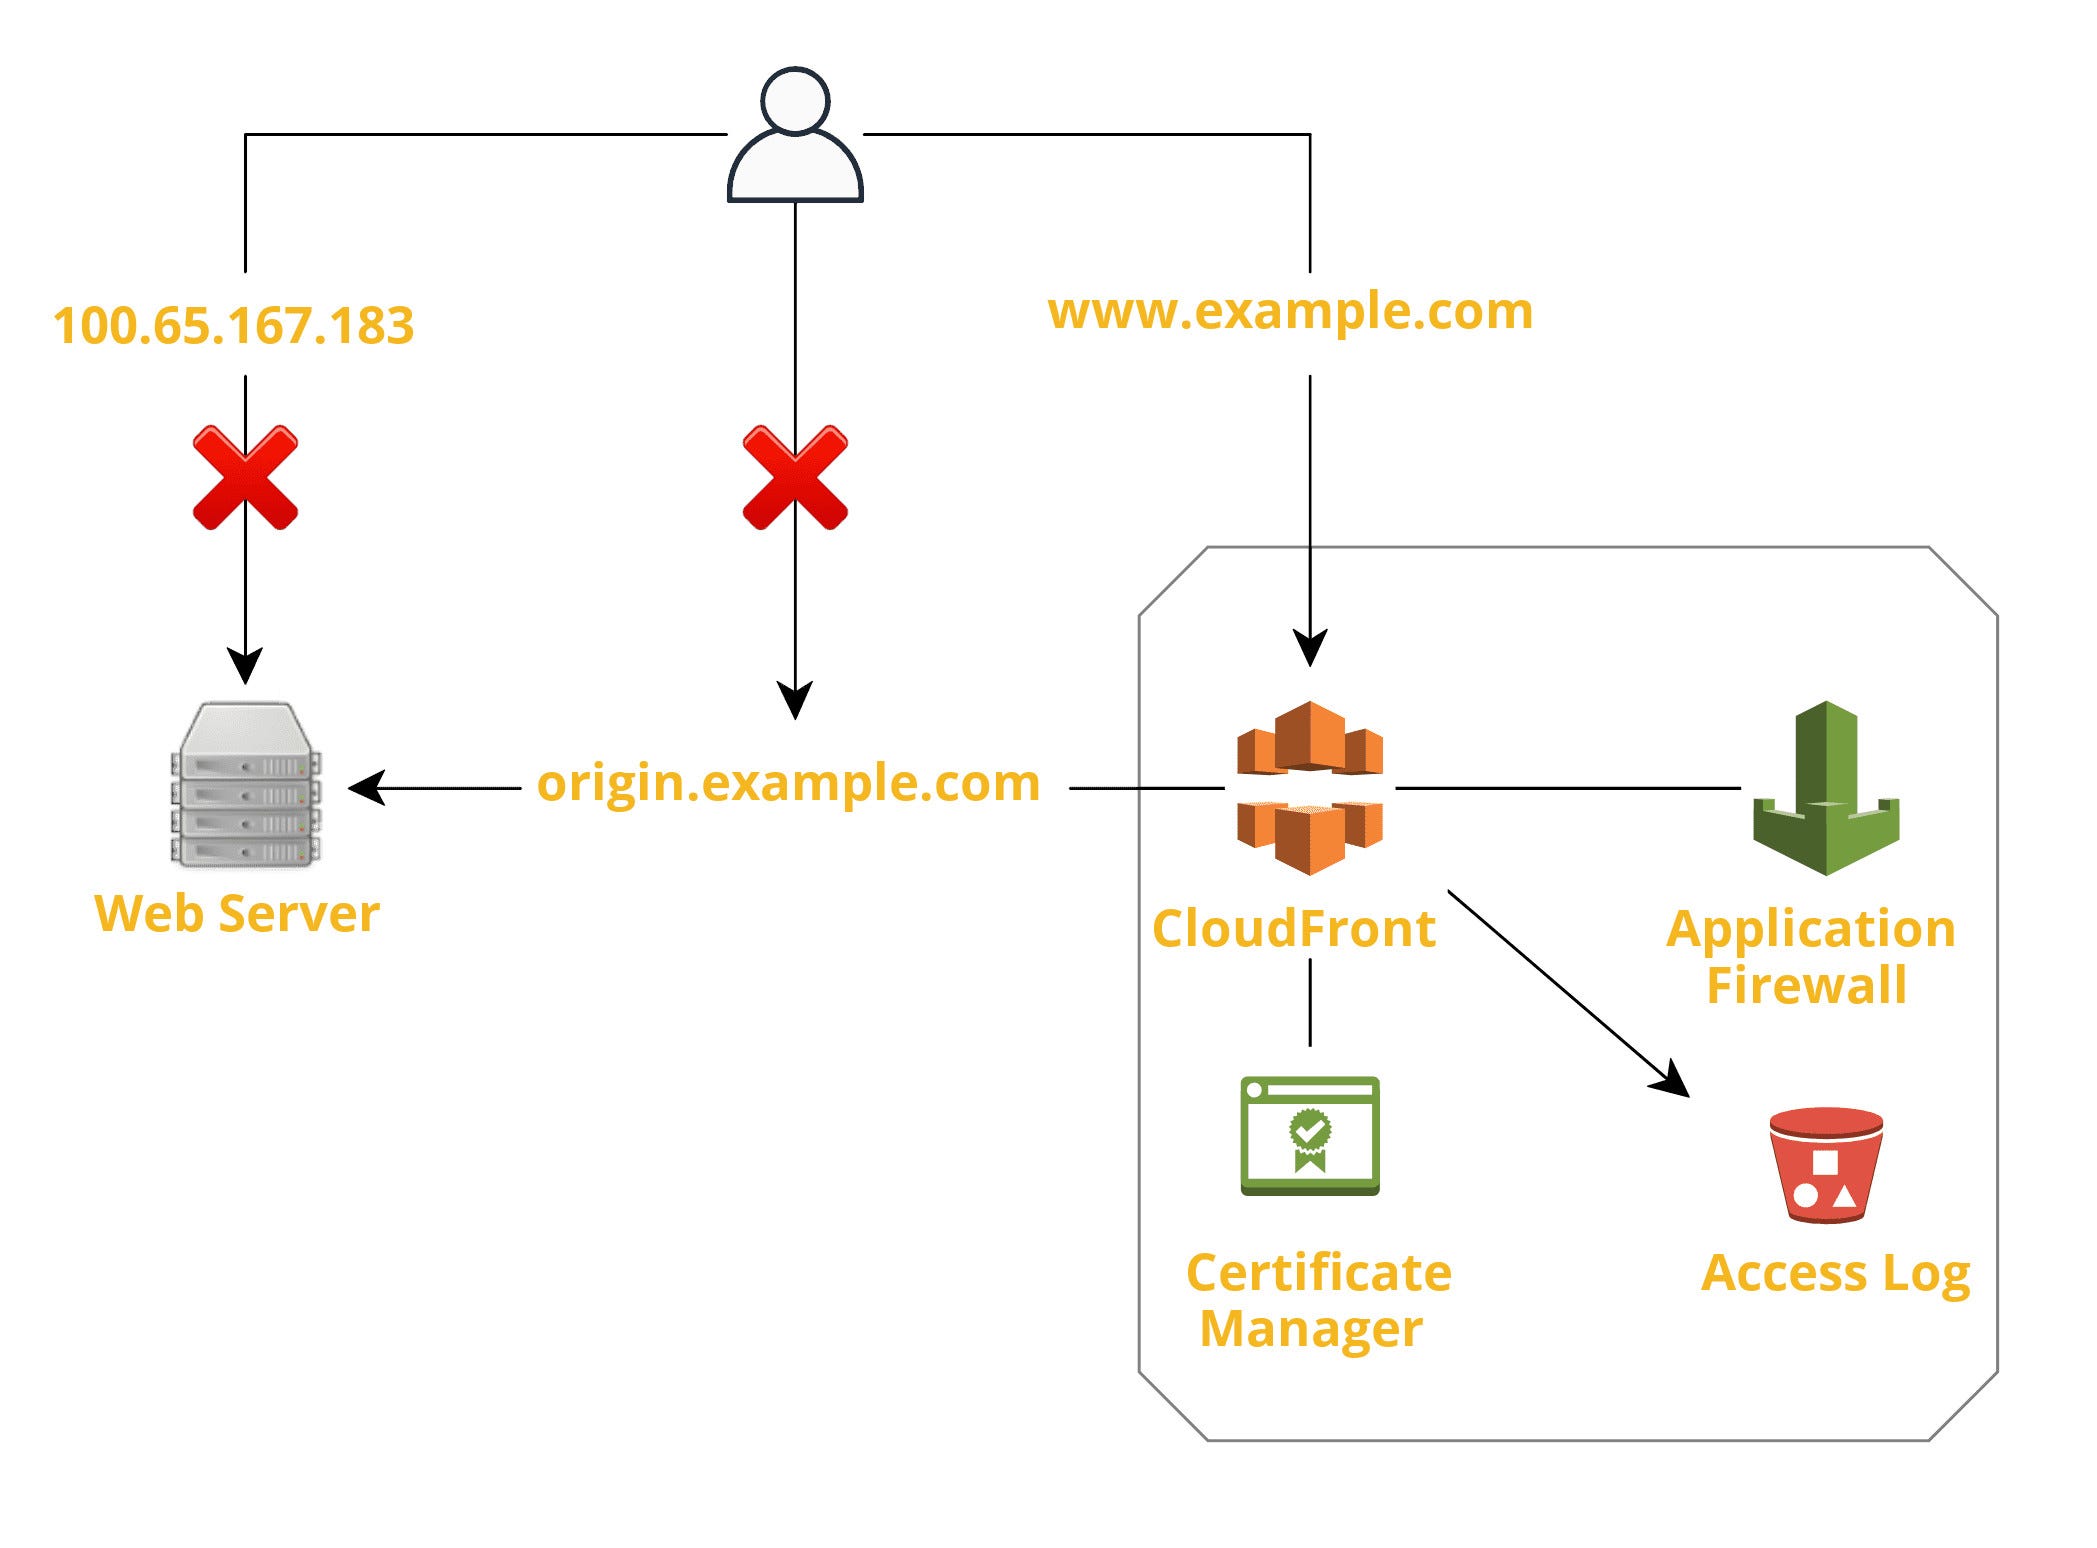
In my architecture, I made several changes to force web traffic go through CloudFront:
在我的架构中,我进行了一些更改以强制Web流量通过CloudFront:
- Create a new DNS record (Origin sub-domain) pointing to my server IP 创建一个指向我的服务器IP的新DNS记录(Origin子域)
- Create a CloudFront distribution pointing to the origin sub-domain 创建一个指向原始子域的CloudFront分布
- Change the existing DNS record (Public sub-domain) to the CloudFront distribution 将现有的DNS记录(公共子域)更改为CloudFront分配
- Block all traffic through the origin sub-domain or the server IP, except those from CloudFront 阻止通过原始子域或服务器IP的所有流量,但来自CloudFront的流量除外
By using CloudFront, we can enable many security features:
通过使用CloudFront,我们可以启用许多安全功能:
- CloudFront protects the website from DDoS attacks. CloudFront可以保护网站免受DDoS攻击。
- AWS Certificate Manager provision SSL certificate for HTTPS connections. AWS Certificate Manager为HTTPS连接提供SSL证书。
- AWS WAF block traffic from malicious IP or common OWASP attacks. AWS WAF阻止来自恶意IP或常见OWASP攻击的流量。
- S3 can store the access log, allow us to analyse web traffic or root-cause incidents. S3可以存储访问日志,使我们能够分析Web流量或根本原因事件。
Most of the setup is so common that there are many tutorials we can find elsewhere. My focus will be on how to do the DNS routing.
大多数设置都很常见,因此我们可以在其他地方找到许多教程。 我的重点是如何进行DNS路由。
交通路线 (Traffic routing)
DNS记录集 (DNS record sets)
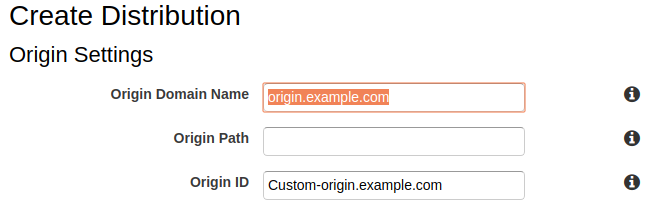
Because CloudFront doesn’t allow IP address as origin, we have to create a new DNS record to direct CloudFront traffic towards the IP address of the server. It can be anything we want, even in a different domain name, but it should be different from the one that normal visitors use (I use origin.example.com in this example).
由于CloudFront不允许IP地址作为来源,因此我们必须创建一个新的DNS记录,以将CloudFront流量引向服务器的IP地址。 它可以是我们想要的任何内容,即使使用不同的域名也可以,但是它应该不同于普通访问者使用的名称(在此示例中,我使用origin.example.com )。
We then use the origin sub-domain to create a CloudFront distribution. After it has been created, we can see the domain name for that distribution xxxxxxxxxxxxxx.cloudfront.net.
然后,我们使用Origin子域创建CloudFront分配。 创建完毕后,我们可以看到该发行版的域名xxxxxxxxxxxxxx.cloudfront.net 。

Now, we can change the target of the existing public sub-domain to the CloudFront domain name.
现在,我们可以将现有公共子域的目标更改为CloudFront域名。

Because the CloudFront endpoint is not an IP address, we should use a CNAME record. If you want to use root domain, you may consider moving your nameserver to those support CNAME flattening (e.g. Cloudflare). We may also use Route53 as nameserver and use its alias feature to point the root domain to CloudFront.
因为CloudFront端点不是IP地址,所以我们应该使用CNAME记录。 如果要使用根域,则可以考虑将域名服务器移至支持CNAME拼合的服务器(例如Cloudflare)。 我们还可以将Route53用作名称服务器,并使用其别名功能将根域指向CloudFront。


避免重定向循环 (Avoid redirect loop)
Now, our web server is receiving traffic through the origin sub-domain. If the web app is host-sensitive, it won’t work. The most common case would be redirections.
现在,我们的Web服务器正在通过源子域接收流量。 如果该Web应用程序对主机敏感,则它将无法正常工作。 最常见的情况是重定向。
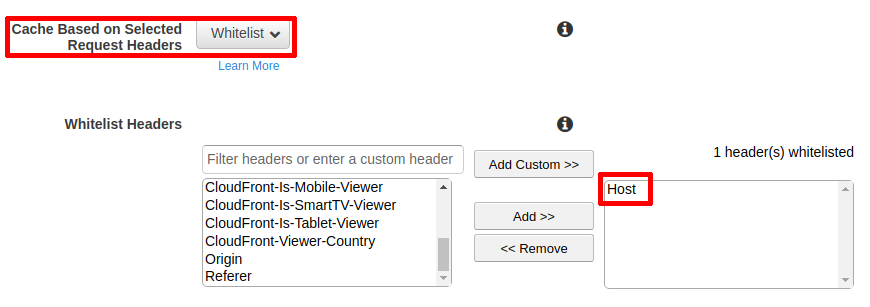
If the web app detects hostname of incoming traffic and redirects users to the correct one (e.g. redirecting origin.example.com to www.example.com), the redirection will never end (server receives traffic from origin.example.com> user redirected to www.example.com> CloudFront relay traffic to origin.example.com > back to the beginning)
如果Web应用程序检测到传入流量的主机名并将用户重定向到正确的主机名(例如,将origin.example.com重定向到www.example.com ),则重定向将永远不会结束(服务器从origin.example.com >用户重定向接收到流量)到www.example.com > CloudFront将流量中继到origin.example.com >回到开头)
To avoid these situations, we need to pass the Host header to the server. We can do this by adding Host into header whitelist of the CloudFront distribution.
为了避免这些情况,我们需要将Host标头传递给服务器。 我们可以通过将Host添加到CloudFront发行版的标头白名单中来实现。
Another common situation is that your web app redirects HTTP traffic to HTTPS. Because CloudFront can change the protocol between viewer and origin, it may end up in a redirect loop like the previous case.
另一个常见情况是您的Web应用将HTTP通信重定向到HTTPS。 因为CloudFront可以更改查看器和源之间的协议,所以它可能会像前面的情况一样以重定向循环结尾。
To tackle this issue, we have 2 choices:
为了解决这个问题,我们有2种选择:
1. Provision HTTPS on the webserver
1.在Web服务器上配置HTTPS
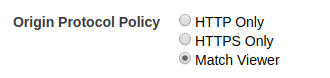
If you have a 3rd party signed SSL certificate for the origin sub-domain, you can provision it on the server and accept HTTPS traffic from CloudFront. We also need to choose Match Viewer for Origin Protocol Policy option in the CloudFront distribution.
如果您具有针对原始子域的第三方签名的SSL证书,则可以在服务器上进行配置,并接受来自CloudFront的HTTPS通信。 我们还需要在CloudFront分配中选择“ Match Viewer for Origin Protocol Policy”选项。
2. Disable HTTP to HTTPS redirection
2.禁用HTTP到HTTPS重定向
If you don’t have an SSL certificate or if you cannot set up HTTPS on the server, we should choose HTTP Only for Origin Protocol Policy, so that CloudFront will only send traffic to the server using HTTP.
如果您没有SSL证书,或者无法在服务器上设置HTTPS,则应为“ 源协议策略”选择“ 仅HTTP ” ,以便CloudFront仅使用HTTP将流量发送到服务器。
The next step is to disable the HTTPS redirection feature of the web app. This can be difficult as different apps have different approaches.
下一步是禁用Web应用程序的HTTPS重定向功能。 这可能很困难,因为不同的应用程序具有不同的方法。
For WordPress (Yes, many insecure websites on the Internet is using WordPress), we can add the following at the beginning of wp-config.php
对于WordPress(是的,互联网上许多不安全的网站都在使用WordPress),我们可以在wp-config.php的开头添加以下内容
$_SERVER['HTTPS']='on';This code fake WordPress to think that the incoming traffic is using HTTPS, and thus won’t trigger the redirection.
这段代码伪造 WordPress,认为传入流量正在使用HTTPS,因此不会触发重定向。
If you are using Apache Server, your web app may do the HTTPS redirection through rewrite rule. The most common methods are usingRewriteCondto detect if the incoming traffic is using HTTPS or using port 443. Find for the following keywords and disable the rewrite rules:
如果您使用的是Apache服务器,则您的Web应用可以通过重写规则进行HTTPS重定向。 最常见的方法是使用RewriteCond来检测传入的流量是使用HTTPS还是使用端口443。查找以下关键字并禁用重写规则:
RewriteCond %{SERVER_PORT} 80
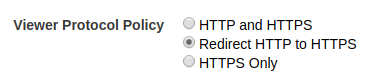
RewriteCond %{HTTPS} !=onIf we use this method, the server cannot distinguish whether the user is using HTTP or HTTPS. I would suggest choosing Redirect HTTP to HTTPS for Viewer Protocol Policy in the CloudFront distribution setting. So that we can assume every request from our user is using HTTPS.
如果使用此方法,服务器将无法区分用户使用的是HTTP还是HTTPS。 我建议在CloudFront分配设置中为“ 查看器协议策略”选择“ 将HTTP重定向到HTTPS ” 。 这样我们就可以假设来自用户的每个请求都使用HTTPS。
Although using HTTP between CloudFront and the webserver is not secure, it is less likely the hackers can intercept these traffic compare to the traffic between users and the webserver.
尽管在CloudFront和Web服务器之间使用HTTP是不安全的,但与用户和Web服务器之间的流量相比,黑客拦截这些流量的可能性较小。
阻止直接访问 (Blocking direct access)
Now, we have secured the CloudFront endpoint. But hackers can easily circumvent by directly accessing the origin sub-domain or even the server’s IP address. We need to block those traffic but allow traffic from CloudFront only.
现在,我们已经保护了CloudFront端点。 但是,黑客可以通过直接访问源子域甚至服务器的IP地址来轻松规避。 我们需要阻止这些流量,但仅允许来自CloudFront的流量。
IP白名单 (IP Whitelist)
CloudFront uses a set of IP to send traffic to origins, Amazon publishes those IP ranges in this file: https://ip-ranges.amazonaws.com/ip-ranges.json.
CloudFront使用一组IP将流量发送到源,Amazon在这些文件中发布这些IP范围:https://ip-ranges.amazonaws.com/ip-ranges.json。
The list contains many different services, but we are interested in CloudFront only. The following bash script helps us filter them out:
该列表包含许多不同的服务,但是我们仅对CloudFront感兴趣。 以下bash脚本可帮助我们过滤掉它们:
curl https://ip-ranges.amazonaws.com/ip-ranges.json 2>/dev/null | jq -r '.prefixes[] | select(.service == "CLOUDFRONT") | .ip_prefix'We will get a list like this:
我们将获得如下列表:
144.220.0.0/16
52.124.128.0/17
54.230.0.0/16
54.239.128.0/18
52.82.128.0/19
99.84.0.0/16
.....
The next step is to deny all traffic except those IP prefixes. For Apache Server, we can do this by adding the following block in the site config
下一步是拒绝除那些IP前缀之外的所有流量。 对于Apache Server,我们可以通过在站点配置中添加以下代码块来实现
<Directory "<webroot_path>">
    Order Deny,Allow
    Deny from all
    Allow from 144.220.0.0/16
    Allow from 52.124.128.0/17
    Allow from 54.230.0.0/16
    Allow from 54.239.128.0/18
    Allow from 52.82.128.0/19
    Allow from 99.84.0.0/16
    ...
</Directory>
We need to add the ServerName directive in the existing VirtualHost and add a fallback VirtualHost pointing to an empty page
我们需要在现有VirtualHost添加ServerName指令,并添加指向空页的后备VirtualHost
<VirtualHost *:80>
    DocumentRoot "<empty_webroot_path>"
</VirtualHost><VirtualHost *:80>
    ServerName www.example.com
    DocumentRoot "<real_webroot_path>"
</VirtualHost>
After the setup, our website can be accessed through CloudFront with the correct domain name (www.example.com) only.
设置完成后,只能使用正确的域名(www.example.com)通过CloudFront访问我们的网站。
If hackers want to access our website directly, they have to know the origin sub-domain or server IP, realising we allow CloudFront traffic only, then provision their CloudFront distribution, access that distribution and fake the Host HTTP header. Although it’s doable, we still significantly raise the bar to attack our website.
如果黑客想要直接访问我们的网站,他们必须知道源子域或服务器IP,意识到我们只允许CloudFront流量,然后提供他们的CloudFront分发,访问该分发并伪造Host HTTP标头。 尽管这是可行的,但我们仍然显着提高了攻击我们网站的标准。
成本 (Cost)
The services we use here are charged by usage, it is difficult to say how much exactly it cost, so just do an estimate
我们在这里使用的服务是按使用量收费的,很难说要多少钱,所以只做一个估算
CloudFront (CloudFront)
CloudFront charges per GB monthly usage. For endpoints in North America:Traffic from CloudFront to the internet: $0.085/GBTraffic from CloudFront to the webserver: $0.02/GBEvery 10,000 HTTP request: $0.0075Every 10,000 HTTPS request: $0.01
CloudFront每GB每月使用费收费。 对于北美的终端节点:从CloudFront到互联网的流量:$ 0.085 / GB从CloudFront到Web服务器的流量:$ 0.02 / GB每10,000个HTTP请求:$ 0.0075每10,000个HTTPS请求:$ 0.01
Assume we have a high traffic website with 10GB traffic and 100,000 HTTPS request per month, the cost of CloudFront would be: 10 X 0.085 + 10 X 0.02 + 10 X 0.01 = $1.15/month
假设我们有一个流量很高的网站,每月有10GB流量和100,000个HTTPS请求,则CloudFront的成本为:10 X 0.085 + 10 X 0.02 + 10 X 0.01 = $ 1.15 /月
The actual price would be lower as most of the static contents are cached in CloudFront, traffic to the webserver should be lower.
由于大多数静态内容都缓存在CloudFront中,因此实际价格会更低,到Web服务器的流量也应该更低。
S3 (S3)
In my architecture, we use S3 to store access logs. Although it is optional, I would still count it as logging is one of the best practices of security, I assume most of you will enable it.
在我的体系结构中,我们使用S3来存储访问日志。 尽管它是可选的,但我仍将其视为日志记录是安全性的最佳实践之一,我想大多数人都将启用它。
CloudFront logs are normally delivered every hour. And depending on the traffic volume, it may be split into several files. Let’s assume there are 200 files per hour and the size of each one is 500 bytes.
CloudFront日志通常每小时发送一次。 并且根据流量,它可能会分为几个文件。 假设每小时有200个文件,每个文件的大小为500字节。
Every hour, there would be 200 PUT request (No. of files to be stored), the request cost would be: $0.005 X 200/1000 = $0.001/hour, or $0.72/month
每小时将有200个PUT请求(要存储的文件数),请求成本为:$ 0.005 X 200/1000 = $ 0.001 /小时,或$ 0.72 /月
The total file size generated in a month would be 72MB, the cost for that would be: $0.023 X 72/1000 = $0.001656
一个月内生成的文件总大小为72MB,其成本为:$ 0.023 X 72/1000 = $ 0.001656
Assume we keep the logs for 2 years, at the end of the second year, we will have 72MB X 24 = 1.8GB of files. The storage cost for that month would be: $0.023 X 1.8 = $0.0414
假设我们将日志保留了2年,到第二年末,我们将拥有72MB X 24 = 1.8GB的文件。 该月的存储成本为:$ 0.023 X 1.8 = $ 0.0414
AWS WAF (AWS WAF)
Each Web ACL cost $5 per month, every 1 million requests cost $0.6. If we only use AWS provided ruleset, there will be no extra cost. Let’s assume our traffic doesn’t exceed 1 million per month, the cost would be: $5.6/month
每个Web ACL每月花费$ 5,每100万个请求的费用为$ 0.6。 如果我们仅使用AWS提供的规则集,则不会有任何额外费用。 假设我们的流量每月不超过100万,费用为:每月5.6美元
总计花费 (Total cost)
The total cost per month would be: $1.15 (CloudFront) + $0.72 (S3 request) + $0.0414 (S3 storage) + $5.6 (WAF) = $7.5114
每月的总成本为:1.15美元(CloudFront)+ 0.72美元(S3请求)+ 0.0414美元(S3存储)+ 5.6美元(WAF)= $ 7.5114
It’s just $7.5114, we can have content caching, DDoS protection, web access log storage and web application firewall. The most expensive service is WAF, if we opt-out this, the cost can be even lowered to just $1.9114/month.
只需$ 7.5114 ,我们就可以提供内容缓存,DDoS保护,Web访问日志存储和Web应用程序防火墙。 最昂贵的服务是WAF,如果我们选择退出,则成本甚至可以降低到$ 1.9114 /月。
结论 (Conclusion)
Many companies think securing their website is difficult and worthless. However, public cloud services make it easy and the cost is convenient.
许多公司认为保护自己的网站是困难且毫无价值的。 但是,公共云服务使它变得容易并且成本也很方便。
Don’t set the goal too high at first. Don’t think that you are fighting with state-sponsored hackers, it will only scare you away from implementing cybersecurity.
首先不要将目标设定得太高。 不要以为您在与政府资助的黑客作斗争,这只会吓到您实施网络安全。
By implementing simple cybersecurity measure like enforcing HTTPS, you have already outperformed almost 40% of websites on the Internet which uses HTTP as default.
通过实施简单的网络安全措施(如实施HTTPS),您已经超过了使用HTTP作为默认设置的Internet上近40%的网站。
If you spend more on coffee than on IT security, you will be hacked. What’s more, you deserve to be hacked.
如果您花在咖啡上的钱多于IT安全,那么您将被黑。 而且,您值得被黑客入侵。
— Richard Clarke
—理查德·克拉克
$1.9114 can’t even buy you a cup of coffee in Starbucks. I find no reason not to take action to secure your website.
$ 1.9114甚至无法在星巴克买一杯咖啡。 我发现没有理由不采取行动保护您的网站。
翻译自: https://medium.com/swlh/using-aws-to-secure-your-web-applications-3bd363206875
cloudfront


 310
310

 被折叠的 条评论
为什么被折叠?
被折叠的 条评论
为什么被折叠?
 到【灌水乐园】发言


