


 本文翻译自Software Alchemy的文章,介绍了如何构建一个干净的领域驱动设计(DDD)Web应用程序的第一步,主要聚焦于设置用户界面。内容涉及到搭建git服务器的Web界面,帮助开发者进行更有效的版本控制和协作。
搭建git服务器web界面
Image credit: Capri23auto @ Pixabay
介绍 (Introduction)
This is the first in a multi-part series in which I will be building off the Foundational Concepts Series. If you haven’t read those yet, then I highly recommend you go back and familiarize yourself with the ideas I present in those entries. Going forward, I’ll make the assumption that you’re relatively familiar with basic programming concepts as well as those related to architecture, such as Layers of Abstraction, Loose-Coupling, etc. Especially important are the patterns and practices focused around Domain-Driven Design, Clean Architecture, and CQRS, as those inform the high-level design of the demo solution.
这是一个由多个部分组成的系列文章中的第一篇,我将在此基础上构建基础概念系列文章 。 如果您还没有阅读这些内容,那么我强烈建议您回过头来熟悉一下我在这些文章中提出的想法。 展望未来,我将假设您相对熟悉基本的编程概念以及与体系结构相关的概念,例如抽象层,松耦合等。尤其重要的是围绕Domain-驱动设计 , 清洁架构和CQRS ,因为它们为演示解决方案的高级设计提供了信息。
My objective is to present actual, procedural steps that you can follow and apply to your own web projects using ASP.NET Core. As I present these steps, I will be updating the demo application accordingly, the goal being to evolve it into a working web application by the end of this series.
我的目标是介绍使用ASP.NET Core可以遵循的实际步骤,并将其应用于自己的Web项目。 在介绍这些步骤时,我将相应地更新演示应用程序,目的是在本系列文章的最后将其发展为可正常使用的Web应用程序。
Just to be totally transparent: the finished application will be a little rough around the edges. Actually, VERY rough around the edges. That’s okay. My intent is simply to demonstrate that Clean Domain-Driven Design works in modern web applications built on the ASP.NET Core stack. The desired end-product will be a multi-tenant SaaS product which can scale to accommodate complex business logic. I intend to revisit different areas of functionality in future blog series’, at which point we can make it more robust and enterprise worthy.
只是要完全透明:完成的应用程序边缘会有些粗糙。 实际上,边缘非常粗糙。 没关系。 我的目的仅仅是演示“干净域驱动设计”可以在基于ASP.NET Core堆栈的现代Web应用程序中工作。 所需的最终产品将是多租户SaaS产品,该产品可以扩展以适应复杂的业务逻辑。 我打算在未来的博客系列中重新讨论功能的不同领域,届时我们可以使其变得更健壮,更有价值。
Another point I wanted to mention as we embark upon this phase of our journey is that I’ll be building out the user interface as a SPA (Single Page Application) using Angular 10. This choice is somewhat arbitrary and based upon my own preferences, and you may want to build your front end using a different framework, such as React, Blazor, or whatever you’re comfortable with.
在开始这一阶段的过程中,我想提到的另一点是,我将使用Angular 10将用户界面构建为SPA(单页应用程序)。这种选择有些随意,并且基于我自己的偏好,并且您可能想使用其他框架(例如React,Blazor或您喜欢的任何东西)构建前端。
(For any of you who may not be familiar with SPAs and how they work, there are plenty of resources out there to help you get familiar with the basic concepts. In a nutshell, the way they work is that a simple HTML page is rendered to the user with a single element on it, which acts as a placeholder for where the SPA will be loaded. After that, the SPA, which is essentially just a series of JavaScript libraries, gets loaded into the user’s browser and bootstraps itself. From there on, the application runs entirely in the user’s browser and dynamically manipulates the DOM (Domain Object Model) of the browser in order to present a user interface which resembles a watered-down desktop application. A high-level web protocol such as REST or GraphQL is used by the SPA to communicate back and forth to the server application from the user’s browser.)
(对于可能不熟悉SPA及其工作原理的任何人,有很多资源可以帮助您熟悉基本概念。简而言之,它们的工作方式是呈现一个简单HTML页面带有单个元素的用户,该元素充当将要加载SPA的占位符,之后,本质上只是一系列JavaScript库的SPA被加载到用户的浏览器中并自行引导。在此之后,该应用程序完全在用户的浏览器中运行,并动态地操纵浏览器的DOM(域对象模型),以提供类似于精简后的桌面应用程序的用户界面,例如REST或SPA使用GraphQL从用户的浏览器与服务器应用程序来回通信。)
Using my particular interpretation of Clean Domain-Driven Design, I’ll develop an architecture which is loosely-coupled enough that you can “peel off” the UI from the Presentation layer, and replace it with anything else that’s compatible with the web protocol of the SPA/server-side controllers (in the case of the demo app, REST).
使用对Clean Domain-Driven Design的特殊解释,我将开发一种松散耦合的架构,以便您可以从Presentation层“剥离” UI,并用与Web协议兼容的其他任何东西替换它。 SPA /服务器端控制器(在演示应用程序中为REST)。
脚手架工具和项目-不要重新发明轮子 (Scaffolding Tools and Projects — Do Not Reinvent the Wheel)
As it currently stands, the Presentation layer and user interface for our OrgManager demo application is a simple .NET Core console application with a bunch of hard-coded calls to CQRS workflows. That’s not very useful in practice, is it?
就目前而言,我们的OrgManager演示应用程序的Presentation层和用户界面是一个简单的.NET Core控制台应用程序,带有对CQRS工作流程的大量硬编码调用。 在实践中那不是很有用,是吗?
We’ll start moving the solution in the direction of actual web application by:
我们将通过以下方式开始朝实际Web应用程序的方向移动解决方案:
- Scaffolding a new ASP.NET Core Web API project into our solution, and 将一个新的ASP.NET Core Web API项目构建到我们的解决方案中,并
- Removing the web UI from the ClientApp folder and replacing it with a pre-built starter project. 从ClientApp文件夹中删除Web UI,然后将其替换为预先构建的入门项目。
Step A is fairly easy, as the web scaffolding tools are built right into Visual Studio. Step B is much more involved, as we will be removing features that aren’t useful to us at this time, changing around the structure of the project, and adding new components to communicate with our web API and present an interface to the user. Still, I prefer this approach rather than building the UI from scratch because:
步骤A相当容易,因为Web脚手架工具是内置在Visual Studio中的。 步骤B涉及更多,因为我们将删除目前对我们无用的功能,更改项目的结构,并添加新的组件以与我们的Web API进行通信并向用户提供接口。 不过,我还是喜欢这种方法,而不是从头开始构建UI,因为:
- It saves us from having to write a lot of boilerplate code (and Angular is unfortunately a boilerplate-heavy framework). 它使我们不必编写大量的样板代码(不幸的是,Angular是一个繁重的样板框架)。
- We get a lot of features “for free,” which in theory eases the learning curve and accelerates development. 我们提供了许多“免费”功能,从理论上讲,这些功能可以简化学习曲线并加速发展。
So, without further adieu, let’s get started by scaffolding out the Web API.
因此,在没有其他条件的情况下,让我们开始构建Web API。
使用Visual Studio创建Web Api项目 (Using Visual Studio to Create a Web Api Project)
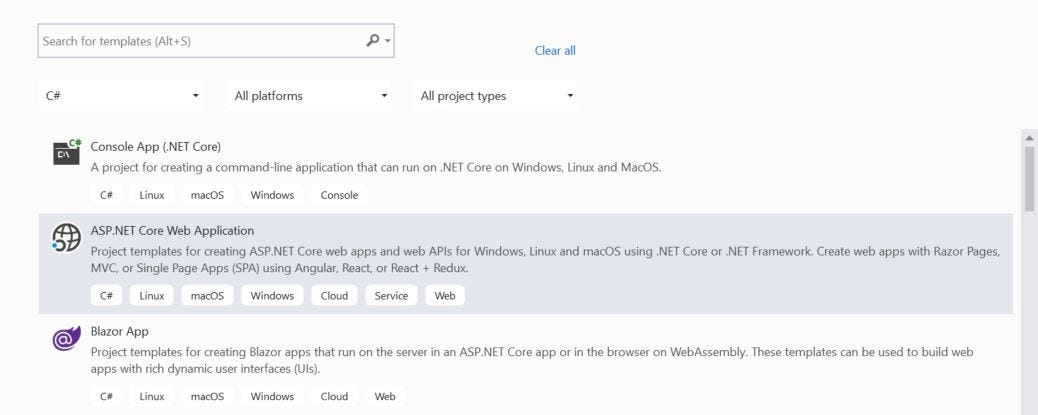
First, we’ll click on the solution and select “Add New Project”. From the list of project templates that comes up, we select “ASP.NET Core Web Application” and click Next.
首先,我们将单击解决方案,然后选择“添加新项目”。 从出现的项目模板列表中,我们选择“ ASP.NET Core Web应用程序”,然后单击“下一步”。
The name of this project will be JDS.OrgManager.Presentation.WebApi.
该项目的名称将是JDS.OrgManager.Presentation.WebApi。
Click Create.
单击创建。
We are now presented with a series of specific web project templates. Select Angular and then click on “Change” under the Authentication section.
现在,我们将看到一系列特定的Web项目模板。 选择“角度”,然后单击“身份验证”部分下的“更改”。
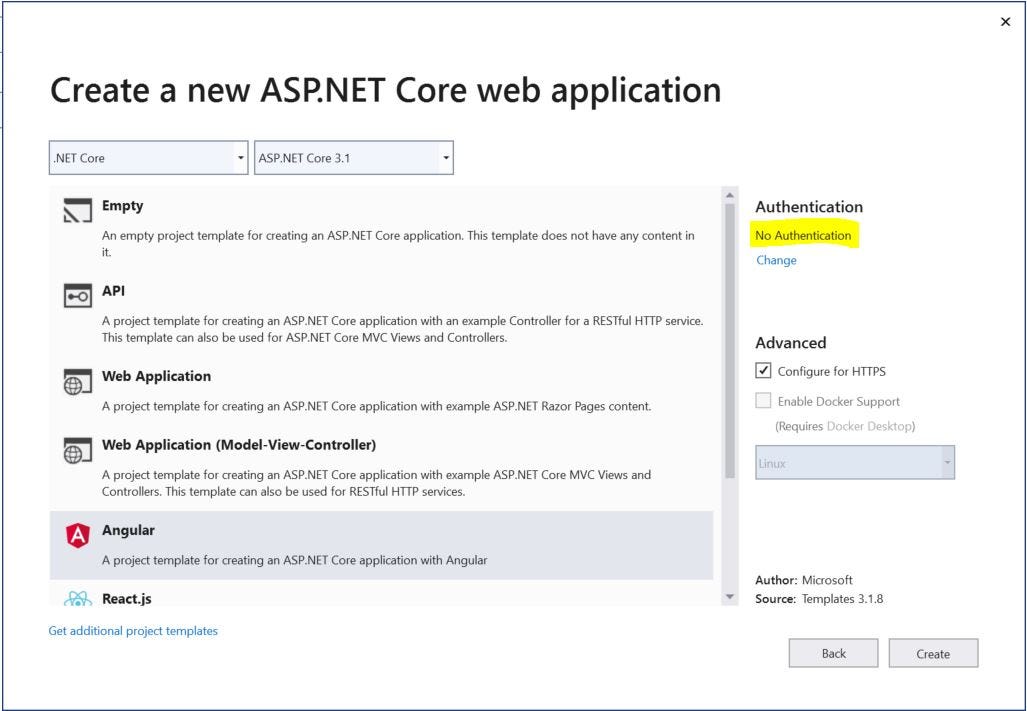
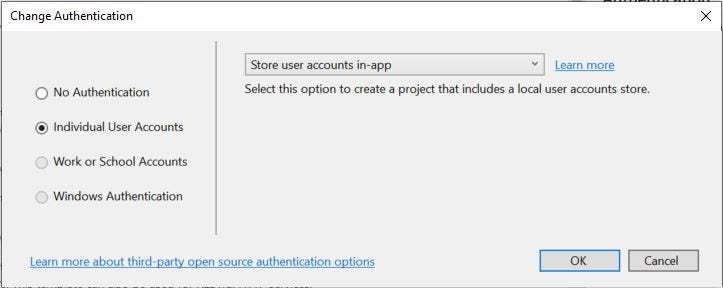
A new dialog box appears allowing you to select either “No Authentication” or “Individual User Accounts.” Select “Individual User Accounts.” This will add the ASP.NET Core Identity packages and scaffolding to our Web Api project.
出现一个新对话框,允许您选择“无身份验证”或“个人用户帐户”。 选择“个人用户帐户”。 这会将ASP.NET Core Identity软件包和脚手架添加到我们的Web Api项目中。
When we click OK and then Create, it’ll scaffold our Web Api project.
当我们单击“确定”,然后单击“创建”时,它将支持我们的Web Api项目。
Now we will set JDS.OrgManager.Presentation.WebApi as our startup project and run our solution.
现在,我们将JDS.OrgManager.Presentation.WebApi设置为我们的启动项目并运行我们的解决方案。
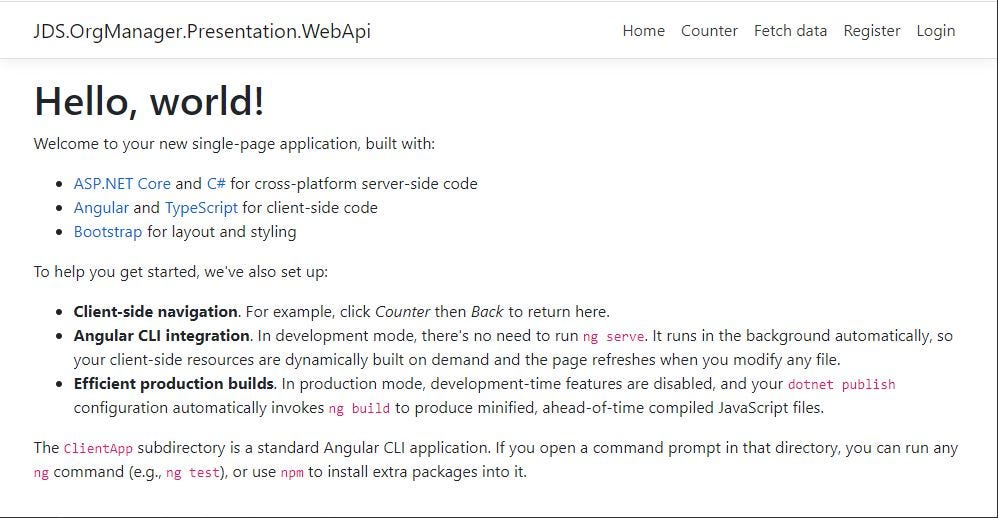
As you can see, we have the standard “Hello World” application that gets scaffolded by default. All well and good, but not super useful for what we’re trying to do.
如您所见,我们拥有标准的“ Hello World”应用程序,该应用程序默认情况下是脚手架。 一切都很好,但是对于我们正在尝试做的事情却不是超级有用。
Pay attention; here’s where things can get a little tricky.
请注意; 在这里,事情可能会有些棘手。
用开箱即用的入门项目替换默认的SPA用户界面 (Replacing the Default SPA User Interface with an Out-Of-Box Starter Project)
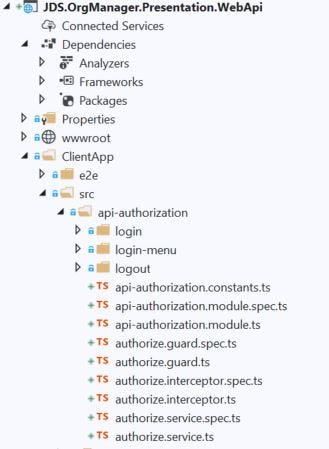
The plan is to blow away 90% of the default ClientApp UI and replace it with a starter UI project, while maintaining the critical login and user account components which are auto generated by ASP.NET Core. Specifically, I’m referring to the components inside ClientApp/src/api-authorization.
计划是删除90%的默认ClientApp UI,并用入门UI项目替换它,同时保留由ASP.NET Core自动生成的关键登录和用户帐户组件。 具体来说,我指的是ClientApp / src / api-authorization中的组件。
These components use OIDC (OpenID Connect)/Oauth2 to authenticate users into our system.
这些组件使用OIDC(OpenID Connect)/ Oauth2将用户认证到我们的系统中。
Pro tip: Trying to roll your own login and authentication components will lead you down the path of pain, guaranteed. Don’t do it. I highly, highly recommend you use out of the box solutions whenever possible. As far as security components go, like password hashers and the like, DON’T EVER TRY TO ROLL YOUR OWN, as that is just downright dangerous and is a good way for your web app to get hacked.
专家提示:尝试推出自己的登录和身份验证组件将使您步入困境,这是有保证的。 不要这样 我强烈建议您尽可能使用开箱即用的解决方案。 就安全性组件(例如密码哈希等)而言,永远不要尝试自己动手,因为这绝对是危险的,并且是Web应用程序被黑客入侵的好方法。
Getting back on track. Our approach will be to set aside the ClientApp folder for now, replace it with a starter UI project, and then splice the OIDC/authentication components back into it at some future point.
回到正轨。 我们的方法是暂时保留ClientApp文件夹,将其替换为Starter UI项目,然后在将来某个时候将OIDC /身份验证组件重新拼接到其中。
Rename the ClientApp folder “ClientApp-old,” or something to that effect. You may need to exit from Visual Studio to do this.
重命名ClientApp文件夹为“ ClientApp-old”,或类似的名称。 您可能需要退出Visual Studio才能执行此操作。
Now let’s install the UI starter project. For the demo application, I picked a project called Angular NgRx Material Starter. I think this is a good solution to use because it’s clean, neatly maintained, and provides a solid foundation for us to work off of. Additionally, I wanted to get a nice, professional-looking user experience (UX), and Angular Material provides that. Another great thing about starter kits like this is that if you have trouble understanding how to implement certain patterns or functionalities, you can just look at the code that’s already there for guidance, which is exactly what we are going to do.
现在,让我们安装UI入门项目。 对于演示应用程序,我选择了一个名为Angular NgRx Material Starter的项目。 我认为这是一个很好的解决方案,因为它干净,维护整齐并为我们提供了坚实的基础。 另外,我想获得一个不错的,专业的用户体验(UX),Angular Material提供了这种体验。 这样的入门工具包的另一个很棒的事情是,如果您在理解如何实现某些模式或功能方面遇到困难,则只需查看已经存在的代码以进行指导,这正是我们要做的。
Angular itself can be a daunting framework to use, and the various sub-frameworks and packages that are incorporated into it, such as Angular Material, NgRx, Reactive Forms, etc. take that complexity to a whole new level entirely. Once again, that’s why it’s great to have some working demos/examples to use as a reference, and ANMS includes those as well.
Angular本身可能是一个令人生畏的框架,并且合并到其中的各种子框架和包(例如Angular Material,NgRx,Reactive Forms等)将这种复杂性完全提高到了一个全新的水平。 再次,这就是为什么有一些有用的演示/示例作为参考很好的原因,而ANMS也包括了这些示例。
Inside the root folder for the WebApi project, we have renamed ClientApp to ClientApp-old and moved it to a different folder. Following the instructions from the above link, we now execute the following commands from a Developer Command Prompt window to install the new UI:
在WebApi项目的根文件夹中,我们已将ClientApp重命名为ClientApp-old,并将其移至其他文件夹。 按照上述链接中的说明,我们现在从“开发人员命令提示符”窗口执行以下命令以安装新的UI:
git clone https://github.com/tomastrajan/angular-ngrx-material-starter.git ClientAppnpm installnpm startIf all goes well, then the UI should compile and a browser window should pop up pointing to http://localhost:4200/#/about. You should see something that looks like this.
如果一切顺利,则应该编译UI并弹出浏览器窗口,指向http:// localhost:4200 /#/ about。 您应该会看到类似以下的内容。

Hooray, we now have a UI!
哇,我们现在有了UI!
Now comes the fun part.
有趣的来了。
First, we will customize details of the new UI to fit our project, following the guidelines on the ANMS GitHub page.
首先,我们将按照ANMS GitHub页面上的指南自定义新UI的细节以适合我们的项目。
Then we will remove components and features that we don’t need, or which are not important at this point in time from the UI project. At that time, we’ll also perform other cleanup tasks, upgrade the Node packages, etc.
然后,我们将从UI项目中删除不需要或不重要的组件和功能。 届时,我们还将执行其他清理任务,升级Node包等。
In a future blog post, we will splice the authentication/OIDC components into the new UI, but let’s not get too far ahead of ourselves.
在以后的博客文章中,我们将把身份验证/ OIDC组件拼接到新的UI中,但请不要过分领先。
The second step (cleanup) might seem trivial on the surface, but it isn’t. Since we are early on in the development process, it is crucial that we stay diligent, keeping our patterns and practices in mind, and work to manage complexity in the solution so that we don’t get bogged in minutiae and distractions that detract from our ultimate goal: to ship a working product.
第二步(清理)在表面上看似微不足道,但事实并非如此。 由于我们处于开发过程的早期,因此至关重要的是,我们必须保持勤奋,牢记我们的模式和实践 ,并努力管理解决方案中的复杂性,以免陷入对细节的困扰和分心的事情中最终目标:运送有效产品。
“A designer knows he has achieved perfection not when there is nothing left to add, but when there is nothing left to take away.” — Antoine de Saint-Exupery
“设计师知道他已经实现了完美,不是没有什么可添加的,而是什么都没有带走的。” —圣艾修伯里·安托万
With this philosophy in mind, let’s get moving. Rather than posting copious screenshots every inch of the way, I’m just going to list out the steps that I take to get the UI into a working state. Remember those tools that I told you to download way back at the very beginning, like TextCrawler, KDiff, etc.? They come in very handy for tasks like this, as you may need to perform operations like doing a regular expression replace across files nested in directory structures or diffing two files and merging parts of one into the other. These are tools of the trade, and I recommend you familiarize yourself with them.
牢记这一理念,让我们前进。 我不会列出所有屏幕截图,而只是列出要使UI进入工作状态所需采取的步骤。 还记得那些工具,我告诉你下载回来的路上,在一开始 ,像TextCrawler,KDiff等? 它们对于这样的任务非常有用,因为您可能需要执行一些操作,例如对嵌套在目录结构中的文件执行正则表达式替换,或者比较两个文件并将其中一个文件合并到另一个文件中。 这些是交易工具,我建议您熟悉它们。
自定义UI (Customizing the UI)
1. First, I follow the instructions under the “Make It Your Own” section on the ANMS GitHub page. These are pretty self-explanatory. For convenience, I’ve reposted them below:
1.首先,我按照ANMS GitHub页面上“自行制作”部分下的说明进行操作。 这些都是不言自明的。 为了方便起见,我将其重新张贴在下面:
- use search and replace functionality of your favorite IDE to replace anms with <your-app-prefix> [I did this using TextCrawler inside the OrgManager\JDS.OrgManager\JDS.OrgManager.Presentation.WebApi\ClientApp\ folder — recursively scanning through subfolders] 使用您喜欢的IDE的搜索和替换功能以<your-app-prefix>替换anms [我在OrgManager \ JDS.OrgManager \ JDS.OrgManager.Presentation.WebApi \ ClientApp \文件夹中使用TextCrawler进行了此操作–递归扫描子文件夹]
- rename project in package.json name property and set appropriate version (eg 0.0.0 or 1.0.0) 在package.json name属性中重命名项目并设置适当的版本(例如0.0.0或1.0.0)
- remove / rename context path config — — deploy-url /angular-ngrx-material-starter/ — base-href /angular-ngrx-material-starter in package.json, this is used to configure url (context path) on which the application will be available (eg. https://www.something.com/<context-path>/) [I removed the context path entirely because we only have one project] 删除/重命名上下文路径配置— — deploy-url / angular-ngrx-material-starter / — package-json中的base-href / angular-ngrx-material-starter,用于配置URL(上下文路径),该应用程序将可用(例如https://www.something.com/<context-path>/)[我完全删除了上下文路径,因为我们只有一个项目]
- rename app in /environments/ files (will be shown in browser tab) 在/ environments /文件中重命名应用程序(将显示在浏览器选项卡中)
- delete pre-existing CHANGELOG.md (you will generate your own with future releases of your features) 删除现有的CHANGELOG.md(您将在以后发布的功能中生成自己的)
- delete CODE_OF_CONDUCT.md, CONTRIBUTING.md and BUILT_WITH.md files as they are relevant only if project is open sourced on Github 删除CODE_OF_CONDUCT.md,CONTRIBUTING.md和BUILT_WITH.md文件,因为只有在Github上开源项目时它们才相关
- edit the title and Open Graph metadata properties in index.html 编辑index.html中的标题和Open Graph元数据属性
- remove or adjust links in the footer 删除或调整页脚中的链接
- replace logo in /assets folder ( currently 128 x 128 pixel png file ) 替换/ assets文件夹中的徽标(当前为128 x 128像素png文件)
- adjust colors in /themes/default-theme.scss 调整/themes/default-theme.scss中的颜色
- [NOT DOING] create a pull request in the original repository to update BUILT_WITH.md file with a link and short description of your project [NOT DOING]在原始存储库中创建拉取请求,以使用项目的链接和简短描述更新BUILT_WITH.md文件
2. Perform additional cleanup on ClientApp which is not specified in the above steps. This can be tedious.
2.对上述步骤中未指定的ClientApp执行其他清理。 这可能是乏味的。
- Remove .git and .github folders so that we don’t end up checking this in as a submodule, but as a folder in our own solution. 删除.git和.github文件夹,以便我们最终不会将其作为子模块来检入,而是作为我们自己的解决方案中的文件夹来检入。
- Remove extraneous build targets that don’t make sense from project.json like “contributors:add” etc. 从project.json中删除多余的构建目标,例如“ contributors:add”等。
- Delete unnecessary files such as LICENSE, README.MD, travis files, all-contributors*, etc. 删除不必要的文件,例如LICENSE,README.MD,travis文件,所有参与者*等。
- Modify “start” target in package.json to stop “did not start listening for requests” error. 修改package.json中的“开始”目标以停止“未开始侦听请求”错误。
Rather than using Google’s palettes that are provided out of the box, use a color wheel tool such as this one to come up with our own custom colors and then generate our own custom Angular Material palettes from those using this tool. Copy the custom palettes into default-theme.scss and update the primary/accent/warn variables accordingly.
而不是使用提供开箱即用,谷歌的调色板,使用色轮工具,如这一个拿出我们自己的自定义颜色,然后生成自己的自定义角材料调色板使用的这个工具 。 将自定义调色板复制到default-theme.scss中,并相应地更新primary / accent / warn变量。
- Move the contents from the “projects/<project name>” folder to the root folder of the ClientApp. Merge the tslint.json files. Delete the server/server.js file. Delete the now empty projects folder because we only have one project and don’t need it. Update paths in tsconfig.app.json and tsconfig.spec.json. Update paths in karma.conf.js. Update paths in environments/*.ts. Update package.json to remove references to the “projects” folder. Update angular.json to remove references to the “projects” folder. 将内容从“项目/ <项目名称>”文件夹移至ClientApp的根文件夹。 合并tslint.json文件。 删除server / server.js文件。 删除现在为空的项目文件夹,因为我们只有一个项目,不需要它。 更新tsconfig.app.json和tsconfig.spec.json中的路径。 更新karma.conf.js中的路径。 更新环境/*.ts中的路径。 更新package.json以删除对“ projects”文件夹的引用。 更新angular.json以删除对“ projects”文件夹的引用。
- Find any remaining references to “angular-ngrx-material-starter” in our project and replace with “org-manager.” 在我们的项目中找到任何其他有关“ angular-ngrx-material-starter”的引用,并替换为“ org-manager”。
- Update tslint.json: change quotemarks from single to double. Also change quotes from single to double in .prettierrc. 更新tslint.json:将引号由单变为双。 还要在.prettierrc中将引号从单引号更改为双引号。
- Blow away the “features” folder/modules entirely and remove all references to it in the various Angular modules of the project. If you want, you can just cut and paste the folder somewhere else if you want to use it as a reference. 完全删除“功能”文件夹/模块,并在项目的各个Angular模块中删除对其的所有引用。 如果需要,可以将其剪切并粘贴到其他位置(如果要使用它作为参考)。
- Get rid of the references to the modules we just blew away from the app-routing.module.ts file. We’re not going to use the loadChildren() approach anyway (at least not at this time). 摆脱对我们刚刚从app-routing.module.ts文件中删除的模块的引用。 无论如何我们都不会使用loadChildren()方法(至少目前不使用)。
- Remove all internationalization features (i18n) from the project such as ngx-translate — it’s just way too much complexity at this point in our development process. Blow away the assets/i18n folder. We can add these back later if we want. Unfortunately, this means we also have to remove all calls to the “translate” pipe in remaining components and replace those with the actual text. 从项目中删除所有国际化功能(i18n),例如ngx-translate-在我们的开发过程中,这太复杂了。 吹走assets / i18n文件夹。 如果需要,我们可以稍后再添加这些。 不幸的是,这意味着我们还必须删除其余组件中所有对“ translate”管道的调用,并将其替换为实际文本。
- Remove big-input and rtl-support components. We don’t need those at this time. 删除大输入和rtl支持组件。 我们目前不需要这些。
- Remove the lazy reducers and component calls to Ngrx/store (namely in app.component). It’s just too much complexity at this point and we can always add it back in later. 删除对Ngrx / store的惰性化约器和组件调用(即在app.component中)。 这时太复杂了,我们以后可以随时将其重新添加。
- Replace the default logo with something we create in Paint.NET. It’s not forever — we will be replacing it with an actual component at some point. 用我们在Paint.NET中创建的内容替换默认徽标。 这不是永远的-我们有时会用实际的组件替换它。
Finally, it’s a good idea to update all Node packages.
最后,更新所有Node软件包是一个好主意。
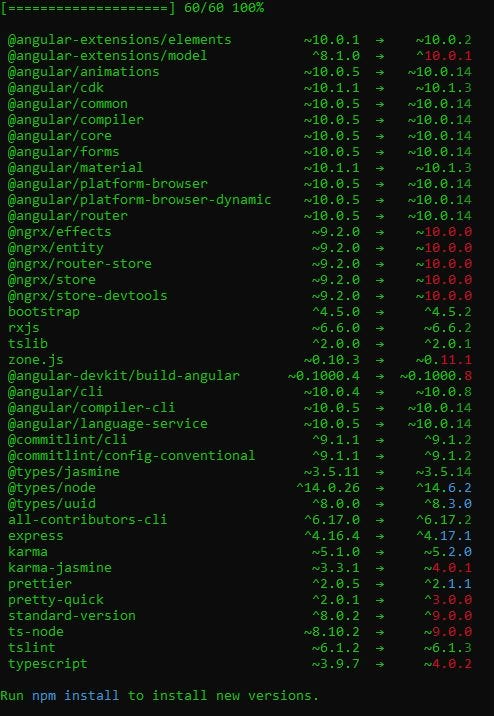
pm install -g npm-check-updatesncu -unpm installYou should see some output like the following:
您应该看到类似以下的输出:
After doing this, we should definitely do an
完成此操作后,我们绝对应该
npm run buildinside the ClientApp folder to make sure that we didn’t break the UI by updating all the packages.
在ClientApp文件夹中,以确保我们没有通过更新所有软件包来破坏UI。
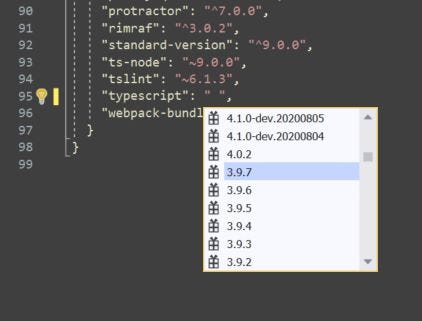
Guess what? We broke Typescript!
你猜怎么了? 我们打破了打字稿!

Fortunately, we can locate the offending package and downgrade it to the prior version. Visual Studio provides IntelliSense for this, which is really nice.
幸运的是,我们可以找到有问题的软件包并将其降级到以前的版本。 Visual Studio为此提供了IntelliSense,这非常好。
我们到了吗? (Are We There Yet?)
At the end of this long slog we should *hopefully* have a barebones UI that looks something like this:
在漫长的结尾之后,我们应该*希望*拥有一个看起来像这样的准系统UI:
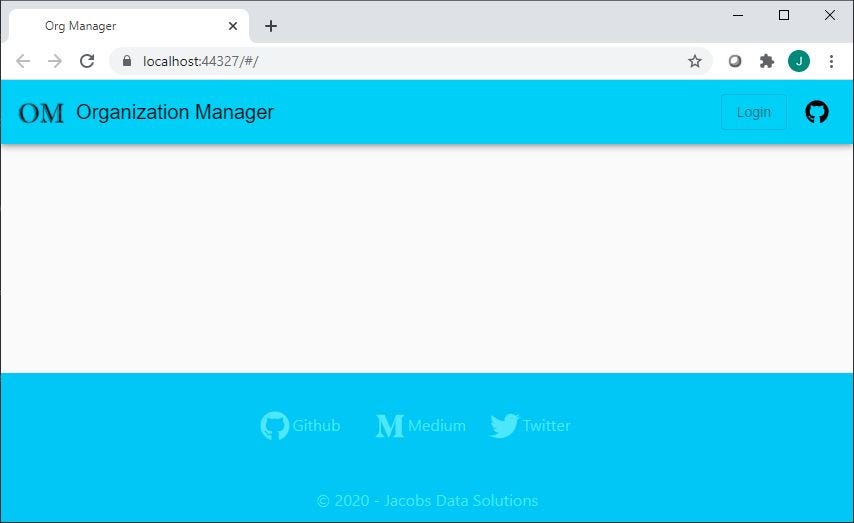
It doesn’t look like much. In fact, it doesn’t look like anything — it’s just a header, a footer, and an empty space in the middle where the Angular router outlet resides. There is no authentication/authorization. We’ve also removed some power features such as translations, ngrx/store, lazy child module loading, and so on. However, these are basically UI optimizations which are not necessary at this point and will only distract us from our primary goal, which is to use the UI as a vehicle to drive development of our web application (back end API) while we focus on building functionality around our Domain layer. That’s our game plan in a nutshell, and this is a good place to stop.
看起来不多。 实际上,它看起来并不像什么-它只是Angular路由器出口所在的中间的页眉,页脚和空白。 没有身份验证/授权。 我们还删除了一些强大的功能,例如翻译,ngrx / store,延迟子模块加载等。 但是,这些基本上是UI优化,目前还没有必要,只会使我们偏离我们的主要目标,即将UI用作驱动Web应用程序(后端API)开发的工具,而我们专注于构建域层的功能。 简而言之,这就是我们的游戏计划,这是一个不错的选择。
结论 (Conclusion)
In this blog entry I demonstrated how to set up a basic ASP.NET Web Application project in a Visual Studio 2019 solution using their out-of-the-box Angular template. Then I showed how to replace the scaffolded Angular UI with a starter project from Github, with the intent that we can save some time, have a working code base as a reference, and get some features “for free” without having to proverbially reinvent the wheel. Finally, I gave some insight into how to customize the UI by updating certain configuration elements and removing features, kind of like what a sculptor does when they create their artworks through a process of subtraction. Hopefully this tedious process has left us in a better place, and we can get back to building the bulk of our solution. Going forward, we will look to start adding features back in and evolving the UI alongside our Web API as we work to meet the business needs of our fictional client.
在此博客文章中,我演示了如何使用现成的Angular模板在Visual Studio 2019解决方案中设置基本的ASP.NET Web应用程序项目。 然后,我展示了如何用Github的入门项目替换脚手架的Angular UI,目的是我们可以节省一些时间,以有效的代码库作为参考,并“免费”获得一些功能,而不必众所周知地轮。 最后,我对如何通过更新某些配置元素和删除功能来自定义UI提出了一些见识,就像雕刻家通过减法创建艺术品时所做的那样。 希望这个乏味的过程使我们处于一个更好的位置,并且我们可以重新构建大部分解决方案。 展望未来,我们将努力开始增加功能并在Web API的基础上改进UI,以便满足虚构客户的业务需求。
专家/主管部门/资源 (Experts/Authorities/Resources)
UI框架 (UI Frameworks)
工具类 (Tools)
Custom Angular Material Palettes
入门项目 (Starter Projects)
Angular, NgRx, Angular CLI & Angular Material Starter Project, by Tomas Trajan
Angular,NgRx,Angular CLI和Angular Material Starter项目 ,作者:Tomas Trajan
人 (People)
托马斯·图拉真(Tomas Trajan) (Tomas Trajan)
更多信息 (More Information)
Single Page Application (Wikipedia)
单页应用程序 (维基百科)
This is entry #1 in the Scaffold Your Clean DDD Web App Series
这是“ Scaffold Your DDD Web应用程序系列”中的条目#1
搭建git服务器web界面


 8008
8008

 被折叠的 条评论
为什么被折叠?
被折叠的 条评论
为什么被折叠?
 到【灌水乐园】发言


