


docker vs开发环境
A problem I had within our teams in my last gig was running projects consistently across multiple operating systems. I spent a few weeks trying to hack around Docker files that would give the teams a consistent workflow locally, but then I found that Visual Studio Code can do it so easily with just one plugin.
我上次工作中在团队中遇到的一个问题是跨多个操作系统一致地运行项目。 我花了几周的时间尝试破解Docker文件,这些文件将为团队提供本地一致的工作流,但是后来我发现Visual Studio Code只需一个插件就可以轻松地做到这一点。
This guide combines Visual Studio Code and Docker to mimic your production settings and create consistency across the development environments. Both Docker and Visual Studio Code are required to be installed to use this guide.
本指南结合了Visual Studio Code和Docker来模拟您的生产设置并在整个开发环境中创建一致性。 使用本指南需要同时安装Docker和Visual Studio Code。
The guide is written for a Node environment with Create React App, but the steps can be altered for whatever the chosen environment required is.
该指南是针对使用Create React App的Node环境编写的,但是可以根据需要选择的环境来更改步骤。
You will even still have hot reloading working inside your dev container.
您甚至还可以在dev容器中进行热重装。
In Visual Studio Code, install the following plugin:
在Visual Studio代码中,安装以下插件:

It can be found here: https://marketplace.visualstudio.com/items?itemName=ms-vscode-remote.remote-containers
可以在这里找到: https : //marketplace.visualstudio.com/items?itemName=ms-vscode-remote.remote-containers
This allows us to run Visual Studio Code in a container.
这使我们可以在容器中运行Visual Studio Code。
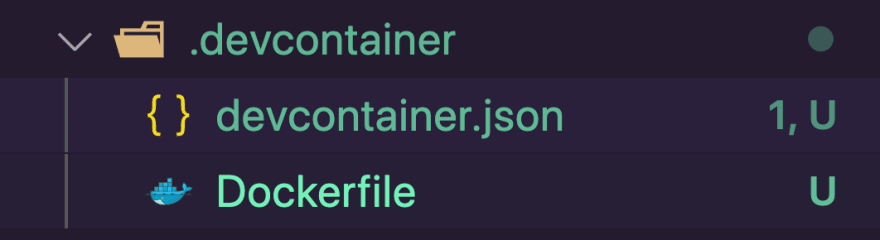
In the root directory of your project, you need to create a folder called .devcontainer. This is where we will store the settings for our environment.
在项目的根目录中,您需要创建一个名为.devcontainer的文件夹。 我们将在此处存储环境设置。
Then create two files in this folder, devcontainer.json and a Dockerfile.
然后在此文件夹中创建两个文件devcontainer.json和Dockerfile 。
The naming is important as there are folder and file names that Visual Studio Code expects from us to run the container successfully.
命名很重要,因为Visual Studio Code希望我们提供一些文件夹和文件名才能成功运行容器。
Your folder structure should match this:
您的文件夹结构应与此匹配:
Within the Dockerfile, we choose the image and RUN any commands required (such as global installs) after we install the image.
在Dockerfile ,我们选择映像并在安装映像后RUN所需的任何命令(例如全局安装)。
Dockerfile
Dockerfile
FROM node:12.14.1-stretch
RUN npm install -g eslint prettier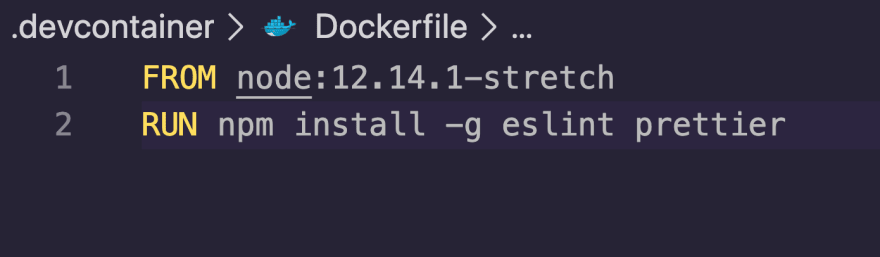
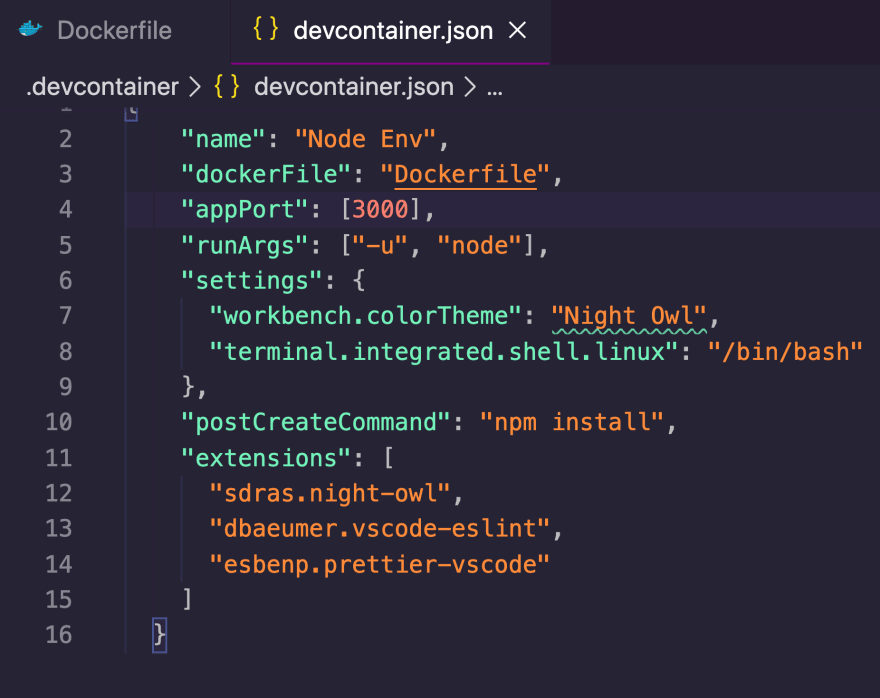
Then in the devcontainer.json we can configure all of the settings.
然后,在devcontainer.json我们可以配置所有设置。
The devcontainer.json is basically a config file that determines how your dev container gets built and started.
devcontainer.json基本上是一个配置文件,该文件确定如何构建和启动dev容器。
devcontainer.json
devcontainer.json
{
  "name": "Node.js Sample",
  "dockerFile": "Dockerfile",
  "appPort": 3000,
  "extensions": ["dbaeumer.vscode-eslint"],
  "settings": {
    "terminal.integrated.shell.linux": "/bin/bash"
  },
  "postCreateCommand": "yarn install",
  // Comment out the next line to run as root instead. Linux users, update
  // Dockerfile with your user's UID/GID if not 1000.
  "runArgs": ["-u", "node"]
}
Option Description
dockerfileRelative — path to a Dockerfile that you wish to use as your image.选项描述
dockerfile相对-您要用作映像的Dockerfile的路径。appPort— a port or array of ports that should be made available locally when the container is runningappPort容器运行时应在本地提供的端口或端口阵列extensions— an array of extension IDs that specify the extensions that should be installed inside the container when it is createdextensions扩展ID的数组,这些ID指定创建容器时应在容器内部安装的扩展settings— adds defaultsettings.jsonvalues into a container/machine-specific settings filesettings—将默认settings.json值添加到特定于容器/机器的设置文件中postCreateCommand— command string or list of command arguments to run after the container is createdpostCreateCommand—创建容器后要运行的命令字符串或命令参数列表runArgs— an array of Docker CLI arguments that should be used when running the containerrunArgs—运行容器时应使用的Docker CLI参数数组
Here is the full list of devcontainer.json options.
这是devcontainer.json选项的完整列表。
检查一下 (Check)
Once the container is running and you’re connected, you should see your remote context change in the bottom left of the Status bar:
容器运行并连接后,您应该在状态栏的左下方看到远程上下文更改:
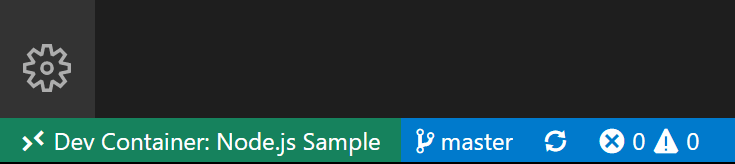
With the Remote — Containers extension installed, you will see a new Status bar item at the far left.
安装了“远程—容器”扩展后,您将在最左侧看到一个新的状态栏项目。
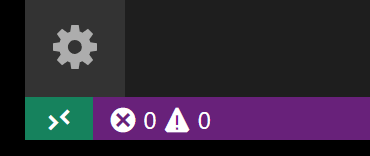
The Remote Status bar item can quickly show you in which context VS Code is running (local or remote) and clicking on the item will bring up the Remote — Containers commands.
远程状态栏项目可以快速向您显示在哪个上下文中运行VS Code(本地或远程),单击该项目将弹出“远程—容器”命令。
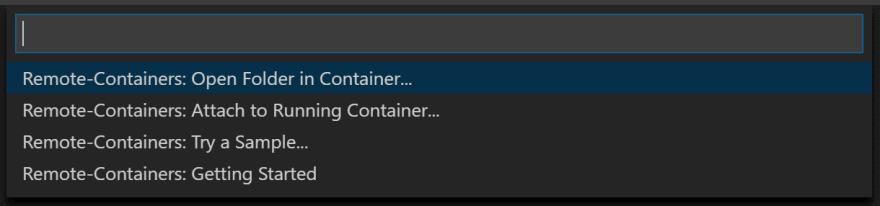
Select Reopen in Container.
选择在容器中重新打开。

等待容器建立 (Wait for the container to build)
If this is your first time connecting, a Docker image will be downloaded and built, and will start a container with a copy of VS Code Server running. This might take a few minutes the first time, but future connections will only take seconds.
如果这是您第一次连接,则将下载并构建Docker映像,并将启动运行VS Code Server副本的容器。 第一次可能需要几分钟,但以后的连接仅需几秒钟。

检查您的环境 (Check your environment)
One of the useful things about developing in a container is that you can use specific versions of dependencies that your application needs without impacting your local development environment.
在容器中进行开发的有用之处之一是,您可以使用应用程序所需的特定版本的依赖关系,而不会影响本地开发环境。
node --version;
npm --version
如果您想要本指南的视频版本: (If you want a video version of this guide:)
翻译自: https://medium.com/better-programming/dockerize-your-development-environment-in-vs-code-d55ba8d705a9
docker vs开发环境


 被折叠的 条评论
为什么被折叠?
被折叠的 条评论
为什么被折叠?
 到【灌水乐园】发言


