


 本文介绍了如何在Gitlab CI中使用Cypress.io进行集成测试的配置和实践。从安装Cypress,添加TypeScript支持,到优化测试结构,以及解决在Gitlab CI中遇到的挑战,如并行化测试和速度问题。通过遵循最佳实践,团队可以确保测试的稳定性和效率,从而提高整体开发流程的可靠性。
赛普拉斯天线
Late evening calls, reverted releases, lost revenue, and eventually fear of touching anything in legacy code not to break something. Nobody likes that. Do you know what is one of the best ways to avoid this? Integration tests!
傍晚的电话,恢复的发行,收入损失,最终担心触摸遗留代码中的任何内容都不会破坏某些内容。 没有人喜欢。 您知道避免这种情况的最佳方法之一是什么? 集成测试!
We at Kiwi.com use Cypress.io for some time, and we already had to rethink how we write such tests to keep them efficient and stable. One topic that plays a role in it sometimes remains forgotten: configuration. In this post, we would like to share with you some tips on how we now set up Cypress tests with Typescript support for a typical Gitlab CI pipeline.
我们在Kiwi.com使用Cypress.io已有一段时间,我们已经不得不重新考虑如何编写这样的测试以保持它们的效率和稳定性。 在其中起作用的一个主题有时仍然被遗忘:配置。 在本文中,我们想与您分享一些有关如何现在为典型的Gitlab CI管道设置带有Typescript支持的赛普拉斯测试的技巧。
在我们开始之前... (Before we start…)
You can see all topics discussed here in the following repository:
您可以在以下存储库中查看此处讨论的所有主题:
回归本源 (Back to Basics)
Beginnings are fairly easy and well described in the documentation. First, we install cypress from npm and run yarn cypress open to get the autogenerated skeleton. After adding the typescript, renaming files to .ts and reshuffling, we get a structure like this:
入门非常容易,并且在文档中有很好的描述。 首先,我们从npm安装cypress,并yarn cypress open以获取自动生成的骨架。 添加打字稿,将文件重命名为.ts并重新.ts ,我们得到如下结构:
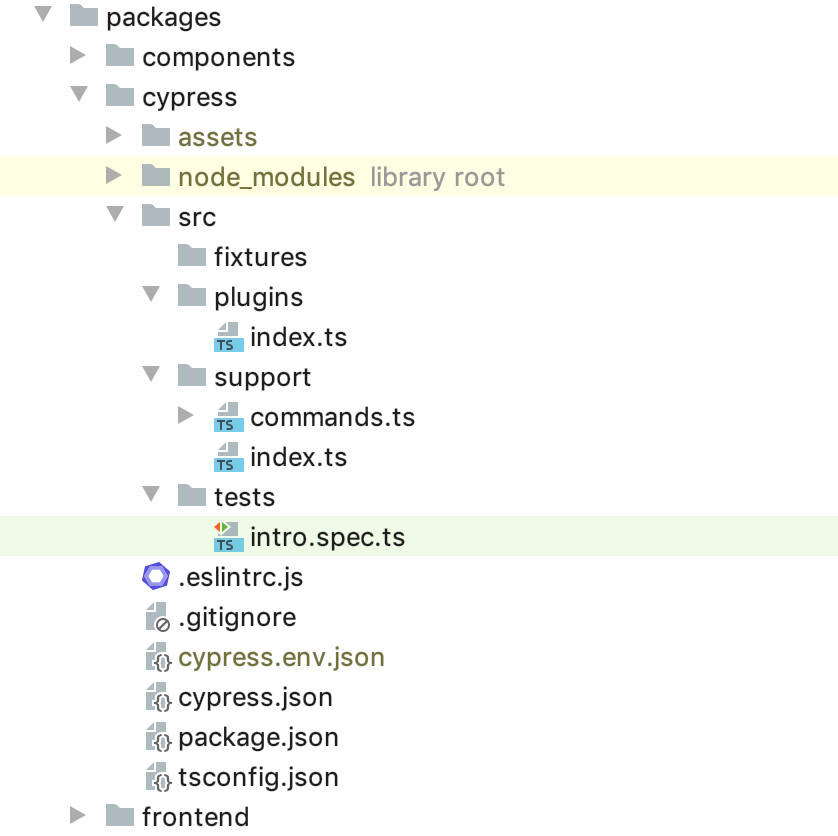
Notice that we use monorepo setup with yarn workspaces — our tests are placed there along with our frontend. To get that, we had to change some paths in cypress.json :
注意,我们在纱线工作区中使用了monorepo设置-我们的测试与前端一起放置在此处。 为此,我们必须在cypress.json更改一些路径:
{
  "fixturesFolder": "src/fixtures",
  "integrationFolder": "src/tests",
  "pluginsFile": "src/plugins",
  "supportFile": "src/support",
  "screenshotsFolder": "assets/screenshots",
  "videosFolder": "assets/videos"
}
Every time we run a test, all screenshots and videos are stored in the assets folder. Trust me, you don’t want to commit it accidentally, so we will add the following lines to .gitignore with possible env file:
每次我们进行测试时,所有屏幕截图和视频都存储在assets文件夹中。 相信我,您不想意外提交它,因此我们将在可能的env文件中向.gitignore添加以下行:
assets
cypress.env.json
As we want to follow the best practices and write clean code, we will add ESLint too. Since it’s already there for the whole repository, we need to just extend it: yarn workspace cypress add eslint-plugin-cypress --dev to install eslint-plugin-cypress in our cypress workspace and then we create .eslintrc.js :
由于我们希望遵循最佳实践并编写简洁的代码,因此我们还将添加ESLint。 由于它已经存在于整个存储库中,因此我们只需对其进行扩展: yarn workspace cypress add eslint-plugin-cypress --dev以在我们的cypress工作区中安装eslint-plugin-cypress ,然后创建.eslintrc.js :
module.exports = {
  extends: ["plugin:cypress/recommended"],
  plugins: ["eslint-plugin-cypress"],
  rules: {
    // does not make sense in Cypress world
    "promise/prefer-await-to-then": OFF,
  },
};
Your exact configuration may vary, but the philosophy is the same — you should have one root ESLint configuration and override only what’s necessary for cypress workspace. For example, we force devs to use async/await in unit tests but we turned off thepromise/prefer-await-to-then rule for cypress workspace because cypress commands are not regular promises.
您的确切配置可能有所不同,但是原理是相同的–您应该具有一个根ESLint配置,并且仅覆盖cypress工作区所需的配置。 例如,我们强迫开发人员在单元测试中使用async / await,但是由于cypress命令不是常规的promise,所以我们关闭了cypress工作区的promise/prefer-await-to-then规则。
让我们写第一个测试 (Let’s write the first test)
Now it’s about the time to finally add some tests. For the beginning, we will check just that the Kiwi.com homepage is loaded, the navbar on top is shown and a user can open the hamburger menu:
现在是时候终于要添加一些测试了。 首先,我们将仅检查是否已加载Kiwi.com主页,显示了顶部的导航栏,并且用户可以打开汉堡包菜单:
describe("Landing page", () => {
  it("shows navigation menu", () => {
    cy.visit("/");
    cy.get("[data-test='NavBar']").should("be.visible");
    cy.get("[data-test='NavBar-SideNav-Open']").click();
    cy.get("[data-test='NavBar-SideNav']").should("be.visible");
  });
});
And the resulting code is…ewww, not great, not terrible.
结果代码是……ewww,不好,也不可怕。
we follow best practices by using
data-testattributes for selectors, but it’s a lot of writing and we have to use quotes inside the string我们通过对选择器使用
data-test属性来遵循最佳做法,但这需要大量的编写工作,我们必须在字符串中使用引号after a couple of weeks or months, it might not be clear what exactly is happening in the test
在几周或几个月后,可能不清楚测试中到底发生了什么
We can do a lot better! In the beginning, we might be tempted to add a custom command to select elements more easily, something like cy.getByDataTest("Navbar"). It turns out there is even a better solution. We use Testing Library for unit tests and there is a variant for Cypress too. Let’s use it:
我们可以做得更好! 在一开始,我们可能会想添加一个自定义命令来更轻松地选择元素,例如cy.getByDataTest("Navbar") 。 事实证明,还有更好的解决方案。 我们使用测试库进行单元测试,赛普拉斯也有一个变体。 让我们使用它:
yarn workspace cypress add @testing-library/cypressto install the libyarn workspace cypress add @testing-library/cypress安装libIn
tsconfig.json, we add support for types:"types": ["cypress", "@types/testing-library__cypress"]在
tsconfig.json,我们添加了对类型的支持:"types": ["cypress", "@types/testing-library__cypress"]We upgrade
src/support/index.tsfile to make use of it:我们升级
src/support/index.ts文件以使用它:
import "@testing-library/cypress/add-commands";
import { configure } from "@testing-library/cypress";import "./commands";configure({ testIdAttribute: "data-test" });
And this is how we rewrite our test:
这就是我们重写测试的方式:
describe("Landing page", () => {
  it("shows navigation menu", () => {
    cy.visit("/");
    cy.findByTestId("NavBar").should("be.visible");    cy.log("🍔 menu can be opened");
    cy.findByTestId("NavBar-SideNav-Open").click();
    cy.findByTestId("NavBar-SideNav").should("be.visible");
  });
});
Small changes make wonders. Selecting elements on the page is no longer cumbersome. We also increased readability by adding cy.log.
小变化就能创造奇迹。 在页面上选择元素不再麻烦。 我们还通过添加cy.log提高可读性。
cy.log may seem unnecessary but we learned this a hard way. The complexity of both application and user scenarios tends to increase over time, real specs files are usually longer and when the test suddenly starts failing after months, it might be challenging to understand at first what the hell we do at that exact step, even with a screenshot or video recording. So make your future self happier by documenting each logical user step… or consider the BDD approach with cucumber.
cy.log似乎不必要,但是我们很难学到。 随着时间的流逝,应用程序和用户场景的复杂性往往会增加,真实规格文件通常会更长,并且当测试在几个月后突然开始失败时,一开始就很难理解我们在该确切步骤上到底做了什么,即使屏幕截图或录像。 因此,通过记录每个逻辑用户步骤来使自己的未来更加快乐……或考虑使用BDD方法来处理Cucumber。
在Gitlab CI中上线 (Going live in Gitlab CI)
Alright, we’ve implemented the first test and it passes locally, now it’s important to incorporate it to our continuous integration to make sure our application works before we merge our changes.
好了,我们已经实施了第一个测试,并且该测试在本地通过,现在将其合并到我们的持续集成中很重要,以确保我们的应用在合并更改之前可以正常工作。
As we use Gitlab CI, we’re gonna extend our .gitlab-ci.yml file:
当我们使用Gitlab CI时,我们将扩展.gitlab-ci.yml文件:
variables:
  CYPRESS_CACHE_FOLDER: $CI_PROJECT_DIR/.cache/Cypresscache:
  key:
    files:
      - yarn.lock
    prefix: $CI_PROJECT_PATH_SLUG
  paths:
    - .cache- node_modules
    - packages/*/node_modules
  policy: pullcypress:
  stage: verify
  environment:
    name: review/$CI_COMMIT_REF_SLUG
  image: cypress/browsers:node12.18.0-chrome83-ff77
  script:
    - yarn --frozen-lockfile
    - export     CYPRESS_BASE_URL="https://$CI_ENVIRONMENT_SLUG.$KUBE_BASE_DOMAIN"
    - yarn workspace cypress cypress run -b chrome --headless
  artifacts:
    when: on_failure
    expire_in: 3 days
    paths:
      - packages/cypress/assets
Again, your exact configuration will vary depending on your use case and used tech stack, but here are some important points:
同样,您的确切配置将根据您的用例和使用的技术堆栈而有所不同,但以下是一些重要事项:
Cypress needs binaries for its execution, so if we cache
node_modulesdependencies in Gitlab CI cache, we define where such binaries should be stored with aCYPRESS_CACHE_FOLDERvariable. Then we have to include this path in the cache.赛普拉斯需要二进制文件来执行它,因此,如果我们在Gitlab CI高速缓存中缓存
node_modules依赖项,我们将使用CYPRESS_CACHE_FOLDER变量定义将此类二进制文件存储在CYPRESS_CACHE_FOLDER。 然后,我们必须将此路径包括在缓存中。Notice we use
yarn.lockas a key. This enables us to reuse cache even between different branches if dependencies haven’t changed.注意,我们使用
yarn.lock作为键。 如果依赖关系没有改变,这使我们即使在不同分支之间也可以重用缓存。- We run our tests in headless chrome and store screenshots and video recordings if it fails. 我们会在无头Chrome中运行测试,并在失败时存储屏幕截图和录像。
To run tests successfully, we had to tell Cypress against which URL it should be run. Such URL is usually created dynamically depending on the branch name. We set it through
CYPRESS_BASE_URLvariable. Notice we had to specify the environment name in the job definition too:review/$CI_COMMIT_REF_SLUGin our case. This is necessary to have access to the environment variables related to the specific environment and should usually correspond 1:1 to the job definition of your deployment.为了成功运行测试,我们必须告诉赛普拉斯应针对哪个URL运行它。 通常根据分支名称动态创建此类URL。 我们通过
CYPRESS_BASE_URL变量进行设置。 注意,我们也必须在作业定义中指定环境名称:本例中review/$CI_COMMIT_REF_SLUG。 必须具有访问与特定环境相关的环境变量的权限,并且通常应与部署的作业定义1:1对应。
…失败 (…annnnd it fails)
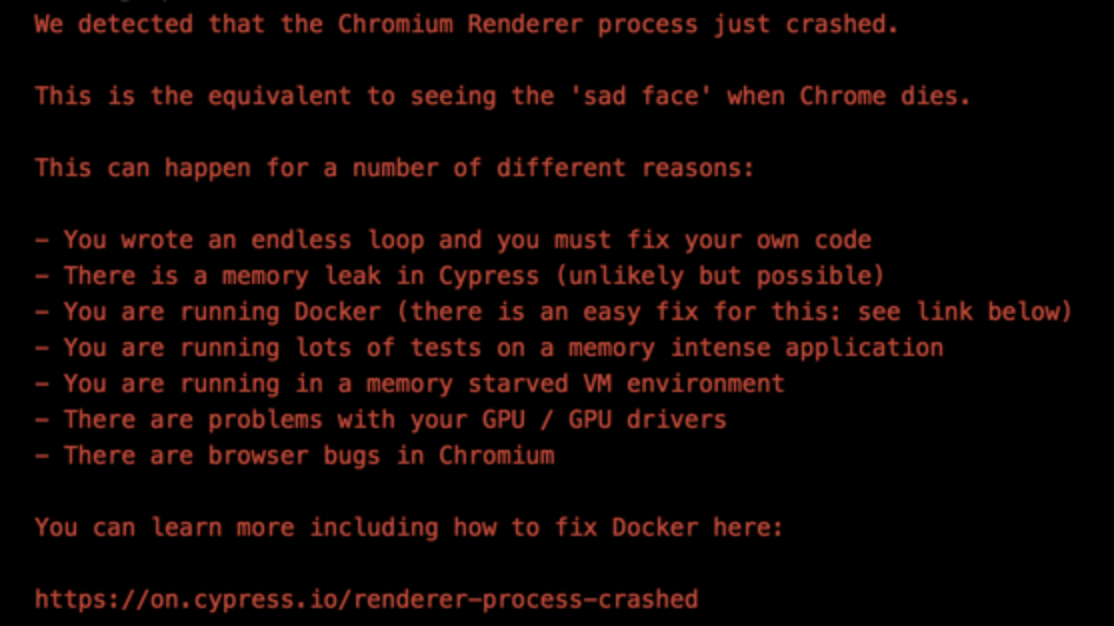
Suppose you pushed commits to the repository, a merge request went through review and was merged. Everything was up & green. Then you went to the office the next day and your colleague asked you to help with the failed job.
假设您将提交推送到存储库,则合并请求经过审查并被合并。 一切都一切顺利和绿色。 然后第二天您去了办公室,您的同事要您为失败的工作提供帮助。
The output shows a weird error:
输出显示一个奇怪的错误:
Or almost nothing while the job execution hung up:
或在执行作业挂起时几乎没有:
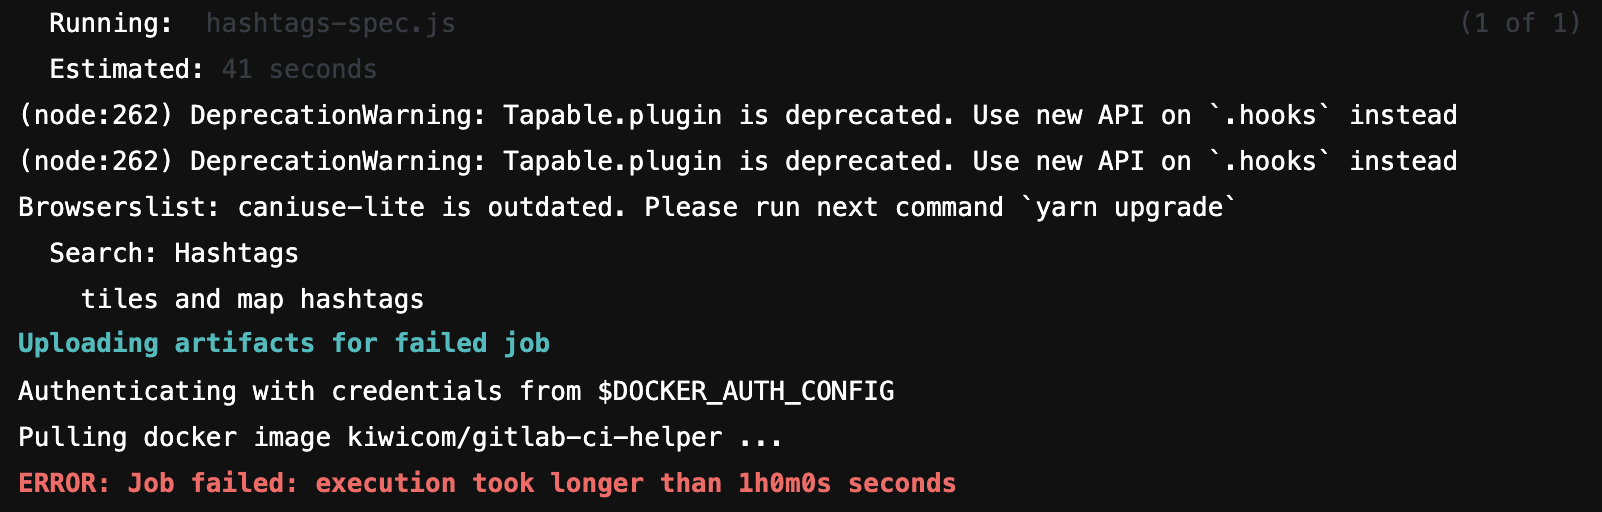
The usual common denominator of these issues occurring only in Gitlab CI is virtual shared memory. The job runner always runs some Docker image and the default setting (64 MB) is too small for a modern browser.
仅在Gitlab CI中发生的这些问题的通常共同点是虚拟共享内存。 作业运行程序始终运行某些Docker映像,默认设置(64 MB)对于现代浏览器而言太小。
You have several options: either ask DevOps to change Gitlab configuration to run Docker images with bigger shared memory (with --shm-size an argument to docker run command where it’s questionable what’s enough), or add shm to volumes (/dev/shm:/dev/shm ), or change IPC mode (--ipc=host which might be refused due to security concerns), or you can just disable it for chromium browsers.
您有几种选择:要么要求DevOps更改Gitlab配置,以使用更大的共享内存来运行Docker映像(使用--shm-size到--shm-size run命令的一个参数,如果有疑问,这是否足够?),或者向卷添加shm( /dev/shm:/dev/shm ),或更改IPC模式( --ipc=host出于安全考虑可能会被拒绝),也可以仅对--ipc=host浏览器禁用它。
To do so, use Cypress Browser Launch API to alter command-line arguments:
为此,请使用赛普拉斯浏览器启动API来更改命令行参数:
module.exports = (on, config) => {
  on("before:browser:launch", (browser = {}, launchOptions) => {
    if (browser.family === "chromium") {
      launchOptions.args.push("--disable-dev-shm-usage");
    }    return launchOptions;
  })
}
While the CI job passes again, Chrome will fall back to using temp files instead
CI作业再次通过时,Chrome将退回到使用临时文件
成长(Growing up)
What started with a single test grew into a full suite. Now one of the hottest concerns in your team is probably the speed of tests, prolonging the execution of the whole pipeline for every merge request.
从一次测试开始,逐渐发展成为一套完整的产品。 现在,团队中最关注的问题之一可能是测试的速度,这会延长每个合并请求的整个管道的执行时间。
Although it’s not the only way how to tackle it, it’s definitely one of the easiest — parallelization using the paid Cypress Dashboard. It requires two lines of code change in .gitlab-ci.yml :
尽管这不是解决问题的唯一方法,但它绝对是最简单的方法之一-使用付费赛普拉斯仪表板进行并行化。 它需要在.gitlab-ci.yml两行代码更改:
# other lines remain the same
cypress:
  script:
    - yarn workspace cypress cypress run -b chrome --headless --record
  parallel: 3
With theparallel: 3 Gitlab will schedule three parallel jobs that will execute the same script. That would normally lead to executing tests three times, but thanks to--record flag, Cypress will send all spec files to Dashboard service first and Dashboard redistributes tests back to Gitlab runners based on previous runs.
使用parallel: 3 Gitlab将调度三个并行作业,这些作业将执行相同的脚本。 通常,这将导致执行三次测试,但是由于--record标志,赛普拉斯将首先将所有规格文件发送到Dashboard服务,并且Dashboard根据先前的运行将测试重新分发给Gitlab运行程序。
Don’t forget that you have to set CYPRESS_RECORD_KEY environment variable to be able to use Dashboard with --record flag:
不要忘记,您必须设置CYPRESS_RECORD_KEY环境变量才能使用带有--record标志的仪表板:

Given you have twelve spec files, each worker will likely get four files back to execute. But it might be just two: for example, if one of your tests is time-consuming and gets several minutes to execute, it’s usually scheduled the first and the runner receiving such spec might get only one more. The exact behavior depends on our context and current magic hidden behind Dashboard.
假设您有十二个规格文件,每个工作人员将可能会取回四个文件来执行。 但这可能只有两个:例如,如果您的一个测试很耗时并且需要几分钟才能执行,那么通常会排定第一个,而收到此类规范的跑步者可能只会再获得一个。 确切的行为取决于我们的环境和仪表板后面隐藏的当前魔术。
Parallelization through Cypress Dashboard this way has one crucial drawback: if any of your tests fail and you trigger a rerun, all tests will get executed again.
通过赛普拉斯仪表板进行并行化有一个关键缺陷:如果您的任何测试失败并触发了重新运行,则所有测试将再次执行。
Luckily, Cypress.io team has just released version 5.x with test retries. So little momentary hiccups do not jeopardize your execution: if some of your tests are a little flaky and fail, they’re retried again before reported as failed.
幸运的是,Cypress.io团队刚刚发布了5.x版本,并进行了重试。 如此短暂的打ic并不会危害您的执行:如果您的某些测试有些不稳定并且失败,则在报告失败之前会再次尝试它们。
If you are still on the older version and can’t update, cypress-plugin-retries plugin does the same as test retries in 5.x.
如果您仍在使用旧版本并且无法更新,则cypress-plugin-retries插件的功能与5.x中的测试重试相同。
Neverlethess, as we learned the hard way, it might not be that easy even with retries — especially if you didn’t follow the best practices before. In case we would implement our first test as follow:
没关系,正如我们所学到的那样,即使重试也不容易,尤其是如果您以前没有遵循最佳实践的话。 如果我们执行以下第一个测试:
describe("Landing page", () => {
  before(() => {
    cy.visit("/");
  });it("shows navigation menu", () => {
    cy.findByTestId("NavBar").should("be.visible");    cy.log("🍔 menu can be opened");
    cy.findByTestId("NavBar-SideNav-Open").click();
    cy.findByTestId("NavBar-SideNav").should("be.visible");
  });
});
Why? That’s because our “shows the navigation menu” test is not retriable. Before hook is guaranteed to run only once so when the test fails, “before” is not run again and we suddenly miss the beginning — visiting our page. As a rule of thumb, you shall almost never use before hooks as there isn’t usually a need for them. Every interaction with the web page should be done inside the test. Also, use “beforeEach” only for real test initialization: seeding database, setting correct cookies, etc.
为什么? 这是因为我们的“显示导航菜单”测试不可重试。 保证hook之前只能运行一次,因此当测试失败时,“ before”不会再次运行,我们突然错过了开始的机会,请访问我们的页面。 根据经验,您几乎永远不要在钩子之前使用,因为通常不需要钩子。 与网页的每次互动都应在测试内完成。 另外,仅将“ beforeEach”用于真正的测试初始化:播种数据库,设置正确的cookie等。
Of course, don’t forget the first rule of the Cypress club: do not share any state between tests.
当然,不要忘记赛普拉斯俱乐部的第一条规则:两次测试之间不要共享任何状态。
Cypress tests are one of the key pieces that keep us from riding Kübler-Ross curve every time we want to release something. At the same time, it’s still programming, vulnerable to similar afflictions as any other code. As you could see, the profound configuration is the first step into having stable tests on which you can rely.
赛普拉斯测试是使我们每次想要释放某些东西时都无法骑乘库伯勒-罗斯曲线的关键部件之一。 同时,它仍在编程中,容易遭受与其他任何代码类似的困扰。 如您所见,强大的配置是您可以依赖的稳定测试的第一步。
我们正在招聘 (We’re hiring)
Are you interested in working in Kiwi.com, or just receiving similar articles from Kiwi.com writers? Check our open positions and subscribe code.kiwi.com newsletter so we can inform you about new articles in the last month.
您是否有兴趣在Kiwi.com工作,或者只是收到Kiwi.com作家的类似文章? 点击我们的空缺职位并发布code.kiwi.com新闻,以便我们可以在上个月通知您有关新文章的信息。
赛普拉斯天线


 被折叠的 条评论
为什么被折叠?
被折叠的 条评论
为什么被折叠?
 到【灌水乐园】发言


