


本系列相关链接
尚硅谷 宋红康 JVM教程_01_内存与垃圾回收篇——01 (20210103-20210110)
https://blog.youkuaiyun.com/wei198621/article/details/112128852
尚硅谷 宋红康 JVM教程_01_内存与垃圾回收篇——02 (20210111-20210117)
https://blog.youkuaiyun.com/wei198621/article/details/112389917
尚硅谷 宋红康 JVM教程_02_字节码与类的加载篇 (20210118~ )
https://blog.youkuaiyun.com/wei198621/article/details/112760463
todo 3 , 4
目录
尚硅谷 宋红康 JVM教程 学习笔记
https://www.bilibili.com/video/BV1PJ411n7xZ
ppt地址:
https://download.youkuaiyun.com/download/wei198621/14040543
JVM参数列表:
https://docs.oracle.com/javase/8/docs/technotes/tools/unix/java.html
1.Class文件结构
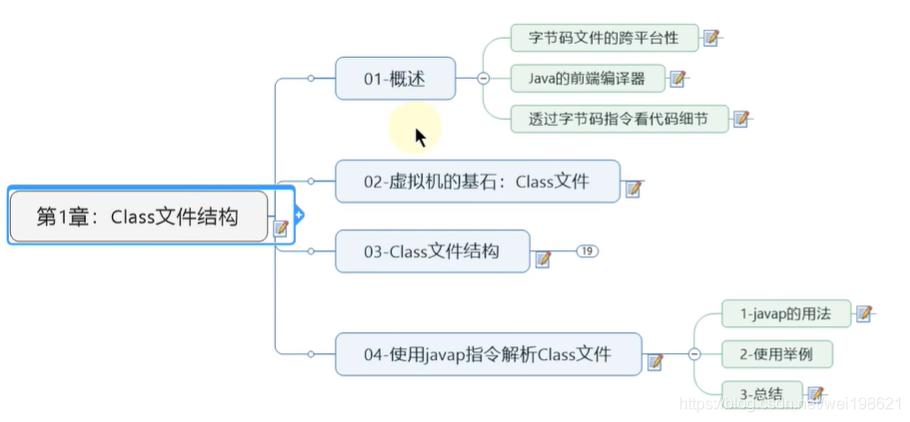
P204-JVM中篇内容概述 11:51
https://www.bilibili.com/video/BV1PJ411n7xZ?p=204
1.Class文件结构
2.字节码指令集与解析举例
3.类的加载过程详解
4.再谈类加载器
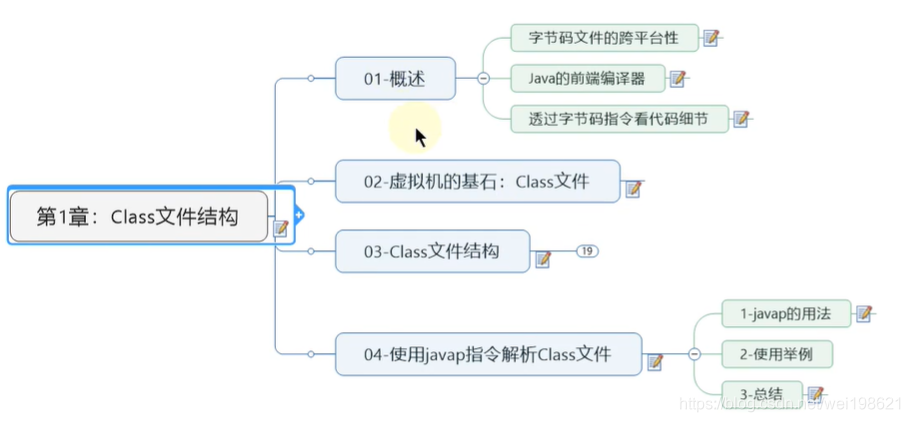
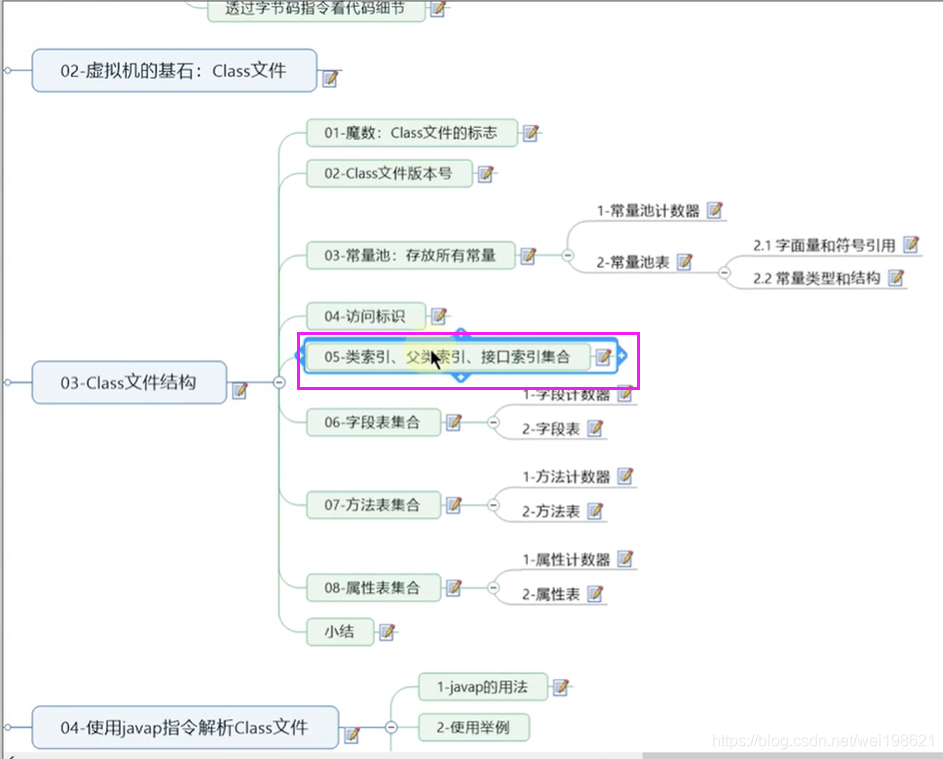
本节开始用思维导图
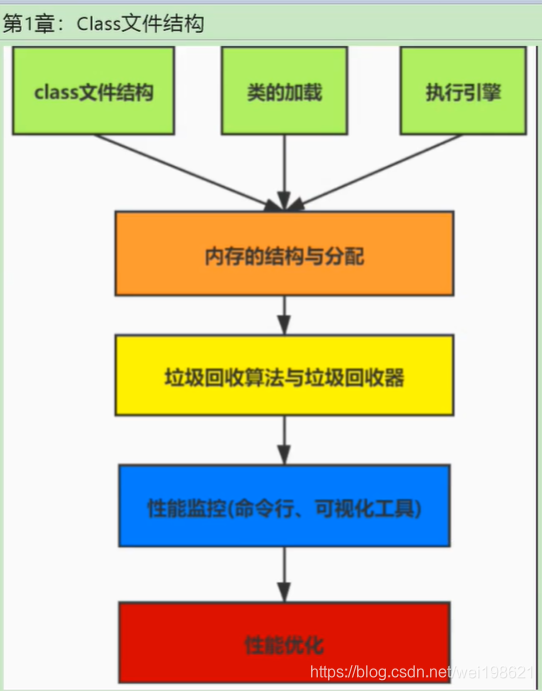
中篇开始关注字节码文件,类加载器
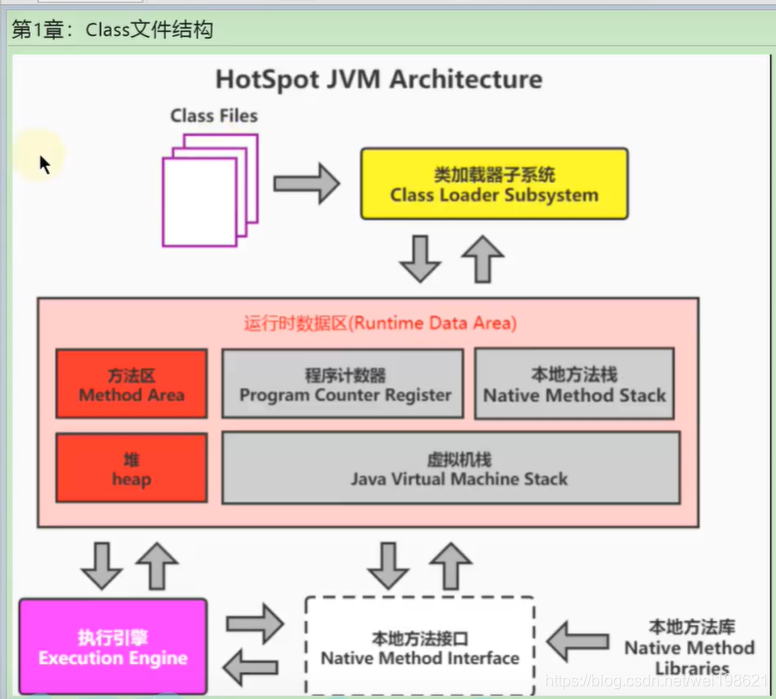
下篇,讲性能监控 、 性能调优
P205-字节码文件的跨平台性 13:12
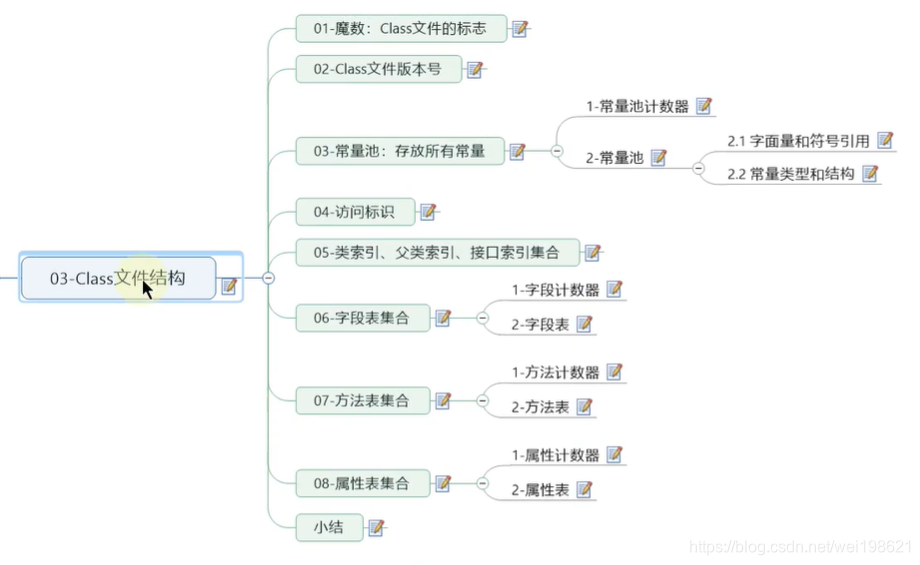
第一章_尚硅谷_宋红康_Class文件结构.mmap
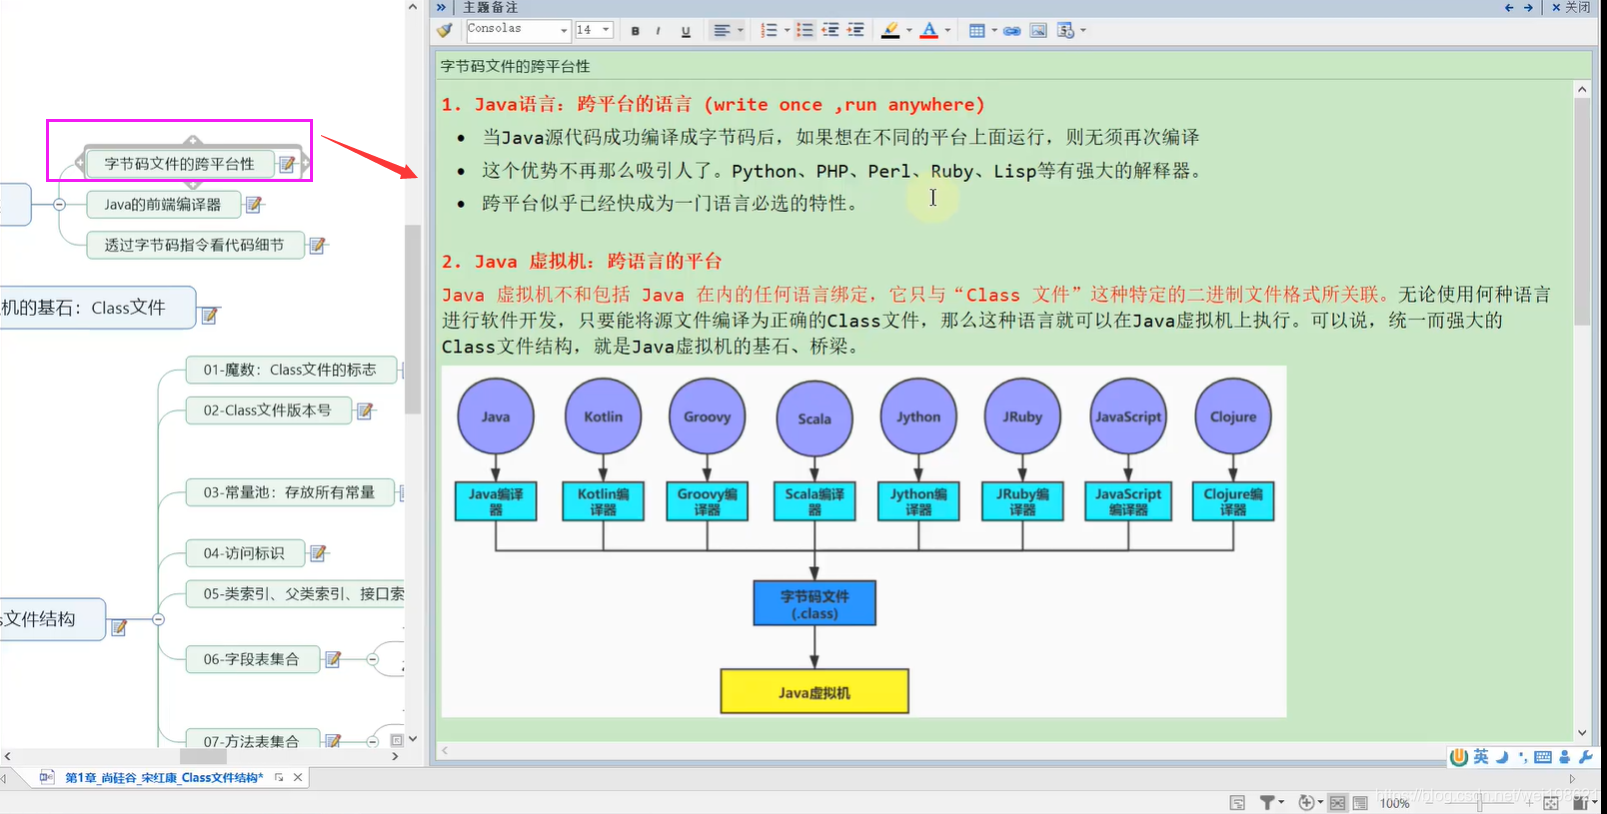
 java语言跨平台,write once,run anywhere
java虚拟机:跨语言的平台 —Java虚拟机 只与遵循JVM规范的“class文件”关联
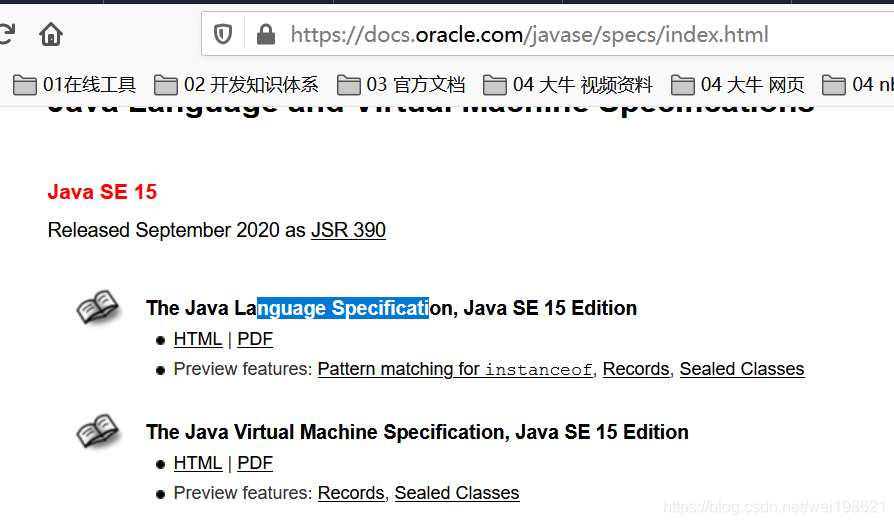
docs.oracle.com/javase/specs/index.html
P206-了解Java的前端编译器 08:30
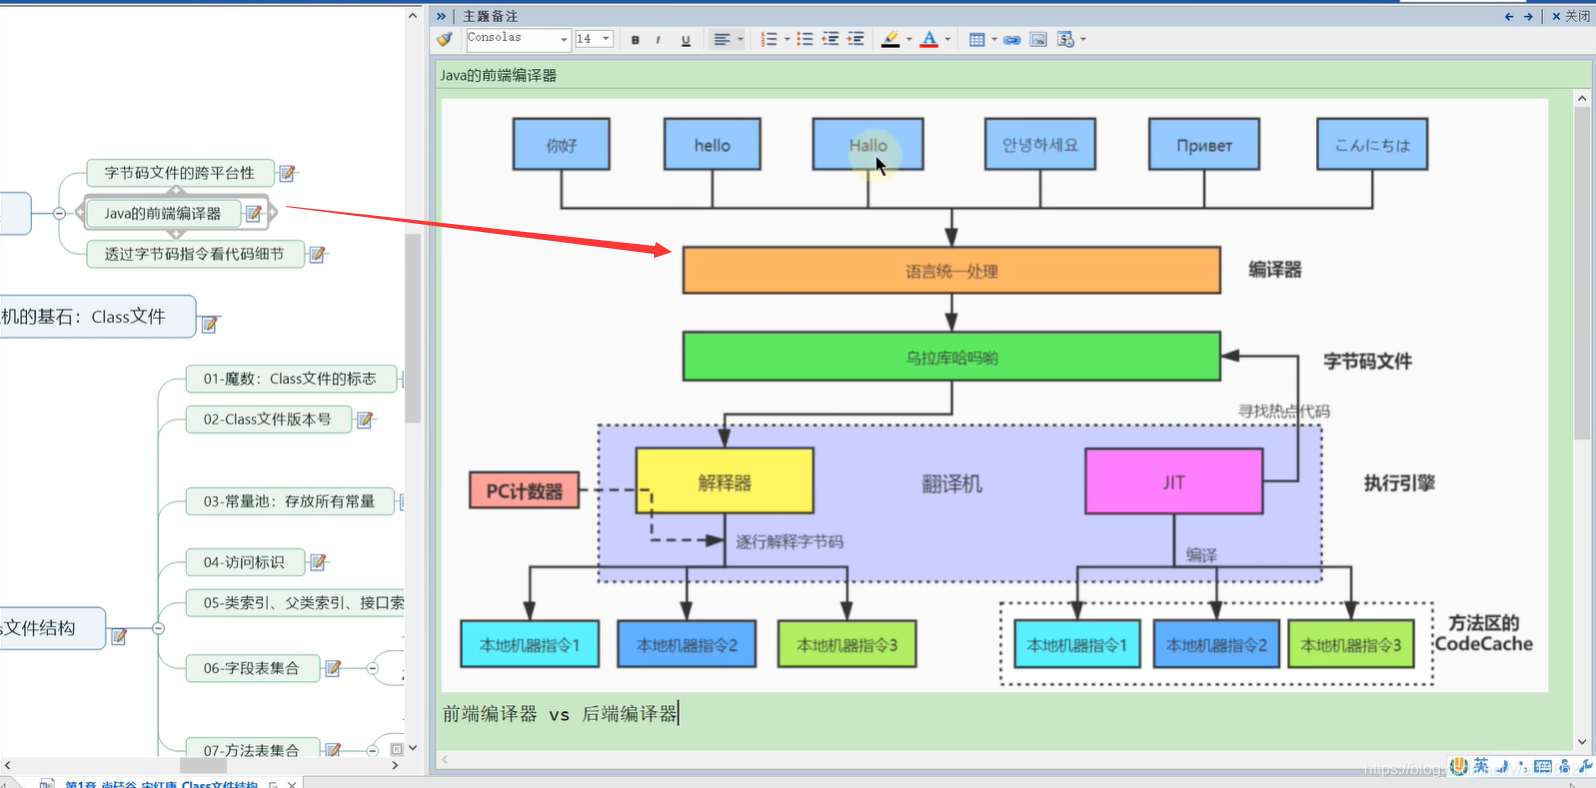
java 是半解释 半编译型的语言
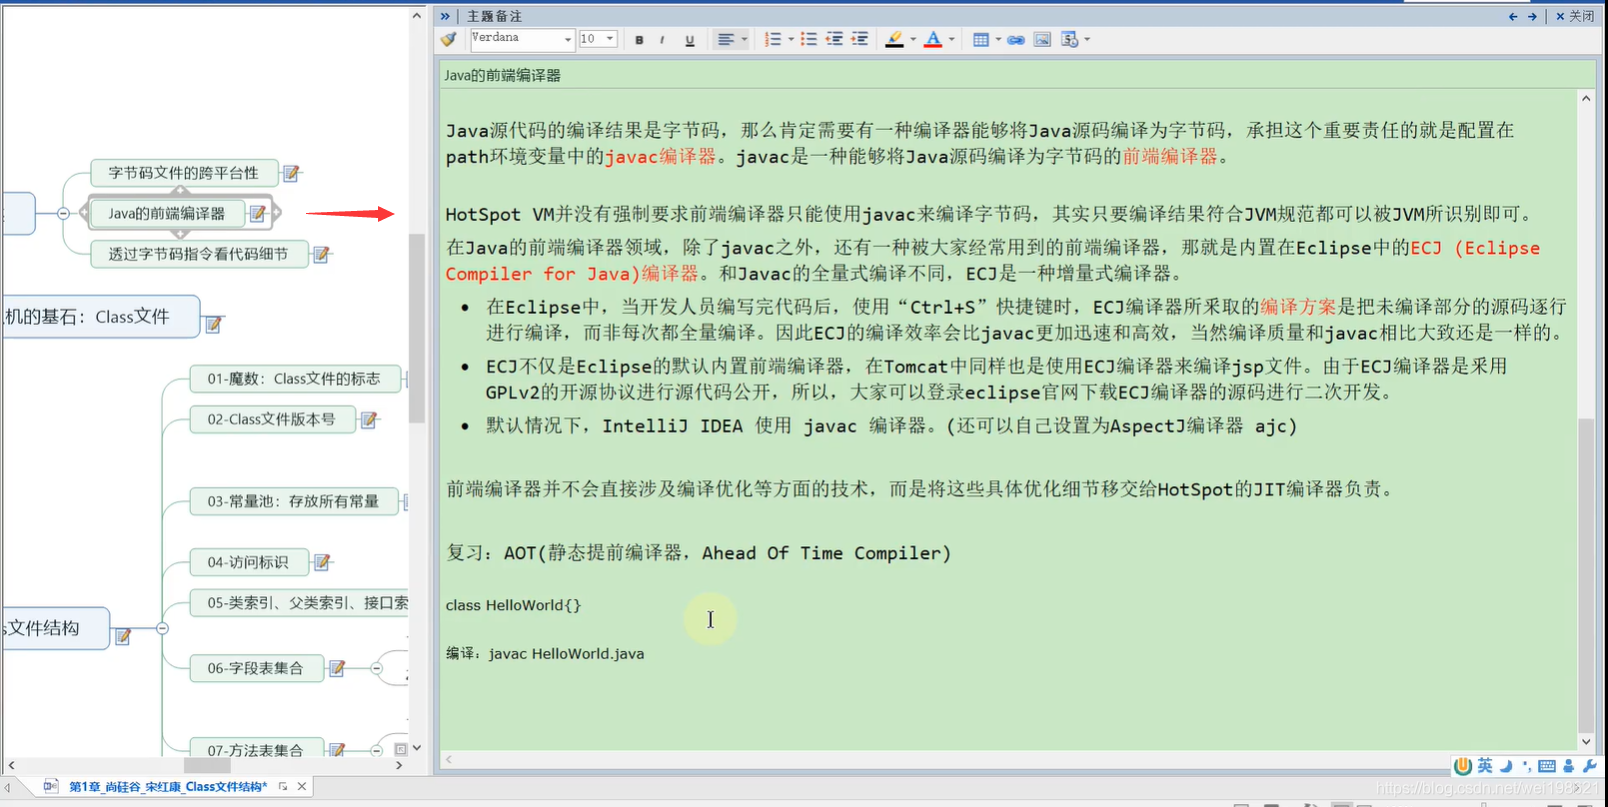
javac 是一种能够将JAVA源码编译为字节码的前端编译器,是一种全量编译器。
ECJ编译器: Eclipse Compiler for java ,ECJ ,是一种增量式的编译器,Tomcat中使用ECJ编译器编译JSP文件
AOT: Ahead of Time Compiler ,静态提前编译器。
P207-透过字节码看代码执行细节举例1 11:15
 Integer.ValueOf()
Integer Cache : -128~127 ,在这之间的数字,预先加载。
package com.tiza.jvm.chapter21;

/**
 * @author leowei
 * @date 2021/1/18  - 23:33
 */
public class IntegerTest {
    public static void main(String[] args) {
        m1();
        m2();
        m3();
    }

    /**
     *
     0 bipush 10
     2 invokestatic #5 <java/lang/Integer.valueOf>
     5 astore_0
     6 bipush 10
     8 invokestatic #5 <java/lang/Integer.valueOf>
     11 astore_1
     12 getstatic #6 <java/lang/System.out>
     15 aload_0
     16 aload_1
     17 if_acmpne 24 (+7)
     20 iconst_1
     21 goto 25 (+4)
     24 iconst_0
     25 invokevirtual #7 <java/io/PrintStream.println>
     28 return

     通过查看字节码文件,看到i1  i2 取值的时候会调用valueOf方法,
     如下所示valueOf 方法 会从一个cache 中取数据
     Cache 的值 在 -128~127 之间
     所以取 -128 ~ 127 之间的数字,不会新建空间,调用cache中的空间就可以了

     * @since  1.5
    public static Integer valueOf(int i) {
        if (i >= IntegerCache.low && i <= IntegerCache.high)
            return IntegerCache.cache[i + (-IntegerCache.low)];
        return new Integer(i);
    }

     这解释了  m1  m2  连个问题

     */
    private static void m1() {
        Integer i1=10;
        Integer i2=10;
        System.out.println(i1==i2);  //true
    }


    private static void m2() {
        Integer i3=128;
        Integer i4=128;
        System.out.println(i3==i4);   //false
    }

    /**
     *
     0 iconst_5
     1 invokestatic #5 <java/lang/Integer.valueOf>
     4 astore_0
     5 iconst_5
     6 istore_1
     7 getstatic #6 <java/lang/System.out>
     10 aload_0
     11 invokevirtual #8 <java/lang/Integer.intValue>
     14 iload_1
     15 if_icmpne 22 (+7)
     18 iconst_1
     19 goto 23 (+4)
     22 iconst_0
     23 invokevirtual #7 <java/io/PrintStream.println>
     26 return
     此处涉及自动装箱拆箱,暂时没有搞懂此时是装箱还是拆箱  20210118
     */
    private static void m3() {
        Integer x=5;
        int y=5;
        System.out.println(x==y);    //true
    }
}
P208-透过字节码看代码执行细节举例2 03:51
package com.tiza.jvm.chapter21;

/**
 * @author leowei
 * @date 2021/1/18  - 23:55
 */
public class StringTest {
    public static void main(String[] args) {
        // 还是没有搞懂这块,待认真学习
        m1();
        m2();
        m3();
    }

    private static void m1() {
        String str1 =  new String("hello")+new String("world");
        String str2 ="helloworld";
        System.out.println(str1 == str2);  // false      str1  在堆中创建 helloworld     str2 在 stringtable 中 创建 helloworld
    }

    private static void m2() {
        String str1 =  new String("helloworld") ;
        String str2 ="helloworld";
        System.out.println(str1 == str2);  // false       str1  在堆中创建 helloworld     str2 在 stringtable 中 创建 helloworld
    }

    private static void m3() {
        String str1 =  new String("hello")+new String("world");
        String str2 = new String("helloworld");
        System.out.println(str1 == str2);  // false      str1  在堆中创建 helloworld     str2 在 stringtable 中 创建 helloworld
    }
}
P209-透过字节码看代码执行细节举例3 11:52
20210118 todo
- 类的非静态成员变量赋值过程
- 前置1 aload_0 a
- 前置2 父类初始化
- step 1 成员变量 默认初始化 x=0
- step 2 成员变量 显示初始化/代码块中初始化 x=10 后打印
- step 3 构造器初始化 x=20
- step 4 (有了对象后) 对象.属性 赋值
package com.tiza.jvm.chapter21;

/**
 *

 0 aload_0                                             0 是this
 1 invokespecial #1 <java/lang/Object.<init>>         调用构造器,首先调用父类的初始化方法
 4 aload_0
 5 bipush 10
 7 putfield #2 <com/tiza/jvm/chapter21/Father.x>       给x赋值 为 10
 10 aload_0
 11 invokevirtual #3 <com/tiza/jvm/chapter21/Father.print>   打印
 14 aload_0
 15 bipush 20
 17 putfield #2 <com/tiza/jvm/chapter21/Father.x>       给x赋值 为 20
 20 return

 */
class Father{
    int x=10;
    public Father(){
        this.print();
        x=20;
    }

    public void print(){
        System.out.println("Father.x="+x);
    }
}

class Son extends Father{
    int x=30;
    public Son(){
        this.print();
        x=40;
    }
    public void print(){
        System.out.println("Son.x="+x);
    }
}

/**
 * @author leowei
 * @date 2021/1/19  - 7:12
 */
public class SonTest {
    public static void main(String[] args) {
        //m1();
        m2();
        //m3();
    }

    /**
     * 类的非静态成员变量赋值过程
     *  前置1  aload_0   a
     *  前置2  父类初始化
     *  step 1  成员变量  默认初始化   x=0
     *  step 2  成员变量  显示初始化/代码块中初始化  x=10  后打印
     *  step 3  构造器初始化           x=20
     *  step 4  (有了对象后)  对象.属性  赋值
     * 打印内容
     Father.x=10
     20
     */
    private static void m1() {
        Father father = new Father();
        System.out.println(father.x);
    }

    /**
     * new Son  先 new  Father
     Son.x=0
     Son.x=30
     40         --- 属性不存在多态,所以一定是 20
     */
    private static void m2(){
        Son son=new Son();
        System.out.println(son.x);
    }

    /**
     *

     0 aload_0 ---------------------------------------------------- 加载当前 Son  的 this
     1 invokespecial #1 <com/tiza/jvm/chapter21/Father.<init>>  --- 构造器初始化时候,先init 其父类的(Father) 构造器
                                                                --- Father 构造器会执行new Father() 构造器函数中的 this.print()
                                                                --- 此时 Father 类中的  this.print() 中的 this 是 Son  ,所以会打印 Son.x =0 ;
     4 aload_0
     5 bipush 30                                               ---- 注意,此时才赋值30 给X
     7 putfield #2 <com/tiza/jvm/chapter21/Son.x>
     10 aload_0
     11 invokevirtual #3 <com/tiza/jvm/chapter21/Son.print>
     14 aload_0
     15 bipush 40
     17 putfield #2 <com/tiza/jvm/chapter21/Son.x>
     20 return


     Son.x=0
     Son.x=30
     20              --- 属性不存在多态,所以一定是 20
     */
    private static void m3(){
        Father f=new Son();
        System.out.println(f.x);
    }

}
P210-解读Class文件的三种方式 15:47
字节码是一种二进制的类文件,它的内容是JVM指令,不像C,C++由编译器直接生成机器码
什么是字节码 byte code ?
操作码+ 操作数 = 字节码
opcode + operand = byte code
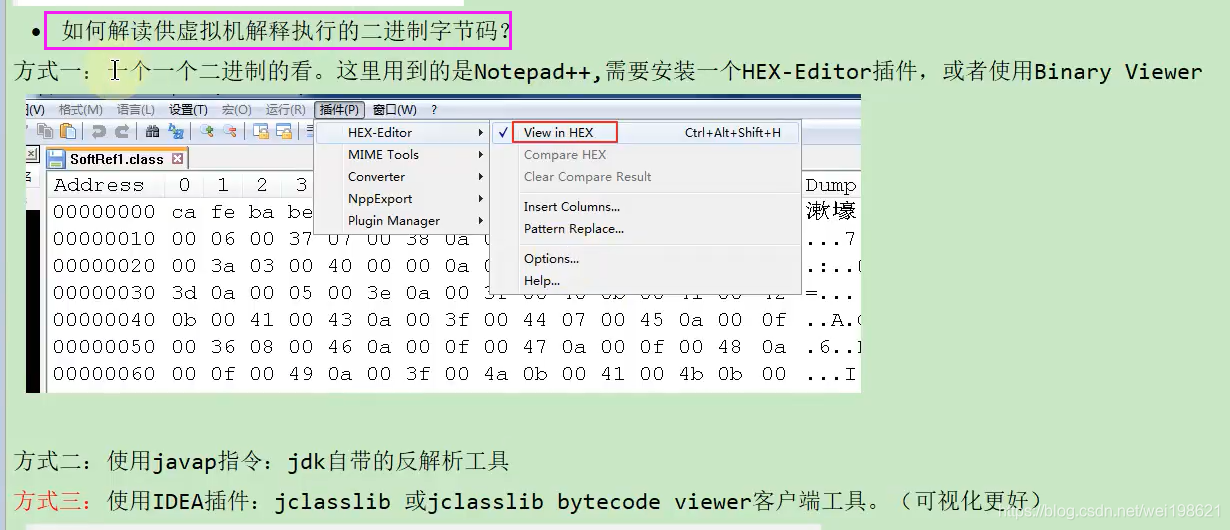
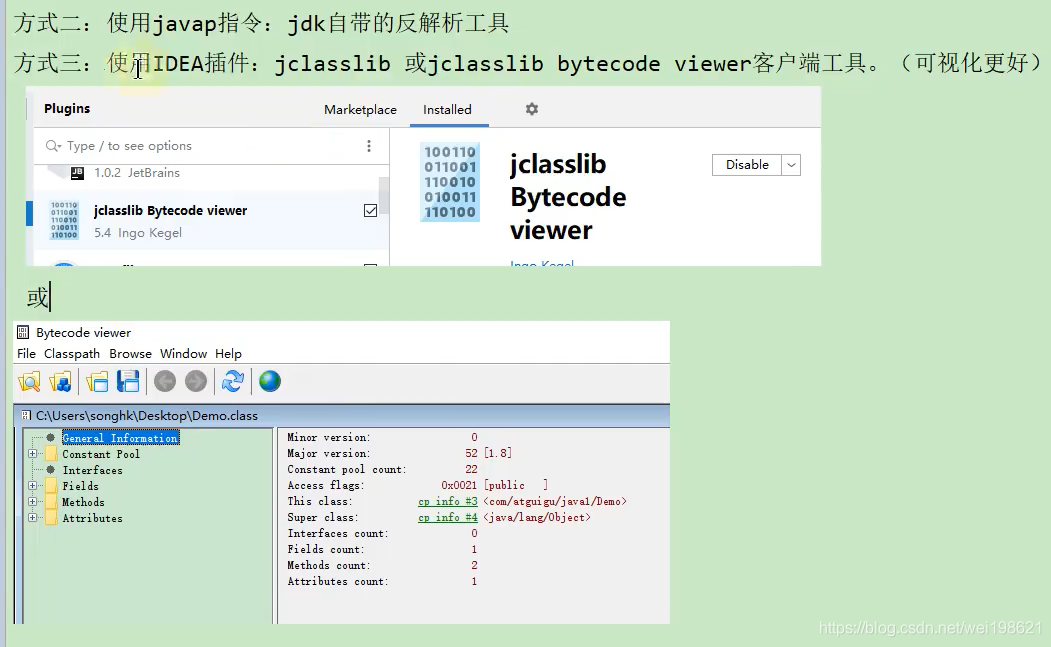
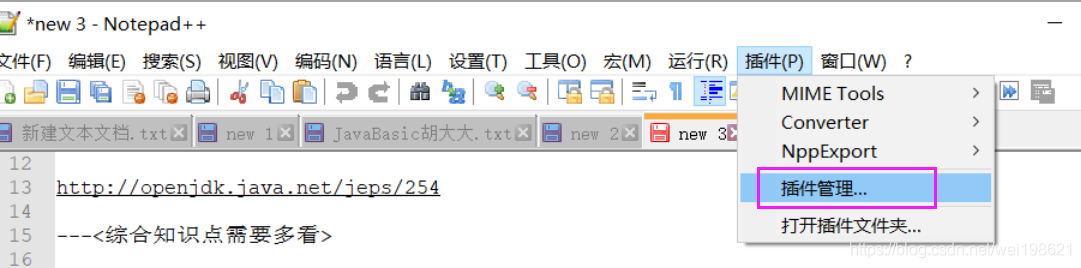
解读字节码的方式三种:
notepad++ (HEX-Editor 插件)
jclasslib 或者 bytecode viewer
javap 反编译指令
https://github.com/chcg/NPP_HexEdit/releases 下载地址
P211-Class文件本质和内部数据类型 15:58
P212-Class文件内部结构概述 08:00
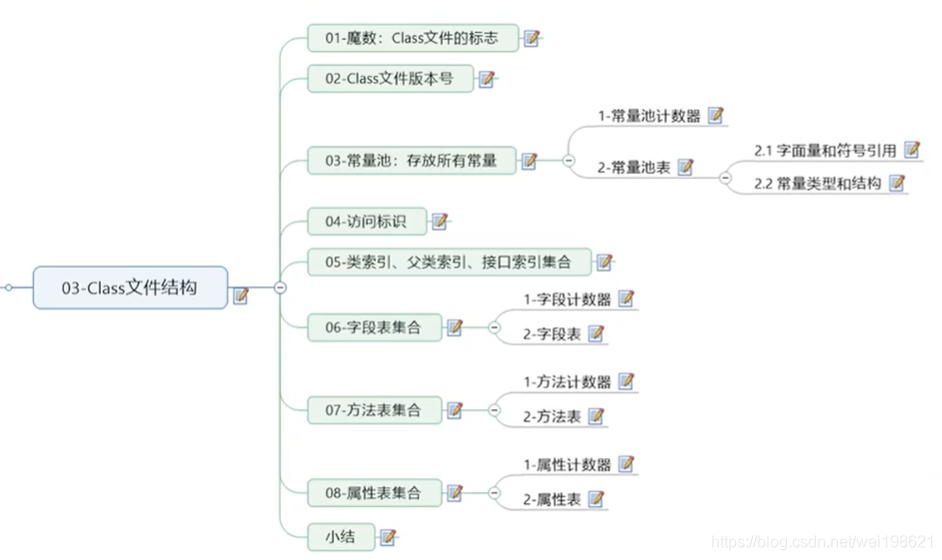
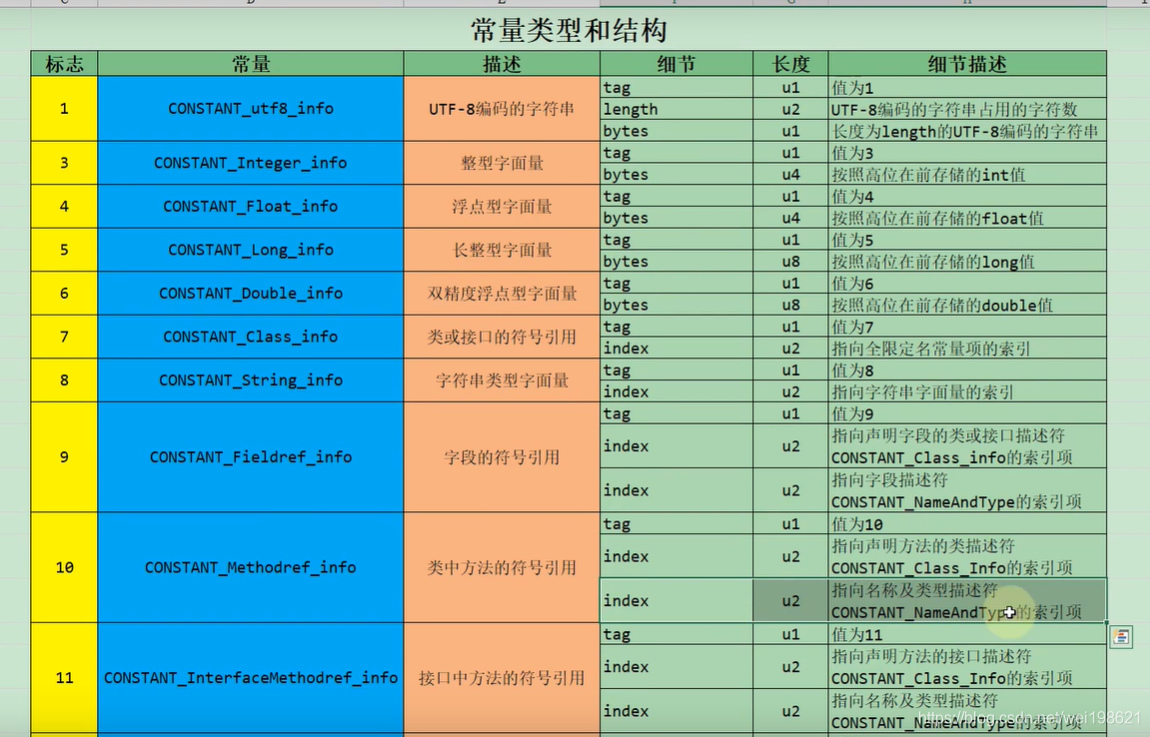
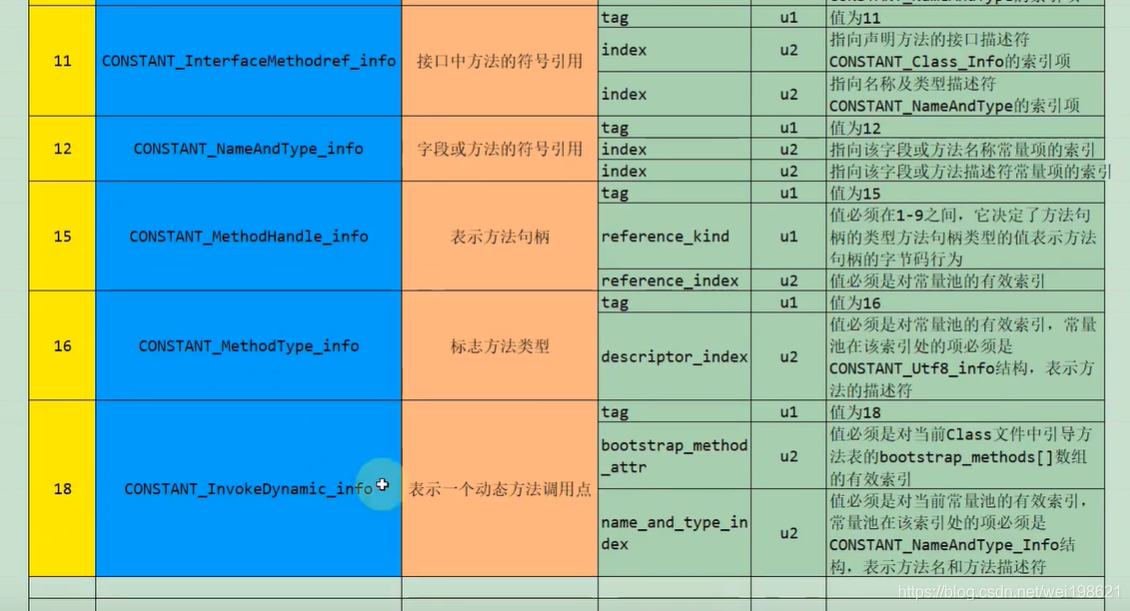
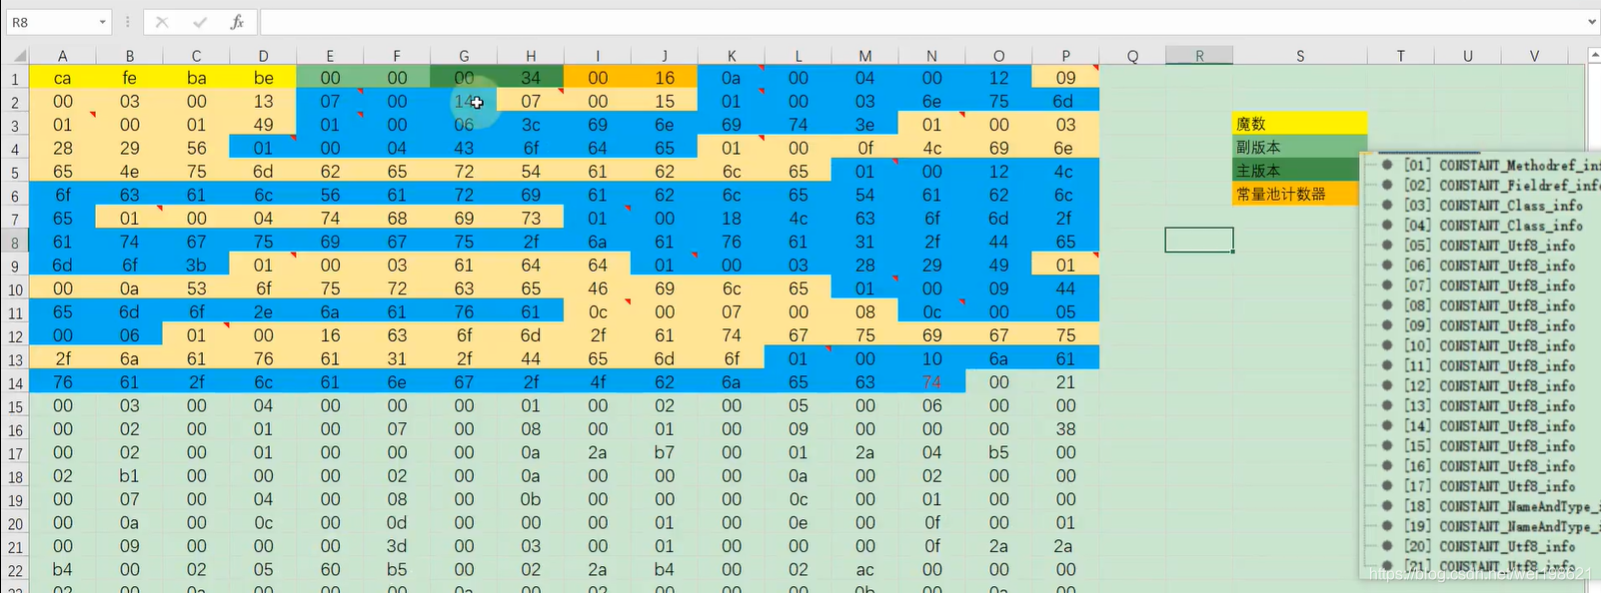
常量类型结构
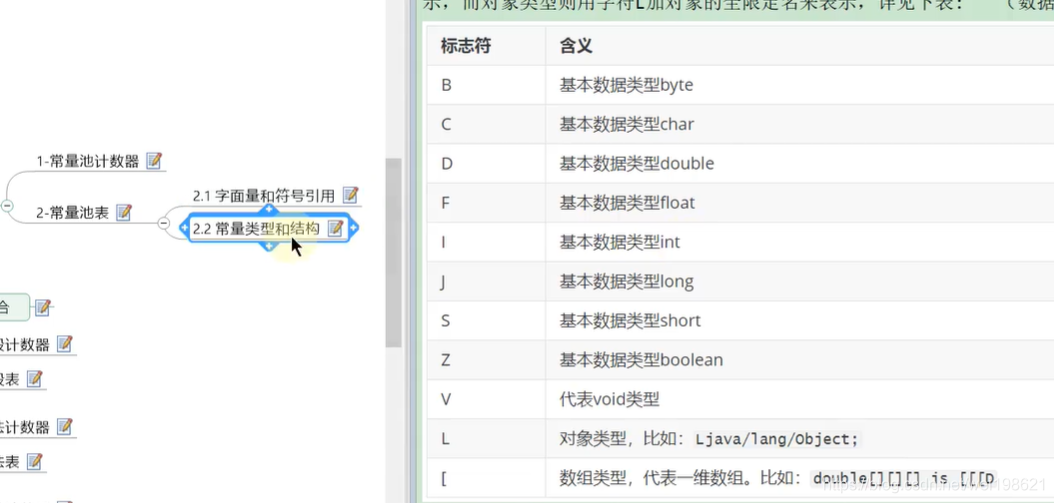 第一项,字符串 CONSTANT_utf8_info 比较特别
P213-字节码数据保存到excel中的操作 07:28
P214-Class文件的标识:魔数 06:33
P215-Class文件版本号 09:40
P216-常量池概述 05:50
P217-常量池计数器 03:53
P218-常量池表中的字面量和符号引用 15:49
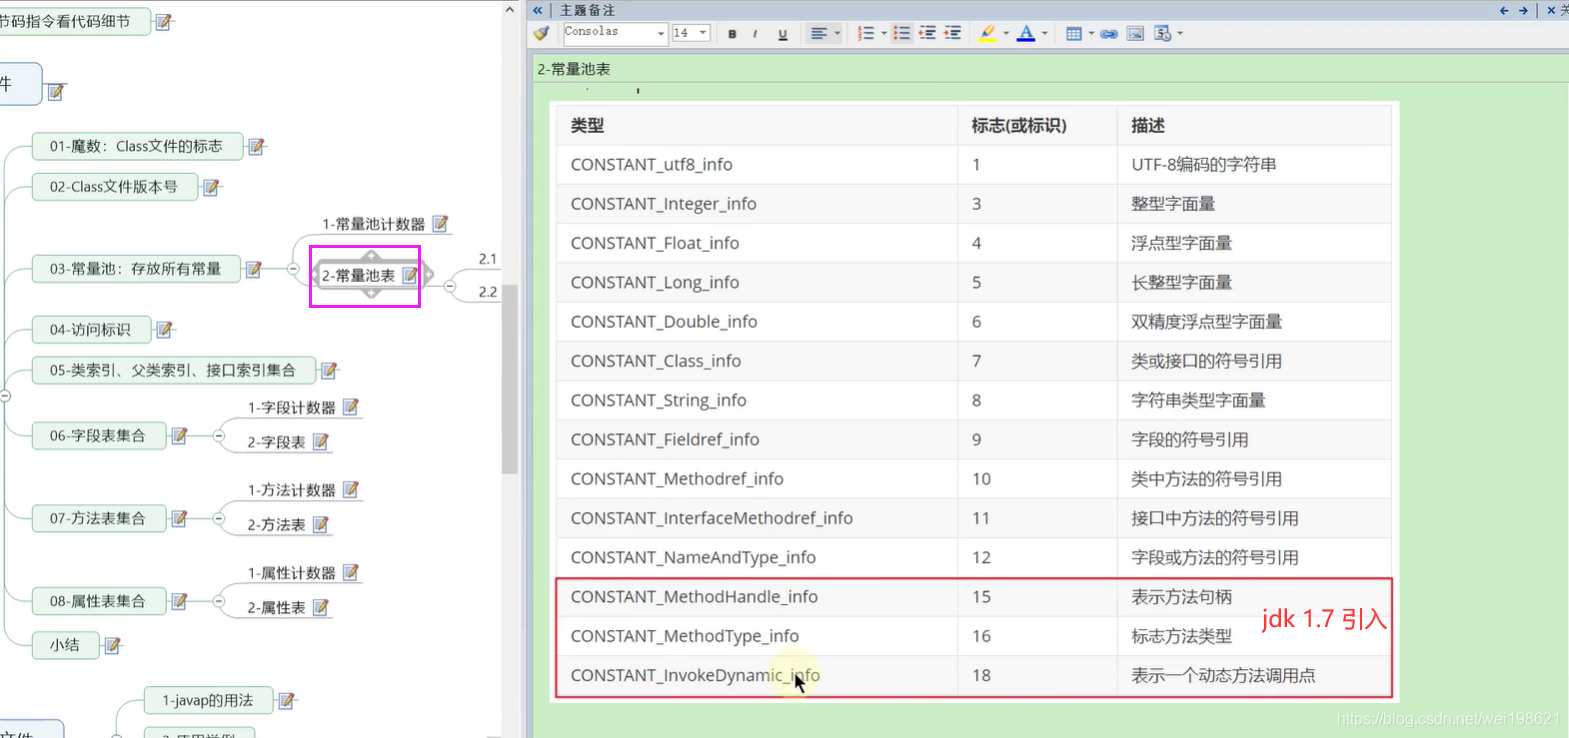
P219-解析得到常量池中所有的常量 16:34
P220-常量池表数据的解读1 10:31
P221-常量池表数据的解读2 10:53
P222-常量池表项数据的总结 08:13
20210119
P223-访问标识 08:20
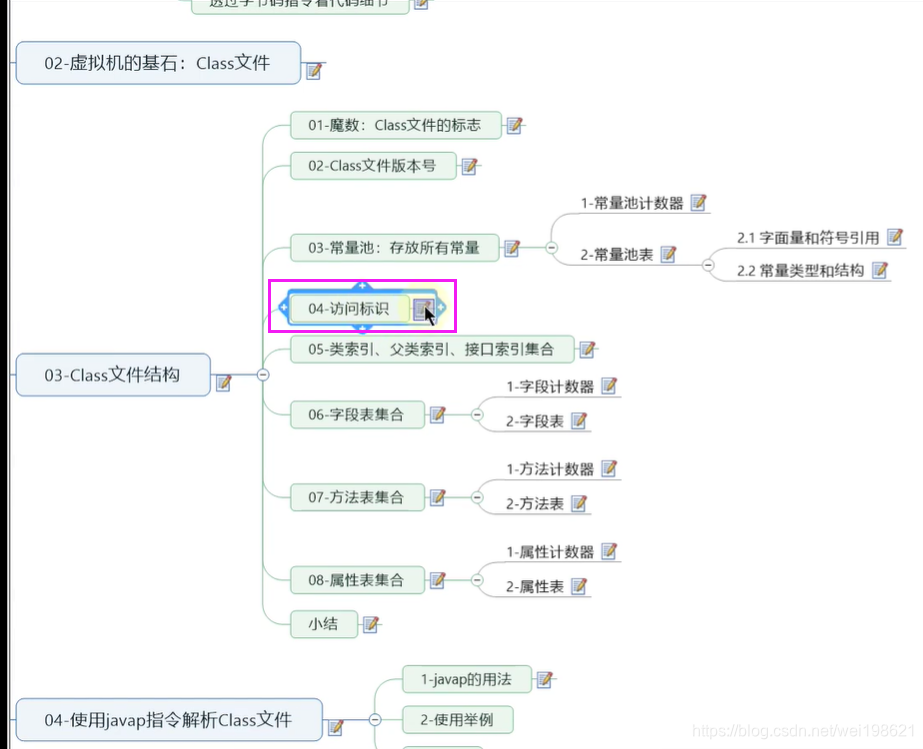
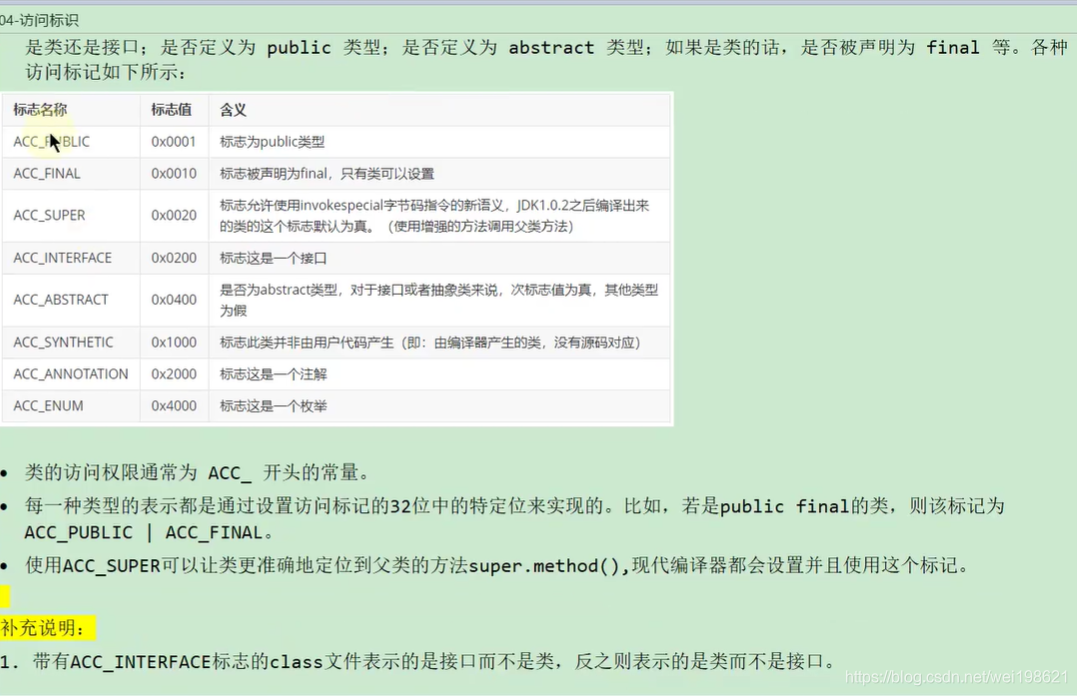
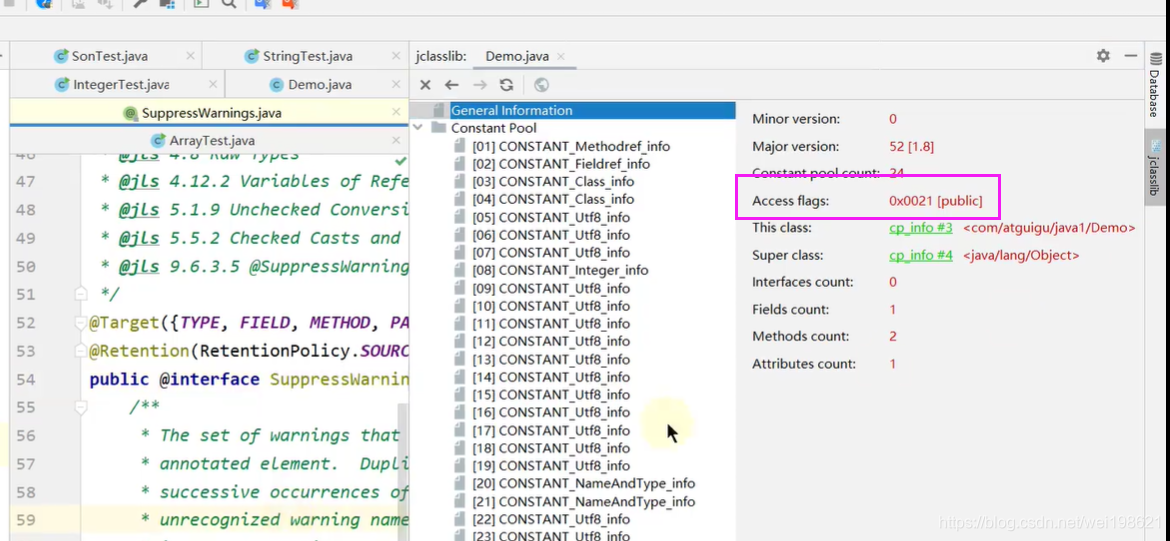
访问标识 access_flag ;使用两个字节标识,
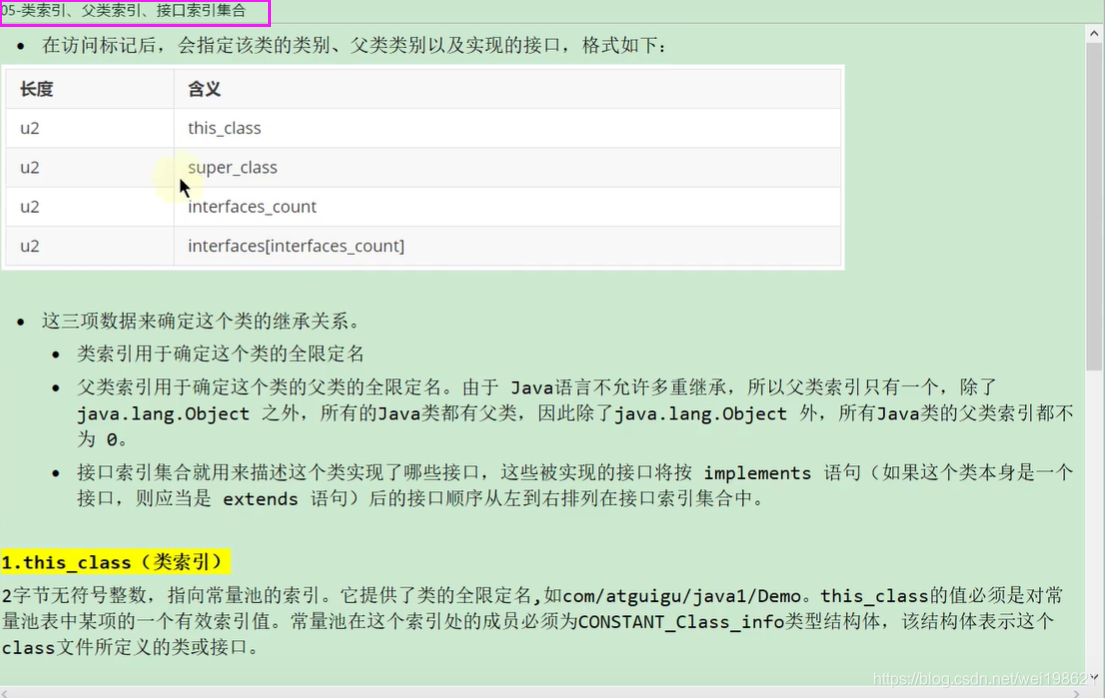
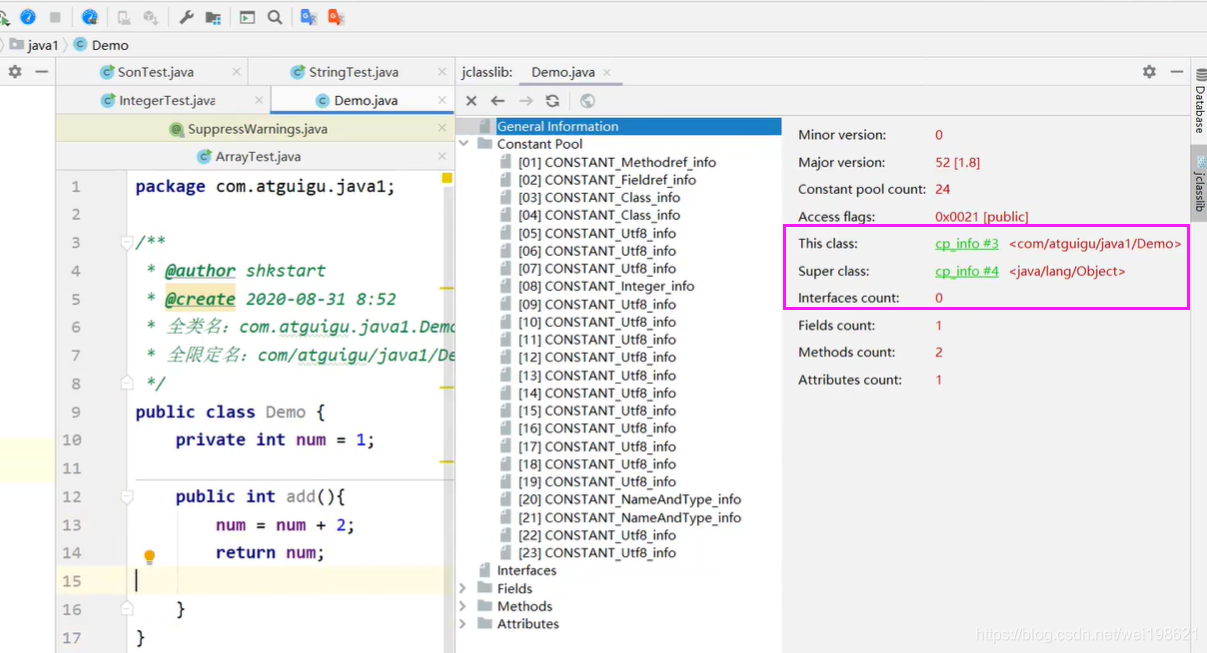
P224-类索引、父类索引、接口索引集合 07:41
当前类索引
父类索引
接口计数器
P225-字段表集合的整体理解 08:13
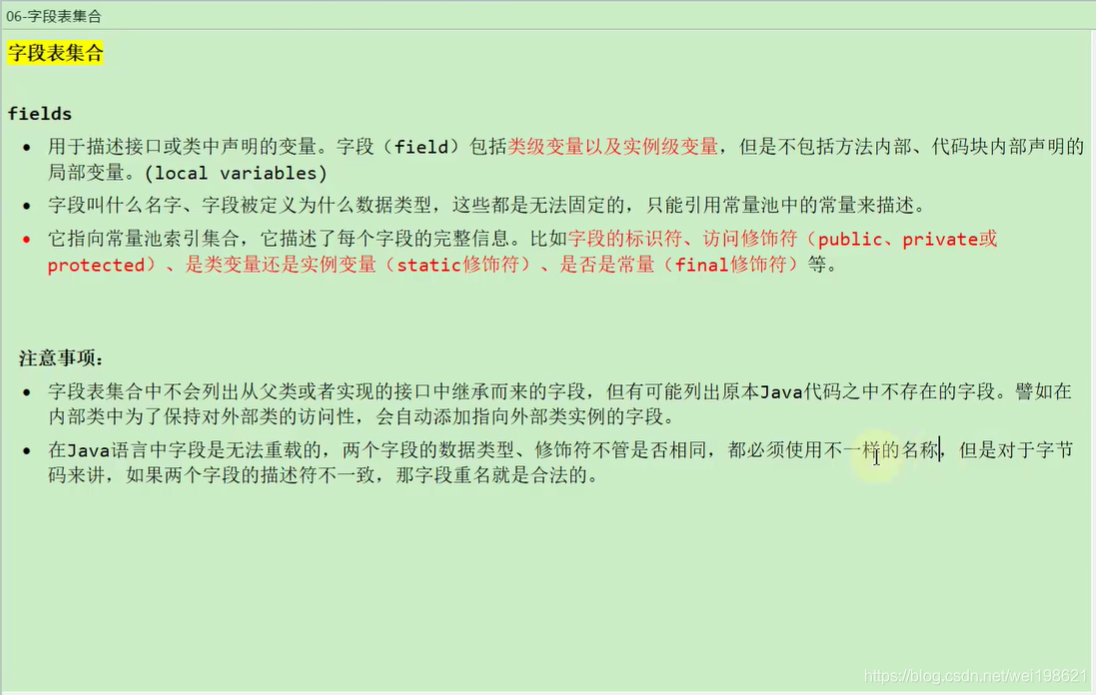
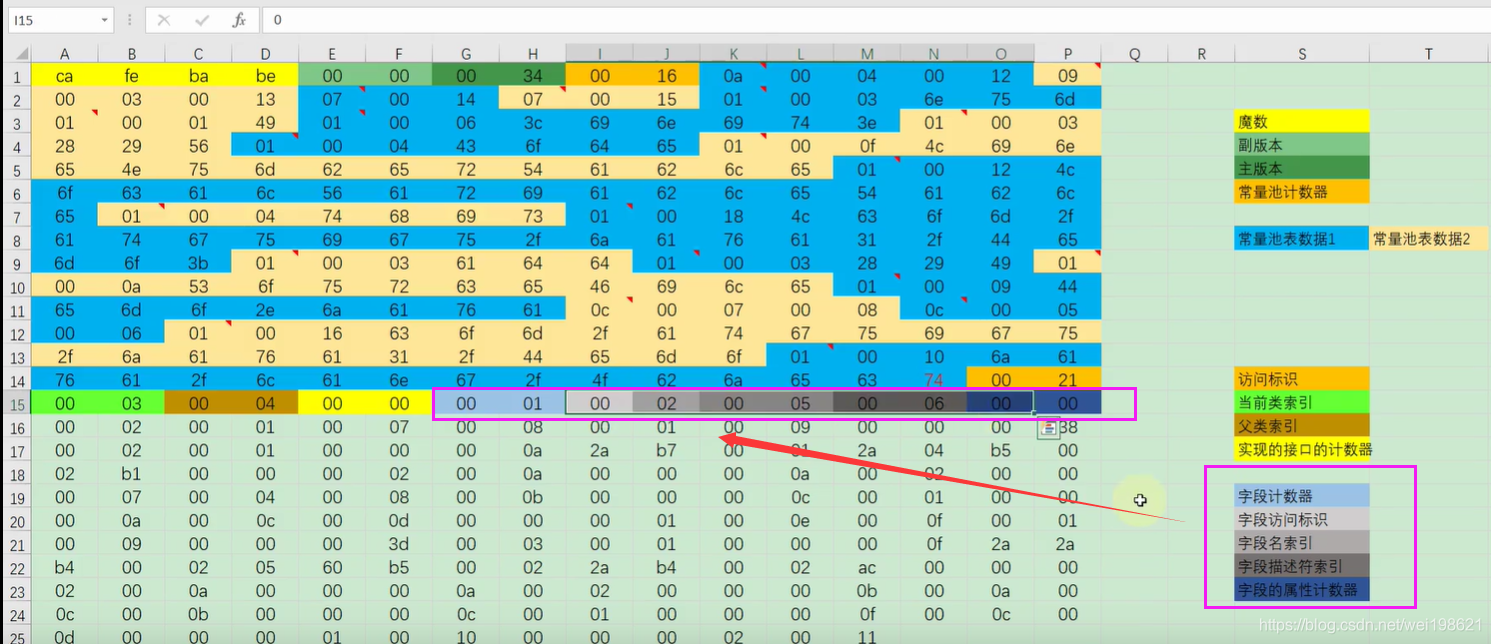
字段计数器,字段数组。
字段是指 类级变量 实例变量 ,不包括方法内部,代码内部的变量
字段表,只包含当前类定义的field,不包括父类中的field
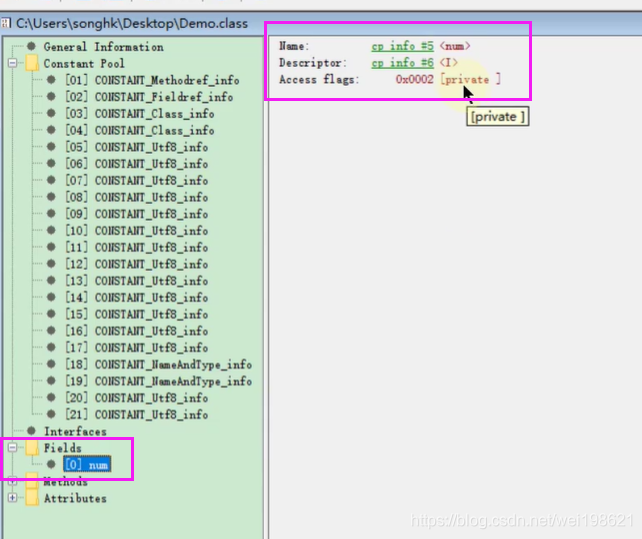
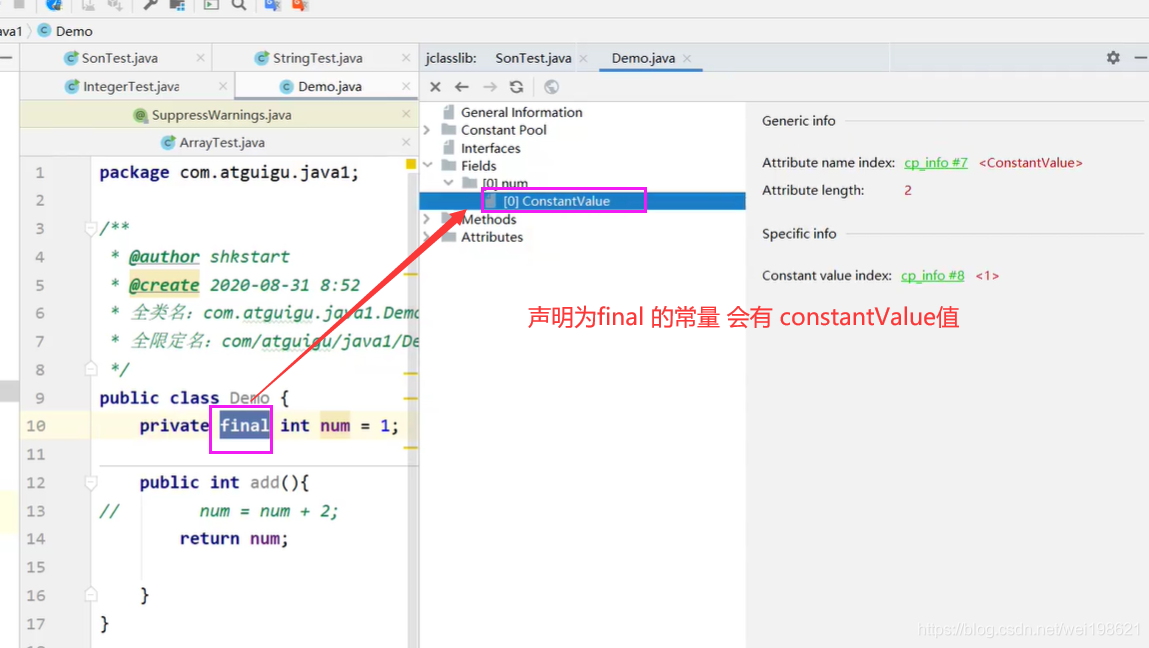
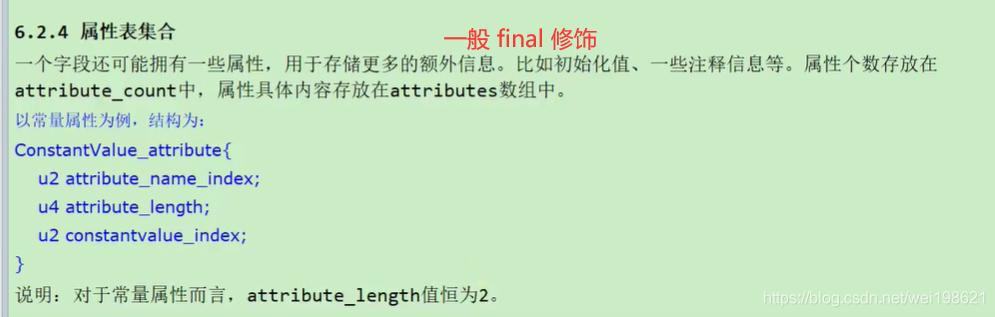
P226-字段表数据的解读 12:01
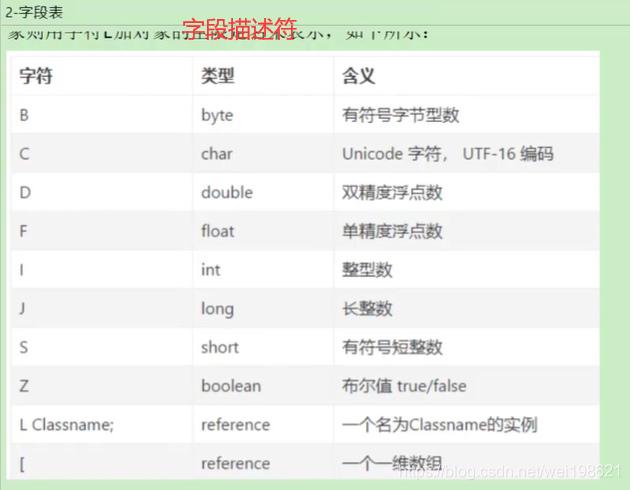
fields_info1 (字段访问标识+字段名索引+字段描述符索引+属性计数器+属性)
fields_info2
fields_info3
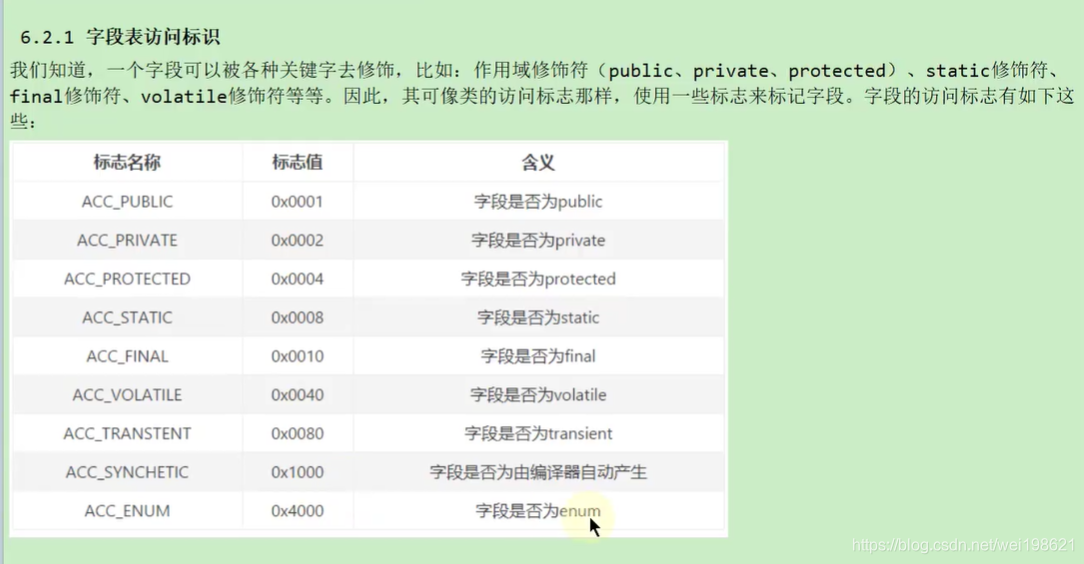
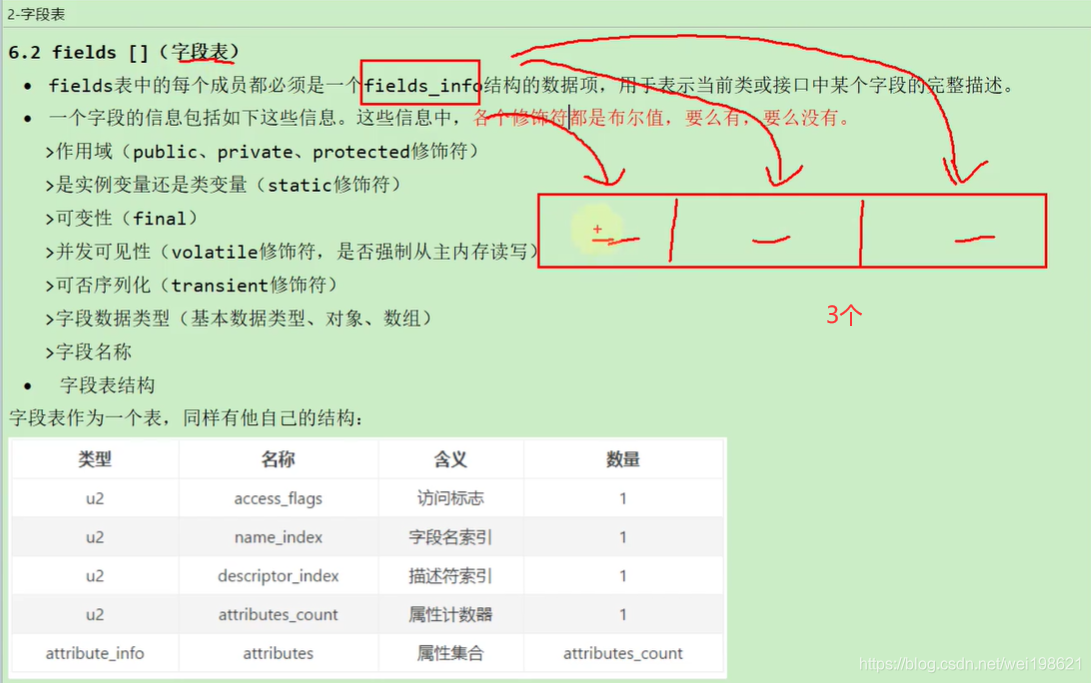 字段表访问标识
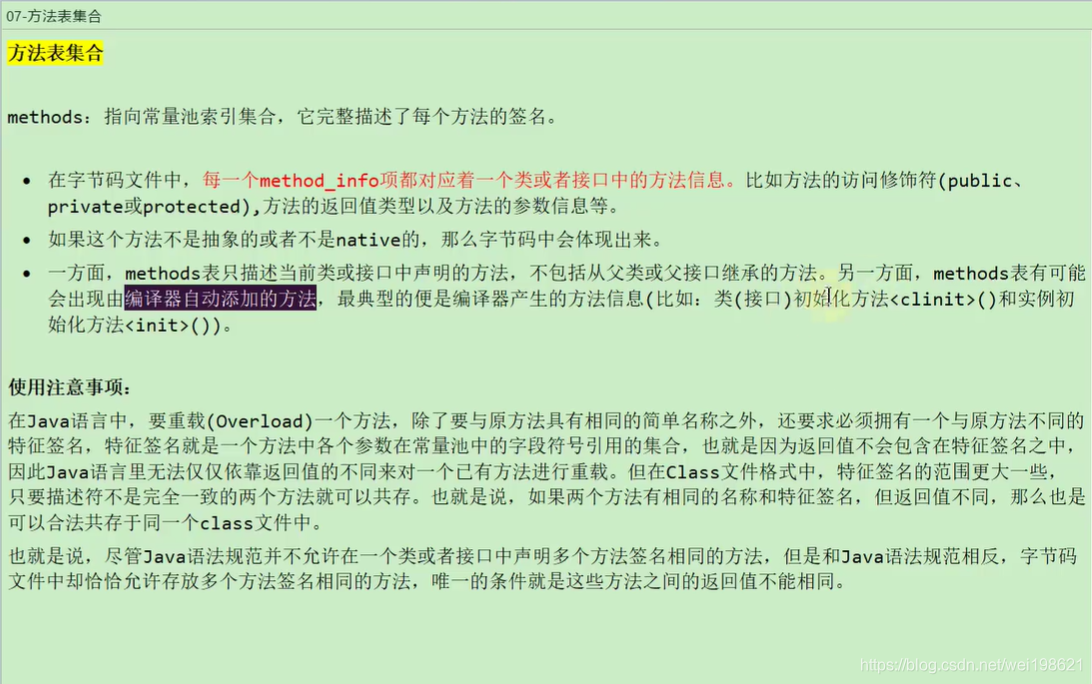
P227-方法表集合的整体理解 06:51
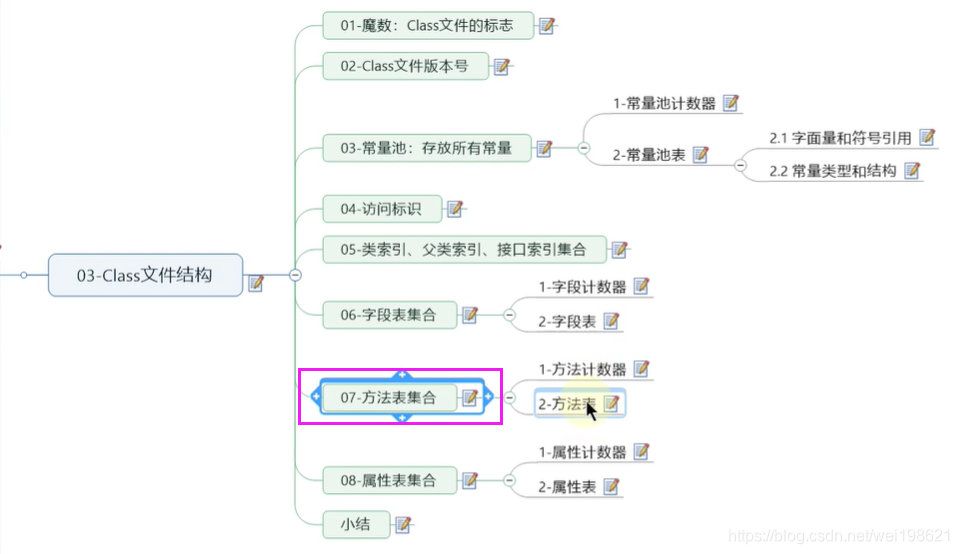
方法计数器
方法表
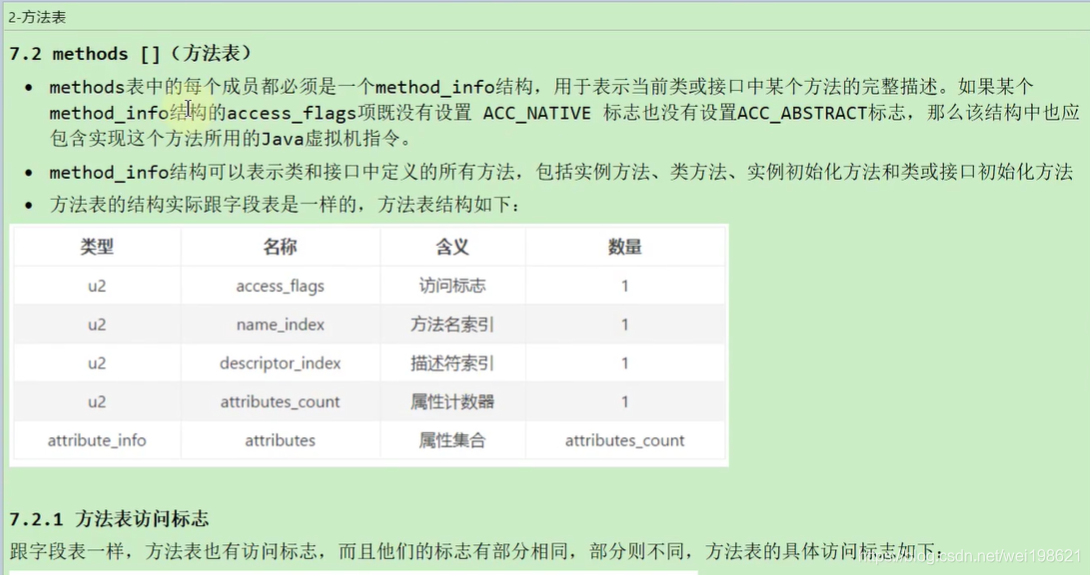
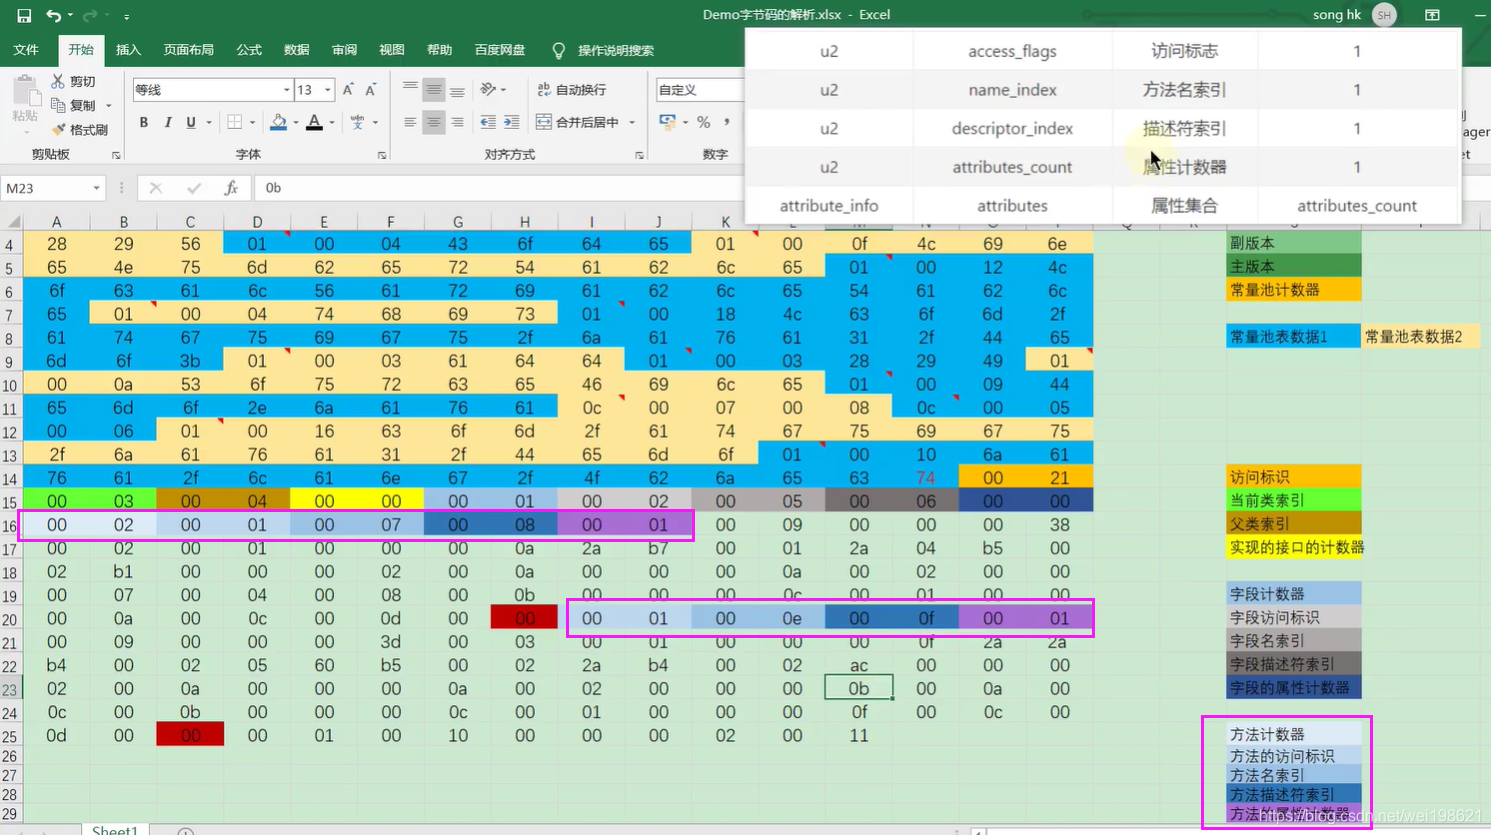
P228-方法表数据的解读 10:48
访问标识
方法名索引
描述符索引
属性计数器
属性集合
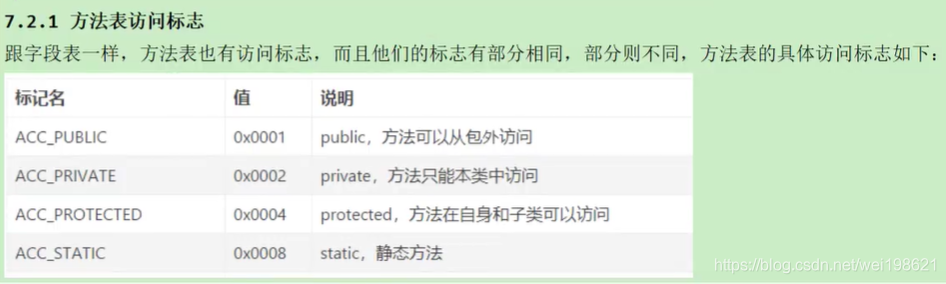
 方法访问标志
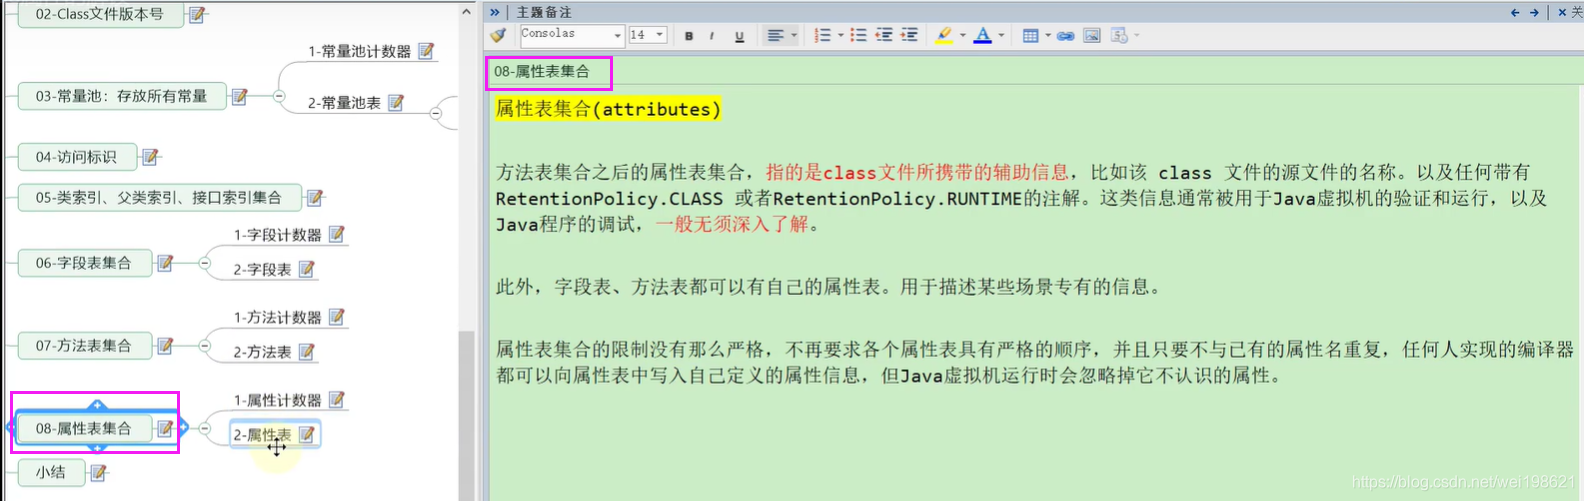
P229-属性表集合的整理理解 04:47
属性计数器
属性数组
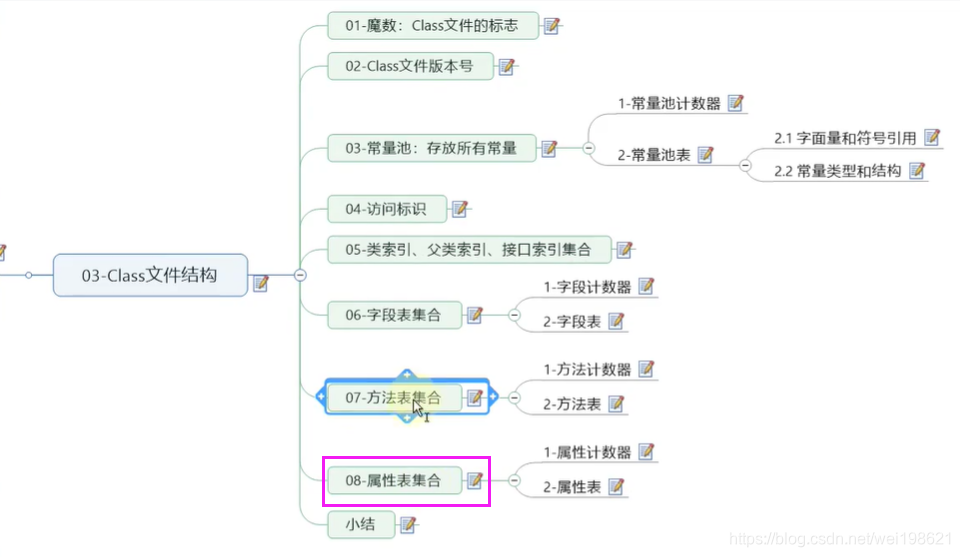
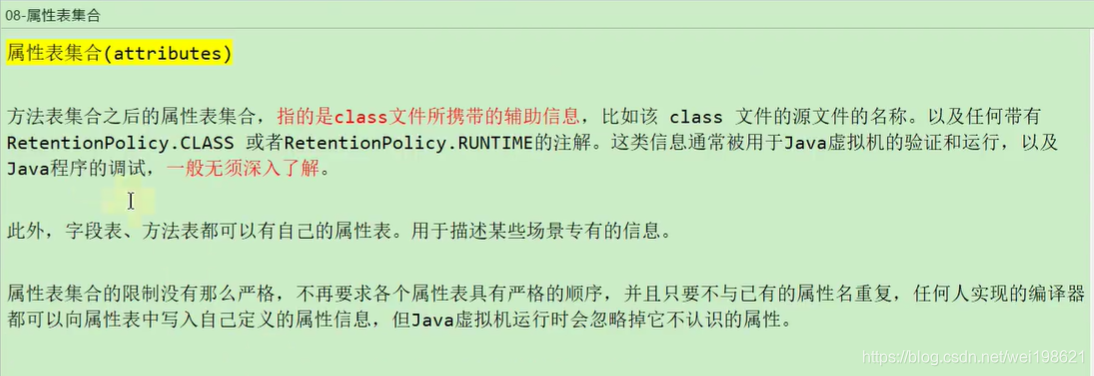
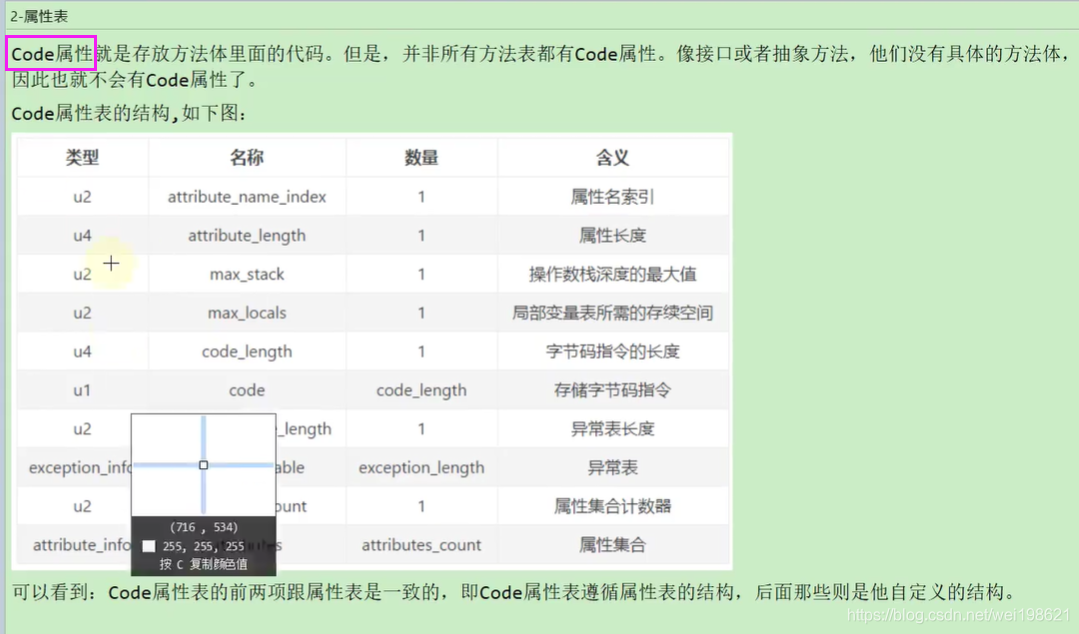
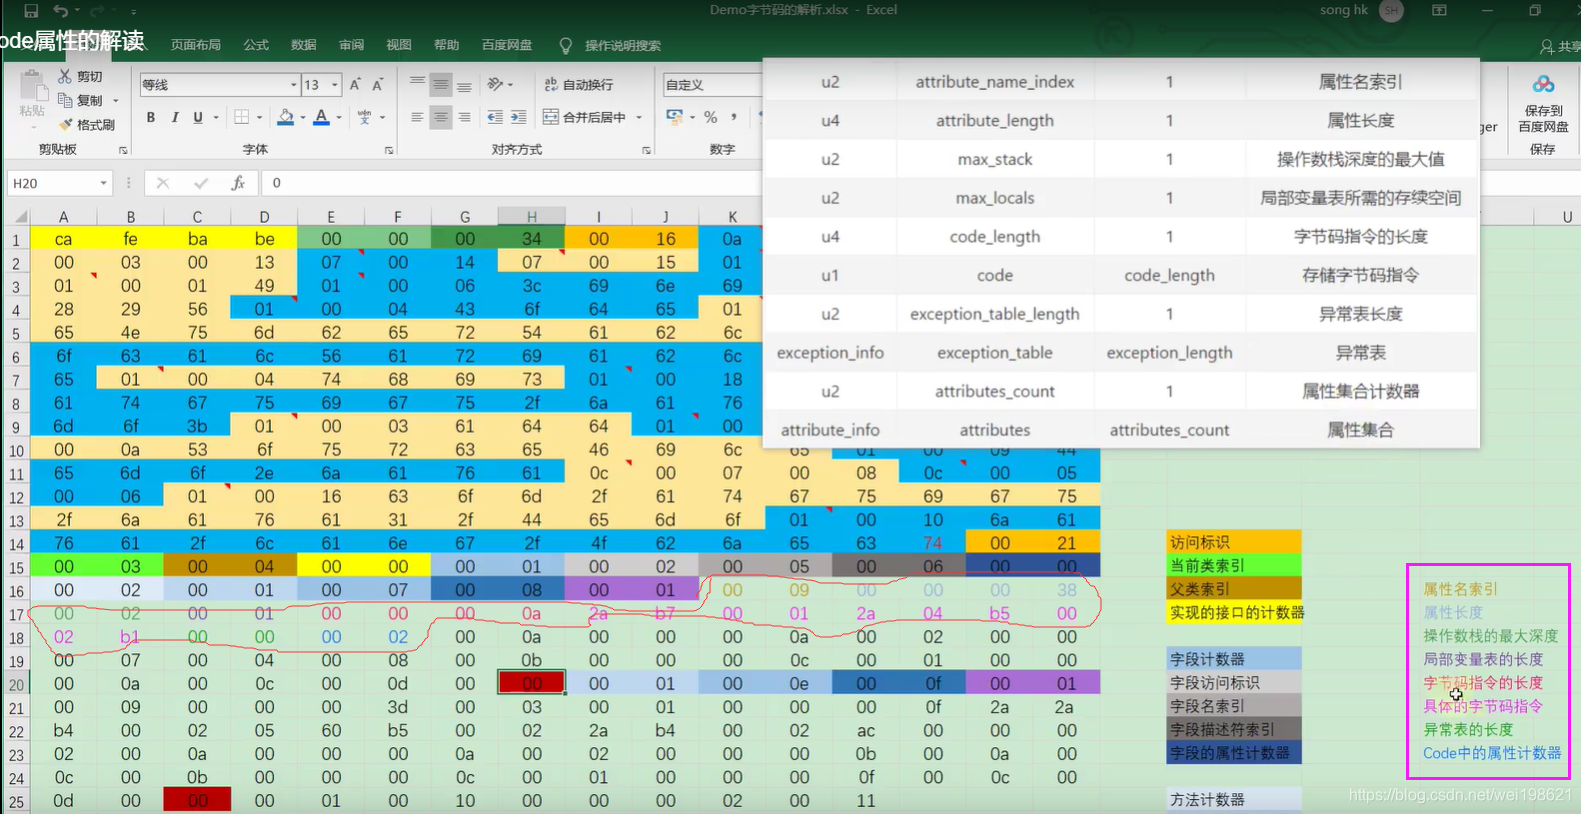
P230-方法中Code属性的解读 13:44
JAVA8里面定义了23种属性
属性名索引
属性长度
属性表
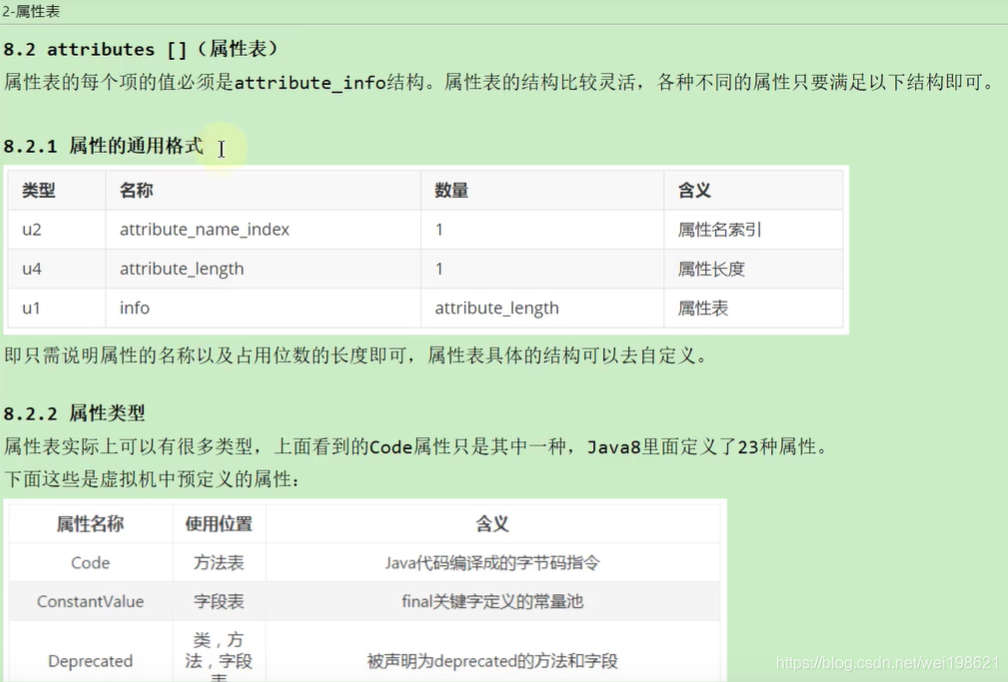
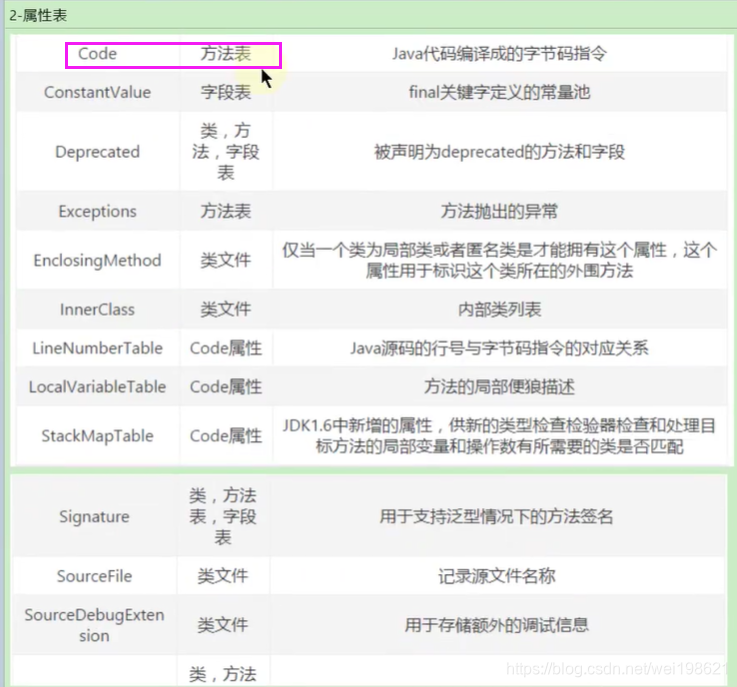
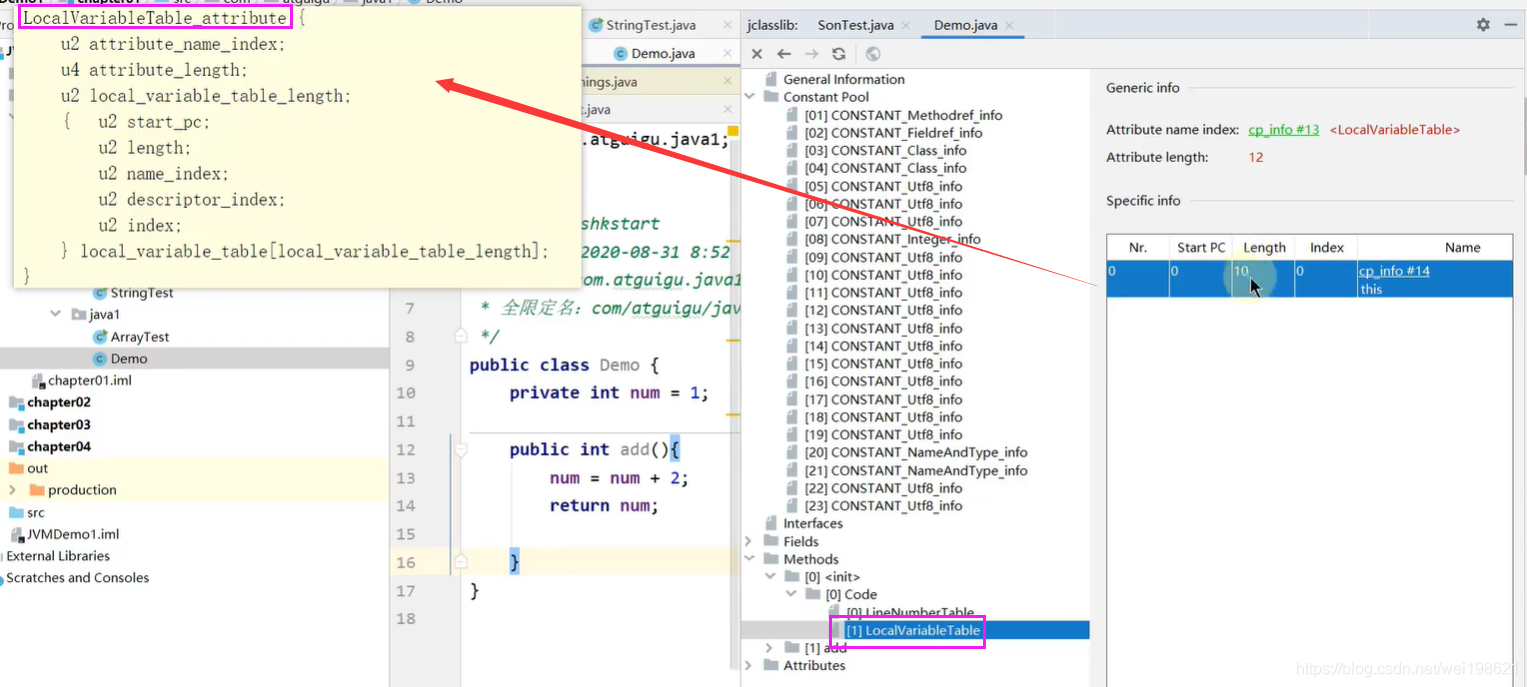
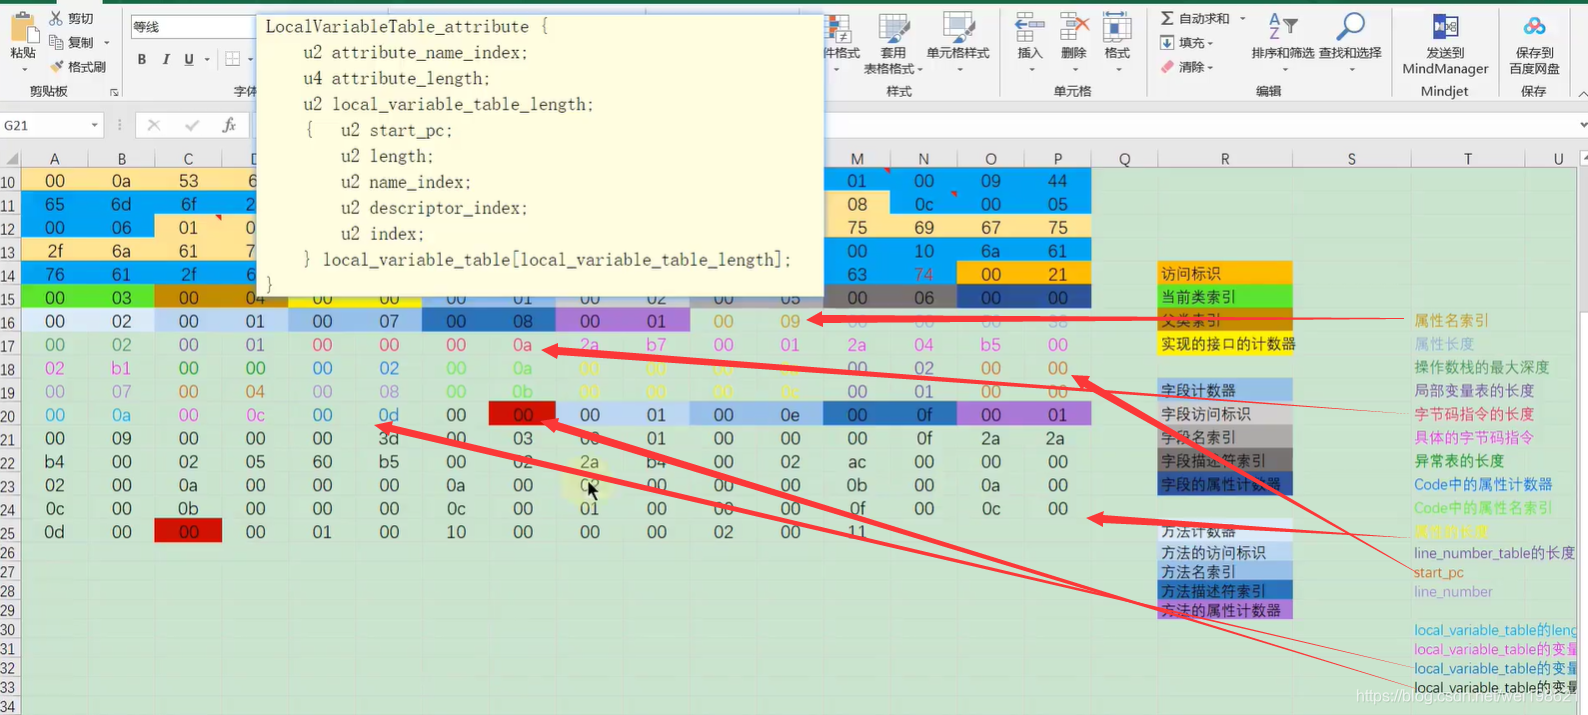
P231-LineNumberTable和LocalVariableTable属性的解读 21:34
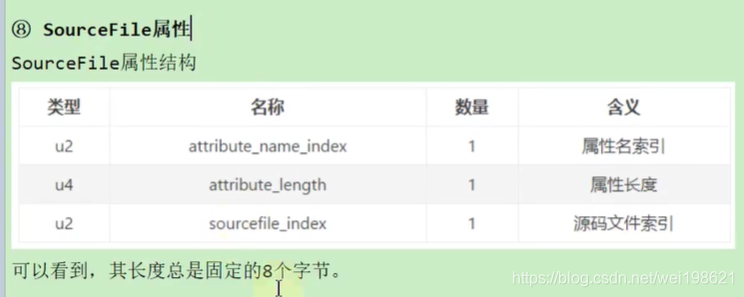
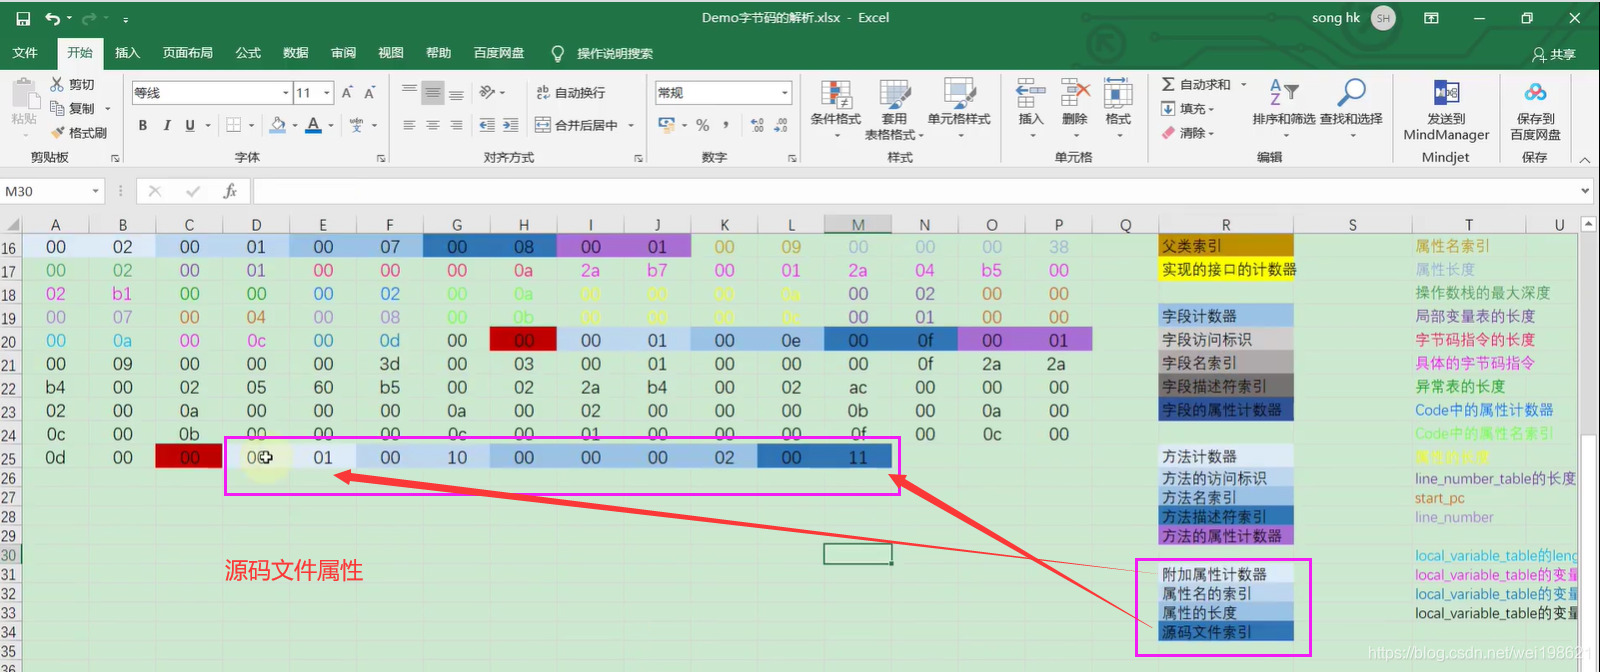
P232-SourceFile属性的解读 07:45
P233-Class文件结构的小结 03:42
 20210120
P234-javac -g操作的说明 13:21
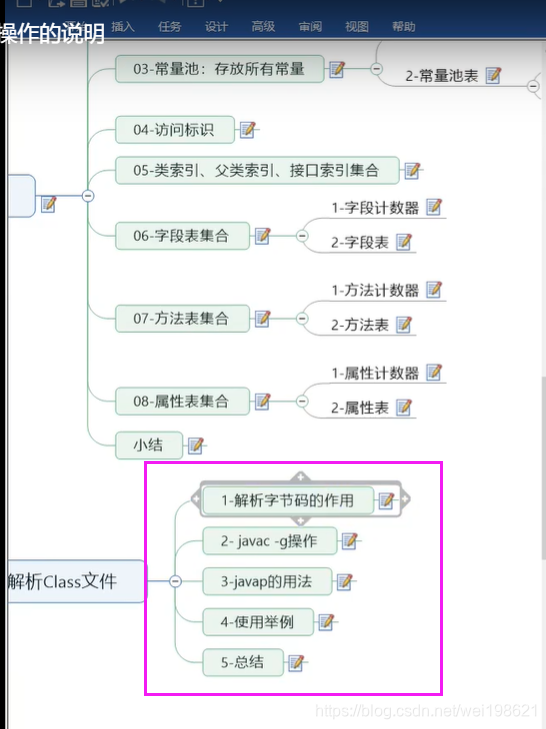
解析Class文件
解析字节码的作用
javac -g 操作
javap 的用法
使用举例
总结
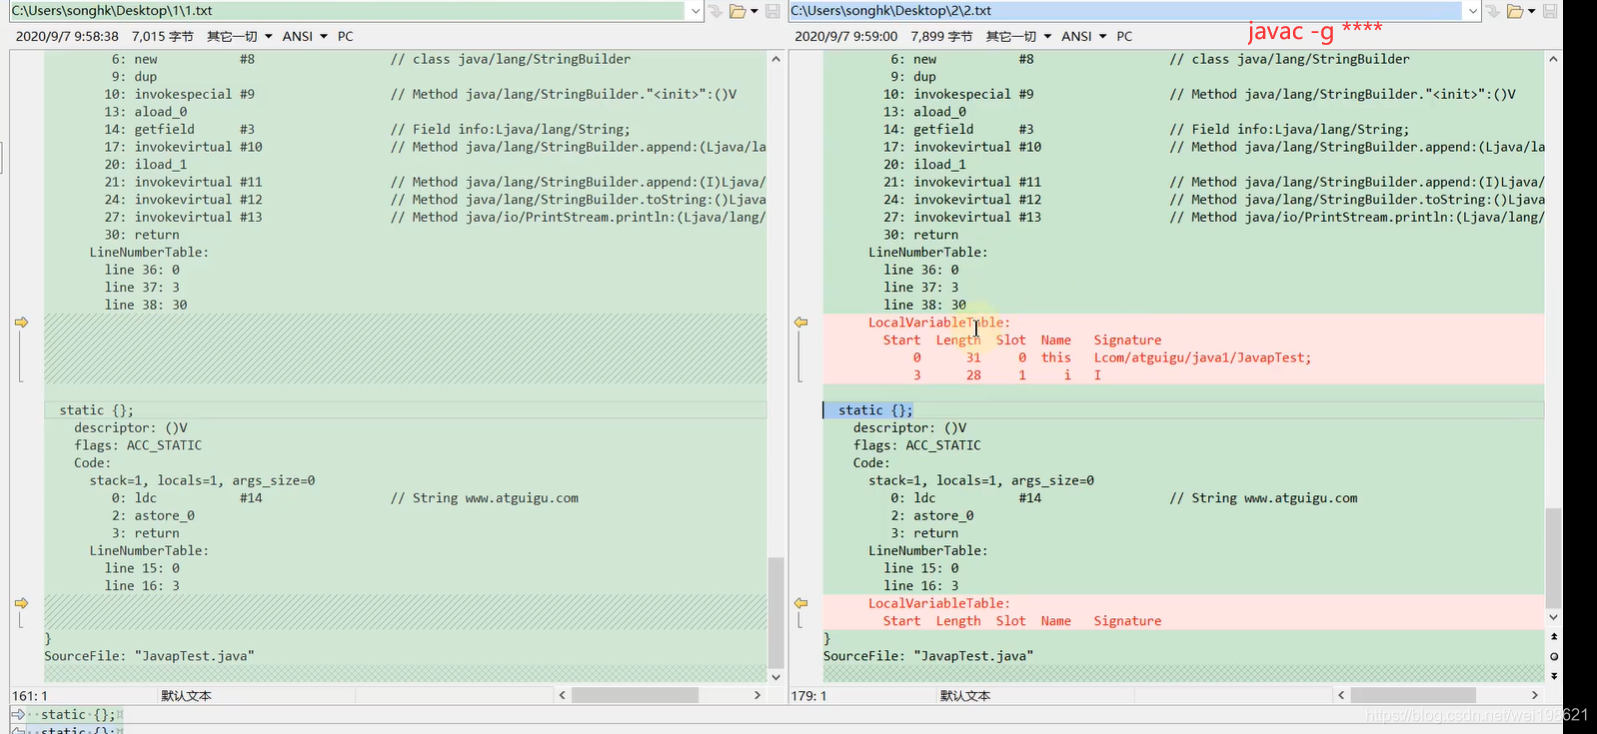
javac xx.java -------- 无局部变量表
javac -g xx.java ------有局部变量表
IDEA EClipse 编译的class 文件使用的是 javac -g ***指令
 javac -g localVariableTable
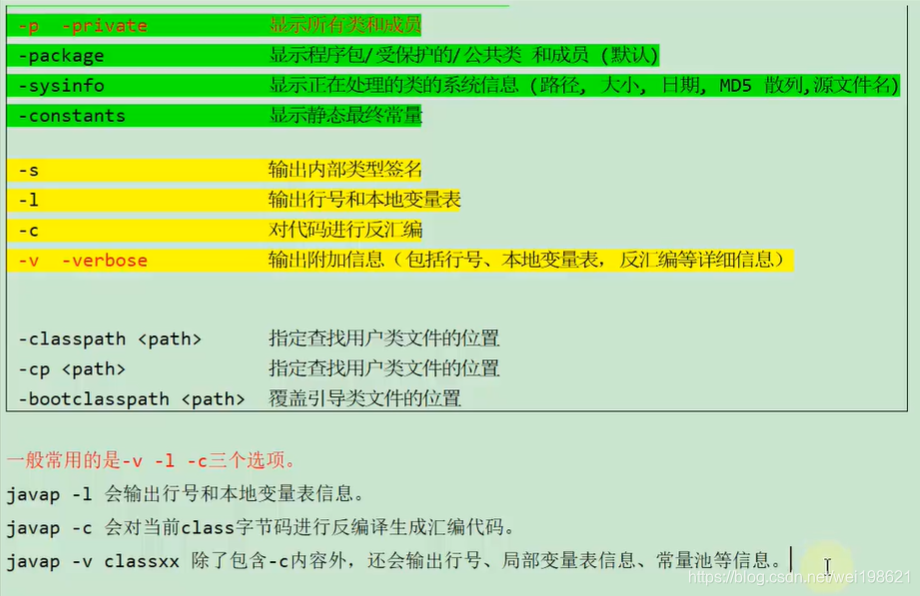
P235-javap主要参数的使用 21:16
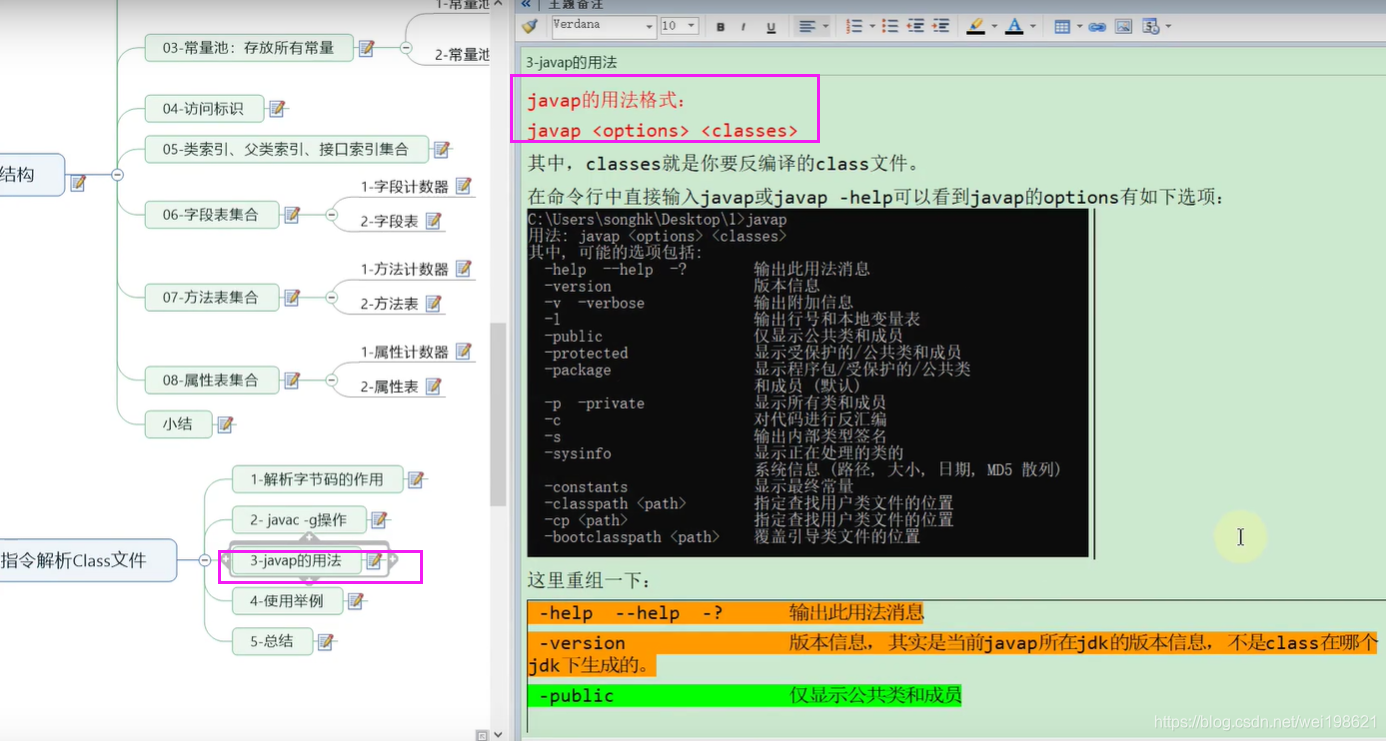
javap
javap
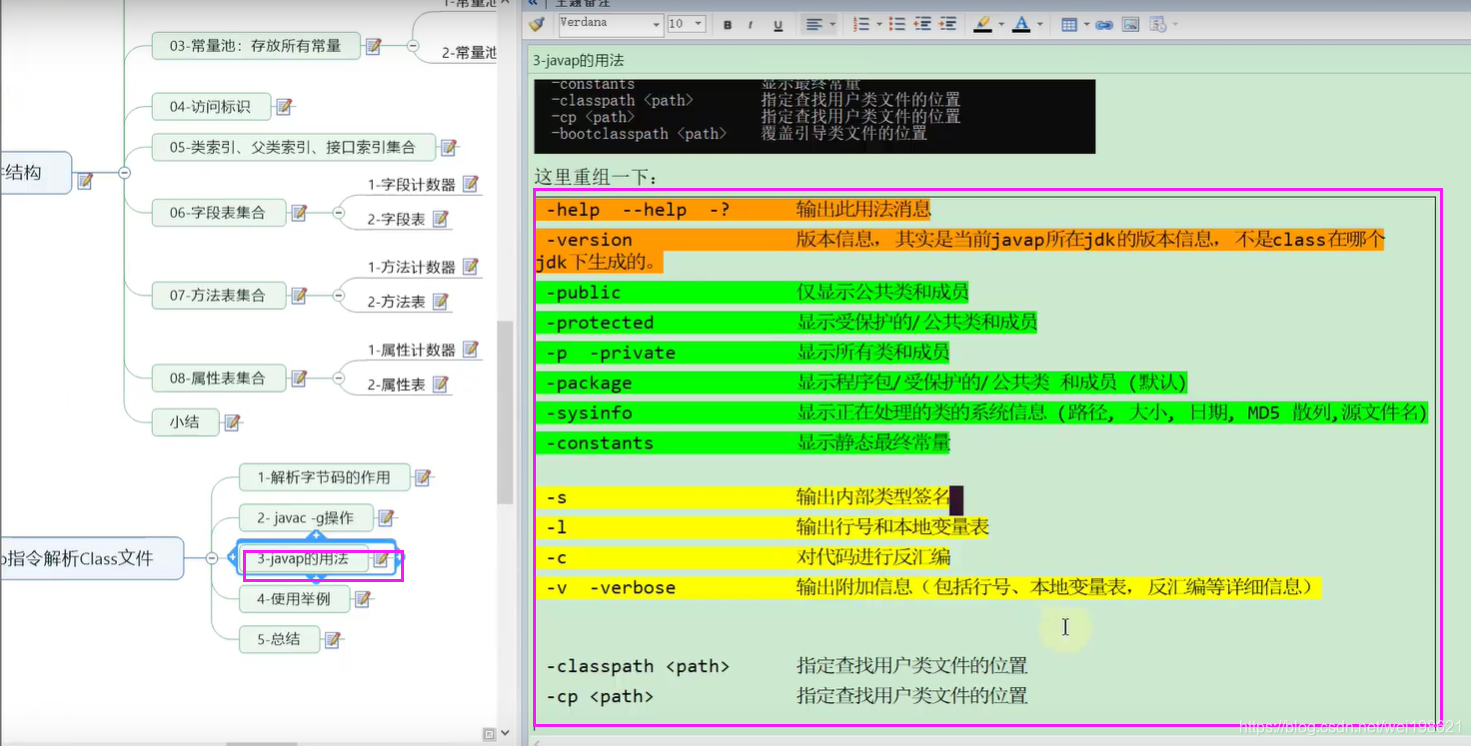
javap -help
javap -version
javap -public javacls.class ----显示公共成员变量和方法
javap -protected javacls.class — ***
javap -private javacls.class ----
javap -package javacls.class — 非私有的
javap -sysinfo javacls.class ---- 类的系统信息
javap -constants javacls.class — 静态常量
javap -s javacls.class ---- 内部类型签名
javap -s -p javacls.class — 内部类型签名(私有及以上)
javap -l javacls.class ---- 输出行号和本地变量表
javap -c javacls.class ---- 对代码进行反汇编
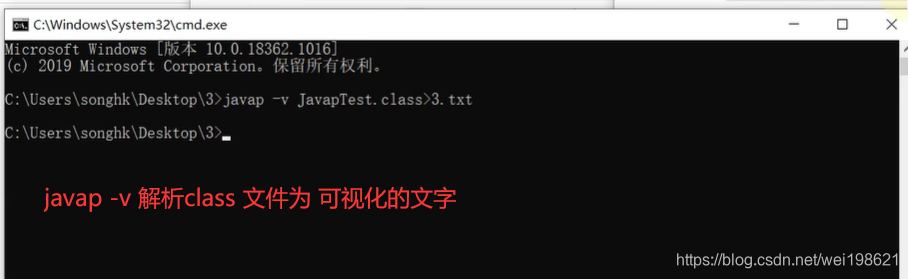
javap -v javacls.class ----- 输出附加信息(包括行号,本地变量表,反汇编,也就是 -v= -l + -c )
javap -v -p javaclass.class -----最全的信息 。
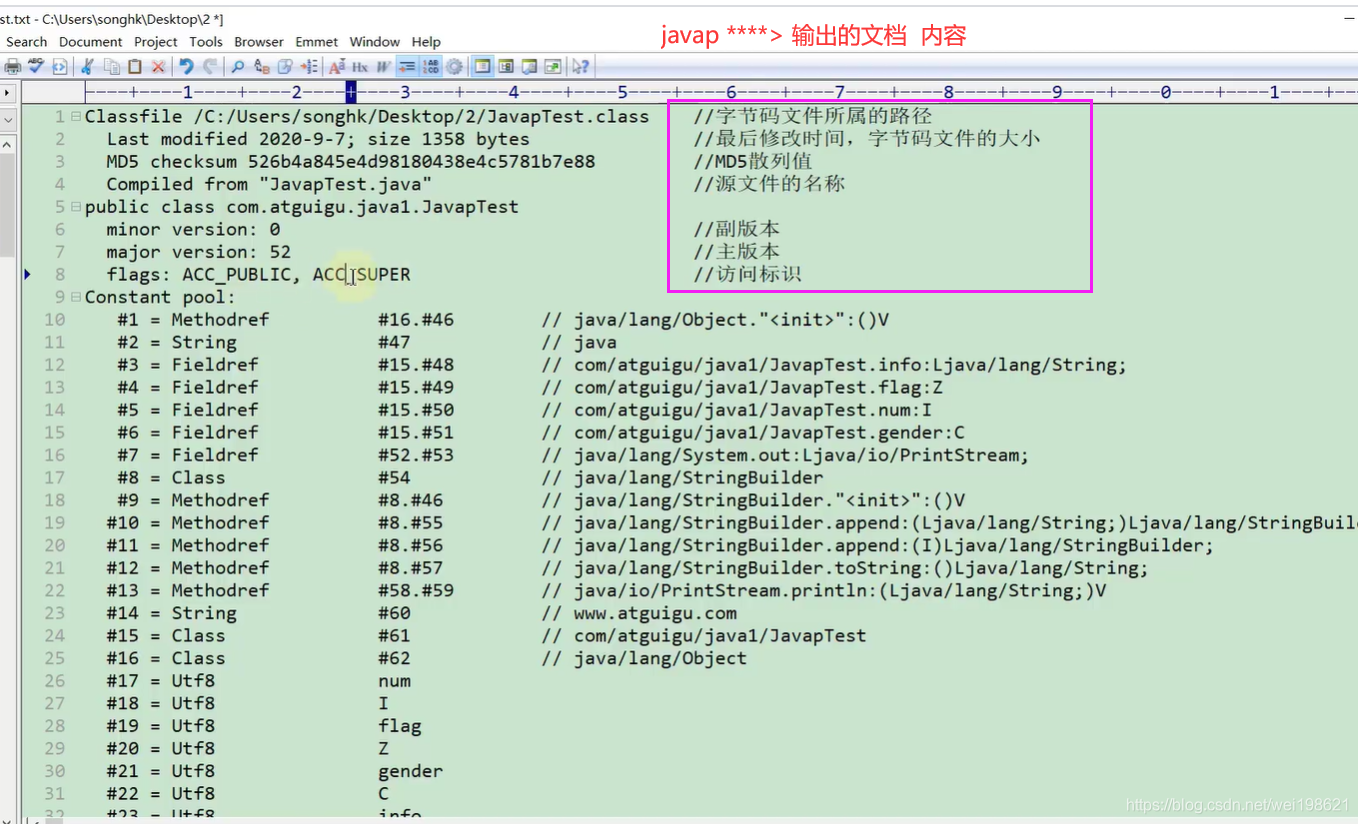
P236-javap解析得到的文件结构的解读 21:19
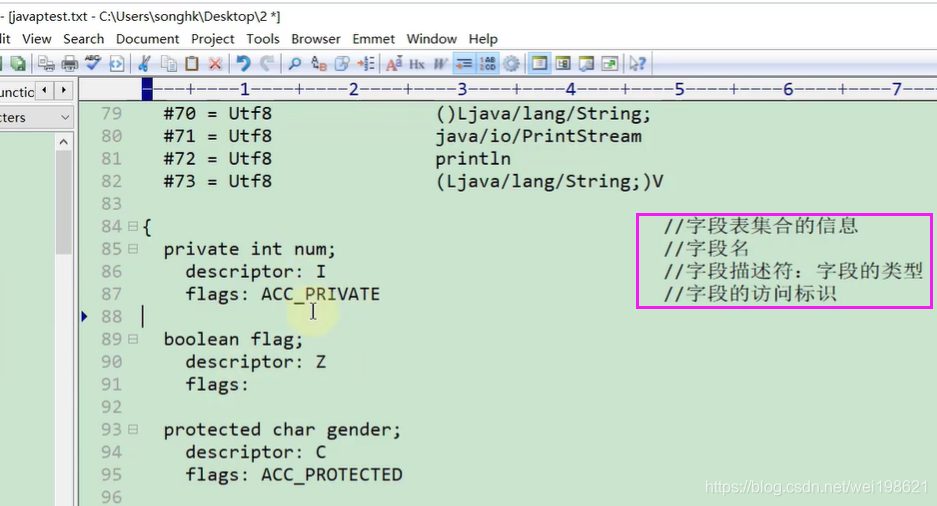
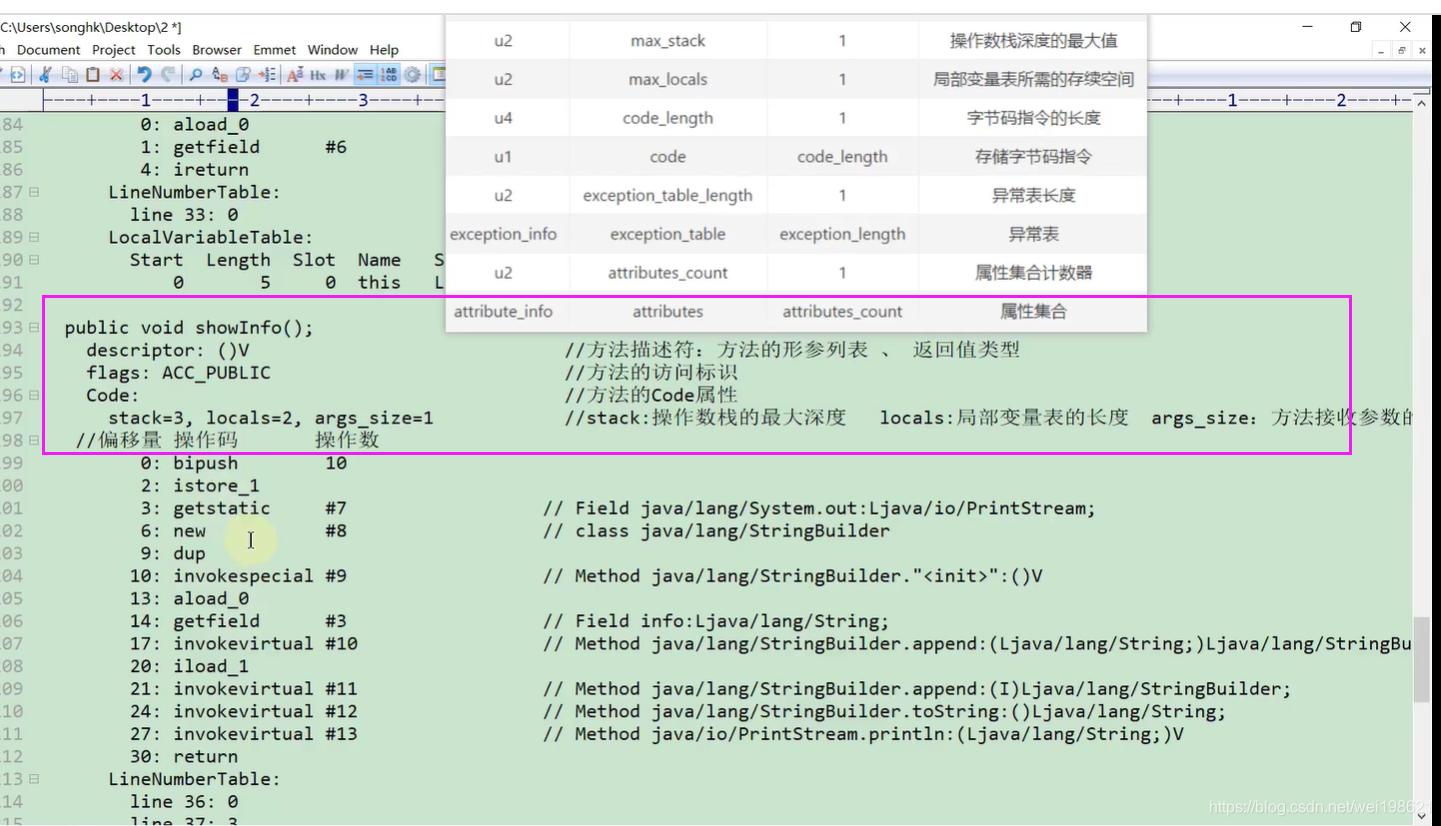
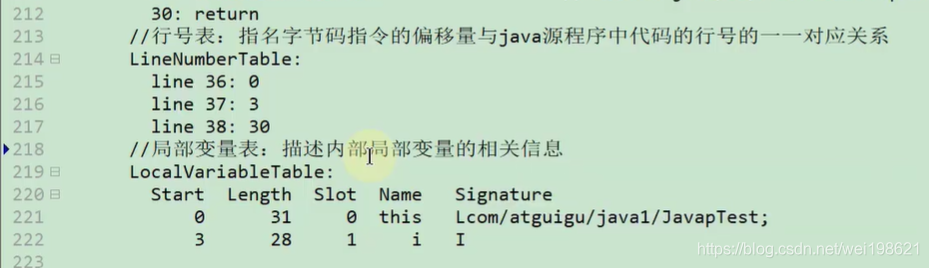
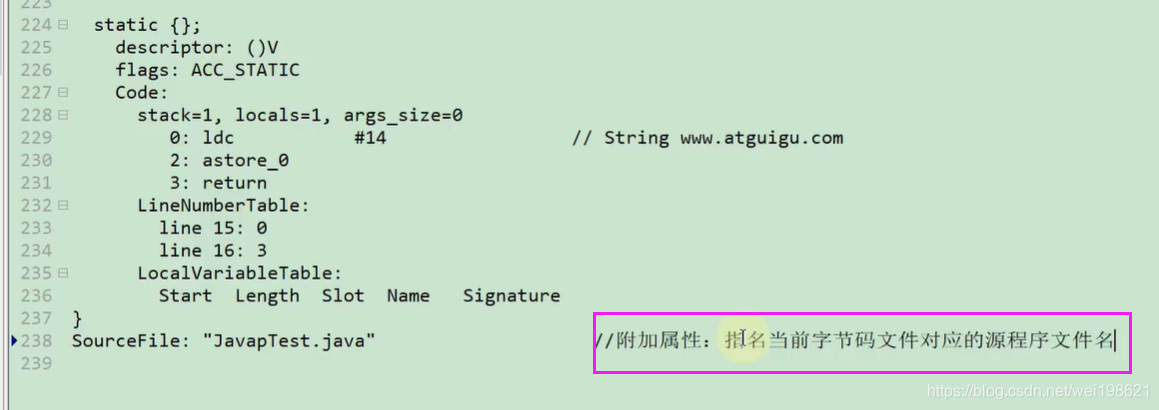
P237-javap使用小结 05:05
不显示类索引,父类索引,接口结合索引,() , () 等结构
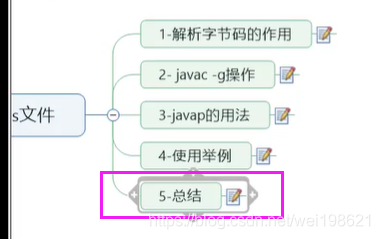
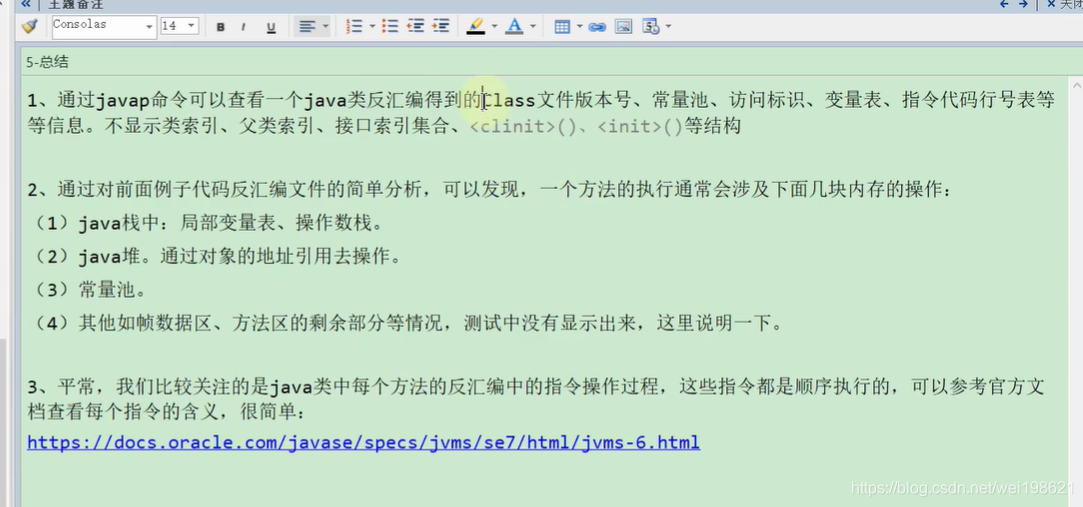
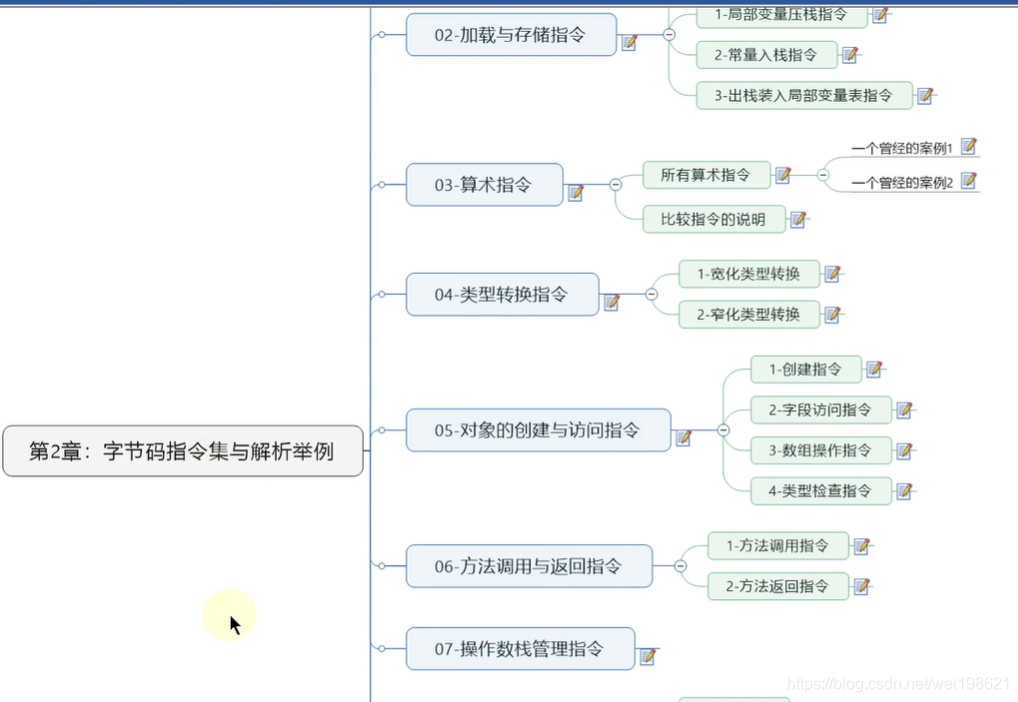
字节码指令集与解析举例
字节码指令集与解析举例
01 概述
02 加载与存储指令
03 算数指令
04 类型转换指令
05 对象的创建于访问指令
06 方法调用与返回指令
07 操作数栈指令
08 比较控制指令
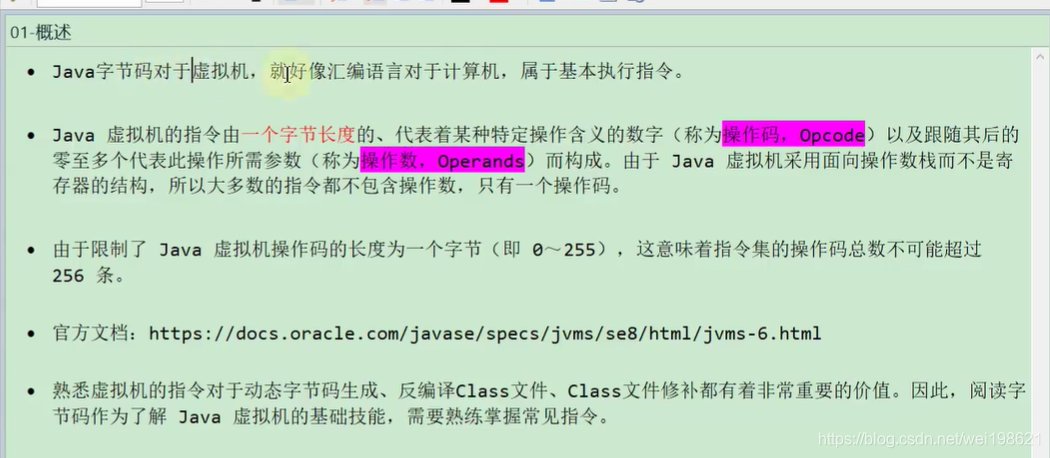
P238-字节码指令集的概述 14:33
操作码,助记符,不能超过256
地址是:https://docs.oracle.com/javase/specs/jvms/se8/html/jvms-6.html
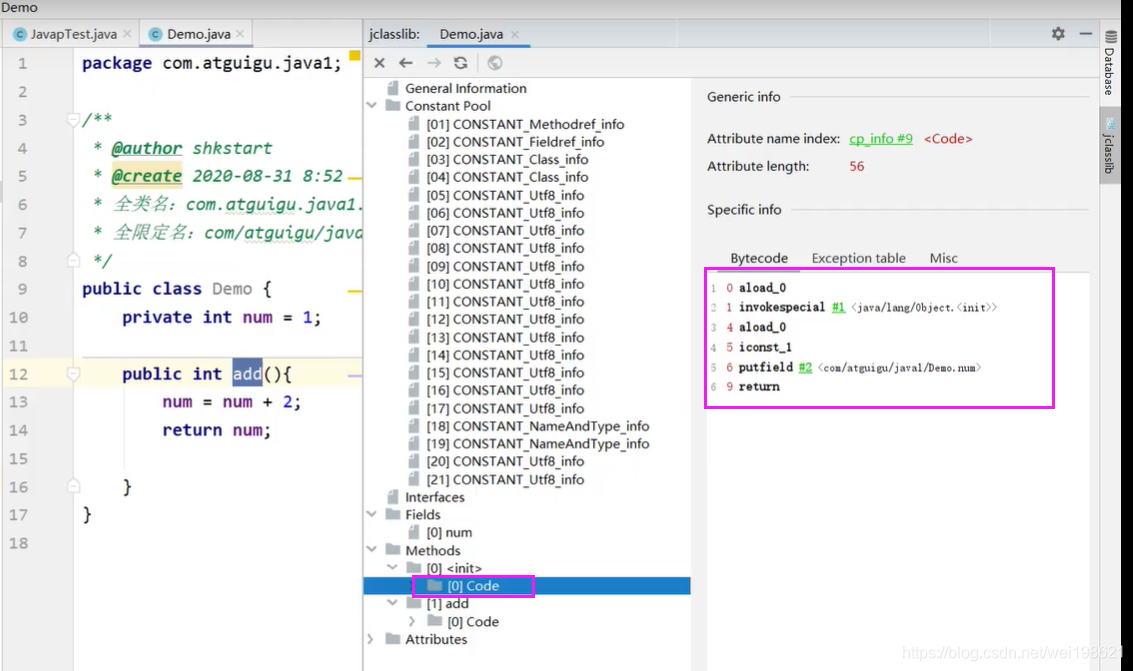
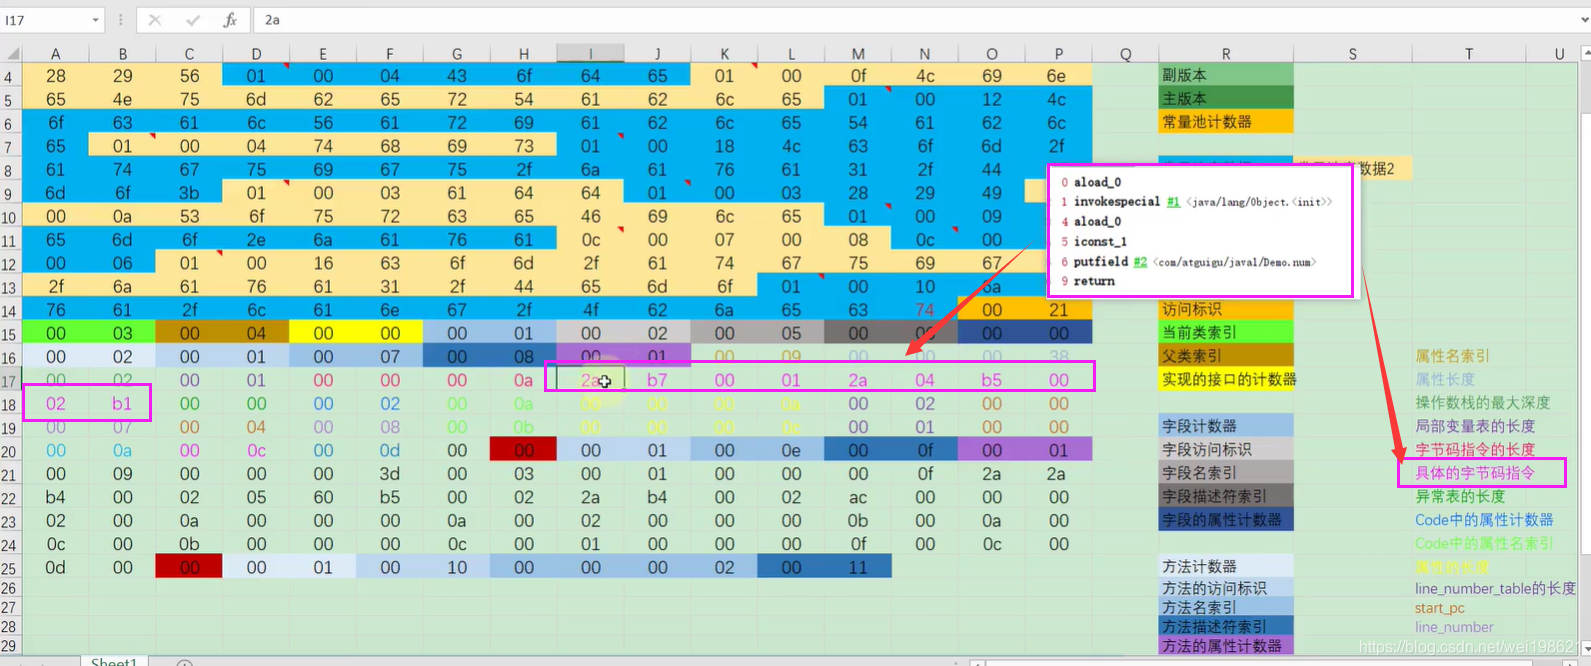
P239-指令与数据类型的关系及指令分类 10:11
指令地址:https://docs.oracle.com/javase/specs/jvms/se8/html/jvms-6.html
iload , int 加载
fload , float 加载
aload , 引用加载
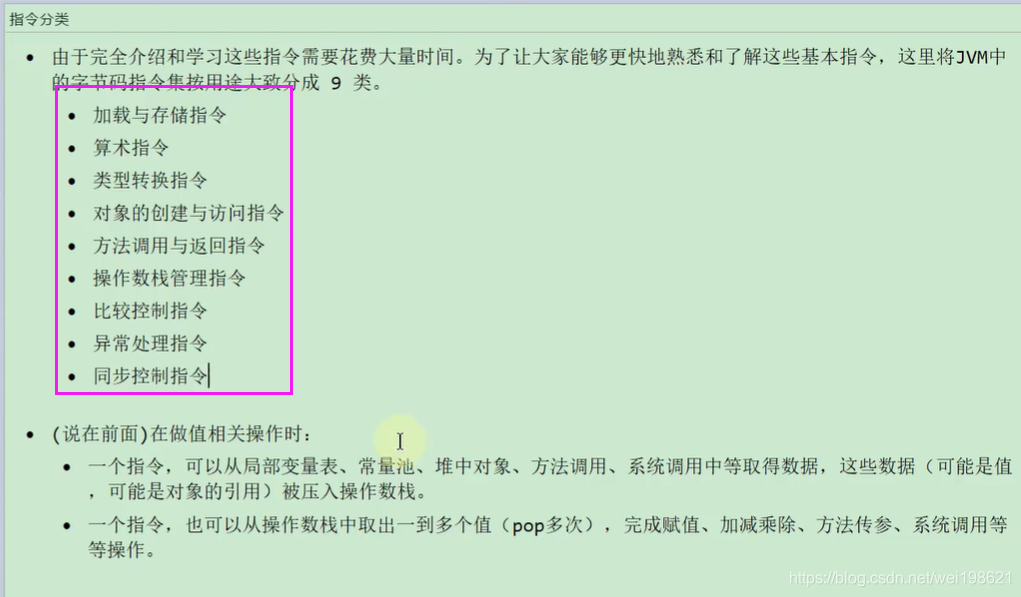
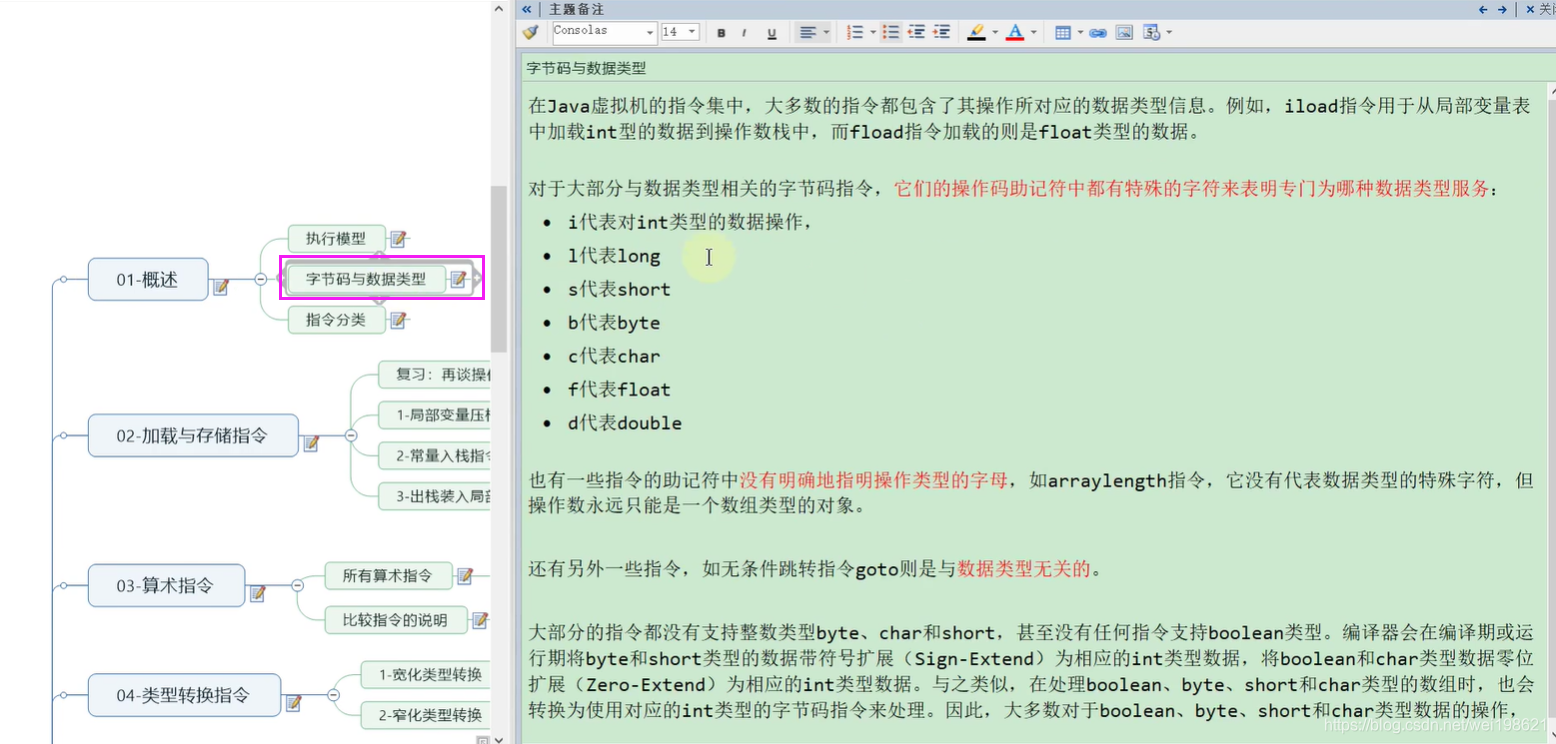 指令分类
 20210121
P240-加载与存储指令概述 08:12
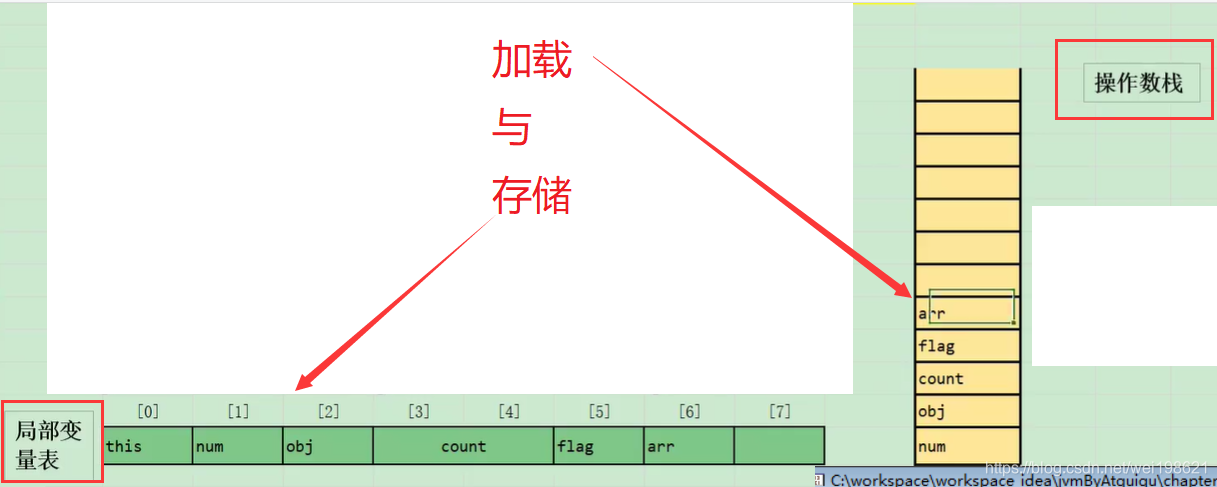
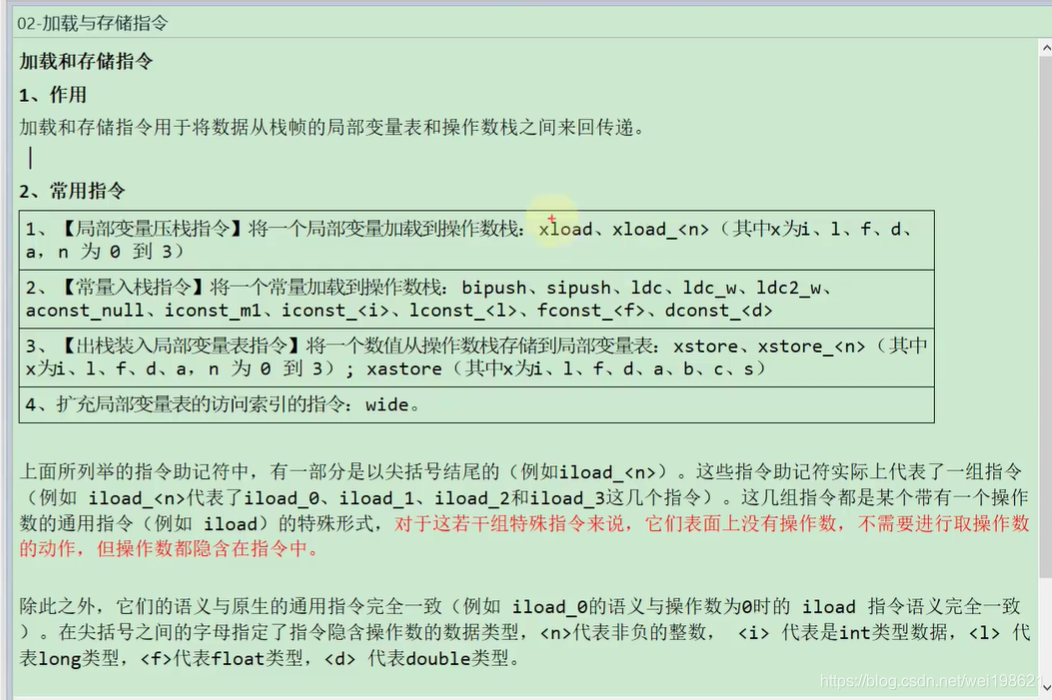
加载: 将数据加载到操作数栈中
存储: 将数据存储到局部变量表
指令(助记符):
https://docs.oracle.com/javase/specs/jvms/se8/html/jvms-6.html
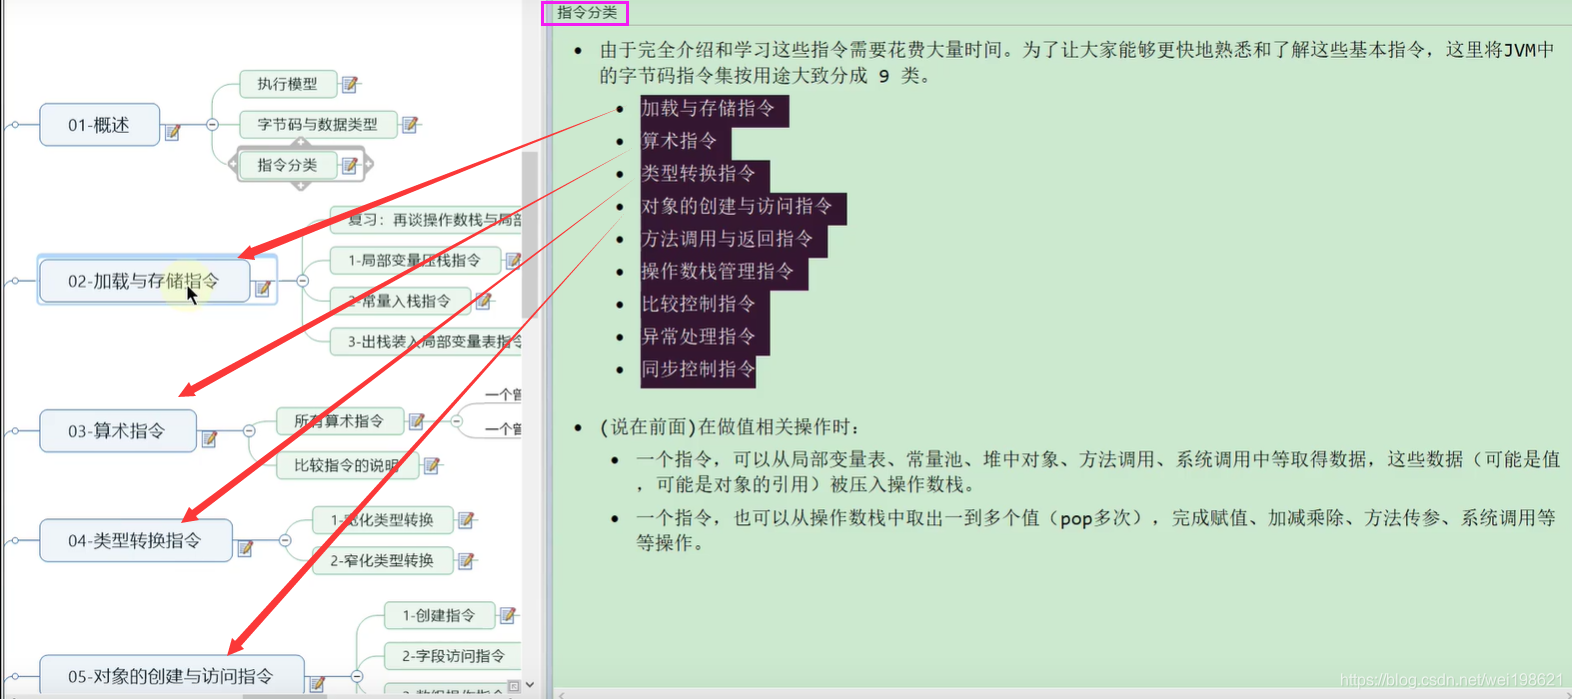
指令的分类
加载与存储指令
算术指令
类型转换指令
对象的创建于访问指令
方法调用与返回指令
操作数栈指令
比较控制指令
异常处理指令
同步控制指令
加载和存储指令
加载指令
存储指令
load push ldc const : 入栈
store : 出栈
局部变量表压栈 : xload_ (x = i/l/f/d/a, n=0/1/2/3)
常量池压栈: bipush/sipush/ldc/ldc_w/iconst_/lconst_/dconst_
出栈装入局部变量表: xstore/xstore_ (x = i/l/f/d/a, n=0/1/2/3)
P241-再谈操作数栈与局部变量表 07:24
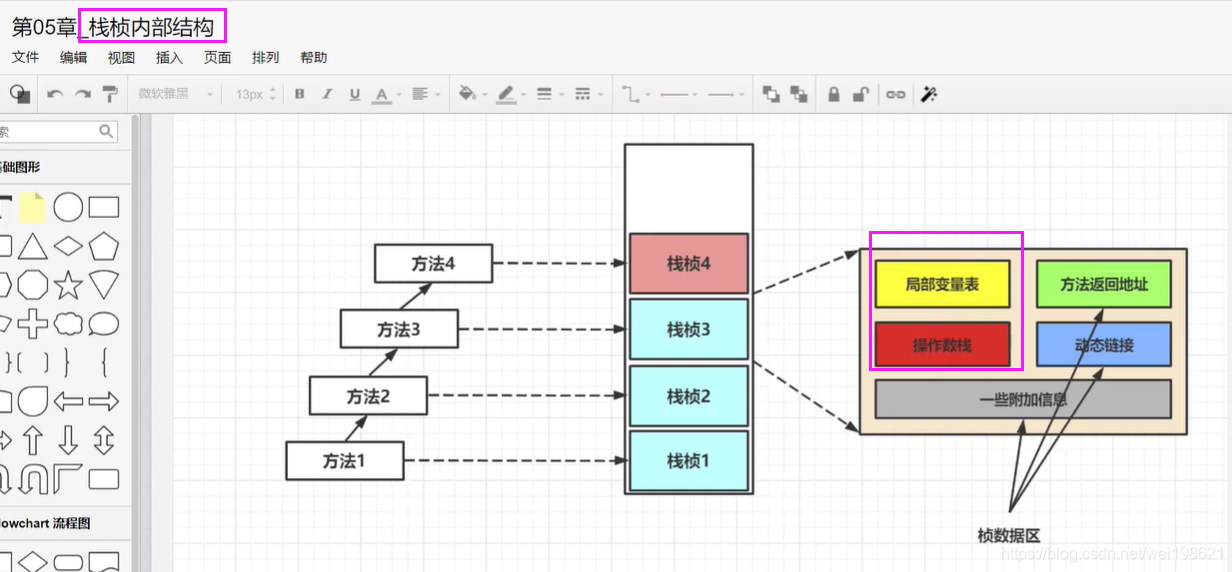
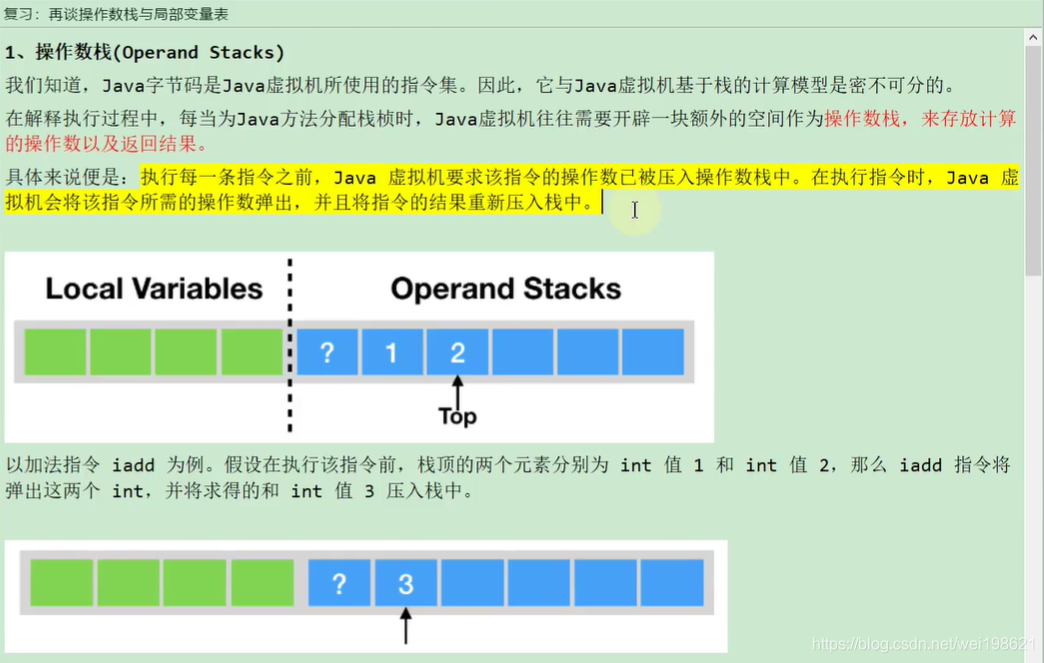
操作数栈:存放计算的操作数以及返回结果。
执行每条指令之前,java虚拟机要求该指令的操作数已被压入操作数栈中,在执行指令时,java虚拟机会将该指令所需操作数弹出,并且将指令的结果重新压入栈中。
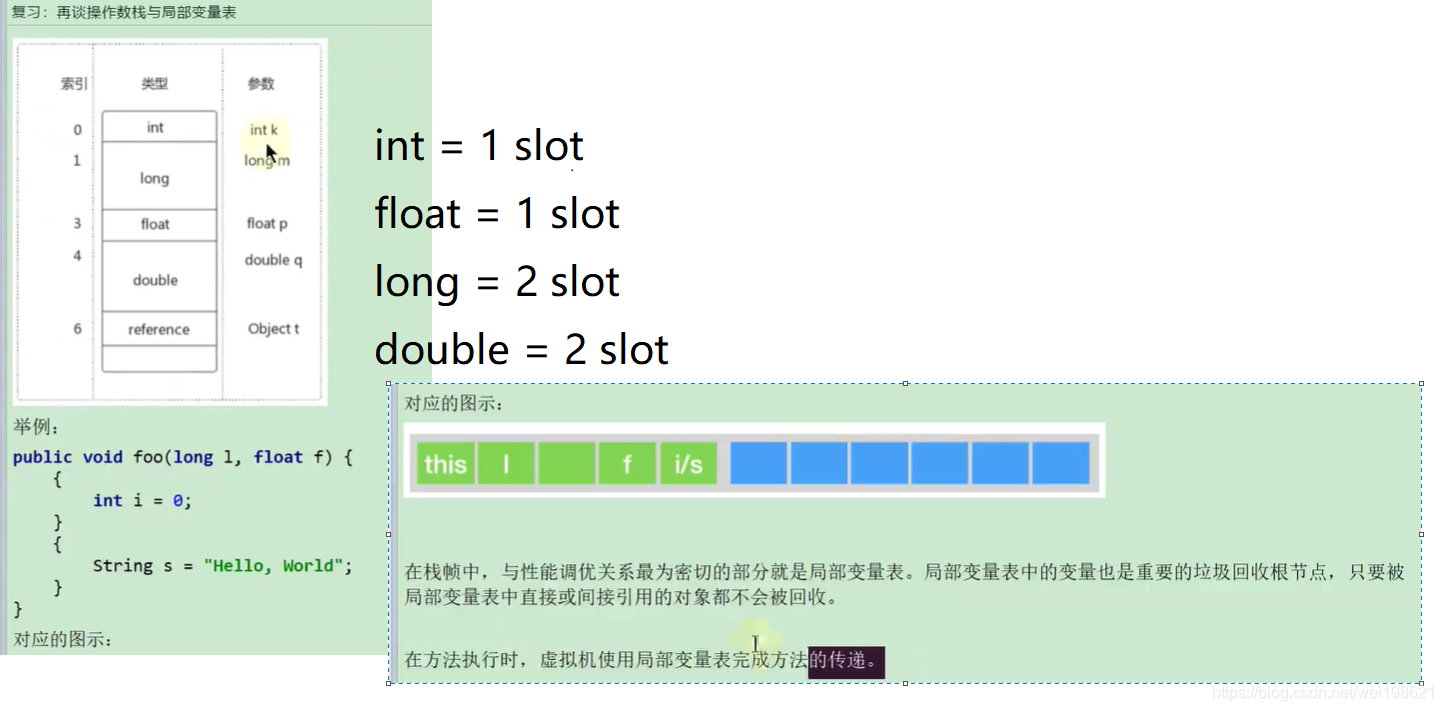
 局部变量表(Local Variables ):
字节码程序将计算的结果缓存在局部变量之中。
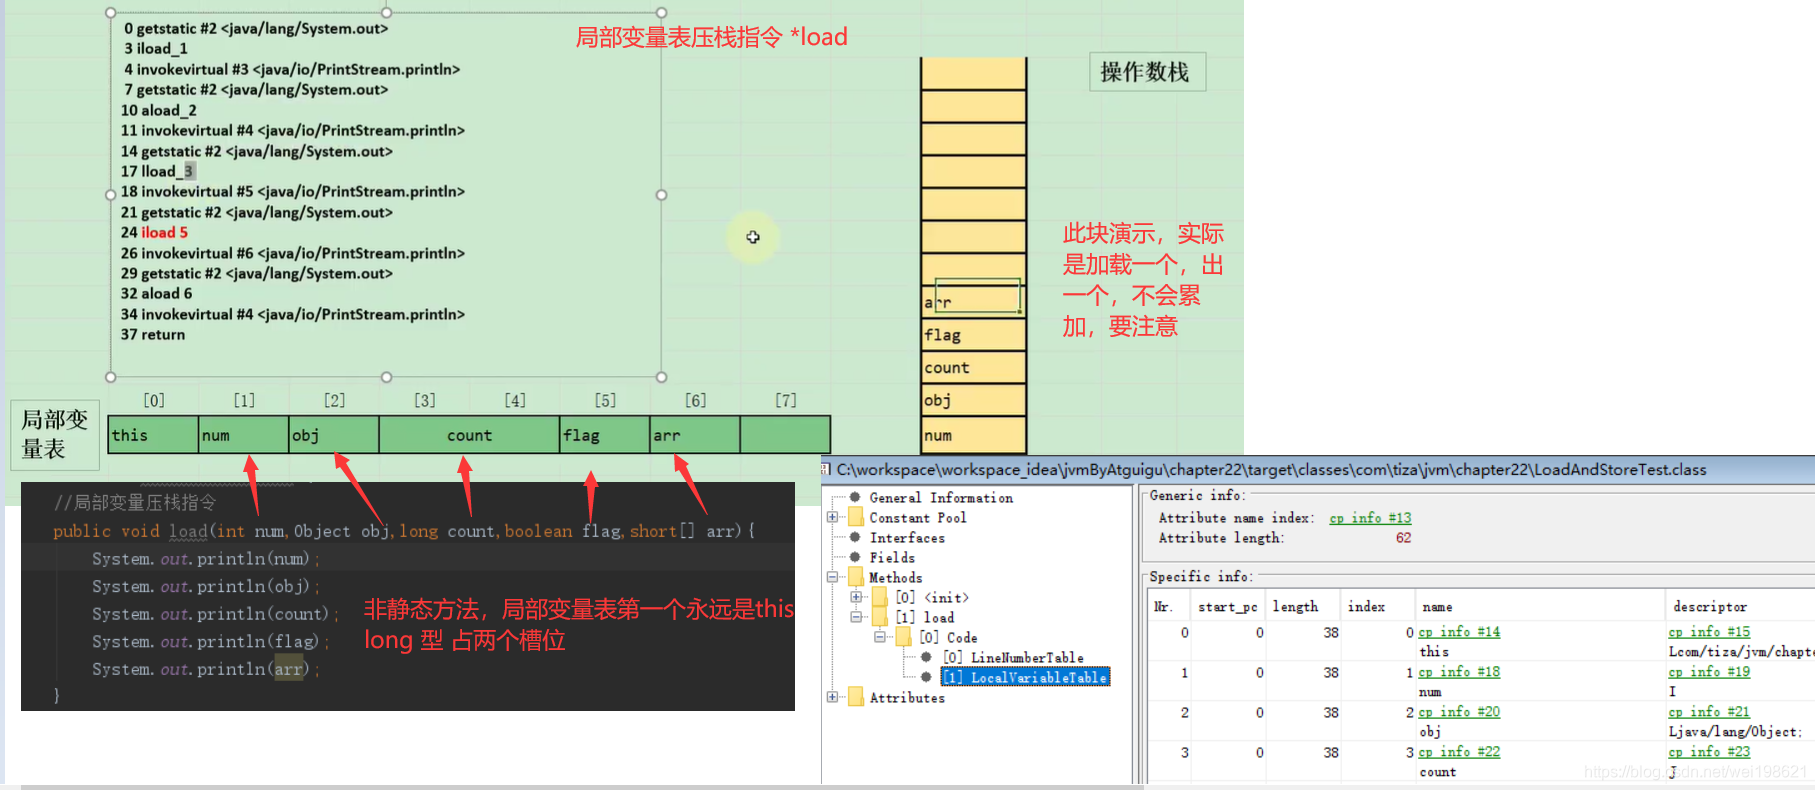
java虚拟机将局部变量当成一个数组,依次存放this指针,
局部变量表中
int , float … = 1 slot
long ,double = 2 slot

P242-局部变量压栈指令 08:44
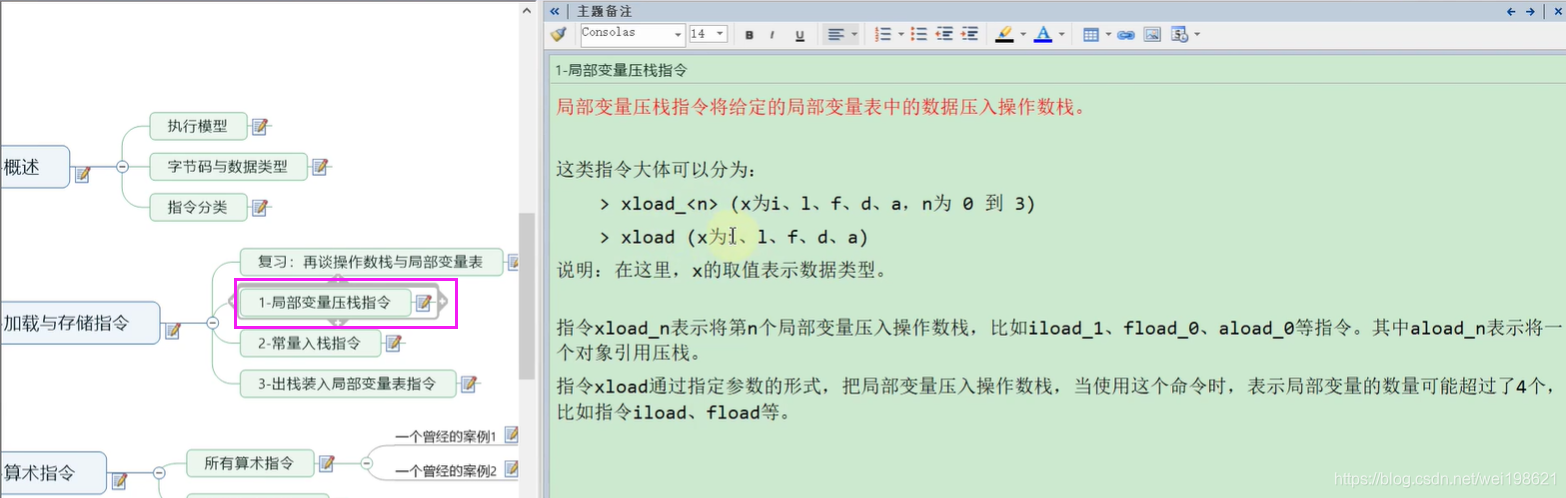
从局部变量中取出数据,放到栈中。
xload (x= i/l/f/d/a)
  //局部变量压栈指令
    public void load(int num,Object obj,long count,boolean flag,short[] arr){
        System.out.println(num);
        System.out.println(obj);
        System.out.println(count);
        System.out.println(flag);
        System.out.println(arr);
    }
P243-常量入栈指令 14:13
const:
iconst_x (x= 1-5)
int i=3; iconst_3 — 小于5的,一个指令
int j=6; iconst 6 ----大于5的, 指令 + 数字 ,错错错
int j=6; bipush 6 ----大于5的, 指令 + 数字 ,指令为bipush ,这个写法是对的lconst_x ( x=1-2)
fconst_x( x=0-2)
dconst_x( x=0-1)
aconst_nullpush:
bipush: 8位整数 (-128~127)
sipush: 16位整数 (-32768 ~32767)sipush 30000 —ok
sipush 32768 ---- 错误ldc: 万能的ldc 指令 ,
ldc: ---- 一个8位参数
ldc_w: ---- 两个8位参数
ldc2_w: ---- 压入的是 long 或者 double
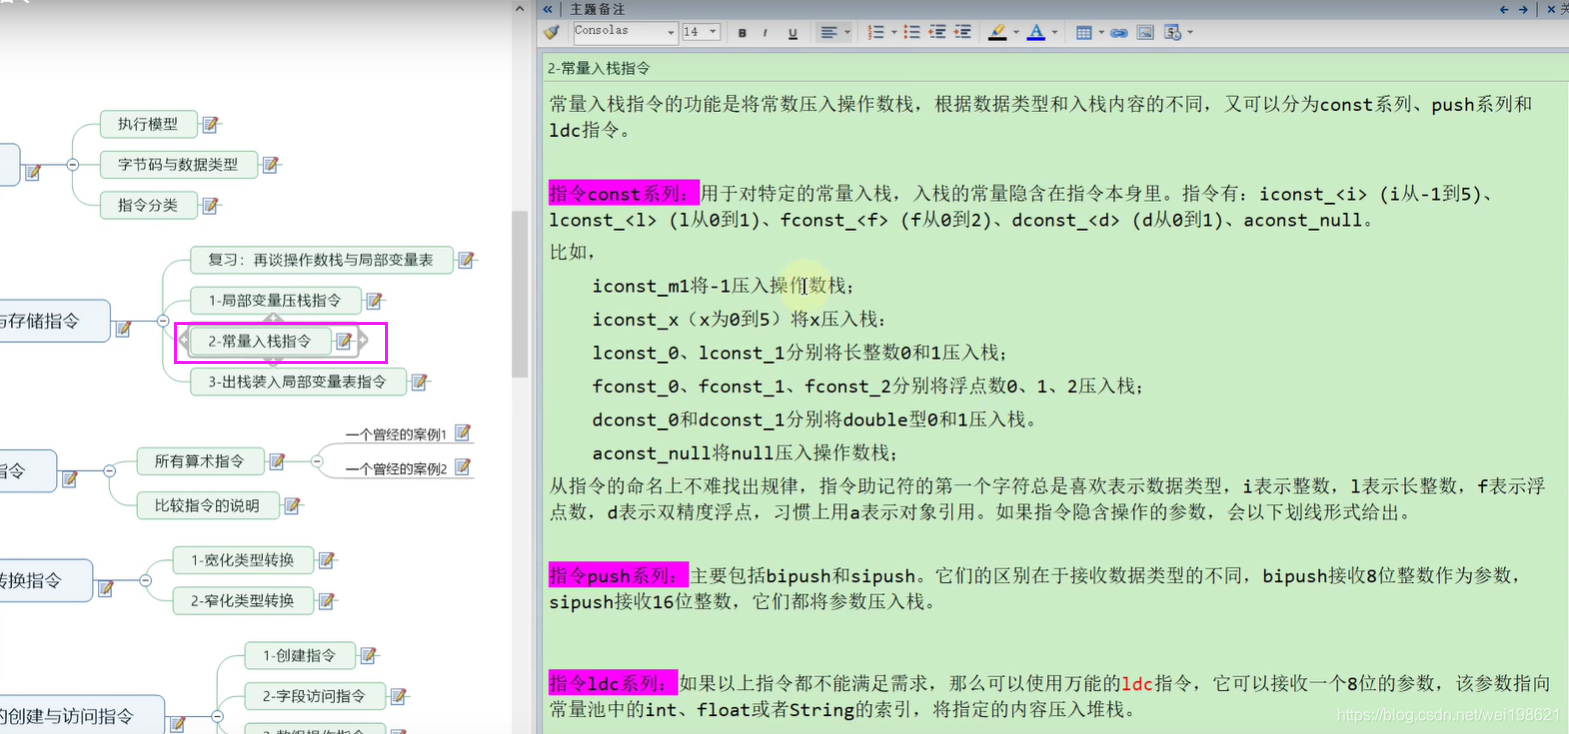
 常量入栈指令:
同样是 int 值 ,用的指令有 iconst bipush ldc 等


P244-出栈装入局部变量表指令 14:25
xstore (x为 i/l/f/d/a )
xstore_n


P245-算术指令及举例 20:37
记住 store往局部变量表里面存储,就可以了
整形数据算数指令
浮点类型数据算数指令
NaN 表示无穷大,
所有的算数指令:
加法,减法,乘法,除法,求余,取反,自增,位运算符,比较指令。


package com.tiza.jvm.chapter22;

import org.junit.Test;

/**
 * @author leowei
 * @date 2021/1/22  - 22:23
 */
public class ArithmeticTest {
    @Test
    public void method1(){
        int i=10;
        double j =i/0.0;
        System.out.println(j);  // 无穷大  Infinity


        double d1=0.0;
        double d2=d1/0.0;
        System.out.println(d2);  //  NaN  : not a number
    }

    // 下面几个方法  编译后看代码
    public void method2(){
        float i=10;
        float j=-i;
        i=-j;
    }

    public void method3_1(){
        int i=100;
        i=i+10;
    }
    public void method3_2(){
        int i=100;
        i+=10;
    }

    public int method4(){
        int a=80;
        int b=7;
        int c=10;
        return (a+b)*c;

    }

    public  int method5(int i,int j) {
        return ((i + j - 1) & (j - 1));
    }

    public void method6_1(){
        int i=10;
        i++;
    }
    public void method6_2(){
        int i=10;
        ++i;
    }
}
P246-算法指令再举例 06:23


一个曾经的案例详细过程


P247-彻底搞定++运算符 08:15
P248-比较指令的说明 02:46
比较指令:
比较栈顶两个元素大小,并将比较结果入栈。
比较指令有: dcmpg, dcmpl, fcmpg, fcmpl,lcmp .

P249-宽化类型转换 17:32

 int -> long->float -> double
int 升 i2l, i2f, i2d
long 升 l2f, l2d
float 升 f2d
int 4字节
long 4 字节
float 4字节


P250-窄化类型转换 18:50
强制类型转换
int: i2b,i2s,i2c
long l2i
float f2i,f2l
double d2i, d2l ,d2f


package com.tiza.jvm.chapter22;

import com.sun.xml.internal.fastinfoset.stax.factory.StAXOutputFactory;

/**
 * @author leowei
 * @date 2021/1/22  - 23:19
 */
public class ClassCastTest {

    public void upCast1(){
        int i=10;
        long l=i;
        float f=i;
        double d=i;


        float f2 =1;
        double d2 =l;

        double d3 =f2;

    }

    // 精度损失示例
    public void upCAst2(){
        int i=123123123;
        float  f=i;
        System.out.println(f) ;  //  123123120


        long l=123123123123L;
        //long l=123123123123123123L;   // 这个转换会丢失
        double d=l;
        System.out.println("d = " + d);
    }
    //  针对 byte,short  转换为 long 等 , 把 byte 看做int 类型
    public void upCast3(byte b){
        int i=b;
        long l=b;
        double d=b;
    }

    //  针对 byte,short  转换为 long 等 , 把 byte 看做int 类型
    public void upCast4(short s){
        int i=s;
        long l=s;
        double d=s;
    }


    // 窄化类型转化
    public void downCast1(){
        int i=10;
        byte b =(byte) i;
        short s= (short) i;
        char c = (char) i;
        long l=10;
        int i2= (int) l;
        byte b2= (byte) l;
    }

    public void downCast2(){
        float f=10;
        long l = (long) f;
        int i = (int) f;
        byte b = (byte) f;

        double d=10;
        byte b2 = (byte) d;
    }

    public void downCast3(){
        short s=10;
        byte b= (byte) s;
    }

    //  窄化类型转换的精度损失问题
    public void downCast4(){
        int i=128;
        byte b = (byte) i;
        System.out.println("b = " + b);  //  -128
    }

    //  测试 NaN   无穷大
    public void downCast5(){
        double d1 =Double.NaN;   //  0.0/ 0.0  就是  NaN
        int i= (int) d1;
        System.out.println(d1); // NaN
        System.out.println(i);  // 0

        double d2 = Double.POSITIVE_INFINITY;  //POSITIVE_INFINITY = 1.0 / 0.0;
        // double d5 = Double.NEGATIVE_INFINITY; //   NEGATIVE_INFINITY = -1.0 / 0.0;
        long l = (long) d2;
        System.out.println(l);
        System.out.println(Long.MAX_VALUE);

        int j = (int) d2;
        System.out.println(j);
        System.out.println(Integer.MAX_VALUE);

        float f = (float)d2;
        System.out.println(f);
        System.out.println(Float.MAX_VALUE);

    }

}
P251-创建类和数组实例的指令 16:11
20210122
对象创建与访问指令:
创建指令
字段访问指令
数组操作指令
类型检查指令
创建指令: 可以创建类实例和数组对象。
创建类实例:new 这个助记符(字节码指令)用于创建类的实例
创建数组指令: newarray; anewarray ; multianewarray
---------------newarray:创建基本数组
---------------anewarray:创建引用数组
---------------multianewarray:创建多维数组
dup ---------- duplicate 复制


 0 new #6 <java/lang/Object>
 3 dup
 4 invokespecial #1 <java/lang/Object.<init>>
 7 astore_1
 8 new #7 <java/io/File>
11 dup
12 ldc #8 <tiza is die>
14 invokespecial #9 <java/io/File.<init>>
17 astore_2
18 return
P252-字段访问指令 11:21

字段访问指令
对象创建后,可以通过对象访问指令获取对象实例中的字段等。
- 访问类字段/ static 字段 指令: getstatic ,putstatic
- 访问类实例字段 指令: getfield , putfield
System.out.print(“hello”);
getstatic / getfield : 压栈
putstatic / putfield : 出栈


P253-数组操作指令 12:14
数组操作
xastore,xaload
xastore:操作数栈的值存储到数组元素中,
------------- bastore,castore,sastore,iastore,lastore,fastore,dastore,aastore
xaload :加载到操作数栈
------------- baload,caload,saload,iaload,laload,faload,daload,aaload
bcs \ ilfda
xastore 针对数组操作,以iastore为例,它用于给一个int数组给定的索引复制,赋值前准备三个值,
值、索引、数组引用,iastore会弹出这三个值,并将值赋给数组中指定所索引的位置。
xaload 针对数组元素压栈,比如saload压入short数组,执行指令时要求,


P254-类型检查指令 04:18


P255-方法调用指令 15:35

 调用方法方式
invokevirtual : 动态分派
invokeinterface
invokespecial: 构造器,私有,父类方法
invokestatic : 静态方法
invokedynamic
package com.tiza.jvm.chapter22;

import java.util.Date;

/**
 * @author leowei
 * @date 2021/1/25  - 21:43
 */
public class MethodInvokeReturnTest {

    public static void main(String[] args) {

    }

    //方法调用  invokespecial: 静态分配

    /**
     0 new #2 <java/util/Date>
     3 dup
     4 invokespecial #3 <java/util/Date.<init>>
     7 astore_1
     8 new #4 <java/lang/Thread>
     11 dup
     12 invokespecial #5 <java/lang/Thread.<init>>
     15 astore_2
     16 aload_0
     17 invokespecial #6 <java/lang/Object.toString>
     20 pop
     21 aload_0
     22 invokespecial #7 <com/tiza/jvm/chapter22/MethodInvokeReturnTest.methodPrivate>
     25 return

     */
    public void invoke1(){
        Date date = new Date();       // 情况1: 类实例构造方法
        Thread t1 = new Thread();
        super.toString();              // 情况2: 父类方法
        methodPrivate();               // 情况3: 私有方法
    }
    private void methodPrivate(){

    }
    public void methodPublic(){

    }

    /**
     0 invokestatic #8 <com/tiza/jvm/chapter22/MethodInvokeReturnTest.methodStatic>
     3 invokestatic #9 <com/tiza/jvm/chapter22/MethodInvokeReturnTest.methodStaticPrivate>
     6 return

     方法调用  invokestatic
     */
    public void invoke2(){
        methodStatic();
        methodStaticPrivate();
    }
    public static void methodStatic(){

    }
    private static void methodStaticPrivate(){

    }


    /**   方法调用指令  : invokeinterface
     0 new #4 <java/lang/Thread>
     3 dup
     4 invokespecial #5 <java/lang/Thread.<init>>
     7 astore_1
     8 aload_1
     9 invokeinterface #10 <java/lang/Runnable.run> count 1
     14 aconst_null
     15 astore_2
     16 aload_2
     17 bipush 123
     19 invokestatic #11 <java/lang/Integer.valueOf>
     22 invokeinterface #12 <java/lang/Comparable.compareTo> count 2
     27 pop
     28 return
     */
    public void invoke3(){
        Thread t1 = new Thread();  // invokespecial
        ((Runnable)t1).run();      // invokeinterface

        Comparable<Integer> com =null;  // Integer.valueOf  invokestatic
        com.compareTo(123);             // invokeinterface
    }

    /**   方法调用指令 :   invokeVirtual   动态分派
     0 getstatic #13 <java/lang/System.out>
     3 ldc #14 <hello>
     5 invokevirtual #15 <java/io/PrintStream.println>
     8 new #4 <java/lang/Thread>
     11 dup
     12 invokespecial #5 <java/lang/Thread.<init>>
     15 astore_1
     16 aload_1
     17 invokevirtual #16 <java/lang/Thread.run>
     20 return

     */
    public void invoke4(){
        System.out.println("hello");   // invokevirtual
        Thread t1 = new Thread();      // invokespecial
        t1.run();                      // invokevirtual
    }

}
package com.tiza.jvm.chapter22;

/**
 * @author leowei
 * @date 2021/1/25  - 22:03
 */
public class InterfaceMethodTest {


    /**
     *
     0 new #2 <com/tiza/jvm/chapter22/Son>
     3 dup
     4 invokespecial #3 <com/tiza/jvm/chapter22/Son.<init>>
     7 astore_1
     8 aload_1
     9 invokeinterface #4 <com/tiza/jvm/chapter22/Father.method2> count 1
     14 invokestatic #5 <com/tiza/jvm/chapter22/Father.method1>
     17 return

     * @param args
     */
    public static void main(String[] args) {
        Father f = new Son();
        f.method2();
        Father.method1();
    }
}

interface Father{
    public static void method1(){

    }
    public default void method2(){

    }
}

class Son implements Father{

}
P256-方法返回指令 07:51
return : void
ireturn : int (boolean,byte,char,short)
lreturn : long
freturn : float
dreturn : double
areturn : reference

package com.tiza.jvm.chapter22;

import java.util.Date;

/**
 * @author leowei
 * @date 2021/1/25  - 21:43
 */
public class MethodInvokeReturnTest {

    public static void main(String[] args) {

    }

    //方法调用  invokespecial: 静态分配

    /**
     0 new #2 <java/util/Date>
     3 dup
     4 invokespecial #3 <java/util/Date.<init>>
     7 astore_1
     8 new #4 <java/lang/Thread>
     11 dup
     12 invokespecial #5 <java/lang/Thread.<init>>
     15 astore_2
     16 aload_0
     17 invokespecial #6 <java/lang/Object.toString>
     20 pop
     21 aload_0
     22 invokespecial #7 <com/tiza/jvm/chapter22/MethodInvokeReturnTest.methodPrivate>
     25 return

     */
    public void invoke1(){
        Date date = new Date();       // 情况1: 类实例构造方法
        Thread t1 = new Thread();
        super.toString();              // 情况2: 父类方法
        methodPrivate();               // 情况3: 私有方法
    }
    private void methodPrivate(){

    }
    public void methodPublic(){

    }

    /**
     0 invokestatic #8 <com/tiza/jvm/chapter22/MethodInvokeReturnTest.methodStatic>
     3 invokestatic #9 <com/tiza/jvm/chapter22/MethodInvokeReturnTest.methodStaticPrivate>
     6 return

     方法调用  invokestatic
     */
    public void invoke2(){
        methodStatic();
        methodStaticPrivate();
    }
    public static void methodStatic(){

    }
    private static void methodStaticPrivate(){

    }


    /**   方法调用指令  : invokeinterface
     0 new #4 <java/lang/Thread>
     3 dup
     4 invokespecial #5 <java/lang/Thread.<init>>
     7 astore_1
     8 aload_1
     9 invokeinterface #10 <java/lang/Runnable.run> count 1
     14 aconst_null
     15 astore_2
     16 aload_2
     17 bipush 123
     19 invokestatic #11 <java/lang/Integer.valueOf>
     22 invokeinterface #12 <java/lang/Comparable.compareTo> count 2
     27 pop
     28 return
     */
    public void invoke3(){
        Thread t1 = new Thread();  // invokespecial
        ((Runnable)t1).run();      // invokeinterface

        Comparable<Integer> com =null;  // Integer.valueOf  invokestatic
        com.compareTo(123);             // invokeinterface
    }

    /**   方法调用指令 :   invokeVirtual   动态分派
     0 getstatic #13 <java/lang/System.out>
     3 ldc #14 <hello>
     5 invokevirtual #15 <java/io/PrintStream.println>
     8 new #4 <java/lang/Thread>
     11 dup
     12 invokespecial #5 <java/lang/Thread.<init>>
     15 astore_1
     16 aload_1
     17 invokevirtual #16 <java/lang/Thread.run>
     20 return

     */
    public void invoke4(){
        System.out.println("hello");   // invokevirtual
        Thread t1 = new Thread();      // invokespecial
        t1.run();                      // invokevirtual
    }


    //  ********************   返回值 测试   ************************

    /**
     0 bipush 40
     2 istore_1
     3 iload_1
     4 ireturn

     * @return
     */
    public int returnInt(){
        int i =40;
        return i;
    }

    /**
     *
     0 dconst_0
     1 dreturn

     * @return
     */
    public double returnDouble(){
        return 0.0;
    }


    /**
     *
     0 ldc #17 <hello,world>
     2 areturn

     * @return
     */
    public String returnString(){
        return "hello,world";
    }

    /**
     0 aconst_null
     1 areturn

     * @return
     */
    public int[] returnArr(){
        return null;
    }

    /**
     0 bipush 10
     2 istore_1
     3 iload_1
     4 i2f
     5 freturn

     */
    public float returnFloat(){
        int i=10;
        return i;
    }

    /**
     0 iconst_0
     1 ireturn

     * @return
     */
    public byte returnByte(){
        return  0;
    }


}
P257-操作数栈管理指令 19:20
将元素从栈顶弹出,直接废弃: pop , pop2
复制栈顶(1,2)元素: dup , dup 2
复制栈顶(1,2)元素,将复制结果重新压入栈顶: dup_x1, dup_x2, dup2_x1, dup2_x2;
将栈顶两个Slot数值位置互换: swap
占位指令, Nop 啥都不做


package com.tiza.jvm.chapter22;
/**
-
@author leowei
-
@date 2021/1/25 - 23:06
*/
public class StackOperateTest {
public static void main(String[] args) {}
private long index;
/**
0 new #2 <java/lang/Object>
3 dup
4 invokespecial #1 <java/lang/Object.>
7 astore_1
8 aload_1
9 invokevirtual #3 <java/lang/Object.toString>
12 astore_2
13 return
*/
public void print(){
Object obj = new Object();
String info = obj.toString();
}/**
0 aload_0
1 invokevirtual #4 <com/tiza/jvm/chapter22/StackOperateTest.bar>
4 pop2
5 return*/
public void foo(){
bar();
}/**
0 lconst_0
1 lreturn- @return
*/
public long bar(){
return 0;
}
/**
0 aload_0
1 dup
2 getfield #5 <com/tiza/jvm/chapter22/StackOperateTest.index>
5 dup2_x1
6 lconst_1
7 ladd
8 putfield #5 <com/tiza/jvm/chapter22/StackOperateTest.index>
11 lreturn- @return
*/
public long nextIndex(){
return index++;
}
}
- @return
P258-比较指令 08:29


P259-条件跳转指令 23:00
1)比较指令 : dcmpg, dcmpl, fcmpg, fcmpl ,lcmp (cmp == compare )
2)条件跳转指令 : ifeq,ifne, iflt,ifle, ifgt ,ifge ,ifnll ,ifnotnull
3)比较条件跳转指令
4)多条件分支跳转指令
5)无条件跳转指令

package com.tiza.jvm.chapter22;

/**
 * @author leowei
 * @date 2021/1/25  - 23:57
 */
public class IfSwitchForGotoTest {

    public static void main(String[] args) {

    }

    /** 条件跳转指令

     0 iconst_0
     1 istore_1
     2 iload_1
     3 ifne 12 (+9)
     6 bipush 10
     8 istore_1
     9 goto 15 (+6)
     12 bipush 20
     14 istore_1
     15 return
    */
    public void comapre1(){
        int a=0;
        if (a == 0) {
            a=10;
        }else{
            a=20;
        }
    }

    /**
     0 aload_1
     1 ifnonnull 6 (+5)
     4 iconst_1
     5 ireturn
     6 iconst_0
     7 ireturn

     * @param str
     * @return
     */
    public boolean compareNull(String str){
        if(str==null){
            return true;
        }else{
            return false;
        }
    }

    /**
     0 ldc #2 <9.0>
     2 fstore_1
     3 ldc #3 <10.0>
     5 fstore_2
     6 getstatic #4 <java/lang/System.out>
     9 fload_1
     10 fload_2
     11 fcmpg
     12 ifge 19 (+7)
     15 iconst_1
     16 goto 20 (+4)
     19 iconst_0
     20 invokevirtual #5 <java/io/PrintStream.println>
     23 return

     */
    public void compare2() {
        float f1 = 9;
        float f2=10;
        System.out.println(f1<f2);
    }

    public void compare3(){
        int i1=20;
        int i2=20;
        System.out.println(i1<i2);
    }

    /**
     *
     0 dload_1
     1 ldc2_w #6 <50.0>
     4 dcmpl
     5 ifle 10 (+5)
     8 iconst_1
     9 ireturn
     10 iconst_m1
     11 ireturn

     * @param d
     * @return
     */

    public int compare4(double d){
        if(d>50.0)
            return  1;
        else
            return -1;
    }

}
P260-比较条件跳转指令 08:16
1)比较指令 : dcmpg, dcmpl, fcmpg, fcmpl ,lcmp (cmp == compare )
2)条件跳转指令 : ifeq,ifne, iflt,ifle, ifgt ,ifge ,ifnll ,ifnotnull
3)比较条件跳转指令 : if_icmpeq, if_icmpne, if_icmplt, if_icmple, if_icmpgt ,if_icmgge, if_acmpeq, if_acmpne
4)多条件分支跳转指令 :
5)无条件跳转指令

 //  比较条件跳转指令

    /**
     0 bipush 10
     2 istore_1
     3 bipush 20
     5 istore_2
     6 getstatic #4 <java/lang/System.out>
     9 iload_1
     10 iload_2
     11 if_icmple 18 (+7)
     14 iconst_1
     15 goto 19 (+4)
     18 iconst_0
     19 invokevirtual #5 <java/io/PrintStream.println>
     22 return

     */
    public  void ifCompare1(){
        int i=10;
        int j=20;
        System.out.println(i>j);
    }

    public void ifCompare2(){
        short s1=9;
        byte b1=10;
        System.out.println(s1>b1);
    }

    public void ifCompare3(){
        Object obj1 = new Object();
        Object obj2 = new Object();
        System.out.println(obj1==obj2);
        System.out.println(obj1!=obj2);
    }
P261-多条件分支跳转指令 14:11
tableswitch
lookupswitch


//  switch test   多条件分支跳转

    /**
     0 iload_1
     1 tableswitch 1 to 3	1:  28 (+27)
     2:  34 (+33)
     3:  40 (+39)
     default:  46 (+45)
     28 bipush 10
     30 istore_2
     31 goto 49 (+18)
     34 bipush 20
     36 istore_2
     37 goto 49 (+12)
     40 bipush 30
     42 istore_2
     43 goto 49 (+6)
     46 bipush 40
     48 istore_2
     49 return

     * @param select
     */

    public void switch1(int select){
        int num;
        switch (select) {
            case 1:
                num = 10;
                break;
            case 2:
                num = 20;
                break;
            case 3:
                num = 30;
                break;
            default:
                num = 40;
        }
    }


    /**
     0 iload_1
     1 lookupswitch 3
     100:  36 (+35)
     200:  48 (+47)
     500:  42 (+41)
     default:  54 (+53)
     36 bipush 10
     ... ...
     * @param select
     */
    public void switch2(int select){
        int num;
        switch (select) {
            case 100:
                num = 10;
                break;
            case 500:
                num = 20;
                break;
            case 200:
                num = 30;
                break;
            default:
                num = 40;
        }
    }

    //JDK 7 新特性: 引入String 类型

    /**
     0 aload_1
     1 astore_2
     2 iconst_m1
     3 istore_3
     4 aload_2
     5 invokevirtual #9 <java/lang/String.hashCode>
     8 lookupswitch 4
     -1842350579:  52 (+44)
     -1837878353:  66 (+58)
     -1734407483:  94 (+86)
     1941980694:  80 (+72)
     default:  105 (+97)
     52 aload_2
     ...
     * @param season
     */
    public void switch3(String season){
        switch(season){
            case "SPRING": break;
            case "SUMMER": break;
            case "AUTUMN": break;
            case "WINTER": break;
        }
    }
P262-无条件跳转指令 15:33
无条件跳转 99% 使用的是goto 指令


 // 4 无条件跳转指令

    /**
     0 dconst_0
     1 dstore_1
     2 dload_1
     3 ldc2_w #16 <100.1>
     6 dcmpg
     7 ifge 20 (+13)
     10 ldc #15 <atguigu.com>
     12 astore_3
     13 dload_1
     14 dconst_1
     15 dadd
     16 dstore_1
     17 goto 2 (-15)  ------------goto 指令
     20 return

     */
    public void whileInt(){
        int i=0;
        while(i<100){
            String s="atguigu.com";
            i++;
        }
    }

    public void whileDouble(){
        double d=0.0;
        while(d<100.1){
            String s="atguigu.com";
            d++;
        }
    }

    public void printFor(){
        short i;
        for (i = 0; i < 100; i++) {
            String s="atguigu.com";
        }
    }


    public void whileTest(){
        int i=1;
        while(i<=100){
            i++;
        }
    }

    public void forTest(){
        for (int i = 0; i < 100; i++) {

        }
    }

    public void doWhileTest(){
        int i=1;
        do{
            i++;
        }while (i<=100);
    }
P263-抛出异常指令 14:07
athrow


P264-异常处理与异常表 24:25

 https://www.bilibili.com/video/BV1PJ411n7xZ?p=264
P265-同步控制指令 24:14
monitor
https://www.bilibili.com/video/BV1PJ411n7xZ?p=265


monitorenter
monitorexit
第三章 类的加载过程详解
P266-类的生命周期概述 15:57
类的加载过程
Loading------------
Linking-------------Verification;Preparation;Resolution
Initialization-------
Using---------------
Unloading---------


P267-加载完成的操作及二进制的获取方式 07:24


package com.tiza.jvm.chapter23;

import java.lang.reflect.Method;
import java.lang.reflect.Modifier;

/**
 * @author leowei
 * @date 2021/1/27  - 22:56
 */
public class LoadingTest {
    public static void main(String[] args) {
        try {
            Class clazz = Class.forName("java.lang.String");
            //获取当前运行时类声明的所有方法
            Method[] ms = clazz.getDeclaredMethods();
            for (Method m : ms) {
                //获取方法的修饰符
                String mod = Modifier.toString(m.getModifiers());
                System.out.print("mod = " + mod);
                //获取方法的返回值类型
                String returnType = m.getReturnType().getSimpleName();
                System.out.print("returnType = " + returnType);
                //获取方法名
                System.out.print(m.getName()+ "(");
                //获取方法的参数列表
                Class<?>[] ps = m.getParameterTypes();
                if(ps.length==0){
                    System.out.print(")");
                }
                for (int i = 0; i < ps.length; i++) {
                    char end = (i==ps.length-1)? ')':',';
                    System.out.print(ps[i].getSimpleName() + end);
                }
                System.out.println();
            }
        } catch (ClassNotFoundException e) {
            e.printStackTrace();
        }
    }
}
P268-类模型与Class实例的位置 08:19
P269-链接之验证环节 13:41
验证
格式验证
语义验证
字节码验证
符号引用验证


P270-链接之准备环节 11:15
准备阶段: 为类的静态变量分配内存,并将其初始化为默认值。


P271-链接之解析环节 11:58
解析阶段(Resolution): 将类、接口、字段、方法的符号引用,转换为直接引用 。


package com.tiza.jvm.chapter23;

/**
 * @author leowei
 * @date 2021/1/27  - 23:40
 * static final 静态常量值 ,在类加载阶段(Loading,linking,Initializaing,Using,Unloading)的
 * Linking阶段 (验证、准备、解析)的准备阶段就给此类赋值了。
 *
 * 基本数据类型:  非final 变量,准备环节进行默认初始化赋值
 *                 final 变量, 准备环节进行显示赋值
 */
public class LinkingTest {
    private static long id;
    private static final int num=1;
    private static final String conStr ="CONST";
    //同样是给 static final String 赋值,静态字面量有 constantValue ,New 的没有
    private static final String conStr02 = new String("Const02");

}
P272-初始化过程与类初始化方法 08:46
initialization 阶段的操作是: 静态字段,显式赋值。


P273-初始化阶段赋值与准备阶段赋值的对比 26:33
链接阶段 准备环节赋值在哪里进行?
结论:
使用 static + final 修饰, and 显式赋值不涉及到方法或构造器的调用 (字面量方式赋值) and 基本数据类型或者String 类型 的显式赋值,在链接阶段的准备环节进行。

package com.tiza.jvm.chapter23;

import org.omg.CORBA.PUBLIC_MEMBER;

/**
 * @author leowei
 * @date 2021/1/28  - 22:19
 *
 * 链接阶段 准备环节赋值在哪里进行?
 * 结论:
 * 使用  static + final 修饰, and
 *                显式赋值不涉及到方法或构造器的调用 (字面量方式赋值) and
 *                           基本数据类型或者String 类型 的显式赋值,在链接阶段的准备环节进行。
 */
public class InitializationTest2 {

    public static int a=1;                             // 在初始化阶段 <clinit>()中赋值
    public static final int INT_CONSTANT =10;          // 在链接阶段准备环节赋值

    public static final Integer INTEGER_CONSTANT1 = Integer.valueOf(10);  // 在初始化阶段 <clinit>()中赋值
    public static Integer INTEGER_CONSTANT2 = Integer.valueOf(10);        // 在初始化阶段 <clinit>()中赋值

    public static final String s0= "helloworld0";                              // 在链接阶段准备环节赋值
    public static final String s1 = new String("helloworld2");    // 在初始化阶段 <clinit>()中赋值

}
P274-类初始化方法clinit()的线程安全性 07:02


package com.tiza.jvm.chapter23;

/**
 * @author leowei
 * @date 2021/1/28  - 22:45
 */
public class StaticDeadLOckMain extends Thread {
    private char flag;

    public StaticDeadLOckMain(char flag){
        this.flag=flag;
        this.setName("Thread "+ flag);
    }

    public void run(){
        System.out.println("-------------- start running flag is "+ flag);
        try {
            Class.forName("com.tiza.jvm.chapter23.Static"+flag);
        } catch (ClassNotFoundException e) {
            e.printStackTrace();
        }
        System.out.println(getName());
        System.out.println("-------------- finish running flag is "+ flag);
    }

    // A 调用 B  , B  调用  A 进入死循环
    public static void main(String[] args) {
        StaticDeadLOckMain loadA = new StaticDeadLOckMain('A');
        loadA.start();

        StaticDeadLOckMain loadB = new StaticDeadLOckMain('B');
        loadB.start();
    }

}

// A 加载 B
class StaticA{
    static{
        try {
            Thread.sleep(1000);
        } catch (InterruptedException e) {
            e.printStackTrace();
        }
        try {
            Class.forName("com.tiza.jvm.chapter23.StaticB");
        } catch (ClassNotFoundException e) {
            e.printStackTrace();
        }
        System.out.println("StaticA init OK");
    }
}
// B 加载  A
class StaticB{
    static{
        try {
            Thread.sleep(1000);
        } catch (InterruptedException e) {
            e.printStackTrace();
        }
        try {
            Class.forName("com.tiza.jvm.chapter23.StaticA");
        } catch (ClassNotFoundException e) {
            e.printStackTrace();
        }
        System.out.println("StaticA init OK");
    }
}
运行效果
-------------- start running flag is A
-------------- start running flag is B
P275-何为类的主动使用和被动使用 04:03
P276-类的主动使用1 08:00
dit Configuration : Templates : JUnit
-XX:+TraceClassLoading
-
创建一个类的实例时
1.1 new ***
1.2 反射,克隆,反序列化 -
当调用类的静态方法时 ,即当使用了字节码invokestatic指令。
-
当使用类、接口的静态字段时(final修饰特殊考虑)。
-
当使用java.lang.reflect包中的方法反射类的方法时。 比如Class.forName(“com.tiza.java.Test”)
-
当初始化子类时,如果发现其父类没有初始化,需要先触发其父类的初始化
(
java虚拟机初始化一个类的时候,要求他的所有父类都已经被初始化,这条规则不适用于接口
5.1 初始化一个类时,并不会先初始化它所实现的接口
5.2 初始化一个接口时,并不会先初始化他的父接口
5.3 一个父接口不会因为它的子接口或者实现类的初始化而初始化。只有当程序首次使用特定接口的静态字段时,
才导致该接口被初始化
) -
如果一个接口定义了default方法,那么直接或者间接实现接口的类的初始化时候,改接口在其之前被初始化
-
虚拟机启动时候,执行一个包含main方法的类。
8.初次调用MethodHandle实例时,初始化改MethodHandle指向的方法所在的类。
P277-类的主动使用2 13:54
package com.tiza.jvm.chapter23;
import org.junit.Test;
import java.util.Random;
/**
- @author leowei
- @date 2021/1/28 - 23:55
- https://www.bilibili.com/video/BV1PJ411n7xZ?p=277
- 当使用类、接口的静态字段时(final修饰特殊考虑)
*/
public class ActiveUser2 {
/**
 User 类的初始化过程
 1
 */
@Test
public void test1(){
    System.out.println(User.num);
}

/**
 2
 */
@Test
public void test2(){
    System.out.println(User.num2);
}

/**
 User 类的初始化过程
 8
 */
@Test
public void test3(){
    System.out.println(User.num3);
}

/**
 1
 没有初始化
 */
@Test
public void test4(){
    System.out.println(CompareA.NUM);
}

/**
 CompareA的初始化
 6
 */
@Test
public void test5(){
    System.out.println(CompareA.NUM2);
}
}
class User{
static {
System.out.println(" User 类的初始化过程");
}
public static int num =1;
public static final int num2=2;
public static final int num3 = new Random().nextInt(10);
}
interface CompareA{
public static final Thread t=new Thread(){
{
System.out.println(“CompareA的初始化”);
}
};
public static final int NUM =1 ;
public static final int NUM2 = new Random().nextInt(10);
}
P278-类的主动使用3 11:43
P279-类的主动使用4 07:46
package com.tiza.jvm.chapter23;

import org.junit.Test;

import java.io.Serializable;
import java.util.Random;

/**
 * @author leowei
 * @date 2021/1/29  - 22:28
 */
public class ActiveUser3 {


    /*
    4. 当使用java.lang.reflect包中的方法反射类的方法时。 比如Class.forName("com.tiza.java.Test")
    Order 类的初始化过程
     */
    @Test
    public void test1(){
        try {
            Class  clazz = Class.forName("com.tiza.jvm.chapter23.Order3");
        } catch (ClassNotFoundException e) {
            e.printStackTrace();
        }
    }

    /*
    5. 当初始化子类时,如果发现其父类没有初始化,需要先触发其父类的初始化

    Father 类的初始化
    Son 类的初始化
    1
     */
    @Test
    public void test2(){
        System.out.println(Son.num);
    }

    /*
    5.1  初始化一个类时,并不会先初始化它所实现的接口
    Father 类的初始化
    Son 类的初始化
    1
     */
    @Test
    public void test3(){
        System.out.println(Son2.num);
    }

    /*
    5.2  初始化一个接口时,并不会先初始化他的父接口
    CompareC 的初始化
    0
     */
    @Test
    public void test4(){
        System.out.println(CompareC.NUM1);
    }

}

class Order3 implements Serializable {
    static {
        System.out.println("Order 类的初始化过程");
    }

    public static void method1(){
        System.out.println("order method() .... ");
    }
}


class Father{
    static {
        System.out.println("Father 类的初始化");
    }
}

class Son extends Father{
    static {
        System.out.println("Son 类的初始化");
    }
    public static int num=1;
}

class Son2 extends Father implements CompareB{
    static {
        System.out.println("Son 类的初始化");
    }
    public static int num=1;
}

interface CompareB{
    public static final Thread t =new Thread(){
        {
            System.out.println("CompareB 的初始化");
        }
    };
}

interface CompareC extends CompareB{
    public static final Thread t =new Thread(){
        {
            System.out.println("CompareC 的初始化");
        }
    };

    public static int NUM1 =new Random().nextInt(10);
}
P280-类的被动使用 14:11
类的被动使用, 即是不会进行类的初始化操作,即是不会调用()
- 当访问一个静态字段时,只有真正声明该字段的类才会被初始化,
当通过子类引用父类的静态变量,不会导致子类的初始化 - 通过数组定义类的引用,不会触发此类的初始化
- 引用常量不会触发此类或接口的初始化,因为常量在链接阶段就已经被显示赋值了
- 调用ClassLoader类的LoadClass()方法加载一个类,并不是对类的主动使用,不会导致类的初始化
Class.forName(**) 阈值相反,是主动调用
package com.tiza.jvm.chapter23;

import org.junit.Test;

/**
 * @author leowei
 * @date 2021/1/29  - 23:25
 *
 *

1. 当访问一个静态字段时,只有真正声明该字段的类才会被初始化,
当通过子类引用父类的静态变量,不会导致子类的初始化
2. 通过数组定义类的引用,不会触发此类的初始化


 *
 *
 */
public class PassiveUse {

    /*
    1. 当访问一个静态字段时,只有真正声明该字段的类才会被初始化,
当通过子类引用父类的静态变量,不会导致子类的初始化

     father is init....
      1
     */
    @Test
    public void test1(){
        System.out.println(ChildA.NUM1);
    }

    //2. 通过数组定义类的引用,不会触发此类的初始化
    //什么都没有打印
    @Test
    public void test2(){
        FatherA[] fathers = new FatherA[10];
    }

}

class FatherA {
    static{
        System.out.println(" father is init....");
    }

    public static int NUM1 = 1;
}

class ChildA extends FatherA{
    static {
        System.out.println(" child is init ...");
    }
}
package com.tiza.jvm.chapter23;

import org.junit.Test;
import org.omg.CORBA.PUBLIC_MEMBER;

import java.util.Random;

/**
 * @author leowei
 * @date 2021/1/29  - 23:31
 */
public class PassiveUse2 {

    /*
    1
     */
    @Test
    public void test1(){
        System.out.println(Person.NUM);
    }

    /*
     Person 的初始化
3

     */
    @Test
    public void test2(){
        System.out.println(Person.NUM2);
    }

    /*
     1
     */
    @Test
    public void test3(){
        System.out.println(SerialA.NUM1);
    }

    /*
    SerialA 的初始化
    9
     */
    @Test
    public void test4(){
        System.out.println(SerialA.NUM2);
    }
/*
4. 调用ClassLoader类的LoadClass()方法加载一个类,并不是对类的主动使用,不会导致类的初始化
     Class.forName(**) 阈值相反,是主动调用
 */

    @Test
    public void test5(){
        try {
            ClassLoader.getSystemClassLoader().loadClass("com.tiza.jvm.chapter23.Person");
        } catch (ClassNotFoundException e) {
            e.printStackTrace();
        }
    }

}

class Person{
    static {
        System.out.println(" Person 的初始化 ");
    }
    public static final int NUM =1 ;      //  在链接过程的准备环节就被赋值为1 了 ,
    public static final int NUM2 = new Random().nextInt(10);
}


interface SerialA{
    public static final Thread t =new Thread(){
        {
            System.out.println("SerialA 的初始化");
        }
    };

    public static int NUM1 =1;
    public static int NUM2= new Random().nextInt(10);  // 此赋值操作需要在<clinit>方法中执行
}
P281-类的使用介绍 04:59
P282-类的卸载相关问题 15:47
启动类加载器
扩展类加载器
应用加载器


4 再谈类的加载器
P283-类加载器的概述 12:35


P284-命名空间与类的唯一性 15:57
比较类是否相同,首先要看类的加载器是否一致。


package com.tiza.jvm.chapter24;

/**
 * @author leowei
 * @date 2021/1/30  - 7:39
 */
public class ClassLoaderTest {
    public static void main(String[] args) {


        Class<?> clazz = null;
        try {
            clazz = ClassLoader.getSystemClassLoader().loadClass("com.tiza.jvm.chapter24.User");
             System.out.println(clazz.getClassLoader());
        } catch (ClassNotFoundException e) {
            e.printStackTrace();
        }

    }
}
P285-类的加载器的分类 07:32


P286-引导类加载器的说明 09:02
-XX:+TraceClassLoading


P287-扩展类加载器的说明 06:17


P288-系统类加载器的说明 04:53


P289-用户自定义类加载器的说明 02:09


P290-测试不同类使用的类加载器 09:10

package com.tiza.jvm.chapter24;

/**
 * @author leowei
 * @date 2021/1/30  - 10:26
 */
public class ClassLoaderTest2 {
    /*
classLoader = null
classLoader1 = sun.misc.Launcher$AppClassLoader@14dad5dc
====================
arrStr classLoader is  null
arr3.getClass().getClassLoader() = null
arr2.getClass().getClassLoader() = sun.misc.Launcher$AppClassLoader@14dad5dc

     */
    public static void main(String[] args) {
        try {
            // java 类 使用  bootstrap类加载器,打印 null
            ClassLoader classLoader = Class.forName("java.lang.String").getClassLoader();
            System.out.println("classLoader = " + classLoader);

            //自定义类 使用 系统类加载器  AppClassLoader
            ClassLoader classLoader1 = Class.forName("com.tiza.jvm.chapter24.User").getClassLoader();
            System.out.println("classLoader1 = " + classLoader1);

            System.out.println("====================");
            //数组类型, 使用的加载器与数组元素加载器相同 ,
            // 数组1
            String[] arrStr = new String[10];
            System.out.println("arrStr classLoader is  " + arrStr.getClass().getClassLoader());
            // 数组2
            int[] arr3 = new int[10];
            System.out.println("arr3.getClass().getClassLoader() = " + arr3.getClass().getClassLoader());
            // 数组3
            ClassLoaderTest2[] arr2 = new ClassLoaderTest2[10];
            System.out.println("arr2.getClass().getClassLoader() = " + arr2.getClass().getClassLoader());
        } catch (ClassNotFoundException e) {
            e.printStackTrace();
        }
    }
}
P291-ClassLoader与Launcher的初步剖析 11:50

P292-ClassLoader的源码解析1 15:04

P293-ClassLoader的源码解析2 07:08
P294-ClassLoader子类的结构剖析 05:16


Class.forName()
classLoader.loadClass()

P295-双亲委派机制的优势与劣势 22:02


P296-三次双亲委派机制的破坏 15:32

P297-热替换的代码实现 07:16
P298-沙箱安全机制 05:36
P299-自定义类加载器的好处和应用场景 05:43
P300-自定义类加载器的代码实现 15:57
P301-Java9的新特性 15:13



 2831


 扫一扫


 被折叠的 条评论
为什么被折叠?
 到【灌水乐园】发言


