


Java后端学习计划(Java SE篇)Day 2
今日总结:今天学习了什么是锁,锁是java中对线程访问和使用共享资源的一个机制,目的是为了是线程同步,解决数据更新不及时,线程安全这类的问题,此外还学习了线程池,线程池类似于一个包,包内有许多已经创建好的线程,用户可以在这里面对这些线程进行调用和管理,有利于减少系统资源的开销。
昨日回顾:
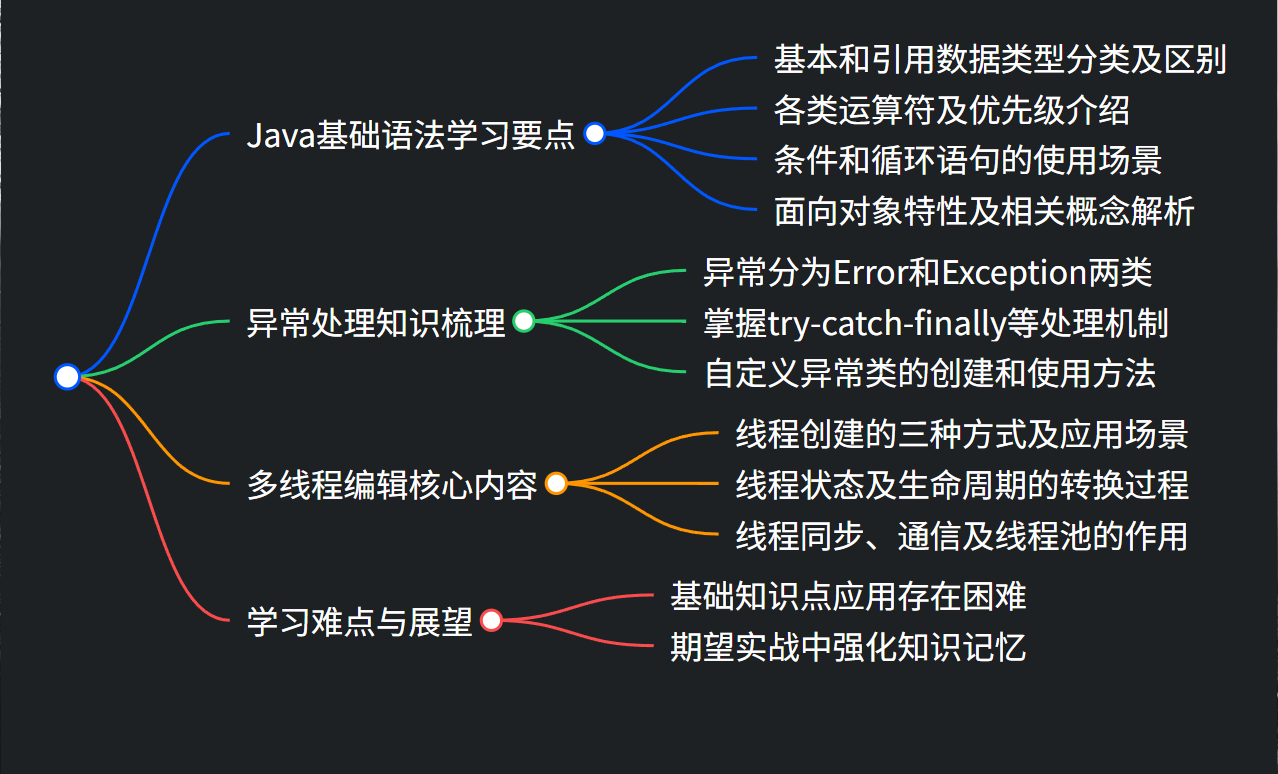
书接上回,上次学习到的是多线程编辑,了解什么是线程以及其与进程和程序之间的关系,也学习到可以通过继承Thread类和实现Runable接口和Callable接口+future创建和启动一个线程。
三、多线程编辑

线程状态与生命周期
tip:这里又要借用到豆包的逻辑图了
         start()
          ┌───┐
          ▼   │
NEW ───── RUNNABLE ───────┐
          │    │          │
          │    ▼          │
          │  BLOCKED      │
          │    │          │
          │    ▼          │
          │  WAITING ─────┘
          │    │
          │    ▼
          │ TIMED_WAITING ─┐
          │    │          │
          └──► TERMINATED ◄┘
正常情况下,线程的生命周期就是三个步骤——创建(new)、运行(run)和销毁。
在他生命周期中可能因为多线程竞争共用资源而出现等待(waiting)的状态。
而如何进入waiting状态呢?这里就要用到锁机制(lock)
线程同步与锁机制
1.什么是锁?
在Java中锁是一种机制,是对线程访问和使用资源的一种限制。
2.线程同步是什么?
我们知道,在一个进程中,所有的线程除了拥有各自的私有资源以外还共同使用这共享部分的资源,而当多个线程同时访问共享资源时,由于CPU缓存的影响,可能会出现数据不一致或者计算错误引发的线程安全问题。
为了避免这一类问题的发生,我们就要通过一些方法来实现线程的同步——锁机制(最常用)
3.锁机制有哪些?
第一种:synchronized关键字(内置锁)
public class SynchronizedExample {
    private int count = 0;
    private static final Object lock = new Object();

    // 1. 实例方法锁(锁对象为 this)
    public synchronized void increment() {
        count++;
    }

    // 2. 静态方法锁(锁对象为类的 Class 对象)
    public static synchronized void staticMethod() {
        // ...
    }

    // 3. 代码块锁(自定义锁对象,推荐)
    public void decrement() {
        synchronized (lock) { // 使用专门的锁对象,避免与其他锁冲突
            count--;
        }
    }
}
特点:
- 自动释放锁(无论是否抛出异常,退出同步块时自动解锁)。
- 属于非公平锁,且不支持中断和超时等待。
第二种:ReentrantLock锁(显示锁)
import java.util.concurrent.locks.ReentrantLock;

public class ReentrantLockExample {
    private int count = 0;
    private final ReentrantLock lock = new ReentrantLock(); // 默认为非公平锁

    public void increment() {
        lock.lock(); // 加锁
        try {
            count++;
        } finally {
            lock.unlock(); // 必须在 finally 中释放锁
        }
    }

    // 高级特性:可中断锁
    public void incrementInterruptibly() throws InterruptedException {
        lock.lockInterruptibly(); // 允许线程在等待锁时被中断
        try {
            count++;
        } finally {
            lock.unlock();
        }
    }
}
特点:
- 支持公平性设置、可中断获取锁、超时获取锁(
tryLock(long time, TimeUnit unit))。 - 需手动释放锁,若
unlock()未执行会导致死锁。
显示锁 与 隐式锁的区别是什么?顾名思义,显示锁就是将开锁和解锁的权限交给用户,允许用户自行安排其功能所在的位置 ,隐式锁就相当于一个“封装类”,将功能写在里面,系统自动根据线程的状态功能开锁和解锁。
线程间通信
如何进行线程间通信?
第一种:共享内存(隐私通信)
线程通过读写共享的变量实现通信,需配合同步机制(如synchronized、volatile)
public class SharedMemoryExample {
    private static final Object lock = new Object();
    private static boolean hasData = false; // 共享变量

    public static void main(String[] args) {
        // 生产者线程
        Thread producer = new Thread(() -> {
            synchronized (lock) {
                // 生产数据
                System.out.println("生产者:生产数据...");
                hasData = true;
                // 通知等待的线程
                lock.notify();
            }
        });

        // 消费者线程
        Thread consumer = new Thread(() -> {
            synchronized (lock) {
                // 等待数据
                while (!hasData) {
                    try {
                        lock.wait(); // 释放锁并等待
                    } catch (InterruptedException e) {
                        e.printStackTrace();
                    }
                }
                System.out.println("消费者:消费数据...");
            }
        });

        consumer.start();
        producer.start();
    }
}
第二种:wait ()/notify ()/notifyAll ()(显式通信)
这组方法是 Object 类的 final 方法,必须在synchronized块中调用:
- wait():当前线程释放锁并进入等待状态,直到其他线程调用
notify()或notifyAll()。 - notify():唤醒在此对象监视器上等待的单个线程。
- notifyAll():唤醒在此对象监视器上等待的所有线程。
适用于简单的等待或者通知
public class ProducerConsumerExample {
    private static final int MAX_CAPACITY = 10;
    private static final LinkedList<Integer> buffer = new LinkedList<>();

    public static void main(String[] args) {
        Thread producer = new Thread(() -> {
            for (int i = 0; i < 20; i++) {
                try {
                    produce(i);
                } catch (InterruptedException e) {
                    e.printStackTrace();
                }
            }
        });

        Thread consumer = new Thread(() -> {
            for (int i = 0; i < 20; i++) {
                try {
                    consume();
                } catch (InterruptedException e) {
                    e.printStackTrace();
                }
            }
        });

        producer.start();//生产者先启动线程,先进入锁
        consumer.start();//消费者后启动线程,先进入waiting状态
    }

    private static void produce(int item) throws InterruptedException {
        synchronized (buffer) {
            // 缓冲区满,等待消费者消费
            while (buffer.size() == MAX_CAPACITY) {
                buffer.wait();
            }
            buffer.add(item);
            System.out.println("生产者:添加元素 " + item + ",当前大小:" + buffer.size());
            buffer.notifyAll(); // 通知消费者
        }
    }

    private static void consume() throws InterruptedException {
        synchronized (buffer) {
            // 缓冲区空,等待生产者生产
            while (buffer.isEmpty()) {
                buffer.wait();
            }
            int item = buffer.poll();
            System.out.println("消费者:消费元素 " + item + ",当前大小:" + buffer.size());
            buffer.notifyAll(); // 通知生产者
        }
    }
}
默认拥有多个线程的情况下,先start的线程进入锁,其他则直接进入waiting状态等待第一个线程释放锁
第三种: Condition 接口(显式锁的通信)
适用于精细的条件控制
ReentrantLock的newCondition()方法可创建多个条件变量,支持更精细的线程控制:
import java.util.concurrent.locks.Condition;
import java.util.concurrent.locks.ReentrantLock;

public class ConditionExample {
    private static final int MAX_CAPACITY = 10;
    private static final LinkedList<Integer> buffer = new LinkedList<>();
    private static final ReentrantLock lock = new ReentrantLock();
    private static final Condition notFull = lock.newCondition(); // 非满条件
    private static final Condition notEmpty = lock.newCondition(); // 非空条件

    public static void main(String[] args) {
        // 启动生产者和消费者线程
    }

    private static void produce(int item) throws InterruptedException {
        lock.lock();
        try {
            while (buffer.size() == MAX_CAPACITY) {
                notFull.await(); // 等待非满条件
            }
            buffer.add(item);
            notEmpty.signal(); // 通知非空条件
        } finally {
            lock.unlock();
        }
    }

    private static void consume() throws InterruptedException {
        lock.lock();
        try {
            while (buffer.isEmpty()) {
                notEmpty.await(); // 等待非空条件
            }
            buffer.poll();
            notFull.signal(); // 通知非满条件
        } finally {
            lock.unlock();
        }
    }
}
第四种:管道流(PipedInputStream/PipedOutputStream)
适用于大量数据传输
适用于线程间通过 IO 流传递数据:
import java.io.IOException;
import java.io.PipedInputStream;
import java.io.PipedOutputStream;

public class PipeExample {
    public static void main(String[] args) {
        try {
            PipedOutputStream pos = new PipedOutputStream();
            PipedInputStream pis = new PipedInputStream(pos); // 连接管道

            // 写线程
            Thread writer = new Thread(() -> {
                try {
                    pos.write("Hello, reader!".getBytes());
                    pos.close();
                } catch (IOException e) {
                    e.printStackTrace();
                }
            });

            // 读线程
            Thread reader = new Thread(() -> {
                try {
                    int data;
                    while ((data = pis.read()) != -1) {
                        System.out.print((char) data);
                    }
                    pis.close();
                } catch (IOException e) {
                    e.printStackTrace();
                }
            });

            writer.start();
            reader.start();
        } catch (IOException e) {
            e.printStackTrace();
        }
    }
}
第五种:高级同步工具
CountDownLatch(倒计时门闩)
适用于一次性事件的等待
允许一个或多个线程等待其他线程完成操作:
import java.util.concurrent.CountDownLatch;

public class CountDownLatchExample {
    public static void main(String[] args) throws InterruptedException {
        int threadCount = 3;
        CountDownLatch latch = new CountDownLatch(threadCount);

        for (int i = 0; i < threadCount; i++) {
            new Thread(() -> {
                try {
                    System.out.println("线程" + Thread.currentThread().getName() + "完成任务");
                } finally {
                    latch.countDown(); // 计数减1
                }
            }).start();
        }

        latch.await(); // 等待所有线程完成
        System.out.println("所有线程已完成任务");
    }
}
CyclicBarrier(循环屏障)
多个线程互相等待,直到所有线程都到达屏障点后继续执行:
import java.util.concurrent.CyclicBarrier;

public class CyclicBarrierExample {
    public static void main(String[] args) {
        int parties = 3;
        CyclicBarrier barrier = new CyclicBarrier(parties, () -> {
            System.out.println("所有线程已到达屏障点");
        });

        for (int i = 0; i < parties; i++) {
            new Thread(() -> {
                try {
                    System.out.println(Thread.currentThread().getName() + "准备就绪");
                    barrier.await(); // 等待其他线程
                    System.out.println(Thread.currentThread().getName() + "继续执行");
                } catch (Exception e) {
                    e.printStackTrace();
                }
            }).start();
        }
    }
}
Exchanger(交换器)
用于两个线程间交换数据:
import java.util.concurrent.Exchanger;

public class ExchangerExample {
    public static void main(String[] args) {
        Exchanger<String> exchanger = new Exchanger<>();

        Thread thread1 = new Thread(() -> {
            try {
                String data = "来自线程1的数据";
                System.out.println("线程1发送:" + data);
                String received = exchanger.exchange(data);
                System.out.println("线程1接收:" + received);
            } catch (InterruptedException e) {
                e.printStackTrace();
            }
        });

        Thread thread2 = new Thread(() -> {
            try {
                String data = "来自线程2的数据";
                System.out.println("线程2发送:" + data);
                String received = exchanger.exchange(data);
                System.out.println("线程2接收:" + received);
            } catch (InterruptedException e) {
                e.printStackTrace();
            }
        });

        thread1.start();
        thread2.start();
    }
}
线程池中的通信
通过Future和Callable获取异步任务结果:
import java.util.concurrent.*;

public class FutureExample {
    public static void main(String[] args) throws ExecutionException, InterruptedException {
        ExecutorService executor = Executors.newSingleThreadExecutor();

        // 提交有返回值的任务
        Future<String> future = executor.submit(() -> {
            Thread.sleep(2000);
            return "任务执行完成";
        });

        // 主线程可继续执行其他操作
        System.out.println("主线程继续执行");

        // 获取任务结果(阻塞操作)
        String result = future.get();
        System.out.println("任务结果:" + result);

        executor.shutdown();
    }
}
线程池 Thread Pool(⭐️)
1. 为什么需要线程池?
- 减少线程创建开销:线程创建和销毁需要消耗系统资源(如内存、CPU 和时间),线程池通过复用线程减少这种开销。
- 控制并发数量:避免无限制创建线程导致系统资源耗尽(如 OOM、CPU 饱和)。
- 提高响应速度:任务提交时无需等待线程创建,直接从池中获取已存在的线程执行。
2. 核心组件
线程管理器
:管理线程池的生命周期,
线程池的生命周期管理
- shutdown():
优雅关闭线程池,不再接受新任务,但会执行完已在队列中的任务。- shutdownNow():
立即关闭线程池,尝试终止正在执行的任务(通过Thread.interrupt()),并返回未执行的任务列表。- awaitTermination(long timeout, TimeUnit unit):
阻塞等待线程池关闭,超时后返回关闭状态(true表示已关闭)。线程池监控
通过
ThreadPoolExecutor的方法获取运行状态:int activeCount = executor.getActiveCount(); // 活跃线程数 long completedTaskCount = executor.getCompletedTaskCount(); // 已完成任务数 int queueSize = executor.getQueue().size(); // 队列中等待的任务数 int poolSize = executor.getPoolSize(); // 当前线程池大小
包括创建、销毁线程。
Executor 框架
- Executor:线程池的顶层接口,仅定义
execute(Runnable command)方法。- ExecutorService:扩展
Executor,提供管理线程池生命周期和提交有返回值任务的方法(如submit()、shutdown())。- ScheduledExecutorService:扩展
ExecutorService,支持定时或周期性任务执行。ThreadPoolExecutor(核心实现类)
通过构造函数配置线程池参数:
public ThreadPoolExecutor(
    int corePoolSize,             // 核心线程数
    int maximumPoolSize,          // 最大线程数
    long keepAliveTime,           // 空闲线程存活时间
    TimeUnit unit,                // 时间单位
    BlockingQueue<Runnable> workQueue, // 任务队列
    ThreadFactory threadFactory,  // 线程工厂
    RejectedExecutionHandler handler // 拒绝策略
)
Executors 工具类(便捷创建线程池)
提供静态方法快速创建预配置的线程池:
// 1. 固定大小线程池
ExecutorService fixedThreadPool = Executors.newFixedThreadPool(5);

// 2. 单线程池
ExecutorService singleThreadExecutor = Executors.newSingleThreadExecutor();

// 3. 缓存线程池(按需创建,空闲线程自动回收)
ExecutorService cachedThreadPool = Executors.newCachedThreadPool();

// 4. 定时任务线程池
ScheduledExecutorService scheduledThreadPool = Executors.newScheduledThreadPool(5);
工作线程
:池中的线程,负责执行任务。
线程池的工作流程
- 提交任务:调用
execute()或submit()方法提交任务。- 线程分配规则:
- 步骤 1:若活跃线程数 < 核心线程数,立即创建新线程执行任务(即使有空闲线程)。
- 步骤 2:若活跃线程数 ≥ 核心线程数,将任务放入任务队列。
- 步骤 3:若任务队列已满且活跃线程数 < 最大线程数,创建新线程执行任务。
- 步骤 4:若任务队列已满且活跃线程数 ≥ 最大线程数,触发拒绝策略。
- 线程回收:
空闲线程超过keepAliveTime时,若当前线程数 > 核心线程数,线程将被回收。
任务队列
:存储待执行的任务(实现 BlockingQueue 接口)。
BlockingQueue的实现类决定了任务排队策略:
- ArrayBlockingQueue:有界队列,需指定容量,防止资源耗尽。
- LinkedBlockingQueue:无界队列(默认容量为
Integer.MAX_VALUE),可能导致 OOM。
Executors.newFixedThreadPool()使用此队列。- SynchronousQueue:不存储任务,每个插入操作必须等待另一个线程的移除操作。
Executors.newCachedThreadPool()使用此队列。- PriorityBlockingQueue:优先级队列,按任务优先级排序。
任务拒绝策略
:当线程池和队列都满时,处理新提交任务的策略。
当线程池和队列都满时,对新提交任务的处理方式:
- AbortPolicy(默认):抛出
RejectedExecutionException异常。- CallerRunsPolicy:由提交任务的线程(调用者)直接执行该任务。
- DiscardPolicy:直接丢弃任务,不做任何处理。
- DiscardOldestPolicy:丢弃任务队列中最老的任务,然后尝试提交新任务。


 593
593

 被折叠的 条评论
为什么被折叠?
被折叠的 条评论
为什么被折叠?
 到【灌水乐园】发言


