cudaCheckError() failed : invalid device function解决方法

本文记录了作者在Ubuntu 14.04服务器上运行smallcorgi/Faster-RCNN的TensorFlow代码时遇到的错误,并详细介绍了如何通过修改make.sh文件中的arch参数来解决编译问题。
部署运行你感兴趣的模型镜像

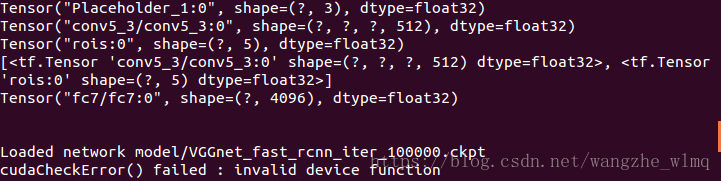
先将出现的问题截图,上图所示为我遇见的错误。

我在服务器上(ubuntu14.04),运行smallcorgi/Faster-RCNN的tensorflow代码时候出现的问题,我的显卡是Tesla K40。

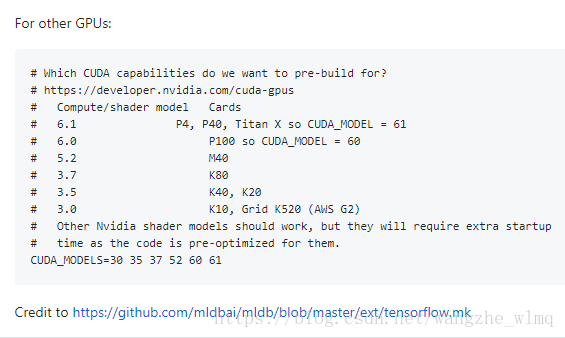
在百度后发现根本没有切实可行的方法,最后还是使用Google解决了问题,发现在运行代码时候在lib文件夹下面执行make操作的时候需要将make.sh文件进行修改,将arch参数从sm_37改为sm_35。为大家附上参数列表。


您可能感兴趣的与本文相关的镜像

TensorFlow-v2.15

TensorFlow-v2.15

TensorFlow

TensorFlow 是由Google Brain 团队开发的开源机器学习框架,广泛应用于深度学习研究和生产环境。 它提供了一个灵活的平台,用于构建和训练各种机器学习模型

你遇到的错误信息如下: ``` terminate called after throwing an instance of 'thrust::system::system_error' what(): parallel_for failed: cudaErrorInvalidDeviceFunction: invalid device function Aborted (core dumped) ``` 这是一个典型的 CUDA 错误,表示程序在运行时尝试调用一个 GPU 设备函数(`__device__` 或 `__global__` 函数),但该函数在当前使用的设备上 **不存在或不可执行**。这通常是因为以下几种原因之一: --- ## 🔍 常见原因分析 ### ✅ 1. 编译目标架构不匹配 (`--cuda-gpu-arch`) 如果你编译时指定的目标 GPU 架构与实际运行时的 GPU 不兼容(比如你在编译时使用了 `--cuda-gpu-arch=ivcore10`,而你的显卡不支持这个架构),就会导致找不到对应的设备函数。 **解决方法:** 确保 `-fcuda-targets` 和 `--cuda-gpu-arch` 匹配你的硬件: ```bash clang++ --cuda-gpu-arch=sm_50 ... # 如果是 NVIDIA Kepler/Tesla 架构 ``` 你可以通过以下命令查看你的 GPU 支持的架构: ```bash nvidia-smi -q -d SUPPORTED_CLOCKS ``` 或者使用 `deviceQuery` 工具(来自 CUDA SDK)。 --- ### ✅ 2. 没有正确嵌入 `.fatbin` 文件到可执行文件中 你之前编译过程中使用了 `fatbinary` 打包 `.cubin`,并通过 `-Xclang -fcuda-include-gpubinary` 嵌入进主机代码。但如果最终链接阶段没有包含这个参数,GPU 二进制就不会被正确嵌入,导致运行时报错。 **解决方法:** 确保最终链接命令中包含: ```bash -Xclang -fcuda-include-gpubinary -Xclang dpc.fatbin ``` 例如: ```bash clang++ -std=c++11 -Wall \ -Xclang -fcuda-include-gpubinary -Xclang dpc.fatbin \ dpc.o dpc.cpp.o -lcudart -L/usr/local/corex/lib64 -o dpc ``` --- ### ✅ 3. 使用了未在设备端定义的函数或 lambda 表达式 如果你在 Thrust 或 CUDA 的 `parallel_for` 中使用了一个未标记为 `__device__` 的函数或 lambda,它就无法在 GPU 上运行。 **示例问题代码:** ```cpp thrust::transform(data.begin(), data.end(), result.begin(), [](float x) { return heavy_computation(x); }); ``` 如果 `heavy_computation()` 没有加 `__device__`,那么它不能在 GPU 上运行。 **解决方法:** 将函数标记为 `__device__`: ```cpp __device__ float heavy_computation(float x) { return x * x + sin(x); } ``` 或者直接写在 lambda 内部并保证其可在设备上执行。 --- ### ✅ 4. 编译器未能正确生成 PTX 或 cubin 有时即使你指定了架构,LLVM/Clang 可能并未正确生成 PTX 或 cubin 文件,或者 fatbinary 没有正确打包它们。 **验证方法:** 检查 `.cubin` 文件是否有效: ```bash nvdisasm dpc.cubin ``` 或使用 `cuobjdump` 查看内容。 --- ## ✅ 推荐调试步骤 1. **确认 GPU 架构是否一致:** ```bash nvidia-smi -q | grep "Product Name" ``` 然后根据型号选择正确的 `--cuda-gpu-arch`,如 `sm_75`(Turing)、`sm_80`(Ampere)等。 2. **打印出 CUDA 驱动和运行时版本:** ```cpp int version; cudaRuntimeGetVersion(&version); std::cout << "CUDA Runtime Version: " << version << std::endl; cudaDriverGetVersion(&version); std::cout << "CUDA Driver Version: " << version << std::endl; ``` 3. **启用 CUDA 调试输出:** 设置环境变量: ```bash export CUDA_LAUNCH_BLOCKING=1 ``` 这会强制 CUDA 同步执行,便于定位出错位置。 --- ## ✅ 示例修复后的完整构建流程(假设使用 sm_75) ```bash # Step 1: 提取设备 IR clang++ -S -emit-llvm --cuda-gpu-arch=sm_75 --cuda-device-only -std=c++11 -Wall -x cuda dpc_t.cu -o dpc.ll # Step 2: 编译设备对象 llc -march=nvptx64 -filetype=obj dpc.ll -o dpc.cuda.o # Step 3: 链接 cubin lld -flavor ld.lld -no-undefined dpc.cuda.o -o dpc.cubin # Step 4: 打包 fatbin fatbinary --cuda --64 --image=profile=sm_75,file=dpc.cubin --create dpc.fatbin # Step 5: 编译主机代码 clang++ -c -std=c++11 -Wall -x cuda --cuda-host-only \ -Xclang -fcuda-include-gpubinary -Xclang dpc.fatbin \ dpc_t.cu -o dpc.o # Step 6: 编译主程序 clang++ -c -std=c++11 -Wall -x c++ -I/usr/local/corex/include dpc.cpp -o dpc.cpp.o # Step 7: 最终链接 clang++ -std=c++11 -Wall \ -Xclang -fcuda-include-gpubinary -Xclang dpc.fatbin \ dpc.o dpc.cpp.o -lcudart -L/usr/local/corex/lib64 -o dpc ``` --- ##
评论 1
添加红包

请填写红包祝福语或标题

红包个数最小为10个

红包金额最低5元

当前余额3.43前往充值 >
需支付:10.00
成就一亿技术人!
领取后你会自动成为博主和红包主的粉丝 规则
hope_wisdom
发出的红包
实付
使用余额支付
点击重新获取
扫码支付
钱包余额 0

抵扣说明:

1.余额是钱包充值的虚拟货币,按照1:1的比例进行支付金额的抵扣。
2.余额无法直接购买下载,可以购买VIP、付费专栏及课程。

余额充值