文章大纲
简介
官网:https://selenium-python.readthedocs.io/installation.html
chrome_driver 下载:https://sites.google.com/chromium.org/driver/
selenium 的好处是可以模拟复杂场景的登录,比如携带windows 域信息的登录。或者是点击某些验证码,这时候可以python 截图 OCR 等等复杂的应用。 本文主要解决两个场景:
- 模仿人工进行登录后跳转
- 爬取AJAX 动态加载的数据(这些数据在网页源码中无法找到 – 令人摸不着头脑!)
一些问题的解决
模拟鼠标点击失败
USB: usb_device_handle_win.cc:1048 Failed to read descriptor from
#coding=utf-8

from selenium.webdriver import Chrome
from selenium.webdriver.common.keys import Keys
from selenium import webdriver
import time
import re
import os

options = webdriver.ChromeOptions()

# 处理SSL证书错误问题
options.add_argument('--ignore-certificate-errors')
options.add_argument('--ignore-ssl-errors')

# 忽略无用的日志
options.add_experimental_option("excludeSwitches", ['enable-automation', 'enable-logging'])
driver = webdriver.Chrome(chrome_options=options)

size_Dict = driver.get_window_size()
driver.set_window_rect(x=1300, y=100, width=1250, height=1300)  # 设置浏览器的大小和位置
# driver.maximize_window()    # 最大化浏览器窗口
driver.implicitly_wait(20)   # 隐式等待。网页加载数据需要时间,智能化等待。

driver.get("https://www.amazon.co.jp")
time.sleep(3)
driver.close
设置点击动作完成后不关闭窗口
options = webdriver.ChromeOptions()
options.add_experimental_option("detach", True)
网页跳转的设置
新网址,当前选项卡跳转
这一句会切换到新url对象,如果不写这句,浏览器对象会去原来url页面中,找元素操作,这时候我们希望操作的元素找不到就会报错。
new_window=driver.current_window_handle
第二点注意点是在跳转到新页面以后要等页面加载完毕才能操作不然也会报错,所以在对新页面进行操作之前往往需要延时几秒等待页面加载完毕,具体延时事件和页面加载速度有关系。
新建选项卡跳转
将处理对象变为新标签页面,否则浏览器操作对象会找不到要操作页面中的元素
driver.switch_to.window(driver.window_handles[-1])
使用 selenium 实现动态加载XHR 数据 的获取
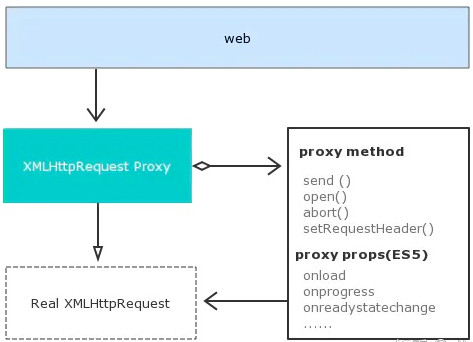
很多动态加载的数据,在网页源码中按f12 是找不到的。这时候我们可以使用 ajax hook 的方式进行获取。
主要思路有:
- 开启browser, performance log,再根据requestId,调用chrome-devtools protocal Network.getResponseBody, 获取响应body (本文目前使用这种方式)
- 使用代理,如 browsermob-proxy
- ajax-hook , 基本方法都是获取到json 然后解析
- selenium-wire: https://github.com/wkeeling/selenium-wire

https://zhuanlan.zhihu.com/p/158394821
https://www.cnblogs.com/darkspr/p/15224798.html
https://blog.youkuaiyun.com/sxf1061700625/article/details/124178651
一些解析ajax json 和解决报错的思路
- https://www.cnblogs.com/fish-101/p/13170021.html
一些深入的讲解和想法
- https://blog.youkuaiyun.com/qq_29404831/article/details/110086552
仅仅使用 selenium execute_cdp_cmd 的似乎也可以实现
- https://www.jianshu.com/p/7c354259657c
一段整体的样例code
import os
import sys
import time,json
# sys.path.insert(0,r'C:\code\ _selenium\chrome-win')
from selenium.webdriver import Chrome
from selenium.webdriver.common.keys import Keys
from selenium import webdriver
from selenium.webdriver.chrome.options import Options
from selenium.webdriver.support.ui import WebDriverWait


from selenium import webdriver
from selenium.webdriver.common.desired_capabilities import DesiredCapabilities


options = webdriver.ChromeOptions()

# 处理SSL证书错误问题
options.add_argument('--ignore-certificate-errors')
options.add_argument('--ignore-ssl-errors')

#设置脚本运行完成后 不关闭的重点
options.add_experimental_option("detach", True)

# 忽略无用的日志
options.add_experimental_option("excludeSwitches", ['enable-automation', 'enable-logging'])

#
# 设置环境变量
os.environ['OS_LOG_PATH_temp']=r"C:\code\selenium\logs"
prefs = {
            'download.default_directory': os.getenv('OS_LOG_PATH_temp')
        }
options.add_experimental_option('prefs', prefs)

#设置日志
# capabilities = DesiredCapabilities.CHROME

capabilities = webdriver.DesiredCapabilities().CHROME
capabilities['acceptSslCerts'] = True

capabilities['perfLoggingPrefs'] = {
    'enableNetwork': True,
    'enablePage': False,
    'enableTimeline': False
}

capabilities['goog:loggingPrefs'] = {'browser': 'ALL','performance': 'ALL'}

my_executable_path = r'C:\code\chromedriver_win32\chromedriver.exe'
url_main = "https://axx.com"
#Chrome浏览器
driver=webdriver.Chrome(chrome_options=options,executable_path=my_executable_path, desired_capabilities=capabilities)
size_Dict = driver.get_window_size()
driver.set_window_rect(x=1300, y=100, width=1250, height=800)  # 设置浏览器的大小和位置
# driver.maximize_window()    # 最大化浏览器窗口
driver.implicitly_wait(20)   # 隐式等待。网页加载数据需要时间,智能化等待。

# 打开网页
driver.get(url_main) # 打开url网页 比如 driver.get("http://www.baidu.com")
#导入 ActionChains 类


# # 鼠标移动到 windows login位置
windows_login = r'/html/body/.../button'
ac = driver.find_element_by_xpath(windows_login)
ac.click()

# ac = driver.find_element_by_xpath(windows_login)
# ac.click()
#
#driver = driver.switch_to.window(driver.window_handles[-1])
new_window=driver.current_window_handle
driver.switch_to.window(new_window)
# 延时几秒确保页面加载完毕
time.sleep(3)


## 跳转到主要页面
new_window=driver.current_window_handle
driver.switch_to.window(new_window)
# # 延时几秒确保页面加载完毕
# time.sleep(3)

## 点击向下的箭头,展开 org_c
xpath_expand_org_c = r'/html/body/.../button'
org_c = driver.find_elements_by_xpath(xpath_expand_org_c)

org_c[0].click()

time.sleep(3)
new_window=driver.current_window_handle
driver.switch_to.window(new_window)
## 获取到每个条目 mat-ripple ui-folder-tree-item-container
organization_arr = driver.find_elements_by_xpath("//ui-folder-tree-item[@class='ng-star-inserted']")
number_organ = len(organization_arr)
print(number_organ)

# 点击进入列表
xpath_automations  = r'/html/'
automations_class = "//div[@class='mat-tab-link']"


# 循环点击
xpath_edit = r'//*[@id="mat-menu-panel-17"]/div/a[1]'

def find_automations_Triggers():
    try:
        detail_arr_automations = driver.find_element_by_xpath(xpath_automations)
        detail_arr_automations.click()

    except Exception as e:
        print(e)
# 打开后可以进行循环点击 , 注意写法,直接循环元素可能产生页面变化
# for i in range(number_organ):
#     organization_arr[i].click()
#     find_automations_Triggers()

url_edit = "https://a。。。"


hook_js_path = r'C:\code\selenium\src\hook_console.js'
#设置cdp命令,每次加载页面都会执行改该js内容
#driver.execute_cdp_cmd("Page.addScriptToEvaluateOnNewDocument", {"source": open(hook_js_path, encoding='utf-8').read()})

driver.get(url_edit)

time.sleep(5)
# 注意日志 对应的ajax.hook 的js 是不一样的
# print('第1次获取日志')
# #获取日志
# for entry in driver.get_log('browser'):
#     print(entry)


# extract requests from logs
logs_raw = driver.get_log("performance")
logs = [json.loads(lr["message"])["message"] for lr in logs_raw]

def log_filter(log_):
    return (
        # is an actual response
            log_["method"] == "Network.responseReceived"
            # and json
            and "json" in log_["params"]["response"]["mimeType"]
    )

# 过滤 resp_url 包含 ProcessSchedules
for log in filter(log_filter, logs):
    request_id = log["params"]["requestId"]
    resp_url = log["params"]["response"]["url"]
    print(request_id)
    print(f"Caught {resp_url}")
    try:
        temp_dict = driver.execute_cdp_cmd("Network.getResponseBody", {"requestId": request_id})
        json_str = temp_dict.get('body')
        json_str_dict = json.loads(json_str)
        print(json_str_dict)

        # json_str = json.dumps(driver.execute_cdp_cmd("Network.getResponseBody", {"requestId": request_id}), indent=4)
        # # 创建一个params.json文件
        # with open(f'{request_id}.json', 'w') as f:
        #     f.write(json_str)  # 将json_str写到文件中
        # 此处结合 下面对象写入 csv 的功能
    except Exception as e:
        print(e)
对象写入 csv
class JobDetail:
    def __init__(self, name = '',cron = ''):
        # 下面为Person对象增加2个实例变量
        self.name = name
        self.cron = cron
        self.machineRotbots = MachineRobots()

class MachineRobots:
    def __init__(self):
        self.machineRotbots = []

    def set_one(self,MachineId,MachineName):
        tempdict = {}
        tempdict["MachineId"] = MachineId
        tempdict["MachineName"] = MachineName
        self.machineRotbots.append(tempdict)

    def return_all_name(self):
        """
        如果是 多个名字的话用;分割
        """
        length = len(self.machineRotbots)
        result = ''
        if length==0:return 'Any machine'
        # 有可能 有一条也没有 名字
        elif length==1:
            if self.machineRotbots[0].get("MachineName"):
                return self.machineRotbots[0].get("MachineName")
            else:return 'Any machine'
        else:
            for item in self.machineRotbots:
                result = result+item.get("MachineName")+';'
            return result

def One_to_csv(path,JobDetail):
    lines = []
    lines.append([JobDetail.name,JobDetail.cron,JobDetail.machineRotbots.return_all_name()])

    import csv
    with open(path, "a", newline='') as csv_file:
        writer = csv.writer(csv_file, delimiter=',',quotechar='"',quoting=csv.QUOTE_ALL)
        for line in lines:
            writer.writerow(line)

def all_to_csv(path,list_JobDetail):
    """
    e.g.
    ["Report","0 45 2,8,14,20 ? * *","Any machine"]
    test = [["Liuyong_BIB Summary Report_Hourly_8/14","0 45 2,8,14,20 ? * *","Any machine"],[]]
    """
    lines = []
    for item in list_JobDetail:
        lines.append([item.name,item.cron,item.machineRotbots.return_all_name()])

    import csv
    with open(path, "w") as csv_file:
        writer = csv.writer(csv_file, delimiter=',',quotechar='"',quoting=csv.QUOTE_ALL)
        for line in lines:

            writer.writerow(line)


if __name__ == '__main__':
    r = MachineRobots()
    r.set_one(1,2,3,'4')
    j= JobDetail(1,2)
    j.machineRotbots = r
    One_to_csv(r'test2.csv',j)
参考文献与学习路径
教程:https://www.geeksforgeeks.org/selenium-python-introduction-and-installation/
反向解析 crontab, 获得任务下一次运行时间
- https://github.com/kiorky/croniter


 10万+
10万+

 被折叠的 条评论
为什么被折叠?


