


HAProxy+Keepalived的配置(二)(及重要问题说明)
在搭建HAProxy+Keepalived之前先单独测试HAProxy
一 HAProxy配置测试
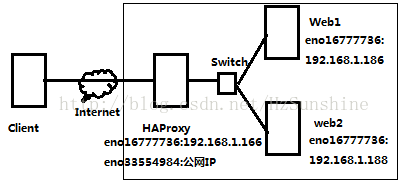
(注测试:HAProxy只设内网网卡,Client同样位于内网)
1.测试web提前配置
yum install httpd -y #安装httpdecho 192.168.1.188 >/var/www/html/index.html #输入网站显示各自IPsystemctl restart httpdfirewall-cmd --permanent --add-port=80/tcp #开启防火墙80端口firewall-cmd --reload#测试,浏览器登录IP查看,是否正常启动。
2.HAProxy配置/etc/haproxy/haproxy.cfg(yum install haproxy -y)
global#全区日志配置 使用rsyslog的local3设备log 127.0.0.1 local3 info#工作目录(安全)chroot /var/lib/haproxy#pid文件存储目录pidfile /var/run/haproxy.pid#后台进程数量nbproc 1#每个进程最大并发数maxconn 40000user haproxygroup haproxy#后台程序模式工作daemon- defaults
mode http#后端连接重试次数,超出标识不可用retries 3#连接服务器最长等待时间timeout connect 10s#客户端发送请求最长等待时间timeout client 30s#服务器会复客户端最长等待时间timeout server 30s#对后端服务器的检测超时时间timeout check 10s#定义HAProxy监控页面listen admin_statsbind 0.0.0.0:9188mode httplog 127.0.0.1 local3 err#HAProxy监控页面统计自动刷新时间。stats refresh 30s#设置监控页面URL路径。 http://IP:9188/haproxy-status可查看stats uri /haproxy-status#统计页面密码框提示信息stats realm welcome login\ Haproxy#登录统计页面用户和密码stats auth admin:123456#隐藏HAProxy版本信息stats hide-version#设置TURE后可在监控页面手工启动关闭后端真实服务器stats admin if TRUE#定义前端虚拟节点frontend www#监听端口bind *:80mode http#启用日志记录HTTP请求。option httplog#启用后后端服务器可以获得客户端IPoption forwardfor#客户端和服务器完成一次连接请求后,HAProxy主动关闭TCP链接(优化选项)option httpclose#使用全局日志配置log global#指定后端服务池(backend定义htmpool)default_backend htmpool#定义后端真实服务器backend htmpoolmode http#用于cookie保持环境。(如后端服务器故障,客户端cookie不会刷新,用此来把用户请求强制定向到正常服务器)option redispatch#负载均衡很高时,自动结束当前队列处理时间长的连接option abortonclose#负载均衡算法balance roundrobin#允许向cookie插入SERVERID.下面server可以使用cookie定义cookie SERVERID#启用HTTP服务状态检测功能 (后端服务器一定要存在此文件,不然haproxy认为其故障)option httpchk GET /index.html#后端服务设置server web1 192.168.1.186:80 cookie server1 weight 6 check inter 2000 rise 2 fall 3server web2 192.168.1.188:80 cookie server2 weight 6 check inter 2000 rise 2 fall 3
开启日志(日志如果在主机性能较弱的情况下,最好关闭)
vim /etc/rsyslog.d/haproxy.conf$ModLoad imudp$UDPServerRun 514local3.* /var/log/haproxysystemctl restart rsyslog
开启防火墙和安全策略
firewall-cmd --permanent --add-port=80/tcpfirewall-cmd --permanent --add-port=9188/tcpfirewall-cmd --reloadsetsebool -P haproxy_connect_any=on#getsebool -a | grep haproxy 查看
启动HAProxy服务
- systemctl start haproxy
测试均衡能力
[root@test2 ~]# curl http://192.168.1.166192.168.1.188[root@test2 ~]# curl http://192.168.1.166192.168.1.186[root@test2 ~]# curl http://192.168.1.166192.168.1.188[root@test2 ~]# curl http://192.168.1.166192.168.1.186
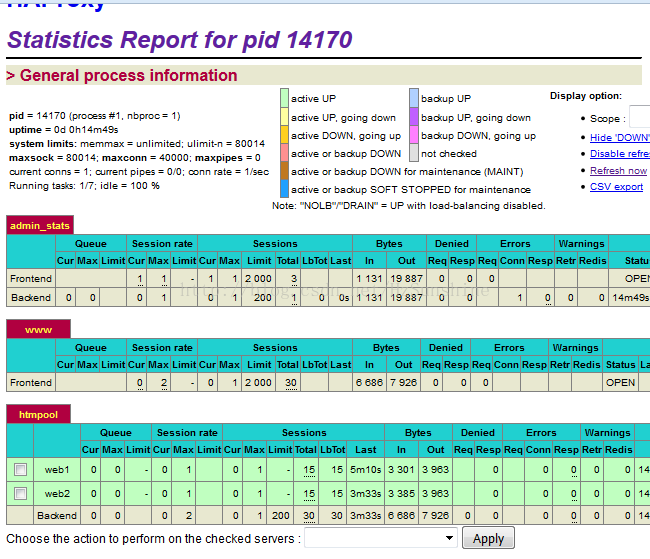
测试HAProxy监控页面是否正常(http://IP:9188/haproxy-status)
二 HAProxy+Keepalived配置
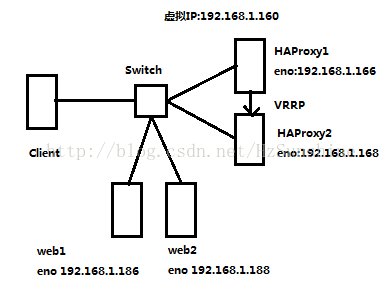
HAProxy配置
(HAProxy两台Proxy主机配置相同,如上HAProxy的配置即可)
Keepalived配置(/etc/keepalived/keepalived.conf)(yum install keepalived -y)
! Configuration File for keepalivedglobal_defs {#设置报警通知邮件地址,可以设置多个notification_email {msun1996@163.com}#设置邮件的发送地址notification_email_from keepalived@msun.com#设置smtp server的地址,该地址必须是存在的smtp_server 127.0.0.1#设置连接smtp server的超时时间smtp_connect_timeout 30#运行Keepalived服务器的标识,发邮件时显示在邮件标题中的信息router_id HAProxy_msun}# 检测haproxy脚本vrrp_script chk_haproxy {script "/etc/keepalived/check_haproxy.sh"interval 2#下面方法相对更优- #script "killall -0 haproxy" #killall (安装 yum install psmisc -y)
- #interval 2
- #weghit 2 #权值脚本成功时(0)等于priority+weghit #否则为priority
}#定义VRRP实例,实例名自定义vrrp_instance haproxy_msun {#指定Keepalived的角色,MASTER为主服务器,BACKUP为备用服务器state MASTER #从设置为BACKUP#指定HA监测的接口interface eno16777736#虚拟路由标识,这个标识是一个数字(1-255),在一个VRRP实例中主备服务器ID必须一样virtual_router_id 68#优先级,数字越大优先级越高,在一个实例中主服务>器优先级要高于备服务器priority 100 #从设置为99#设置主备之间同步检查的时间间隔单位秒advert_int 1#设置验证类型和密码authentication {#验证类型有两种{PASS|HA}auth_type PASS#设置验证密码,在一个实例中主备密码保持一样auth_pass 1689}track_script {chk_haproxy # 执行监控的服务}#定义虚拟IP地址,可以有多个,每行一个virtual_ipaddress {192.168.1.160}}
添加HAProxy检测脚本到vim /etc/keepalived/check_haproxy.sh(执行权限)(这一步必须关闭SElinux,不然vrrp script 脚本是不可以执行的。下面会介绍开启selinux下的解决方法)
#!/bin/bash#判断haproxy是否已经启动if [ `ps -C haproxy --no-header |wc -l` -eq 0 ] ; then#如果没有启动,则启动haproxy程序systemctl start haproxy#睡眠3秒钟以等待haproxy完全启动sleep 3if [ `ps -C haproxy --no-header |wc -l` -eq 0 ] ; thensystemctl stop keepalived#如果haproxy还是没有启动,则将keepalived停掉,这样VIP会自动漂移到另外一台haproxyfifi
启动keepalived
systemctl start keepalived
防火墙允许(开放vrrp组播)(不然会导致脑裂)
firewall-cmd --permanent --add-rich='rule family="ipv4" destination address="224.0.0.18" protocol value="vrrp" accept'firewall-cmd --reload
测试
[root@test5 ~]# curl 192.168.1.160192.168.1.186[root@test5 ~]# curl 192.168.1.160192.168.1.188[root@test5 ~]# curl 192.168.1.160192.168.1.186[root@test5 ~]# curl 192.168.1.160192.168.1.188
通过观察ip a输出VIP来判断是否存在脑裂,和主备故障时是否能正常切换。
三 部署HAProxy遇到的重点问题与解决
1.部署单独的Haproxy时遇到问题
配置完配置文件后,使用systemctl start haproxy,haproxy无法正常启动。(启动后查看状态没有对应进程显示)
(防火墙80端口和9188端口已正常开启。所以不可能是防火墙问题,再说防火墙也不可能影响启动啊)
/var/log/message有以下报错信息
[root@test5 ~]# tail /var/log/messagesMar 12 14:59:29 test5 systemd: Starting HAProxy Load Balancer...Mar 12 14:59:29 test5 haproxy-systemd-wrapper: [ALERT] 070/145929 (3131) : Starting proxy admin_stats: cannot bind socket [0.0.0.0:9188]Mar 12 14:59:29 test5 haproxy-systemd-wrapper: haproxy-systemd-wrapper: exit, haproxy RC=1Mar 12 14:59:29 test5 systemd: haproxy.service: main process exited, code=exited, status=1/FAILUREMar 12 14:59:29 test5 systemd: Unit haproxy.service entered failed state.Mar 12 14:59:29 test5 systemd: haproxy.service failed.
查看haproxy相关selinux政策,发现haproxy默认不允许连接
[root@test5 ~]# getsebool -a | grep haproxyhaproxy_connect_any --> off
重新设置selinux政策后正常启动
[root@test5 ~]# setsebool -P haproxy_connect_any=on[root@test5 ~]# systemctl start haproxy[root@test5 ~]# netstat -tlunpActive Internet connections (only servers)Proto Recv-Q Send-Q Local Address Foreign Address State PID/Program nametcp 0 0 0.0.0.0:80 0.0.0.0:* LISTEN 3171/haproxytcp 0 0 0.0.0.0:9188 0.0.0.0:* LISTEN 3171/haproxy
2.搭建HAProxy+Keepalived遇到的问题
1.服务器搭建完成后,出现脑裂现象。主备机多有VIP。
解决:防火墙允许(开放vrrp组播)
firewall-cmd --permanent --add-rich='rule family="ipv4" destination address="224.0.0.18" protocol value="vrrp" accept'
2.关于Keepalived中的vrrp script 设置的脚本不执行。
因为检测HAproxy状态的脚本不能运行,导致就算主机HAProxy挂掉,但因为Keepalived还正常运行,VIP没有正常从主机正常漂移到从机,导致整个服务垮掉。
直接快速解决方法:关闭SElinux.
SElinux安全策略运行时解决
1)尝试SElinux允许解决(解决失败)
开启SElinux时的错误提示:
- [root@test1 ~]# tail -f /var/log/messages
type=AVC msg=audit(1489338470.513:714): avc: denied { getattr } for pid=5174 comm="check_haproxy.s" path="/usr/bin/systemctl" dev="dm-0" ino=33947874 scontext=system_u:system_r:keepalived_t:s0 tcontext=system_u:object_r:systemd_systemctl_exec_t:s0 tclass=filetype=SYSCALL msg=audit(1489338470.513:714): arch=c000003e syscall=4 success=no exit=-13 a0=f72c00 a1=7ffd88bca560 a2=7ffd88bca560 a3=3 items=0 ppid=5173 pid=5174 auid=4294967295 uid=0 gid=0 euid=0 suid=0 fsuid=0 egid=0 sgid=0 fsgid=0 tty=(none) ses=4294967295 comm="check_haproxy.s" exe="/usr/bin/bash" subj=system_u:system_r:keepalived_t:s0 key=(null)
安装selinux管理工具(根据报错显示可能解决方案)
yum install setroubleshoot -y
查看settoubleshoot给出的解决方案
[root@test1 ~]# tail -f /var/log/messagesMar 13 02:30:27 test1 setroubleshoot: SELinux is preventing /usr/bin/bash from getattr access on the file /usr/bin/systemctl. For complete SELinux messages. run sealert -l 54416ee0-01c3-40e8-8198-675f6f86a7f7Mar 13 02:30:27 test1 python: SELinux is preventing /usr/bin/bash from getattr access on the file /usr/bin/systemctl.#012#012***** Plugin catchall (100. confidence) suggests **************************#012#012If you believe that bash should be allowed getattr access on the systemctl file by default.#012Then you should report this as a bug.#012You can generate a local policy module to allow this access.#012Do#012allow this access for now by executing:#012# ausearch -c 'check_haproxy.s' --raw | audit2allow -M my-checkhaproxys#012# semodule -i my-checkhaproxys.pp#012
尝试解决:
[root@test1 ~]# sealert -l 54416ee0-01c3-40e8-8198-675f6f86a7f7SELinux is preventing /usr/bin/bash from getattr access on the file /usr/bin/systemctl.***** Plugin catchall (100. confidence) suggests **************************If 确定应默认允许 bash getattr 访问 systemctl file。Then 应该将这个情况作为 bug 报告。可以生成本地策略模块以允许此访问。Doallow this access for now by executing:# ausearch -c 'check_haproxy.s' --raw | audit2allow -M my-checkhaproxys# semodule -i my-checkhaproxys.pp
[root@test1 ~]# sealert -l 54416ee0-01c3-40e8-8198-675f6f86a7f7[root@test1 ~]# ausearch -c 'check_haproxy.s' --raw | audit2allow -M my-checkhaproxys[root@test1 ~]# semodule -i my-checkhaproxys.pp
尝试后日志提示:
[root@test1 ~]# tail -f /var/log/messagesMar 13 02:36:08 test1 setroubleshoot: SELinux is preventing /usr/bin/bash from open access on the file /usr/bin/systemctl. For complete SELinux messages. run sealert -l 487ebbb3-fefe-4018-8c4c-5be6a185e64bMar 13 02:36:08 test1 python: SELinux is preventing /usr/bin/bash from open access on the file /usr/bin/systemctl.#012#012***** Plugin catchall (100. confidence) suggests **************************#012#012If you believe that bash should be allowed open access on the systemctl file by default.#012Then you should report this as a bug.#012You can generate a local policy module to allow this access.#012Do#012allow this access for now by executing:#012# ausearch -c 'check_haproxy.s' --raw | audit2allow -M my-checkhaproxys#012# semodule -i my-checkhaproxys.pp#012
[root@test1 ~]# tail -f /var/log/audit/audit.logtype=AVC msg=audit(1489352184.678:549): avc: denied { open } for pid=3990 comm="check_haproxy.s" path="/usr/bin/systemctl" dev="dm-0" ino=33724848 scontext=system_u:system_r:keepalived_t:s0 tcontext=system_u:object_r:systemd_systemctl_exec_t:s0 tclass=filetype=SYSCALL msg=audit(1489352184.678:549): arch=c000003e syscall=2 success=no exit=-13 a0=14bec50 a1=0 a2=43 a3=7ffe13e19190 items=0 ppid=3986 pid=3990 auid=4294967295 uid=0 gid=0 euid=0 suid=0 fsuid=0 egid=0 sgid=0 fsgid=0 tty=(none) ses=4294967295 comm="check_haproxy.s" exe="/usr/bin/bash" subj=system_u:system_r:keepalived_t:s0 key=(null)
继续按提示输入
[root@test1 ~]# sealert -l 487ebbb3-fefe-4018-8c4c-[root@test1 ~]# ausearch -c 'check_haproxy.s' --raw | audit2allow -M my-checkhaproxys[root@test1 ~]# semodule -i my-checkhaproxys.pp
尝试后日志提示:
[root@test1 ~]# tail -f /var/log/messagesMar 13 05:02:35 test1 setroubleshoot: SELinux is preventing /usr/bin/bash from execute_no_trans access on the file /usr/bin/systemctl. For complete SELinux messages. run sealert -l a3a942ad-2b0e-4b4b-bf1f-b521256f4405Mar 13 05:02:35 test1 python: SELinux is preventing /usr/bin/bash from execute_no_trans access on the file /usr/bin/systemctl.#012#012***** Plugin catchall (100. confidence) suggests **************************#012#012If you believe that bash should be allowed execute_no_trans access on the systemctl file by default.#012Then you should report this as a bug.#012You can generate a local policy module to allow this access.#012Do#012allow this access for now by executing:#012# ausearch -c 'check_haproxy.s' --raw | audit2allow -M my-checkhaproxys#012# semodule -i my-checkhaproxys.pp#012
[root@test1 ~]# tail -f /var/log/audit/audit.logtype=AVC msg=audit(1489352298.756:764): avc: denied { execute_no_trans } for pid=5507 comm="check_haproxy.s" path="/usr/bin/systemctl" dev="dm-0" ino=33724848 scontext=system_u:system_r:keepalived_t:s0 tcontext=system_u:object_r:systemd_systemctl_exec_t:s0 tclass=filetype=SYSCALL msg=audit(1489352298.756:764): arch=c000003e syscall=59 success=no exit=-13 a0=162cc50 a1=162ccc0 a2=162d360 a3=7ffddf4d6190 items=0 ppid=5503 pid=5507 auid=4294967295 uid=0 gid=0 euid=0 suid=0 fsuid=0 egid=0 sgid=0 fsgid=0 tty=(none) ses=4294967295 comm="check_haproxy.s" exe="/usr/bin/bash" subj=system_u:system_r:keepalived_t:s0 key=(null)
继续按提示输入
[root@test1 ~]# sealert -l a3a942ad-2b0e-4b4b-bf1f-b521256f4405[root@test1 ~]# ausearch -c 'check_haproxy.s' --raw | audit2allow -M my-checkhaproxys[root@test1 ~]# semodule -i my-checkhaproxys.pp
尝试后日志提示:
[root@test1 ~]# tail -f /var/log/messagesMar 13 05:06:42 test1 setroubleshoot: failed to retrieve rpm info for /run/dbus/system_bus_socketMar 13 05:06:42 test1 setroubleshoot: SELinux is preventing /usr/bin/systemctl from connectto access on the unix_stream_socket /run/dbus/system_bus_socket. For complete SELinux messages. run sealert -l e1afcda9-a674-4d76-8aa0-7787404c515eMar 13 05:06:42 test1 python: SELinux is preventing /usr/bin/systemctl from connectto access on the unix_stream_socket /run/dbus/system_bus_socket.#012#012***** Plugin catchall (100. confidence) suggests **************************#012#012If you believe that systemctl should be allowed connectto access on the system_bus_socket unix_stream_socket by default.#012Then you should report this as a bug.#012You can generate a local policy module to allow this access.#012Do#012allow this access for now by executing:#012# ausearch -c 'systemctl' --raw | audit2allow -M my-systemctl#012# semodule -i my-systemctl.pp#012
[root@test1 ~]# tail -f /var/log/audit/audit.logtype=AVC msg=audit(1489352885.238:1505): avc: denied { connectto } for pid=11711 comm="systemctl" path="/run/dbus/system_bus_socket" scontext=system_u:system_r:keepalived_t:s0 tcontext=system_u:system_r:system_dbusd_t:s0-s0:c0.c1023 tclass=unix_stream_sockettype=SYSCALL msg=audit(1489352885.238:1505): arch=c000003e syscall=42 success=no exit=-13 a0=3 a1=7f42bfa16918 a2=21 a3=7ffe723af2b0 items=0 ppid=11707 pid=11711 auid=4294967295 uid=0 gid=0 euid=0 suid=0 fsuid=0 egid=0 sgid=0 fsgid=0 tty=(none) ses=4294967295 comm="systemctl" exe="/usr/bin/systemctl" subj=system_u:system_r:keepalived_t:s0 key=(null)
继续按提示输入
[root@test1 ~]# sealert -l e1afcda9-a674-4d76-8aa0-7787404c515e[root@test1 ~]# ausearch -c 'systemctl' --raw | audit2allow -M my-systemctl[root@test1 ~]# semodule -i my-systemctl.pp
尝试后日志:(最后没解决 ~。。~)
[root@test1 ~]# tail -f /var/log/messagesMar 13 05:12:09 test1 Keepalived_vrrp[3090]: Process [14395] didn't respond to SIGTERM
[root@test1 ~]# tail -f /var/log/audit/audit.logtype=USER_AVC msg=audit(1489353197.502:2058): pid=1 uid=0 auid=4294967295 ses=4294967295 subj=system_u:system_r:init_t:s0 msg='avc: denied { start } for auid=n/a uid=0 gid=0 path="/usr/lib/systemd/system/haproxy.service" cmdline="systemctl start haproxy" scontext=system_u:system_r:keepalived_t:s0 tcontext=system_u:object_r:haproxy_unit_file_t:s0 tclass=service exe="/usr/lib/systemd/systemd" sauid=0 hostname=? addr=? terminal=?'type=USER_AVC msg=audit(1489353198.557:2059): pid=1 uid=0 auid=4294967295 ses=4294967295 subj=system_u:system_r:init_t:s0 msg='avc: denied { stop } for auid=n/a uid=0 gid=0 path="/usr/lib/systemd/system/keepalived.service" cmdline="systemctl stop keepalived" scontext=system_u:system_r:keepalived_t:s0 tcontext=system_u:object_r:keepalived_unit_file_t:s0 tclass=service exe="/usr/lib/systemd/systemd" sauid=0 hostname=? addr=? terminal=?'type=USER_AVC msg=audit(1489353198.557:2060): pid=1 uid=0 auid=4294967295 ses=4294967295 subj=system_u:system_r:init_t:s0 msg='avc: denied { status } for auid=n/a uid=0 gid=0 path="/usr/lib/systemd/system/keepalived.service" cmdline="systemctl stop keepalived" scontext=system_u:system_r:keepalived_t:s0 tcontext=system_u:object_r:keepalived_unit_file_t:s0 tclass=service exe="/usr/lib/systemd/systemd" sauid=0 hostname=? addr=? terminal=?'
type=AVC msg=audit(1489354986.919:1591): avc: denied { getattr } for pid=7566 comm="check_haproxy.s" path="/usr/sbin/haproxy" dev="dm-0" ino=68172487 scontext=system_u:system_r:keepalived_t:s0 tcontext=system_u:object_r:haproxy_exec_t:s0 tclass=filetype=SYSCALL msg=audit(1489354986.919:1591): arch=c000003e syscall=4 success=no exit=-13 a0=19cbd50 a1=7ffde08b8720 a2=7ffde08b8720 a3=11 items=0 ppid=7565 pid=7566 auid=4294967295 uid=0 gid=0 euid=0 suid=0 fsuid=0 egid=0 sgid=0 fsgid=0 tty=(none) ses=4294967295 comm="check_haproxy.s" exe="/usr/bin/bash" subj=system_u:system_r:keepalived_t:s0 key=(null)
观察:systemctl 相关命令还是因为selinux运行不了
2)根据1)决定对vrrp script脚本修改如下
#!/bin/bash#判断haproxy是否已经启动,去除haproxy试图启动部分if [ `ps -C haproxy --no-header |wc -l` -eq 0 ] ; then#如果haproxy还是没有启动,则将keepalived停掉,这样VIP会自动漂移到另外一台haproxypkill keepalivedfi
(启动顺序必须是haproxy先启动,负责keepalived如果先启动会自杀)
也可设置自启
systemctl enable haproxysystemctl enable keepalived
3)使用文件中注释的信息完成 vrrp_script (下面的脚本对主从服务器的priority差值有严格要求)(最优方法)
# 检测haproxy脚本vrrp_script chk_haproxy{script "killall -0 haproxy" #killall (安装 yum install psmisc -y)interval 2weghit 2 #权值脚本成功时(0)等于priority+weghit #否则为priority}

 2390


 扫一扫


 被折叠的 条评论
为什么被折叠?
 到【灌水乐园】发言


