


规划节点

基础准备
db1和db2部署MariaDB数据库服务,搭建主从数据库集群;一台作为主节点,负责写入数据库信息;另一台作为从节点,负责读取数据库信息。使用一台虚拟机部署Mycat数据库中间件服务,将用户提交的读写操作识别分发给相应的数据库节点。这样将用户的访问操作、数据库的读与写操作分给3台主机,只有数据库集群的主节点接收增、删、改SQL语句,从节点接收查询语句,分担了主节点的查询压力。
基础环境配置
修改主机名
[root@localhost ~]# hostnamectl set-hostname mycat
[root@localhost ~]# bash
[root@mycat ~]#
[root@localhost ~]# hostnamectl set-hostname db1
[root@localhost ~]# bash
[root@db1 ~]#
[root@localhost ~]# hostnamectl set-hostname db2
[root@localhost ~]# bash
[root@db2 ~]#
编辑hosts文件(三台机器)
[root@mycat ~]# cat /etc/hosts
127.0.0.1   localhost localhost.localdomain localhost4 localhost4.localdomain4
::1         localhost localhost.localdomain localhost6 localhost6.localdomain6
10.30.59.212 mycat
10.30.59.221 db1
10.30.59.231 db2
配置yum源(三台机器)
,使用提供的gpmall-repo文件上传至3个虚拟机的/opt目录下,设置本地Yum源。
# mv /etc/yum.repos.d/* /media/
[root@mycat ~]# cat /etc/yum.repos.d/local.repo
[mariadb]
name=mariadb
baseurl=file:///opt/gpmall-repo
gpgcheck=0
enabled=1
[cdrom]
name=cdrom
baseurl=file:///opt/cdrom
gpgcheck=0
enabled=1
安装JDK环境
Mycat节点安装Java环境:、
[root@mycat ~]# yum install -y java-1.8.0-openjdk java-1.8.0-devel
[root@mycat ~]# java -version
openjdk version "1.8.0_222"
OpenJDK Runtime Environment (build 1.8.0_222-b10)
OpenJDK 64-Bit Server VM (build 25.222-b10, mixed mode)
关闭防火墙(三个节点)
[root@db2 ~]# iptables -F
[root@db2 ~]# iptables -X
[root@db2 ~]# iptables -Z
[root@db2 ~]# iptables-save
# Generated by iptables-save v1.4.21 on Mon Jun 21 18:06:56 2021
*filter
:INPUT ACCEPT [21:1648]
:FORWARD ACCEPT [0:0]
:OUTPUT ACCEPT [11:1012]
COMMIT
部署MariaDB主从数据库集群服务
安装MariaDB服务(db1和db2节点)
[root@db1 ~]# yum install -y mariadb mariadb-server
[root@db1 ~]# systemctl start mariadb
[root@db1 ~]# systemctl enable mariadb
初始化(db1和db2节点)
[root@db1 ~]# mysql_secure_installation
修改db1和db2的配置文件
[root@db1 ~]# vim /etc/my.cnf
添加下面的字段
[[mysqld]
log_bin = mysql-bin
binlog_ignore_db = mysql
server_id = 205
datadir=/var/lib/mysql
socket=/var/lib/mysql/mysql.sock
# Disabling symbolic-links is recommended to prevent as
# sorted security risks
# symbolic-links=0
[mysqld_safe]
log-error=/var/log/mariadb/mariadb.log
pid-file=/var/run/mariadb/mariadb.pid
重启数据库
[root@db1 ~]# systemctl restart mariadb
授权
在db1节点
MariaDB [(none)]> grant all privileges on *.* to root@'%' identified by "000000";
Query OK, 0 rows affected (0.001 sec)

MariaDB [(none)]> grant replication slave on *.* to 'user'@'db2' identified by '000000';
Query OK, 0 rows affected (0.001 sec)
db2节点
[root@db2 ~]# mysql -uroot -p000000
Welcome to the MariaDB monitor.  Commands end with ; or \g.
Your MariaDB connection id is 16
Server version: 10.3.18-MariaDB MariaDB Server

Copyright (c) 2000, 2018, Oracle, MariaDB Corporation Ab and others.

Type 'help;' or '\h' for help. Type '\c' to clear the current input statement.

MariaDB [(none)]> change master to master_host='db1',master_user='user',master_password='000000';
Query OK, 0 rows affected (0.019 sec)
开启服务
MariaDB [(none)]> start slave;
Query OK, 0 rows affected (0.003 sec)
MariaDB [(none)]> show slave status\G;
*************************** 1. row ***************************
                Slave_IO_State: Waiting for master to send event
                   Master_Host: db1
                   Master_User: user
                   Master_Port: 3306
                 Connect_Retry: 60
               Master_Log_File: mysql-bin.000001
           Read_Master_Log_Pos: 696
                Relay_Log_File: db2-relay-bin.000002
                 Relay_Log_Pos: 995
         Relay_Master_Log_File: mysql-bin.000001
              Slave_IO_Running: Yes
             Slave_SQL_Running: Yes
               Replicate_Do_DB:
           Replicate_Ignore_DB:
            Replicate_Do_Table:
        Replicate_Ignore_Table:
       Replicate_Wild_Do_Table:
   Replicate_Wild_Ignore_Table:
                    Last_Errno: 0
                    Last_Error:
                  Skip_Counter: 0
           Exec_Master_Log_Pos: 696
               Relay_Log_Space: 1302
               Until_Condition: None
                Until_Log_File:
                 Until_Log_Pos: 0
            Master_SSL_Allowed: No
            Master_SSL_CA_File:
            Master_SSL_CA_Path:
               Master_SSL_Cert:
             Master_SSL_Cipher:
                Master_SSL_Key:
         Seconds_Behind_Master: 0
 Master_SSL_Verify_Server_Cert: No
                 Last_IO_Errno: 0
                 Last_IO_Error:
                Last_SQL_Errno: 0
                Last_SQL_Error:
   Replicate_Ignore_Server_Ids:
              Master_Server_Id: 221
                Master_SSL_Crl:
            Master_SSL_Crlpath:
                    Using_Gtid: No
                   Gtid_IO_Pos:
       Replicate_Do_Domain_Ids:
   Replicate_Ignore_Domain_Ids:
                 Parallel_Mode: conservative
                     SQL_Delay: 0
           SQL_Remaining_Delay: NULL
       Slave_SQL_Running_State: Slave has read all relay log; waiting for the slave I/O thread to update it
              Slave_DDL_Groups: 2
Slave_Non_Transactional_Groups: 0
    Slave_Transactional_Groups: 0
1 row in set (0.000 sec)

ERROR: No query specified**(show slave status\G;的时候,多加了一个“;”分号)**
验证主从数据库的同步功能
在db1节点的数据库中创建库test,并在库test中创建表company,插入表数据。创建完成后,查看表company数据,
MariaDB [(none)]> create database test;
Query OK, 1 row affected (0.001 sec)

MariaDB [(none)]> use test
Database changed
MariaDB [test]> create table company(id int not null primary key,name varchar(50),addr varchar(255));
Query OK, 0 rows affected (0.019 sec)

MariaDB [test]>  insert into company values(1,"facebook","usa");
Query OK, 1 row affected (0.002 sec)

MariaDB [test]> select * from company;
+----+----------+------+
| id | name     | addr |
+----+----------+------+
|  1 | facebook | usa  |
+----+----------+------+
1 row in set (0.001 sec)
到db2查看
MariaDB [(none)]> show databases;
+--------------------+
| Database           |
+--------------------+
| information_schema |
| mysql              |
| performance_schema |
| test               |
+--------------------+
4 rows in set (0.001 sec)

MariaDB [(none)]> select * from test.company;
+----+----------+------+
| id | name     | addr |
+----+----------+------+
|  1 | facebook | usa  |
+----+----------+------+
1 row in set (0.000 sec)

MariaDB [(none)]>
部署Mycat读写分离中间件服务
安装Mycat服务
Mycat-server-1.6-RELEASE-20161028204710-linux.tar.gz上传到Mycat虚拟机的/root目录下,并将软件包解压到/usr/local目录中
[root@mycat ~]# tar -zxvf Mycat-server-1.6-RELEASE-20161028204710-linux.tar.gz -C /usr/local/
[root@mycat ~]# chown -R 777 /usr/local/mycat/
[root@mycat ~]# echo export MYCAT_HOME=/usr/local/mycat/ >> /etc/profile
[root@mycat ~]# source /etc/profile
编辑Mycat的逻辑库配置文件
把之前的全部删掉替换为下面的内容
IP需要修改成实际的IP地址。
[root@mycat ~]# cat /usr/local/mycat/conf/schema.xml
<?xml version="1.0"?>
<!DOCTYPE mycat:schema SYSTEM "schema.dtd">
<mycat:schema xmlns:mycat="http://io.mycat/">
<schema name="USERDB" checkSQLschema="true" sqlMaxLimit="100" dataNode="dn1"></schema>
<dataNode name="dn1" dataHost="localhost1" database="test" />
<dataHost name="localhost1" maxCon="1000" minCon="10" balance="3" dbType="mysql" dbDriver="native" writeType="0" switchType="1"  slaveThreshold="100">
    <heartbeat>select user()</heartbeat>
    <writeHost host="hostM1" url="10.30.59.221:3306" user="root" password="123456">
        <readHost host="hostS1" url="10.30.59.231:3306" user="root" password="123456" />
    </writeHost>
</dataHost>
</mycat:schema>
修改配置文件权限
修改schema.xml的用户权限,命令如下:
[root@mycat ~]# chown root:root /usr/local/mycat/conf/schema.xml
编辑Mycat的访问用户
[root@mycat ~]# cat /usr/local/mycat/conf/server.xml
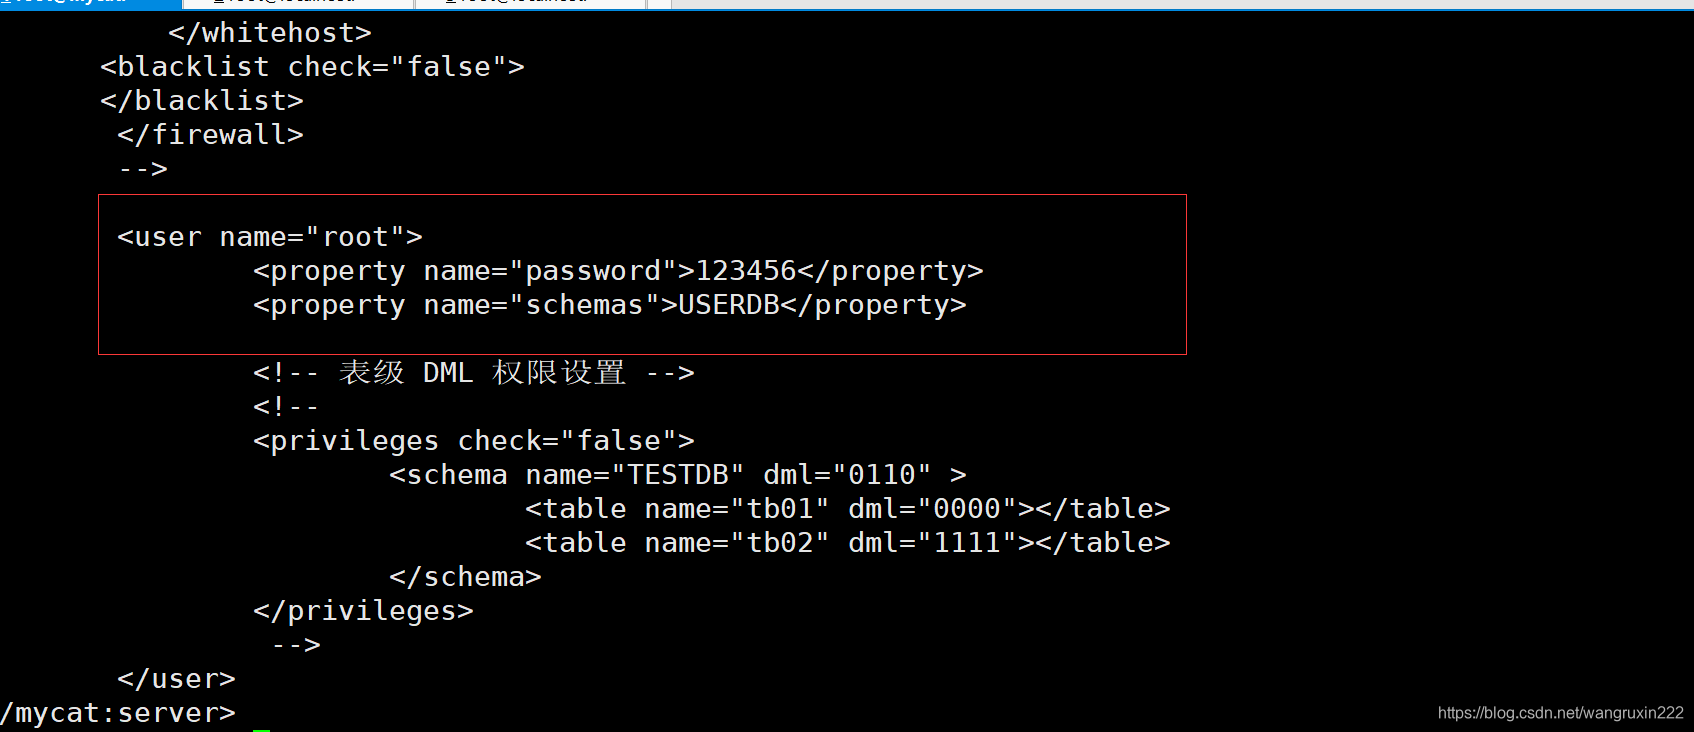
启动Mycat服务
[root@mycat ~]# /bin/bash /usr/local/mycat/bin/mycat restart
[root@mycat ~]# netstat -ntpl (8066和9066)
Active Internet connections (only servers)
Proto Recv-Q Send-Q Local Address           Foreign Address         State       PID/Program name
tcp        0      0 127.0.0.1:32000         0.0.0.0:*               LISTEN      12893/java
tcp        0      0 0.0.0.0:22              0.0.0.0:*               LISTEN      1078/sshd
tcp        0      0 127.0.0.1:25            0.0.0.0:*               LISTEN      1331/master
tcp6       0      0 :::1984                 :::*                    LISTEN      12893/java
tcp6       0      0 :::8066                 :::*                    LISTEN      12893/java
tcp6       0      0 :::41478                :::*                    LISTEN      12893/java
tcp6       0      0 :::9066                 :::*                    LISTEN      12893/java
tcp6       0      0 :::35634                :::*                    LISTEN      12893/java
tcp6       0      0 :::22                   :::*                    LISTEN      1078/sshd
tcp6       0      0 ::1:25                  :::*                    LISTEN      1331/master
验证数据库集群服务读写分离功能(在mycat节点)
用Mycat服务查询数据库信息
[root@mycat ~]# yum install -y MariaDB-client
在Mycat虚拟机上使用mysql命令查看Mycat服务的逻辑库USERDB,因为Mycat的逻辑库USERDB对应数据库test(在部署主从数据库时已安装),所以可以查看库中已经创建的表company
[root@mycat ~]# mysql -h127.0.0.1 -P8066 -uroot -p123456
Welcome to the MariaDB monitor.  Commands end with ; or \g.
Your MySQL connection id is 1
Server version: 5.6.29-mycat-1.6-RELEASE-20161028204710 MyCat Server (OpenCloundDB)

Copyright (c) 2000, 2018, Oracle, MariaDB Corporation Ab and others.

Type 'help;' or '\h' for help. Type '\c' to clear the current input statement.

MySQL [(none)]> show databases;
+----------+
| DATABASE |
+----------+
| USERDB   |
+----------+
1 row in set (0.005 sec)

MySQL [(none)]> use USERDB
Reading table information for completion of table and column names
You can turn off this feature to get a quicker startup with -A

Database changed
MySQL [USERDB]> show tables;
+----------------+
| Tables_in_test |
+----------------+
| company        |
+----------------+
1 row in set (0.002 sec)

MySQL [USERDB]> select .* from company;
ERROR 2013 (HY000): Lost connection to MySQL server during query
MySQL [USERDB]> select * from company;
ERROR 2006 (HY000): MySQL server has gone away
No connection. Trying to reconnect...
Connection id:    2
Current database: USERDB

+----+----------+------+
| id | name     | addr |
+----+----------+------+
|  1 | facebook | usa  |
+----+----------+------+
1 row in set (0.030 sec)
用Mycat服务添加表数据
MySQL [USERDB]>
MySQL [USERDB]> insert into company values(2,"bastetball","usa");
Query OK, 1 row affected (0.006 sec)

MySQL [USERDB]> select * from company;
+----+------------+------+
| id | name       | addr |
+----+------------+------+
|  1 | facebook   | usa  |
|  2 | bastetball | usa  |
+----+------------+------+
2 rows in set (0.003 sec)
验证Mycat服务对数据库读写操作分离
在Mycat虚拟机节点使用mysql命令,通过9066端口查询对数据库读写操作的分离信息。可以看到所有的写入操作WRITE_LOAD数都在db1主数据库节点上,所有的读取操作READ_LOAD数都在db2主数据库节点上。由此可见,数据库读写操作已经分离到db1和db2节点上了。
[root@mycat ~]# mysql -h127.0.0.1 -P9066 -uroot -p123456 -e 'show  @@datasource;'
+----------+--------+-------+--------------+------+------+--------+------+------+---------+-----------+------------+
| DATANODE | NAME   | TYPE  | HOST         | PORT | W/R  | ACTIVE | IDLE | SIZE | EXECUTE | READ_LOAD | WRITE_LOAD |
+----------+--------+-------+--------------+------+------+--------+------+------+---------+-----------+------------+
| dn1      | hostM1 | mysql | 10.30.59.221 | 3306 | W    |      0 |   10 | 1000 |      87 |         0 |          1 |
| dn1      | hostS1 | mysql | 10.30.59.231 | 3306 | R    |      0 |    7 | 1000 |      87 |         5 |          0 |
+----------+--------+-------+--------------+------+------+--------+------+------+---------+-----------+------------+
mycat读写分离数据案列完成


 486
486


 到【灌水乐园】发言


