


 本文介绍了SSM(springmvc+spring+mybatis)框架,包括spring环境、spring整合mybatis环境、springmvc环境的搭建,还提及了jsp常见操作。同时指出搭建中如mapper接口和xml文件识别等问题及解决方案,最后提供码云项目仓库地址。
1、简介ssm框架
ssm是springmvc+spring+mybatis当前的主流框架之一。用其创建一个web项目需要添加以下依赖
<!--数据库驱动-->
<dependency>
      <groupId>mysql</groupId>
      <artifactId>mysql-connector-java</artifactId>
      <version>5.1.39</version>
    </dependency>
    <!--c3po数据库连接池-->
    <dependency>
      <groupId>com.mchange</groupId>
      <artifactId>c3p0</artifactId>
      <version>0.9.5.2</version>
    </dependency>
    <!--spring整合mybatis的依赖-->
    <dependency>
      <groupId>org.mybatis</groupId>
      <artifactId>mybatis</artifactId>
      <version>3.5.4</version>
    </dependency>
    <dependency>
      <groupId>org.mybatis</groupId>
      <artifactId>mybatis-spring</artifactId>
      <version>2.0.4</version>
    </dependency>
    <!--servlet依赖-->
    <dependency>
      <groupId>javax.servlet</groupId>
      <artifactId>servlet-api</artifactId>
      <version>2.5</version>
    </dependency>
    <dependency>
      <groupId>javax.servlet.jsp</groupId>
      <artifactId>jsp-api</artifactId>
      <version>2.2</version>
    </dependency>
    <dependency>
      <groupId>jstl</groupId>
      <artifactId>jstl</artifactId>
      <version>1.2</version>
    </dependency>
    <!--测试-->
    <dependency>
      <groupId>junit</groupId>
      <artifactId>junit</artifactId>
      <version>4.12</version>
      <scope>test</scope>
    </dependency>
    <!--springmvc-->
    <dependency>
      <groupId>org.springframework</groupId>
      <artifactId>spring-webmvc</artifactId>
      <version>5.2.9.RELEASE</version>
    </dependency>
    <!--事务植入-->
    <dependency>
      <groupId>org.aspectj</groupId>
      <artifactId>aspectjweaver</artifactId>
      <version>1.9.2</version>
    </dependency>
    <dependency>
      <groupId>org.springframework</groupId>
      <artifactId>spring-jdbc</artifactId>
      <version>5.2.9.RELEASE</version>
    </dependency>
    <dependency>
      <groupId>org.junit.jupiter</groupId>
      <artifactId>junit-jupiter</artifactId>
      <version>RELEASE</version>
      <scope>compile</scope>
    </dependency>
2、spring环境介绍
这个链接能够对初学spring两大特性有一定了解
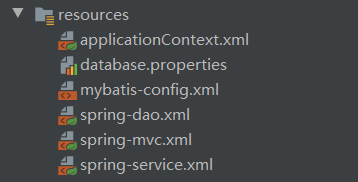
导入spring依赖之后需要在resources下创建applicationContext.xml文件这个是spring控制上下文bean注入控制的配置文件
<?xml version="1.0" encoding="UTF-8"?>
<beans xmlns="http://www.springframework.org/schema/beans"
       xmlns:xsi="http://www.w3.org/2001/XMLSchema-instance"
       xsi:schemaLocation="http://www.springframework.org/schema/beans
        https://www.springframework.org/schema/beans/spring-beans.xsd">
          <!--这个就类似java导入包一样-->
    <import resource="spring-dao.xml"></import>
    <import resource="spring-service.xml"></import>
    <import resource="spring-mvc.xml"></import>

</beans>
3、搭建spring整合mybatis环境
mybatis是一个数据持久化的框架,主要是实现有数据库的交互,相当于封装的jdbc;
mybatis中需要配置mybatis-config类配置其相关的mapper映射别名等
<?xml version="1.0" encoding="UTF-8" ?>
<!DOCTYPE configuration
PUBLIC "-//mybatis.org//DTD Config 3.0//EN"
"http://mybatis.org/dtd/mybatis-3-config.dtd">
<configuration>
<typeAliases>
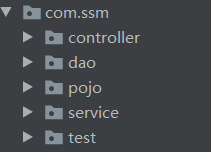
<package name="com.ssm.pojo"/>
</typeAliases>
<mappers>
<mapper class="com.ssm.dao.StudentMapper"/>
<mapper class="com.ssm.dao.NoticeMapper"/>
<mapper class="com.ssm.dao.RoomMapper"/>
<mapper class="com.ssm.dao.ManagerMapper"/>
<mapper class="com.ssm.dao.RepairMapper"/>
</mappers>
</configuration>
同时在dao层或者mapper层
首先写出数据对应的intfaces接口mapper
例如
package com.ssm.dao;
import com.ssm.pojo.Student;
import java.util.List;
public interface StudentMapper {
/**
* 添加学生信息
* @param student
* @return
*/
int addStudent(Student student);
/**
* 按照学号查询学生信息
*/
Student queryStudentBySid(int sId);
/**
* 按学号修改学生信息
*/
int updateStudentBySId(Student student);
/**
* 按照学号删除学生信息
* @param sId
* @return
*/
int deleteStudentBySid(int sId);
/**
* 查询所有学生
* @return
*/
List allStudent();
/**
* 按宿舍号查询所有数据
* @param sDormId
* @return
*/
List allStudentBysDormId(int sDormId);
}
对应同一个包下写相应的mapper.xml文件
<?xml version="1.0" encoding="UTF-8" ?>
<!DOCTYPE mapper
PUBLIC "-//mybatis.org//DTD Mapper 3.0//EN"
"http://mybatis.org/dtd/mybatis-3-mapper.dtd">
<mapper namespace="com.ssm.dao.StudentMapper">
<insert id="addStudent" parameterType="Student">
insert into student(sId,sPassword,sName,sPhone,sCollege,sProfession,sDormId)
values (#{sId},#{sPassword},#{sName},#{sPhone},#{sCollege},#{sProfession},#{sDormId})
</insert>
<select id="allStudent" resultType="Student" >
select * from student
</select>
<select id="queryStudentBySid" parameterType="int" resultType="Student">
select sId,sPassword,sName,sPhone,sCollege,sProfession,sDormId
from student where sId=#{sId}
</select>
<update id="updateStudentBySId" parameterType="Student" >
update student set sName=#{sName},sCollege=#{sCollege},sProfession=#{sProfession},sDormId=#{sDormId},sPassword=#{sPassword}
where sId=#{sId}
</update>
<delete id="deleteStudentBySid" parameterType="int">
delete from student where sId=#{sId}
</delete>
<select id="allStudentBysDormId" parameterType="int" resultType="Student">
select sId,sName,sPhone,sCollege,sProfession,sDormId
from student
where sDormId=#{sDormId}
</select>
</mapper>
问题:
在对应的mapper接口和mapper.xml文件必须在同一包下才能识别
maven不会识别java包下的xml文件
解决方案1
在pom。xml插入相关的build
2是在resource包下写入相同的包名同时对应路径下创建mapper.xml
上面是mybatis相关配置(接着是加入spring代理)
创建spring-dao.xml加入mybatis文件的数据源事务数据库等
database.properties文件
jdbc.driver=com.mysql.jdbc.Driver
jdbc.url=jdbc:mysql://localhost:3306/dormsystem?useSSL=true&useUnicode=true&characterEncoding=utf8
jdbc.userName=root
jdbc.password=123

<?xml version="1.0" encoding="UTF-8"?>
<beans xmlns="http://www.springframework.org/schema/beans"
       xmlns:xsi="http://www.w3.org/2001/XMLSchema-instance"
       xmlns:context="http://www.springframework.org/schema/context"
       xsi:schemaLocation="http://www.springframework.org/schema/beans
        https://www.springframework.org/schema/beans/spring-beans.xsd
        http://www.springframework.org/schema/context
        https://www.springframework.org/schema/context/spring-context.xsd">
    <!--关联数据库配置文件-->
    <context:property-placeholder location="classpath:database.properties"/>
    <!--连接池-->
    <bean id="dataSource" class="com.mchange.v2.c3p0.ComboPooledDataSource">
        <property name="driverClass" value="${jdbc.driver}"></property>
        <property name="jdbcUrl" value="${jdbc.url}"/>
        <property name="user" value="${jdbc.userName}"/>
        <property name="password" value="${jdbc.password}"/>
        <!--私有属性-->
        <property name="maxPoolSize" value="30"></property>
        <property name="minPoolSize" value="10"/>
        <!--关闭连接时不自动commit-->
        <property name="autoCommitOnClose" value="false"/>
        <!--获取连接超时时间-->
        <property name="checkoutTimeout" value="10000"/>
        <!--当获取连接失败重连次数-->
        <property name="acquireRetryAttempts" value="2"/>
    </bean>
    <!--sqlSessionFactory-->
    <bean id="sqlSessionFactory" class="org.mybatis.spring.SqlSessionFactoryBean">
        <property name="dataSource" ref="dataSource"/>
        <!--绑定mybatis的配置文件-->
        <property name="configLocation" value="classpath:mybatis-config.xml"/>
    </bean>
    <!--配置dao层接口扫描包,动态实现dao接口可以注入到spring容器中-->
    <bean class="org.mybatis.spring.mapper.MapperScannerConfigurer">
        <!--注入SQLSessionFactory-->
        <property name="sqlSessionFactoryBeanName" value="sqlSessionFactory"/>
        <!--要扫描的dao包-->
        <property name="basePackage" value="com.ssm.dao"/>
    </bean>

</bean>
下面service包下加入spring代理同时将dao层的bean注入到spring-service.xml
<?xml version="1.0" encoding="UTF-8"?>
<beans xmlns="http://www.springframework.org/schema/beans"
       xmlns:xsi="http://www.w3.org/2001/XMLSchema-instance"
       xmlns:context="http://www.springframework.org/schema/context" xmlns:tx="http://www.springframework.org/schema/tx"
       xmlns:aop="http://www.springframework.org/schema/aop"
       xsi:schemaLocation="http://www.springframework.org/schema/beans
        https://www.springframework.org/schema/beans/spring-beans.xsd
        http://www.springframework.org/schema/context
        https://www.springframework.org/schema/context/spring-context.xsd http://www.springframework.org/schema/tx http://www.springframework.org/schema/tx/spring-tx.xsd http://www.springframework.org/schema/aop https://www.springframework.org/schema/aop/spring-aop.xsd">
    <!--注解扫描对应的包-->
    <context:component-scan base-package="com.ssm.service"/>
    <!--将业务类注入到spring容器中可以通过配置或注解-->
    <bean id="StudentServiceImpl" class="com.ssm.service.StudentServiceImpl">
        <property name="studentMapper" ref="studentMapper"/>
    </bean>
    <bean id="NoticeServiceImpl" class="com.ssm.service.NoticeServiceImpl">
        <property name="noticeMapper" ref="noticeMapper"/>
    </bean>
    <bean id="repairServiceImpl" class="com.ssm.service.RepairServiceImpl">
        <property name="repairMapper" ref="repairMapper"/>
    </bean>
    <bean id="roomServiceImpl" class="com.ssm.service.RoomServiceImpl">
        <property name="roomMapper" ref="roomMapper"/>
    </bean>
    <bean id="managerServiceImpl" class="com.ssm.service.ManagerServiceImpl">
        <property name="managerMapper" ref="managerMapper"/>
    </bean>
    <!--声明是事务-->
    <bean id="transactionManager" class="org.springframework.jdbc.datasource.DataSourceTransactionManager">
        <!--注入数据源-->
        <property name="dataSource" ref="dataSource"/>
    </bean>
    <!--aop事务支持-->
    <tx:advice id="txAdvice" transaction-manager="transactionManager">
        <tx:attributes>
            <tx:method name="*" propagation="REQUIRED"/>
        </tx:attributes>
    </tx:advice>
    <aop:config>
        <aop:pointcut id="txPoint" expression="execution(* com.ssm.dao.*.*(..))"/>
        <aop:advisor advice-ref="txAdvice" pointcut-ref="txPoint"/>
    </aop:config>
    <!---->
</beans>
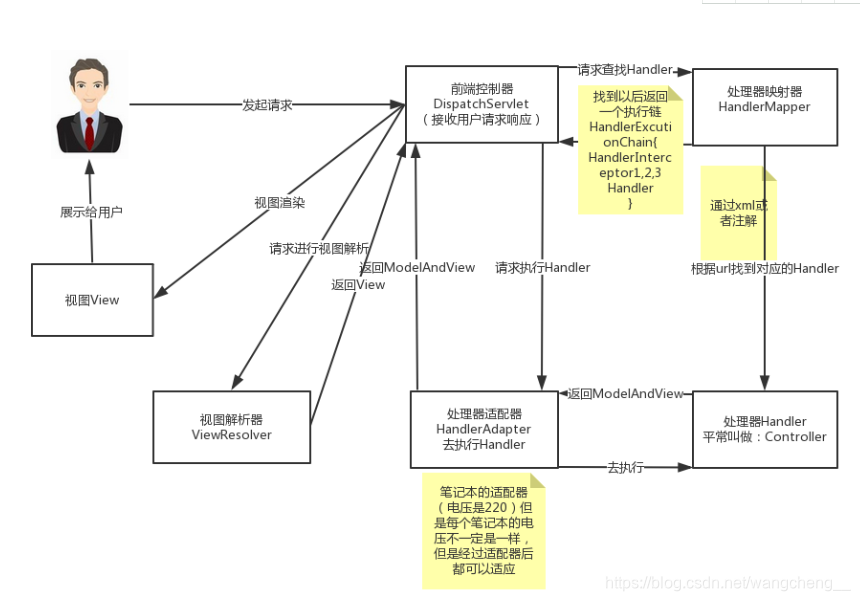
4、搭建springmvc环境
springmvc是建立在原生态servlet进行第三层包装这是引用https://blog.youkuaiyun.com/qq_41123079/article/details/109543986
springmvc配置
<?xml version="1.0" encoding="UTF-8"?>
<beans xmlns="http://www.springframework.org/schema/beans"
       xmlns:xsi="http://www.w3.org/2001/XMLSchema-instance"
       xmlns:context="http://www.springframework.org/schema/context"
       xmlns:mvc="http://www.springframework.org/schema/mvc"
       xsi:schemaLocation="http://www.springframework.org/schema/beans
        https://www.springframework.org/schema/beans/spring-beans.xsd
        http://www.springframework.org/schema/context
        https://www.springframework.org/schema/context/spring-context.xsd http://www.springframework.org/schema/mvc https://www.springframework.org/schema/mvc/spring-mvc.xsd">
        <context:component-scan base-package="com.ssm.controller"/>
           <!-- 启用spring mvc 注解 -->
        <mvc:annotation-driven/>
          <!--取消前端控制器对数据的拦截 使用默认的处理-->
        <mvc:default-servlet-handler/>

    <!--配置视图解析器-->
    <bean id="internalResourceViewResolver" class="org.springframework.web.servlet.view.InternalResourceViewResolver">
        <property name="prefix" value="/WEB-INF/pages/"></property>
        <property name="suffix" value=".jsp"></property>
    </bean>

</beans>
相关配置COntroller层
@Controller
@RequestMapping("/student")
public class StudentController {
    @Autowired
    @Qualifier(value = "StudentServiceImpl")
    private  StudentService studentService;
    @Autowired
    @Qualifier("managerServiceImpl")
    private ManagerService managerService;
    @Autowired
    @Qualifier("repairServiceImpl")
    private RepairService repairService;
    @Autowired
    @Qualifier("NoticeServiceImpl")
    private NoticeService noticeService;

    @RequestMapping("/check")
    public String check(int sId, String sPassword,HttpSession session, Model model){
        System.out.println(sId+ "密码是"+sPassword);
        Student student = studentService.queryStudentBySid(sId);
        System.out.println(student);
        if(student==null){
//            return "redirect:/index.jsp";
//            return "redirect:http://localhost:8080/dormSystemManager/index.jsp";
            return "index";
        }
        if(sPassword.equals(student.getsPassword()))
        {

            session.setAttribute("student",student);
            return "student";
        }

//        return "redirect:http://localhost:8080/dormSystemManager/index.jsp";
        return "index";
    }
}
5、jsp常见操作
使用jstl依赖
<C:input>
<C:foreach>
isELIgnored="false"配置取消正则判断${requerSocpe}就可以展示了


<%@ taglib prefix="c" uri="http://java.sun.com/jsp/jstl/core" %>

<%@ page contentType="text/html;charset=UTF-8" language="java" isELIgnored="false" %>
<%
    String path = request.getContextPath();
    String basePath = request.getScheme()+"://"+request.getServerName()+":"+request.getServerPort()+path+"/";
%>
循环展示
  <table cellspacing="20" cellpadding="10">
            <thead>
            <tr>
                <th>账号</th>
                <th>密码</th>
                <th>姓名</th>
                <th>电话</th>
                <th>职权</th>
            </tr>
            </thead><hr/>
            <tbody>
            <c:forEach var="manager" items="${list}">
                <tr>
                    <td>${manager.managerId}</td>
                    <td>${manager.mPassword}</td>
                    <td>${manager.mName}</td>
                    <td>${manager.mPhone}</td>
                    <td>${manager.mDetail}</td>
                </tr>
            </c:forEach>
            </tbody>
        </table>
6、如果不想自己敲可以去码云上下载我的项目
上链接上链接码云地址仓库https://gitee.com/wang_cheng_w/dormitory-management-system


 729
729

 被折叠的 条评论
为什么被折叠?
被折叠的 条评论
为什么被折叠?
 到【灌水乐园】发言


