


文章目录
一、vue3工程的创建与介绍
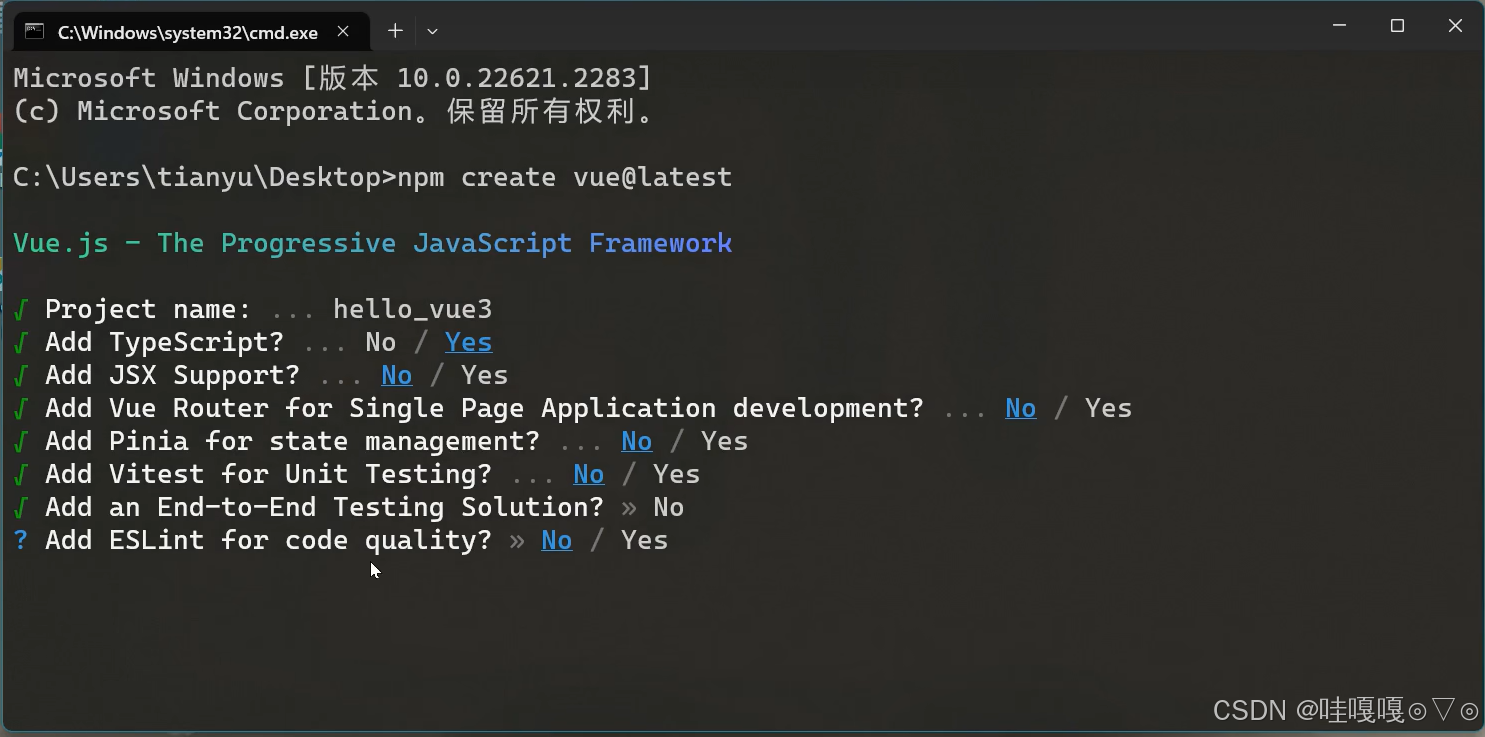
1.创建命令
npm create vue@latest
2.具体配置
配置项目名称
Project name: vue3_test
是否添加TypeScript支持
Add TypeScript? Yes
是否添加JSX支持
Add JSX Support? No
是否添加路由环境
Add Vue Router for Single Page Application development? No
是否添加pinia环境
Add Pinia for state management? No
是否添加单元测试
Add Vitest for Unit Testing? No
是否添加端到端测试方案
Add an End-to-End Testing Solution? » No
是否添加ESLint语法检查
Add ESLint for code quality? Yes
是否添加Prettiert代码格式化
Add Prettier for code formatting? No
在需要创建vue文件的地方进入cmd,执行以上命令
创建完成
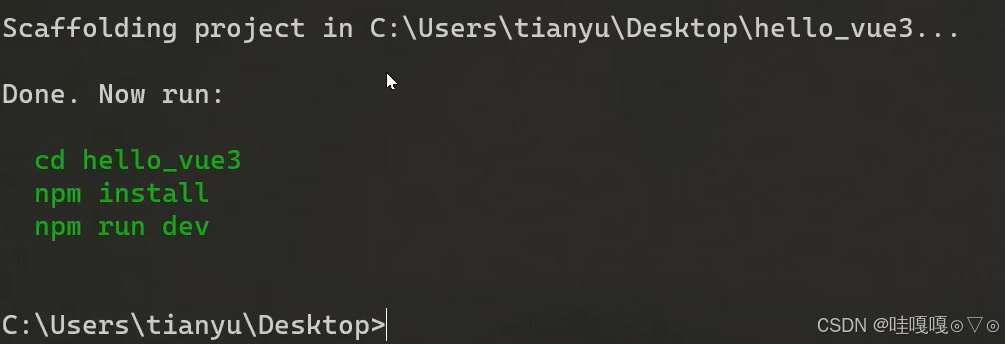
打开vscode。


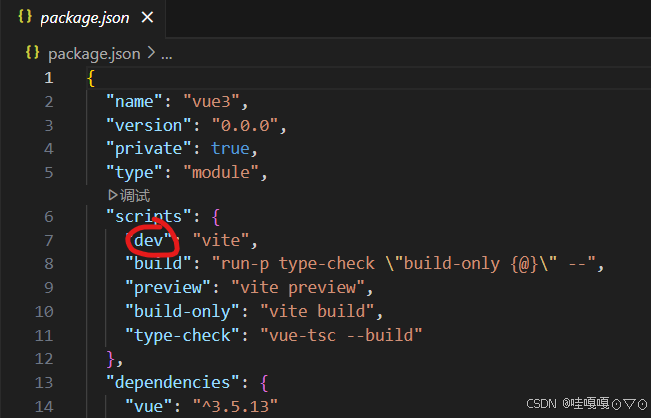
可在此文件中找到要执行的命令 npm run dev执行上一入口文件

执行结果。


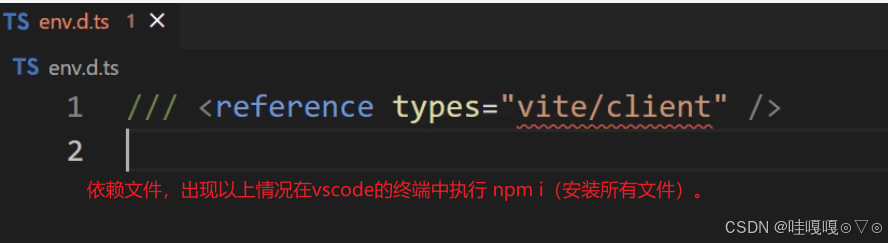
若‘./App.vue’报红,可在env.d.ts文件中添加
declare module "*.vue" {
    import { DefineComponent } from "vue";
    const component: DefineComponent;
    export default component;
  }
二、核心语法
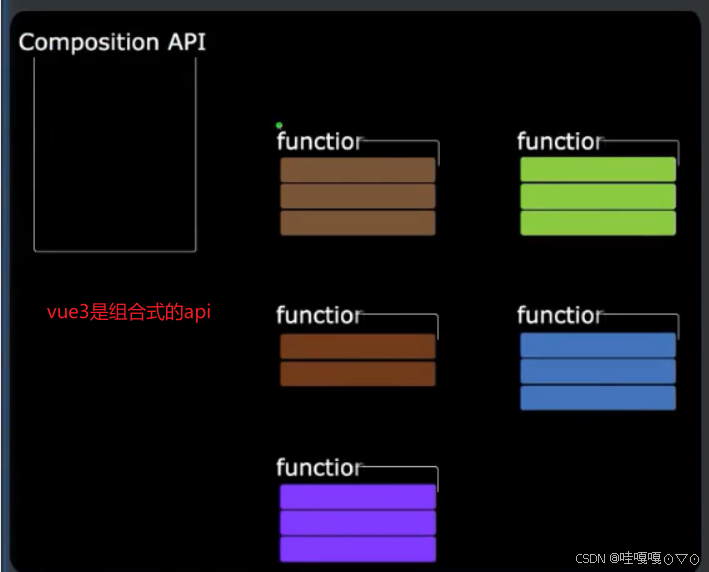
vue3组合式api
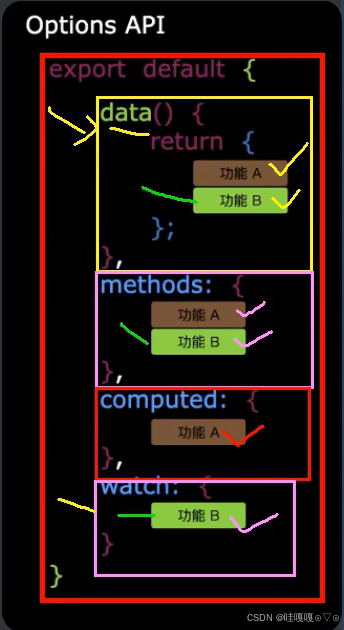
vue2语法是配置式的api
<template>
    <!-- html -->
    <div>
        <h1>你好</h1>
        <Person/>
    </div>
</template>

<script lang="ts">
import Person from './components/Preson.vue'
// JS或TS
export default{
    name:'app',//组件名
    components:{Person}//注册组件
}
</script>

<style>
/* 样式 */
.app{
    background-color: #ddd;
    box-shadow: 0 0 10px;
    border-radius: 10px;
    padding: 20px;
}
</style>
App.vue
<template>
    <div class="person">
      <h2>姓名:{{name}}</h2>
      <h2>年龄:{{age}}</h2>
      <button @click="changeName">修改名字</button>
      <button @click="changeAge">年龄+1</button>
      <button @click="showTel">点我查看联系方式</button>
    </div>
  </template>

  <script lang="ts">
    export default {
      name:'App',
      data() {
        return {
          name:'张三',
          age:18,
          tel:'13888888888'
        }
      },
      methods:{
        changeName(){
          this.name = 'zhang-san'
        },
        changeAge(){
          this.age += 1
        },
        showTel(){
          alert(this.tel)
        }
      },
    }
  </script>

<style scoped>
.person{
    background-color: skyblue;
    box-shadow: 0 0 10px;
    border-radius: 10px;
    padding: 20px;

}
</style>
Person.vue
以上为vue2的编写方式。
<template>
    <div class="person">
      <h2>姓名:{{name}}</h2>
      <h2>年龄:{{age}}</h2>
       <button @click="changeName">修改名字</button>
      <button @click="changeAge">年龄+1</button>
      <button @click="showTel">点我查看联系方式</button>
    </div>
  </template>

  <script lang="ts">
    export default {
      name:'Person',
      setup(){
        //console.log('@@',this)//setup函数中的this是undefined,vue3中已经弱化this了
        //数据,原来是写在Data中的,此时的name,age,tel都不是响应式的数据
        let name ='张三'
        let age = 18
        let tel = '131213'

        //方法
        function changeName(){
          name  = 'zhang-san'//注意:这样修改name,页面是没有变化的
          //但是实际数据是修改了只是因为那么不是响应式的所有页面没有变化
        }
        function changeAge(){
          age += 1
        }
        function showTel(){
          alert(tel)
        }
		//将数据提交,模版才能使用
        return {name,age,changeName,changeAge,showTel}
      }
    }
  </script>

<style scoped>
.person{
    background-color: skyblue;
    box-shadow: 0 0 10px;
    border-radius: 10px;
    padding: 20px;

}
</style>
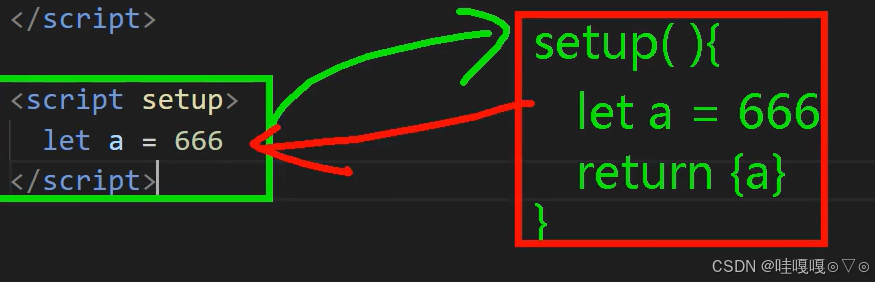
setup语法糖
setup是Vue3中一个新的配置项,值是一个函数,它是 Composition AP组件中所用到的:数据、方法、计算属性、监视…等等,均配置在setup中。
特点如下:
setup函数返回的对象中的内容,可直接在模板中使用。setup中访问this是undefined。setup函数会在beforeCreate之前调用,它是“领先”所有钩子执行的。
setup 与 Options API 的关系
Vue2的配置(data、methos…)中可以访问到setup中的属性、方法。- 但在
setup中不能访问到Vue2的配置(data、methos…)。 - 如果与
Vue2冲突,则setup优先。
<template>
    <div class="person">
       <h2>姓名:{{name}}</h2>
      <h2>年龄:{{age}}</h2>
       <button @click="changeName">修改名字</button>
      <button @click="changeAge">年龄+1</button>
      <button @click="showTel">点我查看联系方式</button>
    </div>
  </template>

  <script lang="ts">
    export default {
      name:'Person',
    }
  </script>
  <script lang="ts" setup>
//console.log('@@',this)//setup函数中的this是undefined
        //数据
        let name ='张三'//注意此时的name不是响应式的
        let age = 18//注意此时的age不是响应式的
        let tel = '131213'//注意此时的tel不是响应式的

        //方法
        function changeName(){
          name  = 'zhang-san'
        }
        function changeAge(){
          age += 1
        }
        function showTel(){
          alert(tel)
        }
</script>

<style scoped>
.person{
    background-color: skyblue;
    box-shadow: 0 0 10px;
    border-radius: 10px;
    padding: 20px;

}
</style>
所以上一个person.vue可更改为这个,语言更精简。
扩展:上述代码,还需要编写一个不写setup的script标签,去指定组件名字,比较麻烦,我们可以借助vite中的插件简化
-
第一步:
npm i vite-plugin-vue-setup-extend -D -
第二步:打开
vite.config.ts添加import { defineConfig } from ‘vite’
import VueSetupExtend from ‘vite-plugin-vue-setup-extend’
export default defineConfig({ plugins: [ VueSetupExtend() ]}) -
第三步:更改原
<script setup lang="ts" name="Person">标签
相应式数据
1、ref 创建:基本类型的响应式数据
- 作用:定义响应式变量。
- 语法:
let xxx = ref(初始值)。 - 返回值:一个
RefImpl的实例对象,简称ref对象或ref,ref对象的value属性是响应式的。 - 注意点:
JS中操作数据需要:xxx.value,但模板中不需要.value,直接使用即可。- 对于
let name = ref('张三')来说,name不是响应式的,name.value是响应式的。
<template>
  <div class="person">
    <h2>姓名:{{name}}</h2>
    <h2>年龄:{{age}}</h2>
    <button @click="changeName">修改名字</button>
    <button @click="changeAge">年龄+1</button>
    <button @click="showTel">点我查看联系方式</button>
  </div>
</template>

<script setup lang="ts" name="Person">
  import {ref} from 'vue'
  // name和age是一个RefImpl的实例对象,简称ref对象,它们的value属性是响应式的。
  let name = ref('张三')
  let age = ref(18)
  // tel就是一个普通的字符串,不是响应式的
  let tel = '13888888888'

  function changeName(){
    // JS中操作ref对象时候需要.value
    name.value = '李四'
    console.log(name.value)

    // 注意:name不是响应式的,name.value是响应式的,所以如下代码并不会引起页面的更新。
    // name = ref('zhang-san')
  }
  function changeAge(){
    // JS中操作ref对象时候需要.value
    age.value += 1
    console.log(age.value)
  }
  function showTel(){
    alert(tel)
  }
</script>
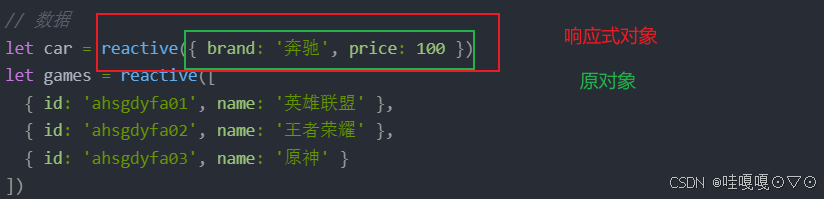
2、reactive 创建:对象类型的响应式数据
- 作用:定义一个响应式对象(基本类型不要用它,要用
ref,否则报错) - 语法:
let 响应式对象= reactive(源对象)。 - 返回值:一个
Proxy的实例对象,简称:响应式对象。 - 注意点:
reactive定义的响应式数据是“深层次”的。
 <template>
  <div class="person">
    <h2>汽车信息:一台{{ car.brand }}汽车,价值{{ car.price }}万</h2>
    <h2>游戏列表:</h2>
    <ul>
      <li v-for="g in games" v-bind:key="g.id">{{ g.name }}</li>
    </ul>
    <h2>测试:{{obj.a.b.c.d}}</h2>
    <button @click="changeCarPrice">修改汽车价格</button>
    <button @click="changeFirstGame">修改第一游戏</button>
    <button @click="test">测试</button>
  </div>
  </template>
  <script lang="ts" setup name="Person">
import { reactive } from 'vue'

// 数据
let car = reactive({ brand: '奔驰', price: 100 })
let games = reactive([
  { id: 'ahsgdyfa01', name: '英雄联盟' },
  { id: 'ahsgdyfa02', name: '王者荣耀' },
  { id: 'ahsgdyfa03', name: '原神' }
])
let obj = reactive({
  a:{
    b:{
      c:{
        d:666
      }
    }
  }
})

function changeCarPrice() {
  car.price += 10
}
function changeFirstGame() {
  games[0].name = '流星蝴蝶剑'
}
function test(){
  obj.a.b.c.d = 999
}
</script>
3、ref 对比 reactive
宏观角度看:
ref用来定义:基本类型数据、对象类型数据;reactive用来定义:对象类型数据。
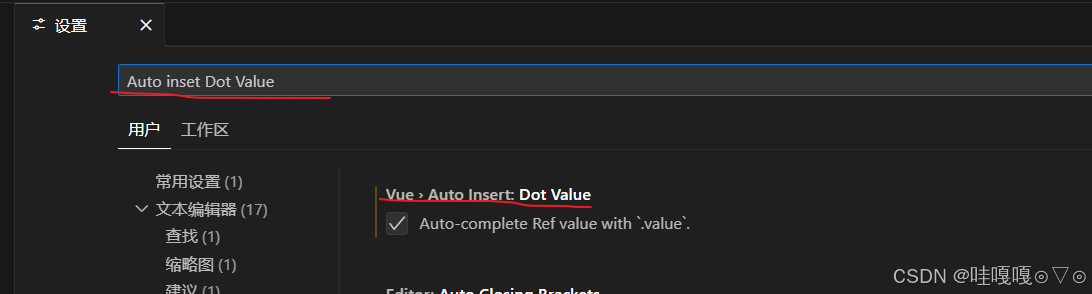
- 区别:
ref创建的变量必须使用.value(可以使用volar插件自动添加.value)。reactive重新分配一个新对象,会失去响应式(可以使用Object.assign去整体替换)。
- 使用原则:
- 若需要一个基本类型的响应式数据,必须使用
ref。- 若需要一个响应式对象,层级不深,
ref、reactive都可以。- 若需要一个响应式对象,且层级较深,推荐使用
reactive。
function changeCar(){
    // car = {brand:'奥拓',price:1} //这么写页面不更新的
    // car = reactive({brand:'奥拓',price:1}) //这么写页面不更新的

    // 下面这个写法页面可以更新
    Object.assign(car,{brand:'奥拓',price:1})
  }
4、toRefs 与 toRef
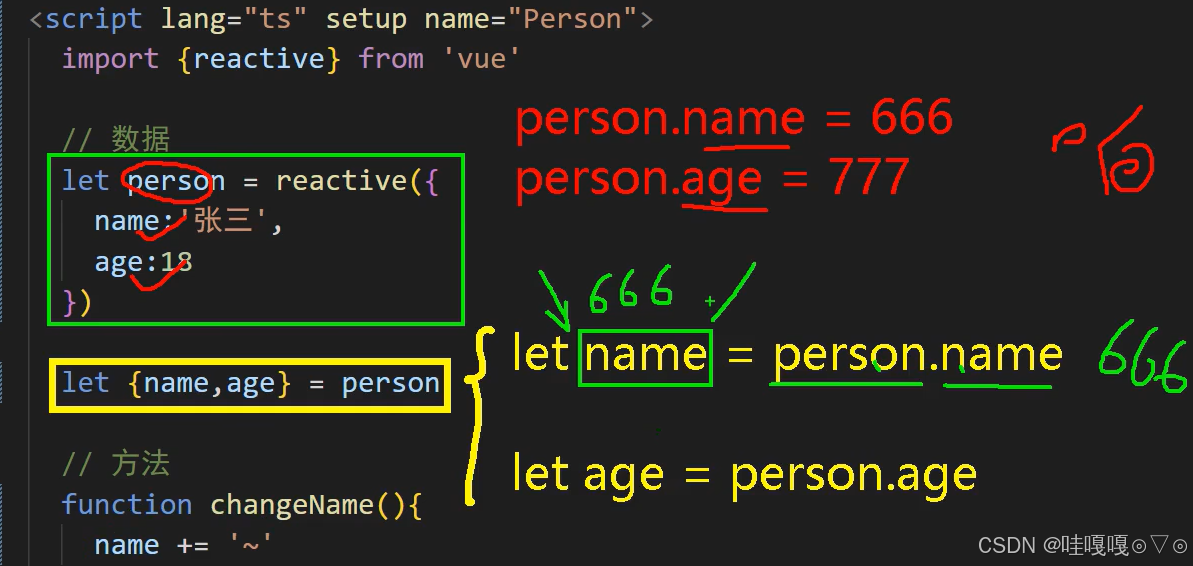
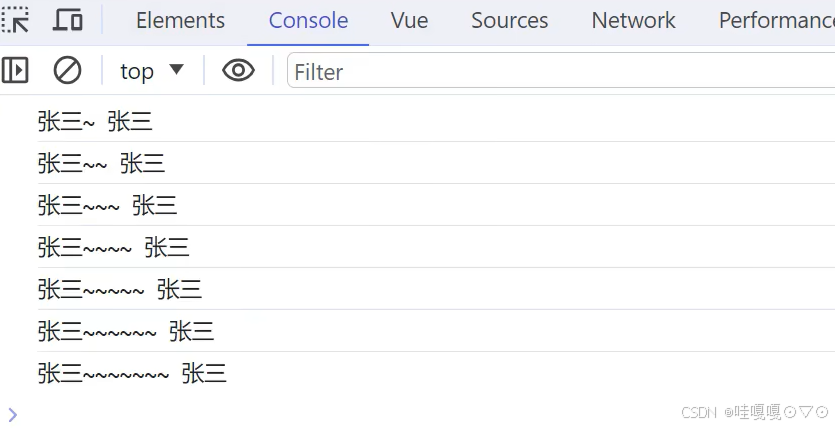
绿色框表示其中的元素name和age都是响应式的启用下面第一个方法可以更改结果并传输到页面上。
黄色框表示先是person读取到元素name和age,已经确定了元素的值,然后再用let去进行更改。启用下面第二个方法,实际元素的值发生改变,但是不会传输到页面上。
function changeName(){
person.name+=‘~’
}
function changeName(){
name+=‘~’
}
运用console打印运行结果

发现name改变,person.name不改变
toRefs 与 toRef
- 作用:将一个响应式对象中的每一个属性,转换为
ref对象。 - 备注:
toRefs与toRef功能一致,但toRefs可以批量转换。 - 语法如下:
<template>
<div class="person">
  <h2>姓名:{{person.name}}</h2>
  <h2>年龄:{{person.age}}</h2>
  <h2>性别:{{person.gender}}</h2>
  <button @click="changeName">修改名字</button>
  <button @click="changeAge">修改年龄</button>
  <button @click="changeGender">修改性别</button>
</div>
</template>
<script lang="ts" setup name="Person">
  import {ref,reactive,toRefs,toRef} from 'vue'

  // 数据
  let person = reactive({name:'张三', age:18, gender:'男'})

  // 通过toRefs将person对象中的n个属性批量取出,且依然保持响应式的能力
  let {name,gender} =  toRefs(person)

  // 通过toRef将person对象中的gender属性取出,且依然保持响应式的能力
  let age = toRef(person,'age')

  // 方法
  function changeName(){
    name.value += '~'
  }
  function changeAge(){
    age.value += 1
  }
  function changeGender(){
    gender.value = '女'
  }
</script>
5、computed
作用:根据已有数据计算出新数据(和Vue2中的computed作用一致)。
<img src="images/computed.gif" style="zoom:20%;" />
   <template>
      <div class="person">
        姓:<input type="text" v-model="firstName"> <br>
        名:<input type="text" v-model="lastName"> <br>
        全名:<span>{{fullName}}</span> <br>
        <button @click="changeFullName">全名改为:li-si</button>
      </div>
    </template>

    <script setup lang="ts" name="App">
      import {ref,computed} from 'vue'

      let firstName = ref('zhang')
      let lastName = ref('san')

      // 计算属性——只读取,不修改
      /* let fullName = computed(()=>{
        return firstName.value + '-' + lastName.value
      }) */


      // 计算属性——既读取又修改
      let fullName = computed({
        // 读取
        get(){
          return firstName.value + '-' + lastName.value
        },
        // 修改
        set(val){
          console.log('有人修改了fullName',val)
          firstName.value = val.split('-')[0]
          lastName.value = val.split('-')[1]
        }
      })

      function changeFullName(){
        fullName.value = 'li-si'
      }
    </script>
监视
-
作用:监视数据的变化(和
Vue2中的watch作用一致) -
特点:
Vue3中的watch只能监视以下四种数据:ref定义的数据。reactive定义的数据。- 函数返回一个值(
getter函数)。 - 一个包含上述内容的数组。
1、监视
ref定义的【基本类型】数据:直接写数据名即可,监视的是其value值的改变。
  <template>
  <div class="person">
    <h1>情况一:监视【ref】定义的【基本类型】数据</h1>
    <h2>当前求和为:{{sum}}</h2>
    <button @click="changeSum">点我sum+1</button>
  </div>
</template>

<script lang="ts" setup name="Person">
  import {ref,watch} from 'vue'
  // 数据
  let sum = ref(0)
  // 方法
  function changeSum(){
    sum.value += 1
  }
  // 监视,情况一:监视【ref】定义的【基本类型】数据
  const stopWatch = watch(sum,(newValue,oldValue)=>{
    console.log('sum变化了',newValue,oldValue)
    if(newValue >= 10){
      stopWatch()
    }
  })
</script>
2、监视ref定义的【对象类型】数据:直接写数据名,监视的是对象的【地址值】,若想监视对象内部的数据,要手动开启深度监视。
-
若修改的是
ref定义的对象中的属性,newValue和oldValue都是新值,因为它们是同一个对象。 -
若修改整个
ref定义的对象,newValue是新值,oldValue是旧值,因为不是同一个对象了。
<template>
  <div class="person">
    <h1>情况二:监视【ref】定义的【对象类型】数据</h1>
    <h2>姓名:{{ person.name }}</h2>
    <h2>年龄:{{ person.age }}</h2>
    <button @click="changeName">修改名字</button>
    <button @click="changeAge">修改年龄</button>
    <button @click="changePerson">修改整个人</button>
  </div>
</template>

<script lang="ts" setup name="Person">
  import {ref,watch} from 'vue'
  // 数据
  let person = ref({
    name:'张三',
    age:18
  })
  // 方法
  function changeName(){
    person.value.name += '~'
  }
  function changeAge(){
    person.value.age += 1
  }
  function changePerson(){
    person.value = {name:'李四',age:90}
  }
  /*
    监视,情况一:监视【ref】定义的【对象类型】数据,监视的是对象的地址值,若想监视对象内部属性的变化,需要手动开启深度监视
    watch的第一个参数是:被监视的数据
    watch的第二个参数是:监视的回调
    watch的第三个参数是:配置对象(deep、immediate等等.....)
  */
  watch(person,(newValue,oldValue)=>{
    console.log('person变化了',newValue,oldValue)
  },{deep:true})

</script>
3、监视reactive定义的【对象类型】数据,且默认开启了深度监视。
<template>
  <div class="person">
    <h1>情况三:监视【reactive】定义的【对象类型】数据</h1>
    <h2>姓名:{{ person.name }}</h2>
    <h2>年龄:{{ person.age }}</h2>
    <button @click="changeName">修改名字</button>
    <button @click="changeAge">修改年龄</button>
    <button @click="changePerson">修改整个人</button>
    <hr>
    <h2>测试:{{obj.a.b.c}}</h2>
    <button @click="test">修改obj.a.b.c</button>
  </div>
</template>

<script lang="ts" setup name="Person">
  import {reactive,watch} from 'vue'
  // 数据
  let person = reactive({
    name:'张三',
    age:18
  })
  let obj = reactive({
    a:{
      b:{
        c:666
      }
    }
  })
  // 方法
  function changeName(){
    person.name += '~'
  }
  function changeAge(){
    person.age += 1
  }
  function changePerson(){
    Object.assign(person,{name:'李四',age:80})
  }
  function test(){
    obj.a.b.c = 888
  }

  // 监视,情况三:监视【reactive】定义的【对象类型】数据,且默认是开启深度监视的
  watch(person,(newValue,oldValue)=>{
    console.log('person变化了',newValue,oldValue)
  })
  watch(obj,(newValue,oldValue)=>{
    console.log('Obj变化了',newValue,oldValue)
  })
</script>
4、监视ref或reactive定义的【对象类型】数据中的某个属性,注意点如下:
- 若该属性值不是【对象类型】,需要写成函数形式。
- 若该属性值是依然是【对象类型】,可直接编,也可写成函数,建议写成函数。
结论:监视的要是对象里的属性,那么最好写函数式,注意点:若是对象监视的是地址值,需要关注对象内部,需要手动开启深度监视。
<template>
  <div class="person">
    <h1>情况四:监视【ref】或【reactive】定义的【对象类型】数据中的某个属性</h1>
    <h2>姓名:{{ person.name }}</h2>
    <h2>年龄:{{ person.age }}</h2>
    <h2>汽车:{{ person.car.c1 }}、{{ person.car.c2 }}</h2>
    <button @click="changeName">修改名字</button>
    <button @click="changeAge">修改年龄</button>
    <button @click="changeC1">修改第一台车</button>
    <button @click="changeC2">修改第二台车</button>
    <button @click="changeCar">修改整个车</button>
  </div>
</template>

<script lang="ts" setup name="Person">
  import {reactive,watch} from 'vue'

  // 数据
  let person = reactive({
    name:'张三',
    age:18,
    car:{
      c1:'奔驰',
      c2:'宝马'
    }
  })
  // 方法
  function changeName(){
    person.name += '~'
  }
  function changeAge(){
    person.age += 1
  }
  function changeC1(){
    person.car.c1 = '奥迪'
  }
  function changeC2(){
    person.car.c2 = '大众'
  }
  function changeCar(){
    person.car = {c1:'雅迪',c2:'爱玛'}
  }

  // 监视,情况四:监视响应式对象中的某个属性,且该属性是基本类型的,要写成函数式
  /* watch(()=> person.name,(newValue,oldValue)=>{
    console.log('person.name变化了',newValue,oldValue)
  }) */

  // 监视,情况四:监视响应式对象中的某个属性,且该属性是对象类型的,可以直接写,也能写函数,更推荐写函数
  watch(()=>person.car,(newValue,oldValue)=>{
    console.log('person.car变化了',newValue,oldValue)
  },{deep:true})
</script>
5、监视上述的多个数据
<template>
  <div class="person">
    <h1>情况五:监视上述的多个数据</h1>
    <h2>姓名:{{ person.name }}</h2>
    <h2>年龄:{{ person.age }}</h2>
    <h2>汽车:{{ person.car.c1 }}、{{ person.car.c2 }}</h2>
    <button @click="changeName">修改名字</button>
    <button @click="changeAge">修改年龄</button>
    <button @click="changeC1">修改第一台车</button>
    <button @click="changeC2">修改第二台车</button>
    <button @click="changeCar">修改整个车</button>
  </div>
</template>

<script lang="ts" setup name="Person">
  import {reactive,watch} from 'vue'

  // 数据
  let person = reactive({
    name:'张三',
    age:18,
    car:{
      c1:'奔驰',
      c2:'宝马'
    }
  })
  // 方法
  function changeName(){
    person.name += '~'
  }
  function changeAge(){
    person.age += 1
  }
  function changeC1(){
    person.car.c1 = '奥迪'
  }
  function changeC2(){
    person.car.c2 = '大众'
  }
  function changeCar(){
    person.car = {c1:'雅迪',c2:'爱玛'}
  }

  // 监视,情况五:监视上述的多个数据
  watch([()=>person.name,person.car],(newValue,oldValue)=>{
    console.log('person.car变化了',newValue,oldValue)
  },{deep:true})

</script>
6、watchEffect
立即运行一个函数,同时响应式地追踪其依赖,并在依赖更改时重新执行该函数。
watch对比watchEffect`
都能监听响应式数据的变化,不同的是监听数据变化的方式不同
watch:要明确指出监视的数据
watchEffect:不用明确指出监视的数据(函数中用到哪些属性,那就监视哪些属性)。
<template>
  <div class="person">
    <h1>需求:水温达到50℃,或水位达到20cm,则联系服务器</h1>
    <h2 id="demo">水温:{{temp}}</h2>
    <h2>水位:{{height}}</h2>
    <button @click="changePrice">水温+1</button>
    <button @click="changeSum">水位+10</button>
  </div>
</template>

<script lang="ts" setup name="Person">
  import {ref,watch,watchEffect} from 'vue'
  // 数据
  let temp = ref(0)
  let height = ref(0)

  // 方法
  function changePrice(){
    temp.value += 10
  }
  function changeSum(){
    height.value += 1
  }

  // 用watch实现,需要明确的指出要监视:temp、height
  watch([temp,height],(value)=>{
    // 从value中获取最新的temp值、height值
    const [newTemp,newHeight] = value
    // 室温达到50℃,或水位达到20cm,立刻联系服务器
    if(newTemp >= 50 || newHeight >= 20){
      console.log('联系服务器')
    }
  })

  // 用watchEffect实现,不用
  const stopWtach = watchEffect(()=>{
    // 室温达到50℃,或水位达到20cm,立刻联系服务器
    if(temp.value >= 50 || height.value >= 20){
      console.log(document.getElementById('demo')?.innerText)
      console.log('联系服务器')
    }
    // 水温达到100,或水位达到50,取消监视
    if(temp.value === 100 || height.value === 50){
      console.log('清理了')
      stopWtach()
    }
  })
</script>
标签的 ref 属性
作用:用于注册模板引用。
用在普通
DOM标签上,获取的是DOM节点。用在组件标签上,获取的是组件实例对象。
用在普通DOM标签上:
<template>
  <div class="person">
    <h1 ref="title1">尚硅谷</h1>
    <h2 ref="title2">前端</h2>
    <h3 ref="title3">Vue</h3>
    <input type="text" ref="inpt"> <br><br>
    <button @click="showLog">点我打印内容</button>
  </div>
</template>

<script lang="ts" setup name="Person">
  import {ref} from 'vue'

  let title1 = ref()
  let title2 = ref()
  let title3 = ref()

  function showLog(){
    // 通过id获取元素
    const t1 = document.getElementById('title1')
    // 打印内容
    console.log((t1 as HTMLElement).innerText)
    console.log((<HTMLElement>t1).innerText)
    console.log(t1?.innerText)

        /************************************/

    // 通过ref获取元素
    console.log(title1.value)
    console.log(title2.value)
    console.log(title3.value)
  }
</script>
用在组件标签上:
  <!-- 父组件App.vue -->
    <template>
      <Person ref="ren"/>
      <button @click="test">测试</button>
    </template>

    <script lang="ts" setup name="App">
      import Person from './components/Person.vue'
      import {ref} from 'vue'

      let ren = ref()

      function test(){
        console.log(ren.value.name)
        console.log(ren.value.age)
      }
    </script>


    <!-- 子组件Person.vue中要使用defineExpose暴露内容 -->
    <script lang="ts" setup name="Person">
      import {ref,defineExpose} from 'vue'
        // 数据
      let name = ref('张三')
      let age = ref(18)
      /****************************/
      /****************************/
      // 使用defineExpose将组件中的数据交给外部
      defineExpose({name,age})
    </script>
props
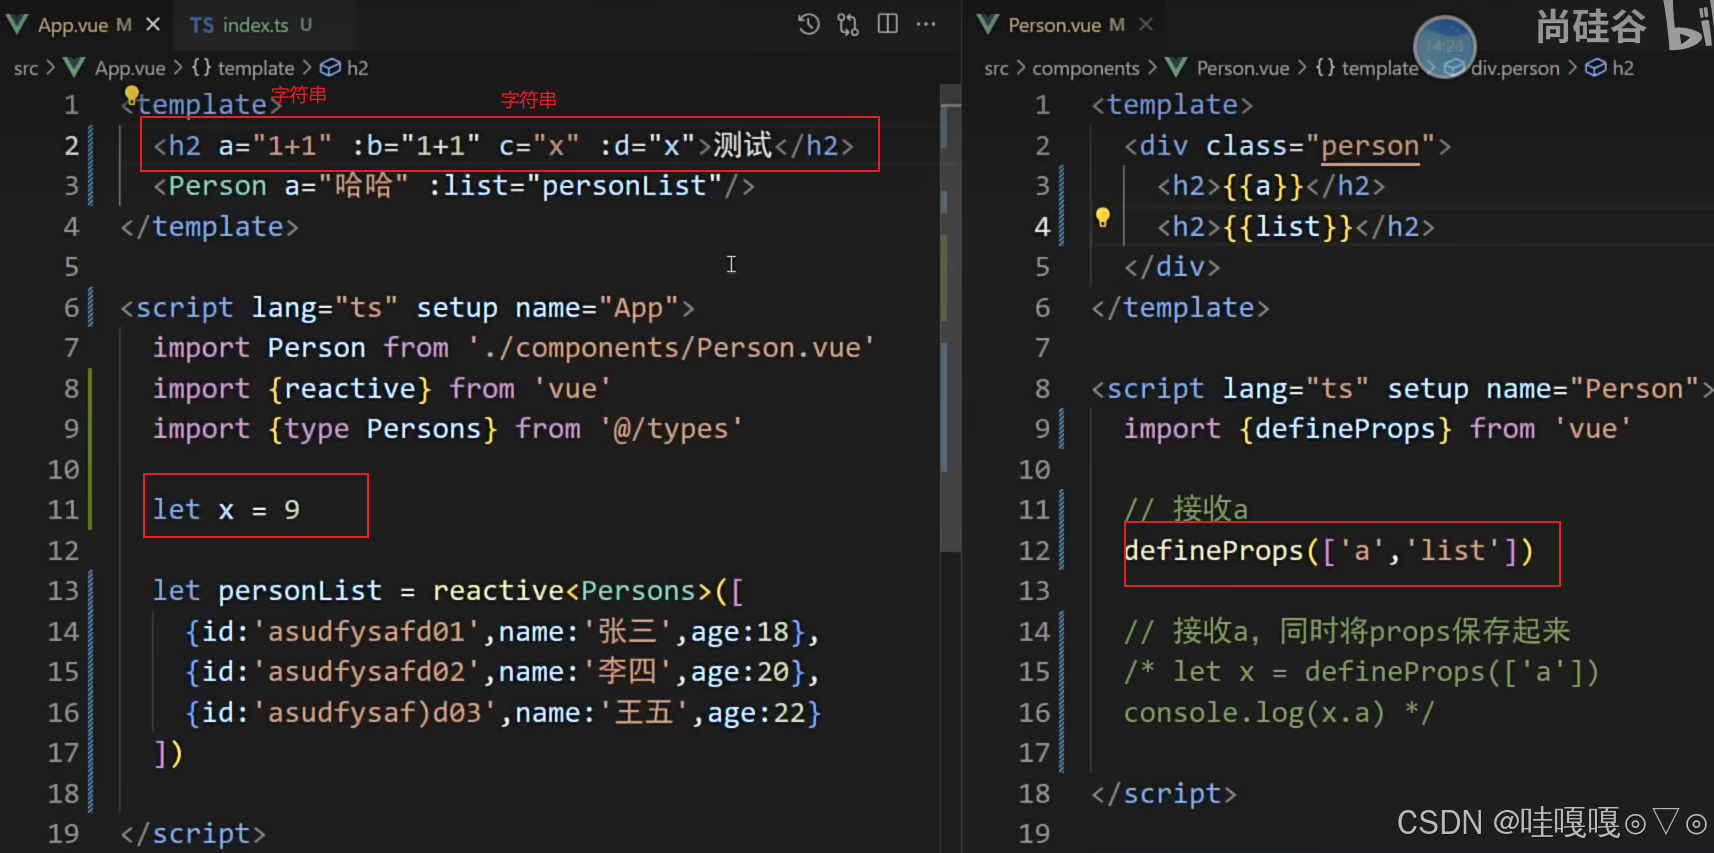

// 定义一个接口,限制每个Person对象的格式
export interface PersonInter {
 id:string,
 name:string,
    age:number
   }

// 定义一个自定义类型Persons
export type Persons = Array<PersonInter>
App.vue中代码:
<template>
    <Person :list="persons"/>
</template>

<script lang="ts" setup name="App">
  import Person from './components/Person.vue'
  import {reactive} from 'vue'
    import {type Persons} from './types'

    let persons = reactive<Persons>([
     {id:'e98219e12',name:'张三',age:18},
      {id:'e98219e13',name:'李四',age:19},
       {id:'e98219e14',name:'王五',age:20}
     ])
   </script>
Person.vue中代码:
<template>
<div class="person">
 <ul>
     <li v-for="item in list" :key="item.id">
        {{item.name}}--{{item.age}}
      </li>
    </ul>
   </div>
   </template>

<script lang="ts" setup name="Person">
import {defineProps} from 'vue'
import {type PersonInter} from '@/types'

  // 第一种写法:仅接收
// const props = defineProps(['list'])

  // 第二种写法:接收+限制类型
// defineProps<{list:Persons}>()

  // 第三种写法:接收+限制类型+指定默认值+限制必要性
let props = withDefaults(defineProps<{list?:Persons}>(),{
     list:()=>[{id:'asdasg01',name:'小猪佩奇',age:18}]
  })
   console.log(props)
  </script>
生命周期
-
概念:
Vue组件实例在创建时要经历一系列的初始化步骤,在此过程中Vue会在合适的时机,调用特定的函数,从而让开发者有机会在特定阶段运行自己的代码,这些特定的函数统称为:生命周期钩子 -
规律:
生命周期整体分为四个阶段,分别是:创建、挂载、更新、销毁,每个阶段都有两个钩子,一前一后。
-
Vue2的生命周期创建阶段:
beforeCreate、created
挂载阶段:beforeMount、mounted
更新阶段:beforeUpdate、updated
销毁阶段:beforeDestroy、destroyed -
Vue3的生命周期创建阶段:
setup
挂载阶段:onBeforeMount、onMounted
更新阶段:onBeforeUpdate、onUpdated
卸载阶段:onBeforeUnmount、onUnmounted -
常用的钩子:
onMounted(挂载完毕)、onUpdated(更新完毕)、onBeforeUnmount(卸载之前) -
示例代码:
<template>
    <div class="person">
      <h2>当前求和为:{{ sum }}</h2>
      <button @click="changeSum">点我sum+1</button>
    </div>
  </template>

  <!-- vue3写法 -->
  <script lang="ts" setup name="Person">
    import {
      ref,
      onBeforeMount,
      onMounted,
      onBeforeUpdate,
      onUpdated,
      onBeforeUnmount,
      onUnmounted
    } from 'vue'

    // 数据
    let sum = ref(0)
    // 方法
    function changeSum() {
      sum.value += 1
    }
    console.log('setup')
    // 生命周期钩子
    onBeforeMount(()=>{
      console.log('挂载之前')
    })
    onMounted(()=>{
      console.log('挂载完毕')
    })
    onBeforeUpdate(()=>{
      console.log('更新之前')
    })
    onUpdated(()=>{
      console.log('更新完毕')
    })
    onBeforeUnmount(()=>{
      console.log('卸载之前')
    })
    onUnmounted(()=>{
      console.log('卸载完毕')
    })
  </script>
自定义hook
-
什么是
hook?—— 本质是一个函数,把setup函数中使用的Composition API进行了封装,类似于vue2.x中的mixin。 -
自定义
hook的优势:复用代码, 让setup中的逻辑更清楚易懂。
示例代码:
useSum.ts中内容如下:
import {ref,onMounted} from 'vue'

  export default function(){
    let sum = ref(0)

    const increment = ()=>{
      sum.value += 1
    }
    const decrement = ()=>{
      sum.value -= 1
    }
    onMounted(()=>{
      increment()
    })

    //向外部暴露数据
    return {sum,increment,decrement}
  }
useDog.ts中内容如下:
import {reactive,onMounted} from 'vue'
  import axios,{AxiosError} from 'axios'

  export default function(){
    let dogList = reactive<string[]>([])

    // 方法
    async function getDog(){
      try {
        // 发请求
        let {data} = await axios.get('https://dog.ceo/api/breed/pembroke/images/random')
        // 维护数据
        dogList.push(data.message)
      } catch (error) {
        // 处理错误
        const err = <AxiosError>error
        console.log(err.message)
      }
    }

    // 挂载钩子
    onMounted(()=>{
      getDog()
    })

    //向外部暴露数据
    return {dogList,getDog}
  }
- 组件中具体使用:
<template>
    <h2>当前求和为:{{sum}}</h2>
    <button @click="increment">点我+1</button>
    <button @click="decrement">点我-1</button>
    <hr>
    <img v-for="(u,index) in dogList.urlList" :key="index" :src="(u as string)">
    <span v-show="dogList.isLoading">加载中......</span><br>
    <button @click="getDog">再来一只狗</button>
  </template>

  <script lang="ts">
    import {defineComponent} from 'vue'

    export default defineComponent({
      name:'App',
    })
  </script>

  <script setup lang="ts">
    import useSum from './hooks/useSum'
    import useDog from './hooks/useDog'

    let {sum,increment,decrement} = useSum()
    let {dogList,getDog} = useDog()
  </script>
三、路由
1、基本切换效果
需要在终端中下载
npm i vue-router
- 路由配置文件代码如下:
index.ts代码如下:
//创建路由器并暴露出去
//第一步引入createRouter
import {createRouter,createWebHistory} from 'vue-router'
//引入要呈现的组件
  import Home from '@/pages/Home.vue'
  import News from '@/pages/News.vue'
  import About from '@/pages/About.vue'

  //第二步创建路由器
  const router = createRouter({
      history:createWebHistory(),//路由器的工作模式
      routes:[//路由规则
          {
              path:'/home',
              component:Home
          },
          {
              path:'/news',
              component:News
          },
          {
              path:'/about',
              component:About
          }

      ]
  })
  //暴露router
  export default router
main.ts代码如下:
//引入路由器
import router from './router/index'
//创建一个应用
const app = createApp(App)
//使用路由器
  app.use(router)
  //挂载整个应用到app容器中
  app.mount('#app')
App.vue代码如下
<template>
    <div class="app">
      <h2 class="title">Vue路由测试</h2>
      <!-- 导航区 -->
      <div class="navigate">
        <RouterLink to="/home" active-class="active">首页</RouterLink>
        <RouterLink to="/news" active-class="active">新闻</RouterLink>
        <RouterLink to="/about" active-class="active">关于</RouterLink>
      </div>
      <!-- 展示区 -->
      <div class="main-content">
        <RouterView></RouterView>
      </div>
    </div>
  </template>

  <script lang="ts" setup name="App">
    import {RouterLink,RouterView} from 'vue-router'
  </script>
两个注意点
-
路由组件通常存放在
pages或views文件夹,一般组件通常存放在components文件夹。 -
通过点击导航,视觉效果上“消失” 了的路由组件,默认是被卸载掉的,需要的时候再去挂载。
路由工作模式
-
history模式优点:
URL更加美观,不带有#,更接近传统的网站URL。
缺点:后期项目上线,需要服务端配合处理路径问题,否则刷新会有404错误。const router = createRouter({ history:createWebHistory(), //history模式 /******/ }) -
hash模式优点:兼容性更好,因为不需要服务器端处理路径。
缺点:URL带有#不太美观,且在SEO优化方面相对较差。const router = createRouter({ history:createWebHashHistory(), //hash模式 /******/ })to的两种写法
   <!-- 第一种:to的字符串写法 -->
<router-link active-class="active" to="/home">主页</router-link>

<!-- 第二种:to的对象写法 -->
<router-link active-class="active" :to="{path:'/home'}">Home</router-link>
命名以及嵌套路由
作用:可以简化路由跳转及传参
给路由规则命名:
    routes:[
      {
        name:'zhuye',
        path:'/home',
        component:Home
      },
      {
        name:'xinwen',
        path:'/news',
        component:News,
      },
      {
        name:'guanyu',
        path:'/about',
        component:About
      }
    ]
跳转路由:
<!--简化前:需要写完整的路径(to的字符串写法) -->
<router-link to="/news/detail">跳转</router-link>

<!--简化后:直接通过名字跳转(to的对象写法配合name属性) -->
<router-link :to="{name:'guanyu'}">跳转</router-link>
嵌套路由
-
编写
News的子路由:Detail.vue -
配置路由规则,使用
children配置项:
index.ts中
 const router = createRouter({
    history:createWebHistory(),
      routes:[
          {
              name:'zhuye',
              path:'/home',
              component:Home
          },
          {
              name:'xinwen',
              path:'/news',
              component:News,
              children:[//子级路由
                  {
                      name:'xiang',
                      path:'detail',
                      component:Detail
                  }
              ]
          },
          {
              name:'guanyu',
              path:'/about',
              component:About
          }
      ]
  })
  export default router
- 跳转路由(记得要加完整路径):
  <router-link to="/news/detail">xxxx</router-link>
  <!-- 或 -->
  <router-link :to="{path:'/news/detail'}">xxxx</router-link>
- 记得去
Home组件中预留一个<router-view>
  <template>
    <div class="news">
      <nav class="news-list">
        <RouterLink v-for="news in newsList" :key="news.id" :to="{path:'/news/detail'}">
          {{news.name}}
        </RouterLink>
      </nav>
      <div class="news-detail">
        <RouterView/>
      </div>
    </div>
  </template>
路由传参
query参数
- 传递参数
  <!-- 跳转并携带query参数(to的字符串写法) -->
  <router-link to="/news/detail?a=1&b=2&content=欢迎你">
      跳转
  </router-link>

  <!-- 跳转并携带query参数(to的对象写法) -->
  <RouterLink
    :to="{
      //name:'xiang', //用name也可以跳转
      path:'/news/detail',
      query:{
        id:news.id,
        title:news.title,
        content:news.content
      }
    }"
  >
    {{news.title}}
  </RouterLink>
- 接收参数:
import {useRoute} from 'vue-router'
  const route = useRoute()
  // 打印query参数
  console.log(route.query)
params参数
- 传递参数
   <!-- 跳转并携带params参数(to的字符串写法) -->
      <RouterLink :to="`/news/detail/${news.id}/${news.title}/${news.content}`">{{news.title}}</RouterLink>

      <!-- 跳转并携带params参数(to的对象写法) -->
      <RouterLink
        :to="{
          name:'xiang', //用name跳转
          params:{
            id:news.id,
            title:news.title,
            content:news.title
          }
        }"
      >
        {{news.title}}
      </RouterLink>
- 接收参数:
 import {useRoute} from 'vue-router'
  const route = useRoute()
  // 打印params参数
  console.log(route.params)
备注1:传递
params参数时,若使用to的对象写法,必须使用name配置项,不能用path。备注2:传递
params参数时,需要提前在规则中占位
路由的props配置
作用:让路由组件更方便的收到参数(可以将路由参数作为props传给组件)
  {
        name:'xiang',
        path:'detail/:id/:title/:content',
        component:Detail,

      // props的对象写法,作用:把对象中的每一组key-value作为props传给Detail组件
      // props:{a:1,b:2,c:3},

      // props的布尔值写法,作用:把收到了每一组params参数,作为props传给Detail组件
      // props:true

      // props的函数写法,作用:把返回的对象中每一组key-value作为props传给Detail组件
      props(route){
        return route.query
      }
    }
<template>
  <ul class="news-list">
    <li>编号:{{id}}</li>
    <li>标题:{{title}}</li>
    <li>内容:{{content}}</li>
  </ul>
</template>

<script setup lang="ts" name="About">
  defineProps(['id','title','content'])
</script>
replace属性
-
作用:控制路由跳转时操作浏览器历史记录的模式。
-
浏览器的历史记录有两种写入方式:分别为
push和replace:push是追加历史记录(默认值)。replace是替换当前记录。
-
开启
replace模式:<RouterLink replace .......>News</RouterLink>
编程式导航
路由组件的两个重要的属性:$route和$router变成了两个hooks
import {useRoute,useRouter} from 'vue-router'

const route = useRoute()
const router = useRouter()

console.log(route.query)
console.log(route.parmas)
console.log(router.push)
console.log(router.replace)
<template>
  <div class="news">
    <!-- 导航区 -->
    <ul>
      <li v-for="news in newsList" :key="news.id">
        <button @click="showNewsDetail(news)">查看新闻</button>
        <RouterLink
          :to="{
            name:'xiang',
            query:{
              id:news.id,
              title:news.title,
              content:news.content
            }
          }"
        >
          {{news.title}}
        </RouterLink>
      </li>
    </ul>
    <!-- 展示区 -->
    <div class="news-content">
      <RouterView></RouterView>
    </div>
  </div>
</template>

<script setup lang="ts" name="News">
  import {reactive} from 'vue'
  import {RouterView,RouterLink,useRouter} from 'vue-router'

  const newsList = reactive([
    {id:'asfdtrfay01',title:'很好的抗癌食物',content:'西蓝花'},
    {id:'asfdtrfay02',title:'如何一夜暴富',content:'学IT'},
    {id:'asfdtrfay03',title:'震惊,万万没想到',content:'明天是周一'},
    {id:'asfdtrfay04',title:'好消息!好消息!',content:'快过年了'}
  ])

  const router = useRouter()

  interface NewsInter {
    id:string,
    title:string,
    content:string
  }

  function showNewsDetail(news:NewsInter){
    router.replace({
      name:'xiang',
      query:{
        id:news.id,
        title:news.title,
        content:news.content
      }
    })
  }

</script>
重定向
-
作用:将特定的路径,重新定向到已有路由。
-
具体编码:
{
    path:'/',
    redirect:'/home'
}
四、pinia
<template>
  <div class="count">
    <h2>当前求和为:{{ sum }}</h2>
    <select v-model.number="n">
      <option value="1">1</option>
      <option value="2">2</option>
      <option value="3">3</option>
    </select>
    <button @click="add">加</button>
    <button @click="minus">减</button>
  </div>
</template>

<script setup lang="ts" name="Count">
  import { ref } from "vue";
  // 数据
  let sum = ref(1) // 当前求和
  let n = ref(1) // 用户选择的数字

  // 方法
  function add(){
    sum.value += n.value
  }
  function minus(){
    sum.value -= n.value
  }
</script>

<style scoped>
  .count {
    background-color: skyblue;
    padding: 10px;
    border-radius: 10px;
    box-shadow: 0 0 10px;
  }
  select,button {
    margin: 0 5px;
    height: 25px;
  }
</style>
<template>
  <div class="talk">
    <button @click="getLoveTalk">获取一句土味情话</button>
    <ul>
      <li v-for="talk in talkList" :key="talk.id">{{talk.title}}</li>
    </ul>
  </div>
</template>

<script setup lang="ts" name="LoveTalk">
  import {reactive} from 'vue'
  import axios from "axios";
  import {nanoid} from 'nanoid'
  // 数据
  let talkList = reactive([
    {id:'ftrfasdf01',title:'今天你有点怪,哪里怪?怪好看的!'},
    {id:'ftrfasdf02',title:'草莓、蓝莓、蔓越莓,今天想我了没?'},
    {id:'ftrfasdf03',title:'心里给你留了一块地,我的死心塌地'}
  ])
  // 方法
  async function getLoveTalk(){
    // 发请求,下面这行的写法是:连续解构赋值+重命名
    let {data:{content:title}} = await axios.get('https://api.uomg.com/api/rand.qinghua?format=json')
    // 把请求回来的字符串,包装成一个对象
    let obj = {id:nanoid(),title}
    // 放到数组中
    talkList.unshift(obj)
  }
</script>

<style scoped>
  .talk {
    background-color: orange;
    padding: 10px;
    border-radius: 10px;
    box-shadow: 0 0 10px;
  }
</style>
1、搭建 pinia 环境
第一步:npm install pinia
第二步:操作src/main.ts
 import { createApp } from 'vue'
    import App from './App.vue'

    /* 引入createPinia,用于创建pinia */
    import { createPinia } from 'pinia'

    /* 创建pinia */
    const pinia = createPinia()
    const app = createApp(App)

    /* 使用插件 */{}
    app.use(pinia)
    app.mount('#app')
此时开发者工具中已经有了pinia选项

2、存储+读取数据
-
Store`是一个保存:状态、业务逻辑 的实体,每个组件都可以读取、写入它。
-
它有三个概念:
state、getter、action,相当于组件中的:data、computed和methods。 -
具体编码:
src/store/count.ts
// 引入defineStore用于创建store
  import {defineStore} from 'pinia'

  // 定义并暴露一个store
  export const useCountStore = defineStore('count',{
    // 动作
    actions:{},
    // 状态,真正存储数据的地方
    state(){
      return {
        sum:6
      }
    },
    // 计算
    getters:{}
  })
- 具体编码:
src/store/talk.ts
  // 引入defineStore用于创建store
  import {defineStore} from 'pinia'

  // 定义并暴露一个store
  export const useTalkStore = defineStore('talk',{
    // 动作
    actions:{},
    // 状态
    state(){
      return {
        talkList:[
          {id:'yuysada01',content:'你今天有点怪,哪里怪?怪好看的!'},
               {id:'yuysada02',content:'草莓、蓝莓、蔓越莓,你想我了没?'},
          {id:'yuysada03',content:'心里给你留了一块地,我的死心塌地'}
        ]
      }
    },
    // 计算
    getters:{}
  })
- 组件中使用
state中的数据
 <template>
    <h2>当前求和为:{{ sumStore.sum }}</h2>
  </template>

  <script setup lang="ts" name="Count">
    // 引入对应的useXxxxxStore
    import {useSumStore} from '@/store/sum'

    // 调用useXxxxxStore得到对应的store
    const sumStore = useSumStore()
  </script>

  <template>
      <ul>
      <li v-for="talk in talkStore.talkList" :key="talk.id">
        {{ talk.content }}
      </li>
    </ul>
  </template>

  <script setup lang="ts" name="Count">
    import axios from 'axios'
    import {useTalkStore} from '@/store/talk'

    const talkStore = useTalkStore()
  </script>
3、修改数据
-
第一种修改方式,直接修改
countStore.sum = 666 -
第二种修改方式:批量修改
countStore.$patch({ sum:999, school:'atguigu' }) -
第三种修改方式:借助
action修改(action中可以编写一些业务逻辑)import { defineStore } from 'pinia' export const useCountStore = defineStore('count', { //actions里面放置的是方法,用于相应组件中的‘动作’ actions: { //加 increment(value:number) { if (this.sum < 10) { //操作countStore中的sum this.sum += value } }, //减 decrement(value:number){ if(this.sum > 1){ this.sum -= value } } }, /*************/ }) -
组件中调用
action即可// 使用countStore const countStore = useCountStore() // 调用对应action countStore.incrementOdd(n.value)
pinia 里常见API
1、storeToRefs
- 借助
storeToRefs将store中的数据转为ref对象,方便在模板中使用。 - 注意:
pinia提供的storeToRefs只会将数据做转换,而Vue的toRefs会转换store中数据。
 <template>
        <div class="count">
            <h2>当前求和为:{{sum}}</h2>
        </div>
    </template>

    <script setup lang="ts" name="Count">
      import { useCountStore } from '@/store/count'
      /* 引入storeToRefs */
      import { storeToRefs } from 'pinia'

        /* 得到countStore */
      const countStore = useCountStore()
      /* 使用storeToRefs转换countStore,随后解构 */
      const {sum} = storeToRefs(countStore)
    </script>
2、getters
-
概念:当
state中的数据,需要经过处理后再使用时,可以使用getters配置。 -
追加
getters配置。
// 引入defineStore用于创建store
  import {defineStore} from 'pinia'

  // 定义并暴露一个store
  export const useCountStore = defineStore('count',{
    // 动作
    actions:{
      /************/
    },
    // 状态
    state(){
      return {
        sum:1,
        school:'atguigu'
      }
    },
    // 计算
    getters:{
      bigSum:(state):number => state.sum *10,
      upperSchool():string{
        return this. school.toUpperCase()
      }
    }
  })
-
组件中读取数据:
const {increment,decrement} = countStore
let {sum,school,bigSum,upperSchool} = storeToRefs(countStore)
3、$subscribe
通过 store 的 $subscribe() 方法侦听 state 及其变化
talkStore.$subscribe((mutate,state)=>{
  console.log('LoveTalk',mutate,state)
  localStorage.setItem('talk',JSON.stringify(talkList.value))
})
4、store组合式写法
 import {defineStore} from 'pinia'
    import axios from 'axios'
    import {nanoid} from 'nanoid'
    import {reactive} from 'vue'

    export const useTalkStore = defineStore('talk',()=>{
      // talkList就是state
      const talkList = reactive(
        JSON.parse(localStorage.getItem('talkList') as string) || []
      )

      // getATalk函数相当于action
      async function getATalk(){
        // 发请求,下面这行的写法是:连续解构赋值+重命名
        let {data:{content:title}} = await axios.get('https://api.uomg.com/api/rand.qinghua?format=json')
        // 把请求回来的字符串,包装成一个对象
        let obj = {id:nanoid(),title}
        // 放到数组中
        talkList.unshift(obj)
      }
      return {talkList,getATalk}
    })
五、组件通信
Vue3组件通信和Vue2的区别:
-
移出事件总线,使用
mitt代替。 -
vuex换成了pinia。 -
把
.sync优化到了v-model里面了。 -
把
$listeners所有的东西,合并到$attrs中了。 -
$children被砍掉了。
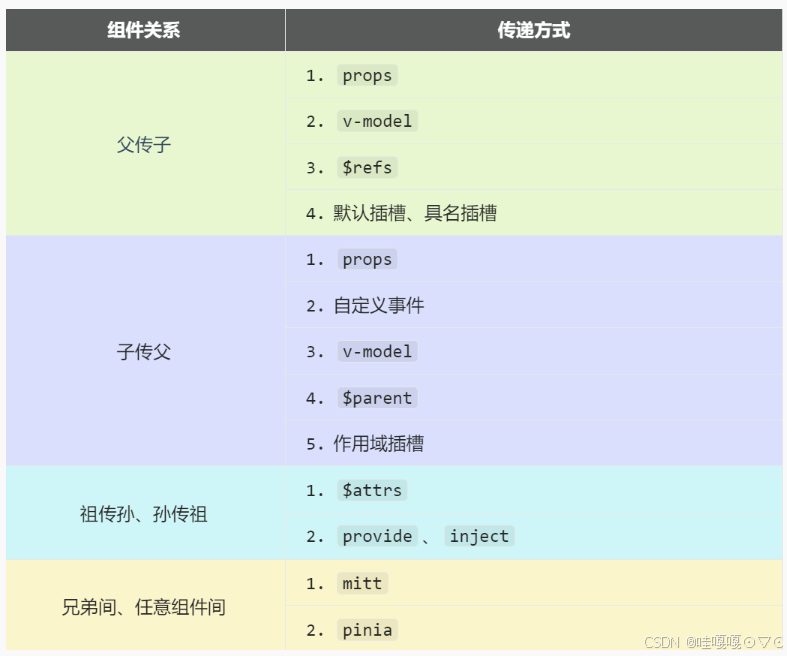
1、props
概述:props是使用频率最高的一种通信方式,常用与 :父 ↔ 子。
- 若 父传子:属性值是非函数。
- 若 子传父:属性值是函数。
父组件:
<template>
  <div class="father">
    <h3>父组件,</h3>
        <h4>我的车:{{ car }}</h4>
        <h4>儿子给的玩具:{{ toy }}</h4>
        <Child :car="car" :getToy="getToy"/>
  </div>
</template>

<script setup lang="ts" name="Father">
    import Child from './Child.vue'
    import { ref } from "vue";
    // 数据
    const car = ref('奔驰')
    const toy = ref()
    // 方法
    function getToy(value:string){
        toy.value = value
    }
</script>
子组件
<template>
  <div class="child">
    <h3>子组件</h3>
        <h4>我的玩具:{{ toy }}</h4>
        <h4>父给我的车:{{ car }}</h4>
        <button @click="getToy(toy)">玩具给父亲</button>
  </div>
</template>

<script setup lang="ts" name="Child">
    import { ref } from "vue";
    const toy = ref('奥特曼')

    defineProps(['car','getToy'])
</script>
2、自定义事件
1). 概述:自定义事件常用于:子 => 父。
2). 注意区分好:原生事件、自定义事件。
-
原生事件:
- 事件名是特定的(
click、mosueenter等等) - 事件对象
$event: 是包含事件相关信息的对象(pageX、pageY、target、keyCode)
- 事件名是特定的(
-
自定义事件:
- 事件名是任意名称
- 事件对象
$event: 是调用emit时所提供的数据,可以是任意类型!!!
3). 示例:
 <Child @send-toy="toy = $event"/>

  <!--注意区分原生事件与自定义事件中的$event-->
  <button @click="toy = $event">测试</button>

  //子组件中,触发事件:
  this.$emit('send-toy', 具体数据)
3、mitt
概述:与消息订阅与发布(pubsub)功能类似,可以实现任意组件间通信。
安装mitt
npm i mitt
新建文件:src\utils\emitter.ts
// 引入mitt
import mitt from "mitt";

// 创建emitter
const emitter = mitt()

/*
  // 绑定事件
  emitter.on('abc',(value)=>{
    console.log('abc事件被触发',value)
  })
  emitter.on('xyz',(value)=>{
    console.log('xyz事件被触发',value)
  })

  setInterval(() => {
    // 触发事件
    emitter.emit('abc',666)
    emitter.emit('xyz',777)
  }, 1000);

  setTimeout(() => {
    // 清理事件
    emitter.all.clear()
  }, 3000);
*/

// 创建并暴露mitt
export default emitter
接收数据的组件中:绑定事件、同时在销毁前解绑事件:
import emitter from "@/utils/emitter";
import { onUnmounted } from "vue";

// 绑定事件
emitter.on('send-toy',(value)=>{
  console.log('send-toy事件被触发',value)
})

onUnmounted(()=>{
  // 解绑事件
  emitter.off('send-toy')
})
【第三步】:提供数据的组件,在合适的时候触发事件
import emitter from "@/utils/emitter";

function sendToy(){
  // 触发事件
  emitter.emit('send-toy',toy.value)
}
**注意这个重要的内置关系,总线依赖着这个内置关系
4、v-model
-
概述:实现 父↔子 之间相互通信。
-
前序知识 ——
v-model的本质
<!-- 使用v-model指令 -->
  <input type="text" v-model="userName">

  <!-- v-model的本质是下面这行代码 -->
  <input
    type="text"
    :value="userName"
    @input="userName =(<HTMLInputElement>$event.target).value"
  >
-
组件标签上的
v-model的本质::moldeValue+update:modelValue事件。<!-- 组件标签上使用v-model指令 --> <AtguiguInput v-model="userName"/> <!-- 组件标签上v-model的本质 --> <AtguiguInput :modelValue="userName" @update:model-value="userName = $event"/>
AtguiguInput组件中:
<template>
    <div class="box">
      <!--将接收的value值赋给input元素的value属性,目的是:为了呈现数据 -->
          <!--给input元素绑定原生input事件,触发input事件时,进而触发update:model-value事件-->
      <input
         type="text"
         :value="modelValue"
         @input="emit('update:model-value',$event.target.value)"
      >
    </div>
  </template>

  <script setup lang="ts" name="AtguiguInput">
    // 接收props
    defineProps(['modelValue'])
    // 声明事件
    const emit = defineEmits(['update:model-value'])
  </script>
-
也可以更换
value,例如改成abc<!-- 也可以更换value,例如改成abc--> <AtguiguInput v-model:abc="userName"/> <!-- 上面代码的本质如下 --> <AtguiguInput :abc="userName" @update:abc="userName = $event"/>
AtguiguInput组件中:
<template>
    <div class="box">
      <input
         type="text"
         :value="abc"
         @input="emit('update:abc',$event.target.value)"
      >
    </div>
  </template>

  <script setup lang="ts" name="AtguiguInput">
    // 接收props
    defineProps(['abc'])
    // 声明事件
    const emit = defineEmits(['update:abc'])
  </script>
-
如果
value可以更换,那么就可以在组件标签上多次使用v-model<AtguiguInput v-model:abc="userName" v-model:xyz="password"/>
5、$attrs
-
概述:
$attrs用于实现当前组件的父组件,向当前组件的子组件通信(祖→孙)。 -
具体说明:
$attrs是一个对象,包含所有父组件传入的标签属性。
注意:
$attrs会自动排除props中声明的属性(可以认为声明过的props被子组件自己“消费”了)
父组件:
  <template>
      <div class="father">
        <h3>父组件</h3>
            <Child :a="a" :b="b" :c="c" :d="d" v-bind="{x:100,y:200}" :updateA="updateA"/>
      </div>
    </template>

    <script setup lang="ts" name="Father">
        import Child from './Child.vue'
        import { ref } from "vue";
        let a = ref(1)
        let b = ref(2)
        let c = ref(3)
        let d = ref(4)

        function updateA(value){
            a.value = value
        }
    </script>
子组件:
 <template>
        <div class="child">
            <h3>子组件</h3>
            <GrandChild v-bind="$attrs"/>
        </div>
    </template>

    <script setup lang="ts" name="Child">
        import GrandChild from './GrandChild.vue'
    </script>
孙组件:
  <template>
        <div class="grand-child">
            <h3>孙组件</h3>
            <h4>a:{{ a }}</h4>
            <h4>b:{{ b }}</h4>
            <h4>c:{{ c }}</h4>
            <h4>d:{{ d }}</h4>
            <h4>x:{{ x }}</h4>
            <h4>y:{{ y }}</h4>
            <button @click="updateA(666)">点我更新A</button>
        </div>
    </template>

    <script setup lang="ts" name="GrandChild">
        defineProps(['a','b','c','d','x','y','updateA'])
    </script>
6、$refs、parent
- 概述:
$refs用于 :父→子。$parent用于:子→父。
- 原理如下:
| 属性 | 说明 |
|---|---|
$refs | 值为对象,包含所有被ref属性标识的DOM元素或组件实例。 |
$parent | 值为对象,当前组件的父组件实例对象。 |
7、provide、inject
-
概述:实现祖孙组件直接通信
-
具体使用:
- 在祖先组件中通过
provide配置向后代组件提供数据 - 在后代组件中通过
inject配置来声明接收数据
- 具体编码:【第一步】父组件中,使用
provide提供数据
 <template>
    <div class="father">
      <h3>父组件</h3>
      <h4>资产:{{ money }}</h4>
      <h4>汽车:{{ car }}</h4>
      <button @click="money += 1">资产+1</button>
      <button @click="car.price += 1">汽车价格+1</button>
      <Child/>
    </div>
  </template>

  <script setup lang="ts" name="Father">
    import Child from './Child.vue'
    import { ref,reactive,provide } from "vue";
    // 数据
    let money = ref(100)
    let car = reactive({
      brand:'奔驰',
      price:100
    })
    // 用于更新money的方法
    function updateMoney(value:number){
      money.value += value
    }
    // 提供数据
    provide('moneyContext',{money,updateMoney})
    provide('car',car)
  </script>
注意:子组件中不用编写任何东西,是不受到任何打扰的
【第二步】孙组件中使用inject配置项接受数据。
  <template>
    <div class="grand-child">
      <h3>我是孙组件</h3>
      <h4>资产:{{ money }}</h4>
      <h4>汽车:{{ car }}</h4>
      <button @click="updateMoney(6)">点我</button>
    </div>
  </template>

  <script setup lang="ts" name="GrandChild">
    import { inject } from 'vue';
    // 注入数据
   let {money,updateMoney} = inject('moneyContext',{money:0,updateMoney:(x:number)=>{}})
    let car = inject('car')
  </script>
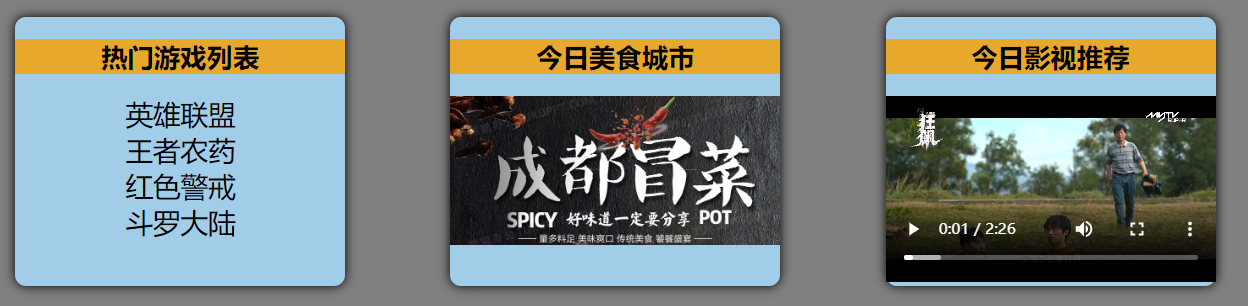
8、slot
- 默认插槽
  父组件中:
            <Category title="今日热门游戏">
              <ul>
                <li v-for="g in games" :key="g.id">{{ g.name }}</li>
              </ul>
            </Category>
    子组件中:
            <template>
              <div class="item">
                <h3>{{ title }}</h3>
                <!-- 默认插槽 -->
                <slot></slot>
              </div>
            </template>
-
具名插槽
父组件中:
 <Category title="今日热门游戏">
          <template v-slot:s1>
            <ul>
              <li v-for="g in games" :key="g.id">{{ g.name }}</li>
            </ul>
          </template>
          <template #s2>
            <a href="">更多</a>
          </template>
        </Category>
子组件中:
<template>
          <div class="item">
            <h3>{{ title }}</h3>
            <slot name="s1"></slot>
            <slot name="s2"></slot>
          </div>
        </template>
-
作用域插槽
-
理解:数据在组件的自身,但根据数据生成的结构需要组件的使用者来决定。(新闻数据在
News组件中,但使用数据所遍历出来的结构由App组件决定) -
具体编码:
父组件中:
 <Game v-slot="params">
        <!-- <Game v-slot:default="params"> -->
        <!-- <Game #default="params"> -->
          <ul>
            <li v-for="g in params.games" :key="g.id">{{ g.name }}</li>
          </ul>
        </Game>
子组件中:
   <template>
          <div class="category">
            <h2>今日游戏榜单</h2>
            <slot :games="games" a="哈哈"></slot>
          </div>
        </template>

        <script setup lang="ts" name="Category">
          import {reactive} from 'vue'
          let games = reactive([
            {id:'asgdytsa01',name:'英雄联盟'},
            {id:'asgdytsa02',name:'王者荣耀'},
            {id:'asgdytsa03',name:'红色警戒'},
            {id:'asgdytsa04',name:'斗罗大陆'}
          ])
        </script>
其它 API
1、shallowRef 与 shallowReactive
shallowRef
-
作用:创建一个响应式数据,但只对顶层属性进行响应式处理。
-
用法:
let myVar = shallowRef(initialValue);
-
特点:只跟踪引用值的变化,不关心值内部的属性变化。
shallowReactive
-
作用:创建一个浅层响应式对象,只会使对象的最顶层属性变成响应式的,对象内部的嵌套属性则不会变成响应式的
-
用法:
const myObj = shallowReactive({ … });
-
特点:对象的顶层属性是响应式的,但嵌套对象的属性不是。
总结
通过使用
shallowRef()和shallowReactive()来绕开深度响应。浅层式API创建的状态只在其顶层是响应式的,对所有深层的对象不会做任何处理,避免了对每一个内部属性做响应式所带来的性能成本,这使得属性的访问变得更快,可提升性能。
2、readonly 与 shallowReadonly
readonly
-
作用:用于创建一个对象的深只读副本。
-
用法:
const original = reactive({ … });
const readOnlyCopy = readonly(original); -
特点:
- 对象的所有嵌套属性都将变为只读。
- 任何尝试修改这个对象的操作都会被阻止(在开发模式下,还会在控制台中发出警告)。
- 应用场景:
- 创建不可变的状态快照。
- 保护全局状态或配置不被修改。
shallowReadonly
-
作用:与
readonly类似,但只作用于对象的顶层属性。 -
用法:
const original = reactive({ … });
const shallowReadOnlyCopy = shallowReadonly(original); -
特点:
-
只将对象的顶层属性设置为只读,对象内部的嵌套属性仍然是可变的。
-
适用于只需保护对象顶层属性的场景。
3、toRaw 与 markRaw
toRaw
- 作用:用于获取一个响应式对象的原始对象,
toRaw返回的对象不再是响应式的,不会触发视图更新。
官网描述:这是一个可以用于临时读取而不引起代理访问/跟踪开销,或是写入而不触发更改的特殊方法。不建议保存对原始对象的持久引用,请谨慎使用。
何时使用? —— 在需要将响应式对象传递给非
Vue的库或外部系统时,使用toRaw可以确保它们收到的是普通对象
- 具体编码:
     import { reactive,toRaw,markRaw,isReactive } from "vue";

      /* toRaw */
      // 响应式对象
      let person = reactive({name:'tony',age:18})
      // 原始对象
      let rawPerson = toRaw(person)

   /* markRaw */
let citysd = markRaw([
  {id:'asdda01',name:'北京'},
  {id:'asdda02',name:'上海'},
  {id:'asdda03',name:'天津'},
  {id:'asdda04',name:'重庆'}
])
// 根据原始对象citys去创建响应式对象citys2 —— 创建失败,因为citys被markRaw标记了
let citys2 = reactive(citys)
console.log(isReactive(person))
console.log(isReactive(rawPerson))
console.log(isReactive(citys))
console.log(isReactive(citys2)
markRaw
- 作用:标记一个对象,使其永远不会变成响应式的。
例如使用
mockjs时,为了防止误把mockjs变为响应式对象,可以使用markRaw去标记mockjs
-
编码:
/* markRaw */
let citys = markRaw([
{id:‘asdda01’,name:‘北京’},
{id:‘asdda02’,name:‘上海’},
{id:‘asdda03’,name:‘天津’},
{id:‘asdda04’,name:‘重庆’}
])
// 根据原始对象citys去创建响应式对象citys2 —— 创建失败,因为citys被markRaw标记了
let citys2 = reactive(citys)
4、customRef
作用:创建一个自定义的ref,并对其依赖项跟踪和更新触发进行逻辑控制。
实现防抖效果(useSumRef.ts):
import {customRef } from "vue";

export default function(initValue:string,delay:number){
  let msg = customRef((track,trigger)=>{
    let timer:number
    return {
      get(){
        track() // 告诉Vue数据msg很重要,要对msg持续关注,一旦变化就更新
        return initValue
      },
      set(value){
        clearTimeout(timer)
        timer = setTimeout(() => {
          initValue = value
          trigger() //通知Vue数据msg变化了
        }, delay);
      }
    }
  })
  return {msg}
}
Vue3新组件
1、Teleport
- 什么是Teleport?—— Teleport 是一种能够将我们的组件html结构移动到指定位置的技术。
<teleport to='body' >
    <div class="modal" v-show="isShow">
      <h2>我是一个弹窗</h2>
      <p>我是弹窗中的一些内容</p>
      <button @click="isShow = false">关闭弹窗</button>
    </div>
</teleport>
2、Suspense
- 等待异步组件时渲染一些额外内容,让应用有更好的用户体验
- 使用步骤:
- 异步引入组件
- 使用
Suspense包裹组件,并配置好default与fallback
 import { defineAsyncComponent,Suspense } from "vue";
    const Child = defineAsyncComponent(()=>import('./Child.vue'))

    <template>
        <div class="app">
            <h3>我是App组件</h3>
            <Suspense>
              <template v-slot:default>
                <Child/>
              </template>
              <template v-slot:fallback>
                <h3>加载中.......</h3>
              </template>
            </Suspense>
        </div>
    </template>
3、全局API转移到应用对象
app.componentapp.configapp.directiveapp.mountapp.unmountapp.use
其他
-
过渡类名
v-enter修改为v-enter-from、过渡类名v-leave修改为v-leave-from。 -
keyCode作为v-on修饰符的支持。 -
v-model指令在组件上的使用已经被重新设计,替换掉了v-bind.sync。 -
v-if和v-for在同一个元素身上使用时的优先级发生了变化。 -
移除了
$on、$off和$once实例方法。 -
移除了过滤器
filter。 -
移除了
$children实例propert。…


 1万+
1万+

 被折叠的 条评论
为什么被折叠?
被折叠的 条评论
为什么被折叠?
 到【灌水乐园】发言


