


 本文详细介绍了如何配置和使用Spring的RestTemplate,包括初始化配置、设置超时时间、支持HTTPS、添加拦截器以及发送POST请求的方法。通过示例代码展示了发送JSON和FORM表单格式的POST请求,并解析了RestTemplate内部的工作原理,强调了数据序列化的重要性。文章旨在帮助开发者避免使用RestTemplate时的常见误区,提供了一套完整的解决方案。
RestTemplate 使用全解
[TOC]
RestTemplate 非常难用,代码风格不统一,设置繁琐,API 文档不够详细,导致 在使用的时候,非常容易陷入误区。
本人秉承完全免费共享的态度,将其总结为以下几点。希望 众人莫再入坑。 愿这世界 没有墙,自由呼吸民主气息。
1. 初始化配置
@Configuration
@Slf4j(topic = "REST客户端")
public class RestTemplateConfig {

    @SneakyThrows
    @Bean
    public RestTemplate restTemplate() {
        RestTemplate template = new RestTemplate(new BufferingClientHttpRequestFactory(factory())); // 设置http配置工厂
        template.setInterceptors(restInterceptor()); // 拦截器
        return template;
    }
}
2. 工厂类设置超时时间
@SneakyThrows
private ClientHttpRequestFactory factory() {

    HttpComponentsClientHttpRequestFactory requestFactory = new HttpComponentsClientHttpRequestFactory();
    requestFactory.setHttpClient(httpClient()); // 支持 https

    // 从pool池中获取可用连接的时间,1 s
    requestFactory.setConnectionRequestTimeout(1 * 1000);
    // 与远程服务器建立一个新连接所需要的时间, 10 s
    requestFactory.setConnectTimeout(55 * 1000);
    // 数据包开始传输之前的等待时间, 60 s
    requestFactory.setReadTimeout(55 * 1000);
    return requestFactory;
}
3. set httpclient客户端支持ssl ? 支持本地测试调用 https
/**
 * support https on local test
 * 不明觉厉,这是经过测验的唯一可用 支持 https 不抛错的代码。如您有更好的思路,请在评论区或者私信分享。
 */
@SneakyThrows
private CloseableHttpClient httpClient() {
    TrustStrategy acceptingTrustStrategy = new TrustStrategy() {
        @Override
        public boolean isTrusted(X509Certificate[] chain, String authType) {
            return true;
        }
    };

    SSLContext sslContext = org.apache.http.ssl.SSLContexts.custom()
        .loadTrustMaterial(null, acceptingTrustStrategy)
        .build();

    SSLConnectionSocketFactory csf = new SSLConnectionSocketFactory(sslContext);

    return HttpClients.custom()
        .setSSLSocketFactory(csf)
        .setRedirectStrategy(new LaxRedirectStrategy())
        .build();
}
4. 设置拦截器,记录每次请求时长 。
modify request header & add response header
/**
 * 设置 拦截器
 */
@Bean
public List<ClientHttpRequestInterceptor> restInterceptor() {
    List<ClientHttpRequestInterceptor> interceptors = new ArrayList<>();

    // header 1 : foo:bar
    ClientHttpRequestInterceptor header = new ClientHttpRequestInterceptor() {
        @Override
        public ClientHttpResponse intercept(HttpRequest request, byte[] body, ClientHttpRequestExecution execution) throws IOException {
            ClientHttpResponse response = execution.execute(request, body);
            response.getHeaders().add("Foo", "bar");
            return response;
        }
    };

    // header 2: cost-milliseconds:time
    ClientHttpRequestInterceptor timer = new ClientHttpRequestInterceptor() {
        @Override
        public ClientHttpResponse intercept(HttpRequest request, byte[] body, ClientHttpRequestExecution execution) throws IOException {
            StopWatch watch = new StopWatch();
            watch.start();

            ClientHttpResponse response = execution.execute(request, body);
            watch.stop();

            String time = String.valueOf(watch.getTime(TimeUnit.MILLISECONDS));
            int rawStatusCode = response.getRawStatusCode();
            String statusText = response.getStatusText();
            response.getHeaders().add("cost-milliseconds", time);
            log.info("发送rest请求耗时 :{} ms,response:{} {},{} {} headers:{}", time,rawStatusCode,statusText, request.getMethod(), request.getURI(), request.getHeaders());
            return response;
        }
    };

    interceptors.add(timer);
    interceptors.add(header);

    return interceptors;
}
5. 如何发送请求
5.1 如何发送 post 请求,json 格式数据
/**
  * post 发送json 请求
  * @param json Map
  * @see RestTemplate#RestTemplate()
  * @see org.springframework.web.client.RestTemplate.HttpEntityRequestCallback#doWithRequest(org.springframework.http.client.ClientHttpRequest)
  */
@SneakyThrows
public static ResponseEntity<String> postJson(String postUrl, Map<String, Object> json) {

    HttpHeaders headers = new HttpHeaders();
    headers.setContentType(MediaType.APPLICATION_JSON);

    // HttpEntity request = new HttpEntity<>(JsonUtils.writeValueAsString(json), headers);
    HttpEntity request = new HttpEntity<>(json, headers);
    ResponseEntity<String> responseEntityStr = staticRest.postForEntity(postUrl, request, String.class);
    return responseEntityStr;
}

/**
 * 方法重载,直接传输 序列化好之后的 json String 也是可以的
 * @param jsonStr 必须是符合json 序列化标准的 字符串 ,即: jsonStr = new ObjectMapper().writeValueAsString(json);
 */
public static ResponseEntity<String> postJson(String postUrl,String jsonStr) {

    HttpHeaders headers = new HttpHeaders();
    headers.setContentType(MediaType.APPLICATION_JSON);

    HttpEntity request = new HttpEntity<>(jsonStr, headers);
    ResponseEntity<String> responseEntityStr = staticRest.postForEntity(postUrl, request, String.class);
    return responseEntityStr;
}
5.2 如何发送 post 请求,form表单格式
/**
 * post 发送 form 表单类型的请求
 * @param postMap 这个map的value 都是 list [] 格式的,专门为了 form 表单的多name而生 。
 * 并且该map中的value,必须都是 string类型的,否则会抱错 类型转换错误
 *      final long t = System.currentTimeMillis();
 *       MultiValueMap<String, Object> postMap = new LinkedMultiValueMap() {{
 *           add(BanConstants.forbiddenIds, JsonUtils.writeValueAsString(onceList));
 *           add(BanConstants.gameId, aId);
 *           add(BanConstants.t, "" + t);
 *       }};
 */
@SneakyThrows
public static ResponseEntity postForm(String url, MultiValueMap postMap) {

    RequestEntity requestEntity = RequestEntity
        .post(new URI(""))
        .contentType(MediaType.APPLICATION_FORM_URLENCODED)
        .accept(MediaType.ALL).acceptCharset(Charset.defaultCharset())
        .body(postMap);

    ResponseEntity<String> result = staticRest.postForEntity(url, requestEntity, String.class);

    return result;
}
6. 原理说明
随便贴上几张源码截图,对 步骤 # 5.1 中的注释部分进行一个 说明
网络传输,最终的格式必须是序列化为字符串或者2进制格式的。
因此,无论 RestTemplate 传输的 json 格式,还是 form格式,其实最终传输的都是字符串。
-
rest 在无参构造初始化时,会wrap一系列的 序列化转换器,如图
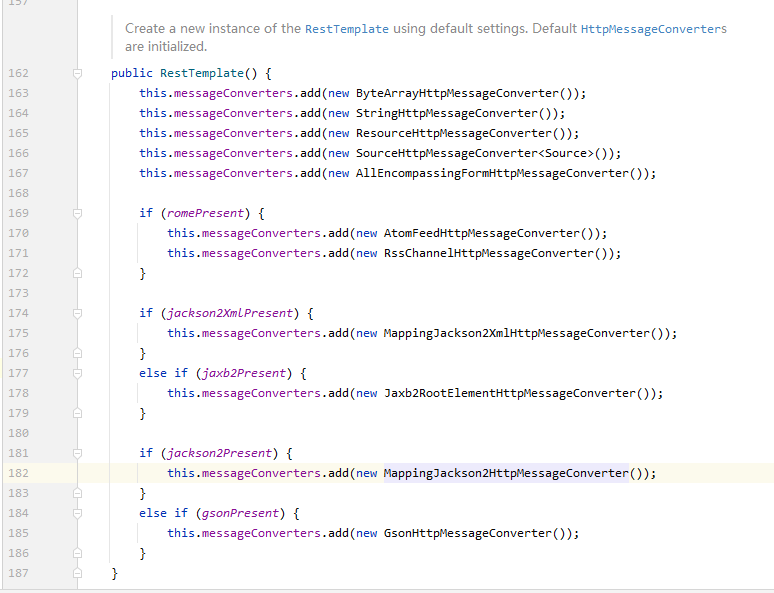
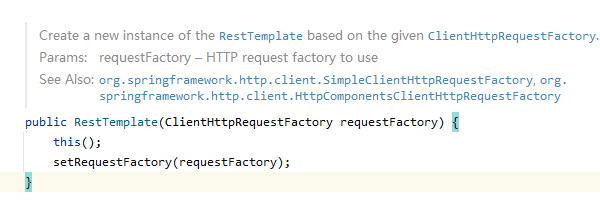
而我们的初始化1 ,第一步是设置了 factory ,重载的有参构造源码如下
this(); // 回调无参构造,设置所有可能的 消息转换器 。
-
rest 在传输 json格式之前,是必须要进行序列化的,代码如下 :
[外链图片转存失败,源站可能有防盗链机制,建议将图片保存下来直接上传(img-Mie0pYA9-1627563241961)(https://raw.githubusercontent.com/wshidaijingshen/iHyCU2mXpYNpqG-u8dKcjvOmD/master/img/image-20210729204435537.png)]
-
所以,无论我们采用何种方式,发送数据,最终都会被序列化为字符串或者2进制。
所不同的是,json格式序列化,采用的肯定是符合json规范的方式,比如 调用new ObjectMapper().writeValueAsString(json).这样,我们客户端发出去的这个json,才能被接收方 服务器正确把字符串解析出来,进而再进行后续处理。 -
而,当我们传输的是 form格式,或者 get请求时,参数就肯定是 字符串了,无需预处理,直接发送即可,再大不了就是个 url的编解码过程。
-
因此, 别看 是 json格式,其实 背后还是字符串,所以我们也可以直接传输 序列化好之后的 json字符串,但是必须满足格式才行喔!因为传输的双方已经约定好了 contentType = json; 不按套路来,那可是要不得滴~


 843
843


 到【灌水乐园】发言


