


目录
借鉴文章戳这里
我们在自动化测试过程中,可能需要手机相关联的一些操作进行辅助测试,这些我们主要讲解获取手机分辨率、手机截图、获取和设置手机网络、发送手机按键到设备、操作手机通知栏。
1.获取手机分辨率
方法:
# driver.get_window_size()
window_size = driver.get_window_size()
print(window_size)
2.手机截图
方法:
get_screenshot_as_file(filename):参数是将截图保存为指定路径下、指定格式的图片。实战代码:
from selenium.webdriver.support.wait import WebDriverWait
from selenium.webdriver.support import expected_conditions as EC
from appium import webdriver
from appium.webdriver.common.mobileby import MobileBy
from appium.webdriver.common.touch_action import TouchAction
from appium.webdriver.common.multi_action import MultiAction


desired_caps = {
    'platformName': 'Android',
    'platformVersion': '8.1',
    'deviceName': 'ye_shen_Android',
    'appPackage': 'com.tencent.mm',
    'appActivity': 'com.tencent.mm.ui.LauncherUI',
    'noReset': True,
    'autoAcceptAlerts': True,
    'newCommandTimeout': 240,
    'automationName': 'uiautomator2'
}

driver = webdriver.Remote('http://127.0.0.1:4723/wd/hub', desired_caps)
driver.implicitly_wait(10)

# 点击 微信 我的
loc = (MobileBy.ANDROID_UIAUTOMATOR, 'new UiSelector().resourceId("com.tencent.mm:id/j5t")')
WebDriverWait(driver, 30).until(EC.visibility_of_element_located(loc))
TouchAction(driver).tap(x=540, y=1255).wait(200).perform()

# 点击 服务
locc = (MobileBy.ANDROID_UIAUTOMATOR, 'new UiSelector().text("服务")')
WebDriverWait(driver, 30).until(EC.visibility_of_element_located(locc))
ele = driver.find_element(MobileBy.ANDROID_UIAUTOMATOR, 'new UiSelector().text("服务")')
TouchAction(driver).tap(ele).wait(200).perform()

# 检查 请输入手势密码
loccs = (MobileBy.ANDROID_UIAUTOMATOR, 'new UiSelector().text("请输入手势密码")')
WebDriverWait(driver, 30).until(EC.visibility_of_element_located(loccs))

driver.get_screenshot_as_file("./touch_action_unlock.png")
看图:

3.获取手机网络
方法:
driver.network_connection方法配置:
			+--------------------+------+------+---------------+
            | Value (Alias)      | Data | Wifi | Airplane Mode |
            +====================+======+======+===============+
            | 0 (None)           | 0    | 0    | 0             |
            +--------------------+------+------+---------------+
            | 1 (Airplane Mode)  | 0    | 0    | 1             |
            +--------------------+------+------+---------------+
            | 2 (Wifi only)      | 0    | 1    | 0             |
            +--------------------+------+------+---------------+
            | 4 (Data only)      | 1    | 0    | 0             |
            +--------------------+------+------+---------------+
            | 6 (All network on) | 1    | 1    | 0             |
            +--------------------+------+------+---------------+
结果打印:

4.设置手机网络
方法:
driver.set_network_connection(connectionType) 参数为网络类型。实战代码:设置当前设备为飞行模式
driver.set_network_connection(1)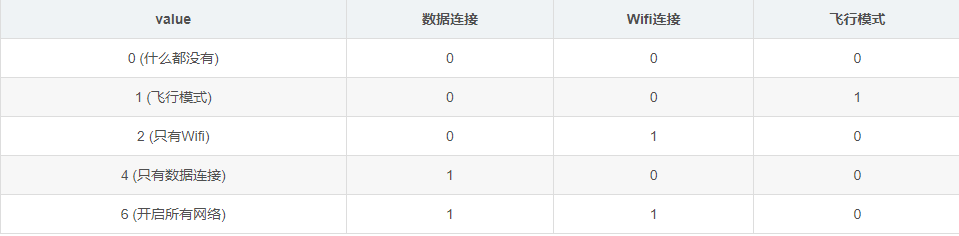
5.发送手机按键到设备
模拟按 “返回键” “home键” 等等操作,很多应用有按两次返回键退出应用的功能,如果这个功能 需要我们做自动化,那么一定会用到这个方法。
方法:
driver.press_keycode(keycode, metastate=None)
# 第一个参数是发送给设备的关键代码,第二个是关键代码的元信息,一般是默认值。按键对应的编码,大家可以看appium官网介绍说明:戳这里哦
常用键
driver.press_keycode(value)第一个表:

第二个表:

第三个表:
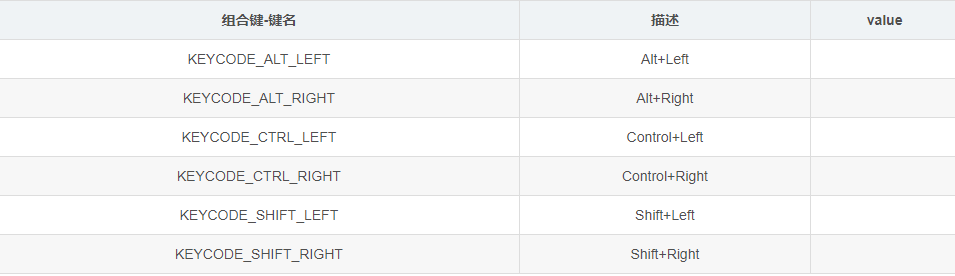
第四个表:
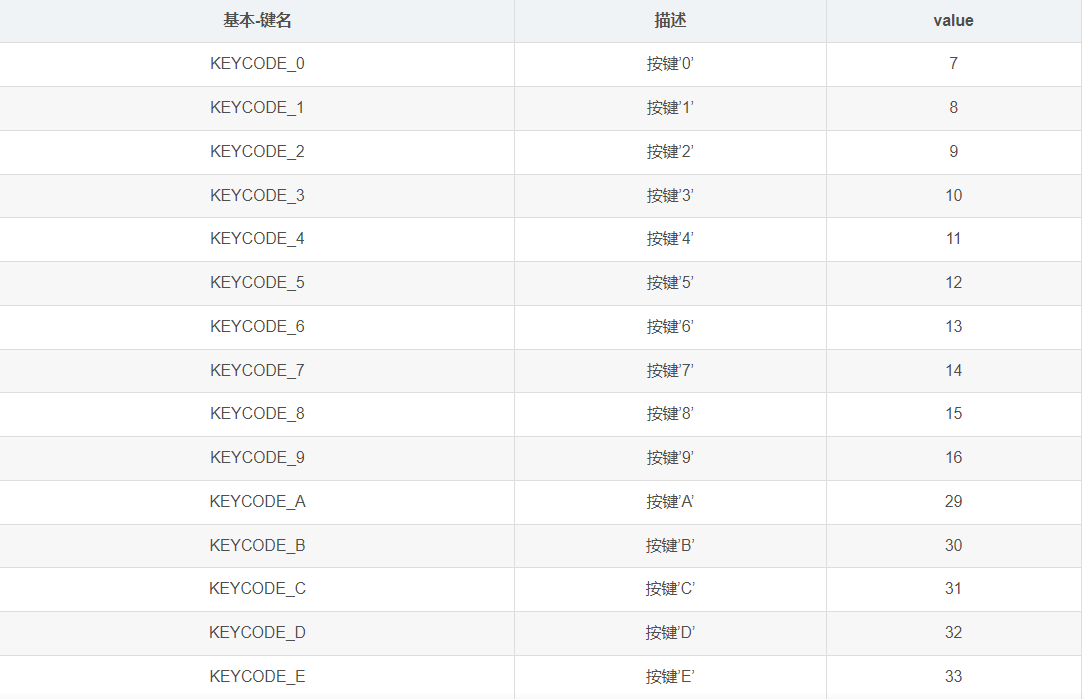
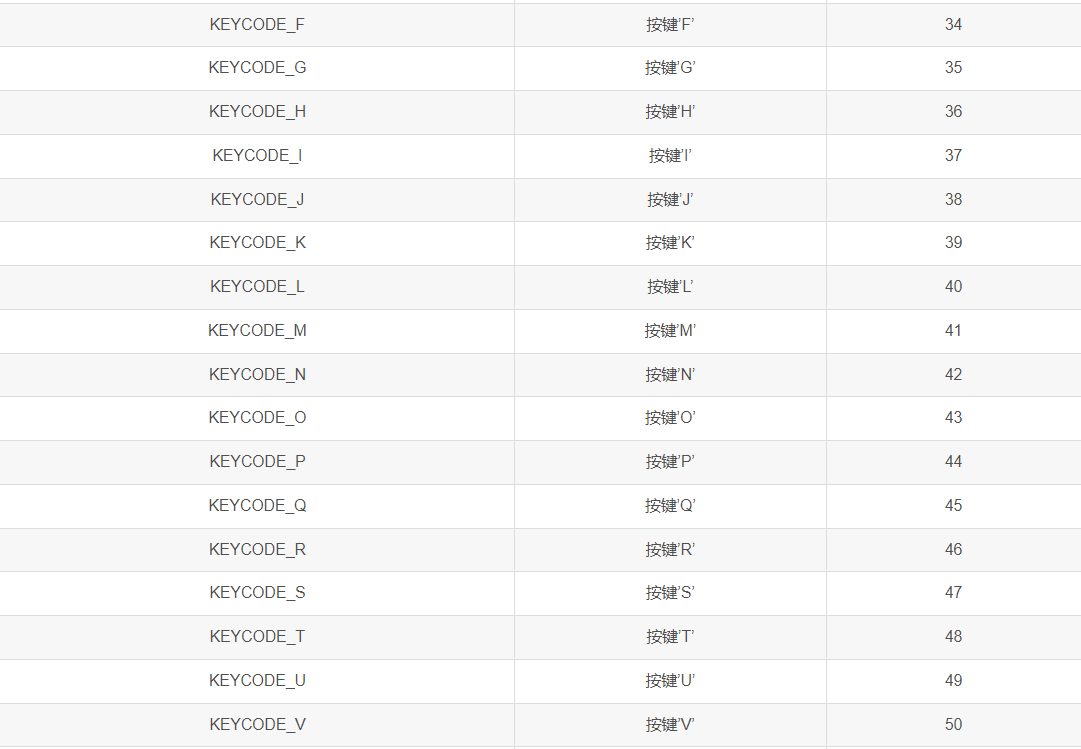

实战代码:
- 点击三次音量加,等待 3S,再点击三次音量减。
# 按音量 + 三次
for i in range(3):
    driver.press_keycode(24)
    time.sleep(1)

time.sleep(3)
# 按音量 - 三次
for i in range(3):
    driver.press_keycode(25)
    time.sleep(1)
6.操作手机通知栏
测试即时通信类软件的时候,如果收到其他人发送的一条消息,通知栏肯定会显示对应的消息。我们想通过通知栏来判断是否收到消息,一定要先操作手机的通知栏。
方法
driver.open_notifications(): # 打开手机通知栏。appium官方没有为我们提供关闭通知的Api,那么打开通知栏之后再怎么关闭呢,我们可以手指从下往上滑动或者按返回键。
实战代码:
- 打开通知栏,三秒后,关闭通知栏。
driver.open_notifications()
time.sleep(3)
driver.press_keycode(4)

# 或者:点击返回键
driver.keyevent(4)
7.page_source 获取当前页面的源码
driver.page_source 获取当前页面的源码
8.quit 退出
driver.quit()


 2003
2003

 被折叠的 条评论
为什么被折叠?
被折叠的 条评论
为什么被折叠?
 到【灌水乐园】发言


