


Python线程与安全
线程安全是指:多线程并发访问共享资源时,不会导致数据的错误或不一致性,在多线程编程中,由于多个线程同时访问共享数据,那么这就可能导致数据竞争,死锁等问题。线程安全的实现是为了 避免这些问题的发生。
实现线程安全有多重方式,常见的包括:锁,条件变量,原子操作,线程本地存储等。
💚
1. 锁
锁是一种 常见的线程同步机制,用于控制对共享资源的访问,在 Python中,锁有两种类型:互斥锁和 读写锁。互斥锁在同一时刻只允许一个线程对共享数据进行操作,读写锁则允许 多个线程同时读取共享数据,但是只允许 一个线程进行写操作。
可以使用 threading.Lock() 或 threading.RLock() 来创建互斥锁或读写锁
下面这个例子:新建 5个线程,和一个全局变量,然后每个线程在 start() 后,会调用 线程的 run(self) 函数,该函数会将变量 自增10 , 通过 lock 锁,可以实现 变量读写安全。
class myThread(threading.Thread):
    def run(self):
        global x  # 声明一个共享数据 x
        lock.acquire() # 上锁
        x += 10  # 变量x 增加10
        print('%s: %d' %(self.name,x)) # self 是线程对象,可以通过selt.name 得到线程名
        lock.release() #解锁

# 设置全局变量 x
x = 0
lock = threading.RLock() # 创建可置入锁
list_thread = []
for i in range(5):
    list_thread.append(myThread()) # 创建5个线程,放到同一列表中

for i in list_thread:
 	i.start()  # 开启线程

# 打印
Thread-1: 10
Thread-2: 20
Thread-3: 30
Thread-4: 40
Thread-5: 50
2. 条件变量
  条件变量时一种用于线程间通信的同步机制,用于在多个线程之间共享状态信息,以便线程可以等待某个条件的出现并被通知,通常情况下,一个线程会等待另一个线程 触发某个条件,当条件满足时,等待的线程被通知并继续执行。
  在Python 中,条件变量是通过 threading.Condition类实现的,Condition 类实际上是一个 锁对象,它允许多个线程等待某个条件的出现,当条件满足时,Condition 会自动通知等待的线程继续执行,可以使用 condition 对象的 wait( ) 方法使 线程等待某个条件的出现,使用 notify()  或者 notify_all( )  方法通知等待的线程。
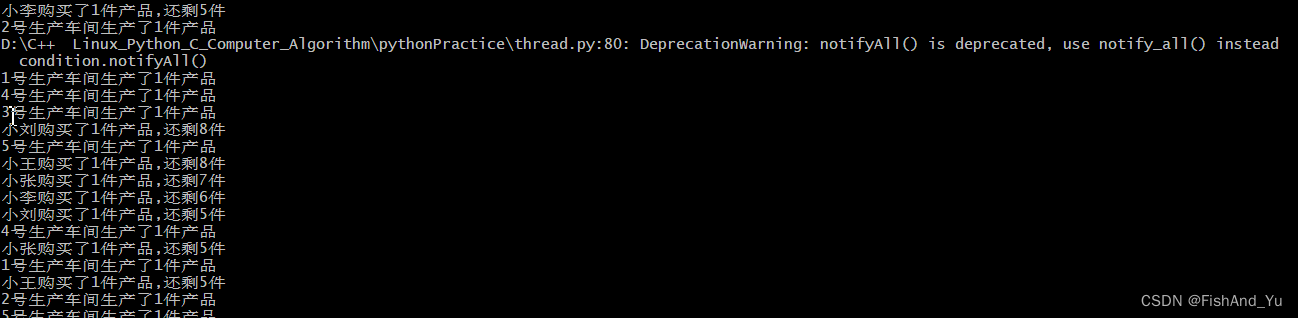
💚 下面我通过一个生成者和消费者模型来说明
举例:如有几个生产车间,几个消费者,当生产到一定数量时,即可停止生产。
# 举例:有几个生产车间,几个消费者,当生产到一定数量时,即可停止生产
condition = threading.Condition() # 获取线程条件锁
sheep = ['1件产品','1件产品','1件产品','1件产品','1件产品','1件产品']
class Producer(threading.Thread):
    def __init__(self,name):
        super().__init__(name = name)
        pass
    def run(self):
        global condition,sheep
        while True:
            time.sleep(0.1)
            condition.acquire()  # 上锁
            if len(sheep) < 10:
                print(self.name + "生产了1件产品")
                sheep.append('1件产品')
                condition.notifyAll()
                pass
            else:
                print("仓库满了,请停止生产,并等待5s后生产")
                condition.wait()
                time.sleep(5)
                pass
            condition.release()
        pass
    pass

class Custome(threading.Thread):
    def __init__(self,name):
        super().__init__(name = name)
        pass
    def run(self):
        global condition,sheep
        while True:
            time.sleep(0.1)
            condition.acquire()
            if len(sheep) > 0:
                meat = sheep.pop()
                print(self.name + "购买了" + meat + ",还剩" + str(len(sheep)) + "件")
                condition.notifyAll
                pass
            else:
                print("对不起,买光了,请等待5s后再购买")
                condition.wait()
                time.sleep(5)
                pass
            condition.release()
        pass
    pass

p1 = Producer("1号生产车间")
p2 = Producer("2号生产车间")
p3 = Producer("3号生产车间")
p4 = Producer("4号生产车间")
p5 = Producer("5号生产车间")

p1.start()
p2.start()
p3.start()
p4.start()
p5.start()

c1 = Custome("小王")
c2 = Custome("小张")
c3 = Custome("小刘")
c4 = Custome("小李")

c1.start()
c2.start()
c3.start()
c4.start()
3. 通过 join 阻塞当前线程
import threading
def thread_test(x,y):
    for i in range(x,y): # range函数 :生成一系列连续整数的函数
        print(i)

thread_01 = threading.Thread(name = 't1',target = thread_test,args=(1,50))
thread_02 = threading.Thread(name = 't2',target = thread_test,args=(11,20))

thread_01.start() # 启动线程1
thread_01.join() # 阻塞主线程,让线程thread_01 执行完毕后再执行后面的代码
print ("thread_01 run over")
print ("main thread ----!")
thread_02.start() # 启动线程2
thread_02.join()
print ("thread_02run over")

// 打印结果
1
2
3
4
5
6
7
8
9
thread_01 run over
main thread ----!
11
12
13
14
15
16
17
18
19
thread_02run over
4. 采用 sleep 来休眠一段时间
# 方法2:通过 sleep来休眠当前线程

import time
import threading
def thread_sleep(x,y):
    print("子线程开始休眠 10s")
    time.sleep(10)  # 休眠10s
    print("子线程休眠结束")
    for i in range(x,y): # range函数 :生成一系列连续的函数
        print(i)
    print("子线程执行完毕")

thread_03 = threading.Thread(target = thread_sleep,daemon = False,args=(1,5)) #线程不会随着主线程退出而退出
thread_03.start()
print("主线线程执行完毕")

# 打印结果
子线程开始休眠 10s
主线线程执行完毕
子线程休眠结束
1
2
3
4
子线程执行完毕
5. 原子操作
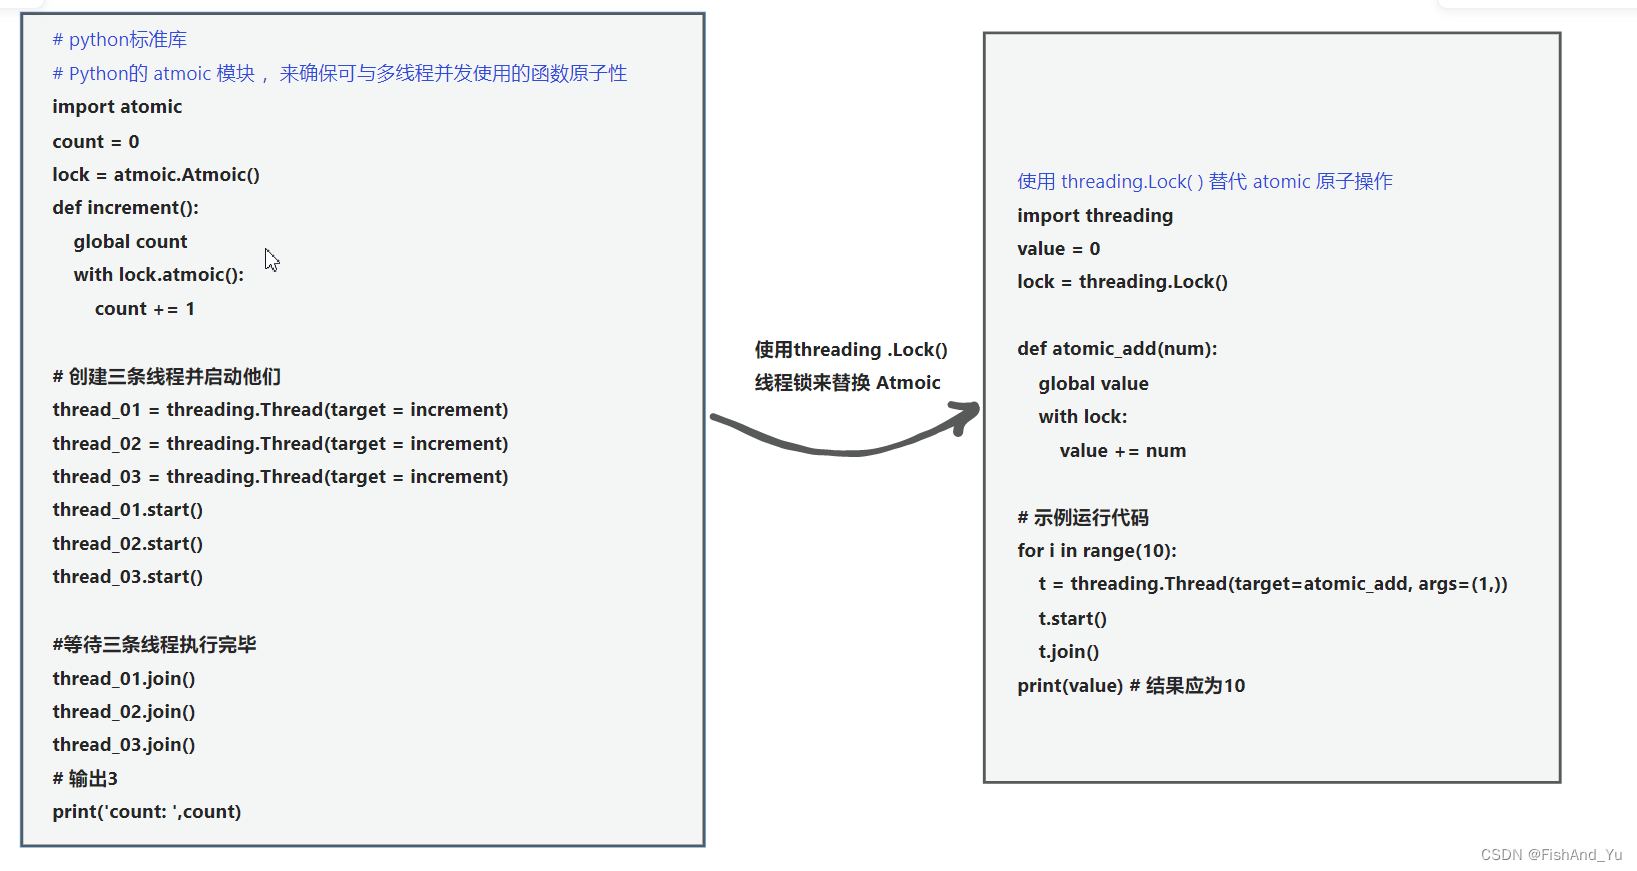
Python的 atmoic 模块提供了一种机制:来确保可与多线程并发使用的函数原子性,它实现了一个 锁机制,该锁机制可保证同一时刻只有一个线程能够访问指定的函数。
🧡🧡🧡 使用 atmoic 模块有以下步骤
- 导入atmoic 模块
import atmoic - 创建一个 atmoic.Atmoic 对象 用于同步访问
lock = atmoic.Atmoic() - 将需要的原子性操作代码包裹在 lock.atmoic( ) 中
with lock.atmoic():
💚 举例 :我们可以使用 atmoic 模块确保两条线程能够同步递增一个计数器
# 在此示例中,我们在increment()函数内使用了lock.atomic()来确保任何时刻仅有一条线程能够访问计数器。
# 这样,即使多个线程同时执行increment()函数在计数器上进行递增,结果也将是唯一且正确的。在本例中,最终输出的计数器值将为2。

# 但是 atomic 这个库下载失败
# 1.通过清华教育镜像会下载失败
#2. 通过 https://pypi.org/project/atomic/ 页面中下载源代码 然后通过:pip install /path/to/atomic-x.x.x.tar.gz 也安装失败
# 3. PATHONPATH 已经安装
# 4. 怀疑是和C++环境冲突了
import atomic
count = 0
lock = atmoic.Atmoic()
def increment():
    global count
    with lock.atmoic():
        count += 1

# 创建三条线程并启动他们
thread_01 = threading.Thread(target = increment)
thread_02 = threading.Thread(target = increment)
thread_03 = threading.Thread(target = increment)

thread_01.start()
thread_02.start()
thread_03.start()

#等待三条线程执行完毕
thread_01.join()
thread_02.join()
thread_03.join()

# 输出3
print('count: ',count)
5.1 使用 threading.Lock( ) 替代 atomic 原子操作
value = 0
lock = threading.Lock()

def atomic_add(num):
    global value
    with lock:
        value += num

# 示例运行代码
for i in range(10):
    t = threading.Thread(target=atomic_add, args=(1,))
    t.start()
    t.join()
print(value)  # 结果应为10

说明:
#在上述代码中,使用了 Python 中的线程锁来保证 value 变量的原子性。每个线程都会执行一次 atomic_add 函数,
# 其中使用了 with lock 语句来获取线程锁,确保在执行某个线程操作 value 时,没有其他线程在执行这个操作。
#如果你需要更高效的 atomic add 实现,可以考虑使用 ctypes 库,利用 C 语言函数来实现原子操作。
6. 使用 threading.Local实现
💚
-
threading.local()这个方法的特点用来保存一个全局变量,但是这个全局变量只有在当前线程才能访问,
localVal.val = name这条语句可以储存一个变量到当前线程,如果在另外一个线程里面再次对localVal.val进行赋值,
那么会在另外一个线程单独创建内存空间来存储,也就是说在不同的线程里面赋值 不会覆盖之前的值,因为每个 -
线程里面都有一个单独的空间来保存这个数据,而且这个数据是隔离的,其他线程无法访问
-
这个东西可以用在那些地方呢,比如下载,现在都是多线程下载了,就像酷狗那样,可以同时下载很多首歌曲,那么
就可以利用这个方法来保存每个下载线程的数据,比如下载进度,下载速度之类的
import threading
# 创建全局ThreadLocal对象:
localVal = threading.local()
localVal.val = "Main-Thread"
def process_student():
	print ('%s (in %s)' % (localVal.val,threading.current_thread().name))

#赋值
def process_thread(value):
    localVal.val = value
    process_student()

# name = '定义线程名'
t1 = threading.Thread(target =process_thread, args = ('One',), name = 'Thread-B')

t2 = threading.Thread(target =process_thread, args = ('Two',), name = 'Thread-A')

t1.start()
t2.start()
t1.join()
t2.join()

print (localVal.val)

# 打印结果
One (in Thread-B)
Two (in Thread-A)
Main-Thread
总结
- Python的线程操作在旧版本中使用的是thread模块,在Python27和Python3中引入了threading模块,同时thread模块在Python3中改名为_thread模块。
- threading模块相较于thread模块,对于线程的操作更加的丰富,而且threading模块本身也是相当于对thread模块的进一步封装而成,thread模块有的功能threading模块也都有,所以涉及到对线程的操作,推荐使用threading模块。
- threading模块中包含了关于线程操作的丰富功能,包括:常用线程函数,线程对象,锁对象,递归锁对象,事件对象,条件变量对象,信号量对象,定时器对象,栅栏对象。
代码示例
# python多线程
# 1:多线程基础
#或者
# 2:线程同步
#2.1 python的锁


# 方法1:通过 thread.join() 阻塞当前线程来实现
import threading
def thread_test(x,y):
    for i in range(x,y): # range函数 :生成一系列连续整数的函数
        print(i)

thread_01 = threading.Thread(name = 't1',target = thread_test,args=(1,10))
thread_02 = threading.Thread(name = 't2',target = thread_test,args=(11,20))

thread_01.start() # 启动线程1
thread_01.join() # 阻塞主线程,让线程thread_01 执行完毕后再执行后面的代码
print ("thread_01 run over")
print ("main thread ----!")
thread_02.start() # 启动线程2
thread_02.join()
print ("thread_02run over")

# 方法2:通过 sleep来休眠当前线程

import time
def thread_sleep(x,y):
    print("子线程开始休眠 10s")
    time.sleep(10)  # 休眠10s
    print("子线程休眠结束")
    for i in range(x,y): # range函数 :生成一系列连续的函数
        print(i)

thread_03 = threading.Thread(target = thread_sleep,daemon = False,args=(20,50)) #线程不会随着主线程退出而退出
thread_03.start()
print("主线线程执行完毕")
print("子线程执行完毕")


# 线程同步
# python 的锁 :
# 背景:异步模式的情况下,同时有一个线程在修改共享数据,另一个线程在读取共享数据,当修改的共享数据的线程没有处理完毕,读取数据的线程肯定会得到错误的结果。
# 如果采用多线程的同步控制机制,当处理共享数据的线程完成处理数据之后,读取线程就读取数据。
# 1.

# 举例
class myThread(threading.Thread):
    def run(self):
        global x  # 声明一个共享数据 x
        lock.acquire() # 上锁
        x += 10  # 变量x 增加10
        print('%s: %d' %(self.name,x)) # self 是线程对象,可以通过selt.name 得到线程名
        lock.release() #解锁


#设置全局变量 x
x = 0
lock = threading.RLock() # 创建可置入锁
list_thread = []
for i in range(5):
    list_thread.append(myThread()) # 创建5个线程,放到同一列表中

for i in list_thread:
    i.start()  # 开启线程


# 举例:有几个生产车间,几个消费者,当生产到一定数量时,即可停止生产
condition = threading.Condition() # 获取线程条件锁
sheep = ['1件产品','1件产品','1件产品','1件产品','1件产品','1件产品']
class Producer(threading.Thread):
    def __init__(self,name):
        super().__init__(name = name)
        pass
    def run(self):
        global condition,sheep
        while True:
            time.sleep(0.1)
            condition.acquire()  # 上锁
            if len(sheep) < 10:
                print(self.name + "生产了1件产品")
                sheep.append('1件产品')
                condition.notifyAll()
                pass
            else:
                print("仓库满了,请停止生产,并等待5s后生产")
                condition.wait()
                time.sleep(5)
                pass
            condition.release()
        pass
    pass

class Custome(threading.Thread):
    def __init__(self,name):
        super().__init__(name = name)
        pass
    def run(self):
        global condition,sheep
        while True:
            time.sleep(0.1)
            condition.acquire()
            if len(sheep) > 0:
                meat = sheep.pop()
                print(self.name + "购买了" + meat + ",还剩" + str(len(sheep)) + "件")
                condition.notifyAll
                pass
            else:
                print("对不起,买光了,请等待5s后再购买")
                condition.wait()
                time.sleep(5)
                pass
            condition.release()
        pass
    pass

p1 = Producer("1号生产车间")
p2 = Producer("2号生产车间")
p3 = Producer("3号生产车间")
p4 = Producer("4号生产车间")
p5 = Producer("5号生产车间")

#p1.start()
#p2.start()
#p3.start()
#p4.start()
#p5.start()

c1 = Custome("小王")
c2 = Custome("小张")
c3 = Custome("小刘")
c4 = Custome("小李")

#c1.start()
#c2.start()
#c3.start()
#c4.start()
import time
import threading
def thread_sleep(x,y):
    print("子线程开始休眠 10s")
    time.sleep(10)  # 休眠10s
    print("子线程休眠结束")
    for i in range(x,y): # range函数 :生成一系列连续的函数
        print(i)
    print("子线程执行完毕")

thread_03 = threading.Thread(target = thread_sleep,daemon = False,args=(1,5)) #线程不会随着主线程退出而退出
thread_03.start()
print("主线线程执行完毕")


value = 0
lock = threading.Lock()

def atomic_add(num):
    global value
    with lock:
        value += num

# 示例运行代码
for i in range(10):
    t = threading.Thread(target=atomic_add, args=(1,))
    t.start()
    t.join()
print(value)  # 结果应为10

#在上述代码中,使用了 Python 中的线程锁来保证 value 变量的原子性。每个线程都会执行一次 atomic_add 函数,
#其中使用了 with lock 语句来获取线程锁,确保在执行某个线程操作 value 时,没有其他线程在执行这个操作。


#如果你需要更高效的 atomic add 实现,可以考虑使用 ctypes 库,利用 C 语言函数来实现原子操作。

# 在此示例中,我们在increment()函数内使用了lock.atomic()来确保任何时刻仅有一条线程能够访问计数器。
# 这样,即使多个线程同时执行increment()函数在计数器上进行递增,结果也将是唯一且正确的。在本例中,最终输出的计数器值将为2。

# 但是 atomic 这个库下载失败
# 1.通过清华教育镜像会下载失败
#2. 通过 https://pypi.org/project/atomic/ 页面中下载源代码 然后通过:pip install /path/to/atomic-x.x.x.tar.gz 也安装失败
# 3. PATHONPATH 已经安装
# 4. 怀疑是和C++环境冲突了


# import atomic
# count = 0
#lock = atmoic.Atmoic()
#def increment():
    # global count
    # with lock.atmoic():
      #  count += 1

# 创建三条线程并启动他们
#thread_01 = threading.Thread(target = increment)
#thread_02 = threading.Thread(target = increment)
#thread_03 = threading.Thread(target = increment)

#thread_01.start()
#thread_02.start()
#thread_03.start()

#等待三条线程执行完毕
#thread_01.join()
#thread_02.join()
#thread_03.join()

# 输出3
# print('count: ',count)


#coding = utf - 8
import threading
# 创建全局ThreadLocal对象:
localVal = threading.local()
localVal.val = "Main-Thread"
def process_student():
	print ('%s (in %s)' % (localVal.val,threading.current_thread().name))

#赋值
def process_thread(value):
    localVal.val = value
    process_student()

# name = '定义线程名'
t1 = threading.Thread(target =process_thread, args = ('One',), name = 'Thread-B')

t2 = threading.Thread(target =process_thread, args = ('Two',), name = 'Thread-A')

t1.start()
t2.start()
t1.join()
t2.join()

print (localVal.val)


 被折叠的 条评论
为什么被折叠?
被折叠的 条评论
为什么被折叠?
 到【灌水乐园】发言


