


 本文详细介绍了如何使用Hystrix实现微服务熔断,通过创建消费者与提供者服务,配置Eureka作为服务发现组件,并利用HystrixDashboard进行服务监控。展示了在不同请求场景下,如超时与正常请求,仪表盘的反馈效果。
Hystrix Dashboard仪表盘用于以GUI的形式展示消费者的执行情况,包括其处理器方法与Service方法的调用执行情况,及熔断器CircuitBreaker的状态等。当然,这些显示出的数据都是在指定时间窗内的执行情况及状态信息
一、创建消费者
(1)创建spring boot工程,命名04-consumer-dashboard-8080
(2)依赖
<?xml version="1.0" encoding="UTF-8"?>
<project xmlns="http://maven.apache.org/POM/4.0.0" xmlns:xsi="http://www.w3.org/2001/XMLSchema-instance"
         xsi:schemaLocation="http://maven.apache.org/POM/4.0.0 http://maven.apache.org/xsd/maven-4.0.0.xsd">
    <modelVersion>4.0.0</modelVersion>

    <groupId>com.abc</groupId>
    <artifactId>03-consumer-loadbalance-8080</artifactId>
    <version>0.0.1-SNAPSHOT</version>
    <packaging>jar</packaging>

    <parent>
        <groupId>org.springframework.boot</groupId>
        <artifactId>spring-boot-starter-parent</artifactId>
        <version>2.1.7.RELEASE</version>
        <relativePath/> <!-- lookup parent from repository -->
    </parent>

    <properties>
        <java.version>1.8</java.version>
        <spring-cloud.version>Greenwich.SR1</spring-cloud.version>
    </properties>

    <dependencies>
        <!--feign依赖-->
        <dependency>
            <groupId>org.springframework.cloud</groupId>
            <artifactId>spring-cloud-starter-openfeign</artifactId>
        </dependency>

        <!--actuator依赖-->
        <dependency>
            <groupId>org.springframework.boot</groupId>
            <artifactId>spring-boot-starter-actuator</artifactId>
        </dependency>
        <!--eureka客户端依赖-->
        <dependency>
            <groupId>org.springframework.cloud</groupId>
            <artifactId>spring-cloud-starter-netflix-eureka-client</artifactId>
        </dependency>

        <dependency>
            <groupId>org.springframework.boot</groupId>
            <artifactId>spring-boot-starter-web</artifactId>
        </dependency>

        <dependency>
            <groupId>org.projectlombok</groupId>
            <artifactId>lombok</artifactId>
            <optional>true</optional>
        </dependency>
    </dependencies>

    <dependencyManagement>
        <dependencies>
            <dependency>
                <groupId>org.springframework.cloud</groupId>
                <artifactId>spring-cloud-dependencies</artifactId>
                <version>${spring-cloud.version}</version>
                <type>pom</type>
                <scope>import</scope>
            </dependency>
        </dependencies>
    </dependencyManagement>

    <build>
        <plugins>
            <plugin>
                <groupId>org.springframework.boot</groupId>
                <artifactId>spring-boot-maven-plugin</artifactId>
            </plugin>
        </plugins>
    </build>


</project>
(3)application.yml配置
spring:
  application:
    name: abcmsc-consumer-depart

eureka:
  client:
    service-url:
      defaultZone: http://localhost:8000/eureka

feign:
  client:
    config:
      default:
        connectTimeout: 5000  # 指定Feign客户端连接提供者的超时时限   取决于网络环境
        readTimeout: 5000   # 指定Feign客户端从请求到获取到提供者给出的响应的超时时限  取决于业务逻辑运算时间
  compression:
    request:
      enabled: true   # 开启对请求的压缩
      mime-types: text/xml, application/xml
      min-request-size: 2048   # 指定启用压缩的最小文件大小
    response:
      enabled: true   # 开启对响应的压缩
# 设置服务熔断时限
hystrix:
  command:
    default:
      execution:
        isolation:
          thread:
            timeoutInMilliseconds: 3000
(4)实体类
package com.abc.consumer.bean;

import lombok.Data;

@Data
public class Depart {
    private Integer id;
    private String name;
}
(5)service接口
package com.abc.consumer.service;


import com.abc.consumer.bean.Depart;
import org.springframework.cloud.openfeign.FeignClient;
import org.springframework.stereotype.Service;
import org.springframework.web.bind.annotation.*;

import java.util.List;

@Service
@FeignClient("abcmsc-provider-depart")
@RequestMapping("/provider/depart")
public interface DepartService {
    @GetMapping("/get/{id}")
    Depart getDepartById(@PathVariable("id") int id);

}
(6)控制层
package com.abc.consumer.controller;

import com.abc.consumer.bean.Depart;
import com.abc.consumer.service.DepartService;
import org.springframework.beans.factory.annotation.Autowired;
import org.springframework.web.bind.annotation.*;

import java.util.List;

@RestController
@RequestMapping("/consumer/depart")
public class DepartController {
    @Autowired
    private DepartService service;

    @GetMapping("/get/{id}")
    public Depart getHandle(@PathVariable("id") int id) {
        return service.getDepartById(id);
    }

}
(7)启动类
package com.abc.consumer;

import org.springframework.boot.SpringApplication;
import org.springframework.boot.autoconfigure.SpringBootApplication;
import org.springframework.cloud.openfeign.EnableFeignClients;

// 指定Feign接口所在的包
@EnableFeignClients(basePackages = "com.abc.consumer.service")
@SpringBootApplication
public class ConsumerApplication {

    public static void main(String[] args) {
        SpringApplication.run(ConsumerApplication.class, args);
    }

}
二、创建提供者
(1)创建spring boot工程,命名04-provider-8081
(2)依赖
<?xml version="1.0" encoding="UTF-8"?>
<project xmlns="http://maven.apache.org/POM/4.0.0" xmlns:xsi="http://www.w3.org/2001/XMLSchema-instance"
         xsi:schemaLocation="http://maven.apache.org/POM/4.0.0 http://maven.apache.org/xsd/maven-4.0.0.xsd">
    <modelVersion>4.0.0</modelVersion>

    <groupId>com.abc</groupId>
    <artifactId>01-provider-8081</artifactId>
    <version>0.0.1-SNAPSHOT</version>
    <packaging>jar</packaging>

    <parent>
        <groupId>org.springframework.boot</groupId>
        <artifactId>spring-boot-starter-parent</artifactId>
        <version>2.1.7.RELEASE</version>
        <relativePath/> <!-- lookup parent from repository -->
    </parent>

    <properties>
        <project.build.sourceEncoding>UTF-8</project.build.sourceEncoding>
        <project.reporting.outputEncoding>UTF-8</project.reporting.outputEncoding>
        <java.version>1.8</java.version>
    </properties>

    <dependencies>
        <dependency>
            <groupId>com.alibaba</groupId>
            <artifactId>druid</artifactId>
            <version>1.1.10</version>
        </dependency>

        <!--修改MySQL驱动版本-->
        <dependency>
            <groupId>mysql</groupId>
            <artifactId>mysql-connector-java</artifactId>
            <version>5.1.47</version>
            <scope>runtime</scope>
        </dependency>
        <dependency>
            <groupId>org.springframework.boot</groupId>
            <artifactId>spring-boot-starter-data-jpa</artifactId>
        </dependency>
        <dependency>
            <groupId>org.springframework.boot</groupId>
            <artifactId>spring-boot-starter-web</artifactId>
        </dependency>

        <dependency>
            <groupId>org.projectlombok</groupId>
            <artifactId>lombok</artifactId>
            <optional>true</optional>
        </dependency>
    </dependencies>

    <build>
        <plugins>
            <plugin>
                <groupId>org.springframework.boot</groupId>
                <artifactId>spring-boot-maven-plugin</artifactId>
            </plugin>
        </plugins>
    </build>

</project>
(3)application.yml配置
server:
  port: 8081

# 设置Spring-Data-JPA
spring:
  jpa:
    # 指定在Spring容器启动时是否自动建表,默认为false
    generate-ddl: true
    # 指定是否在控制台显示其执行的SQL语句,默认false
    show-sql: true
    # 指定应用重启时是否重新创建更新表
    hibernate:
      ddl-auto: none

  # 配置数据源
  datasource:
    type: com.alibaba.druid.pool.DruidDataSource
    driver-class-name: com.mysql.jdbc.Driver
    url: jdbc:mysql:///test?useUnicode=true&characterEncoding=utf8
    username: root
    password: root

  application:
    name: abcmsc-provider-depart   # 暴露微服务名称

logging:
  # 设置日志输出格式
  pattern:
    console: level-%level %msg%n
  level:
    root: info
    org.hibernate: info
    org.hibernate.type.descriptor.sql.BasicBinder: trace
    org.hibernate.type.descriptor.sql.BasicExtractor: trace
    com.abc.provider: debug

# 指定Eureka服务中心
eureka:
  client:
    service-url:
      defaultZone: http://localhost:8000/eureka
(4)实体类
package com.abc.provider.bean;

import com.fasterxml.jackson.annotation.JsonIgnoreProperties;
import lombok.Data;

import javax.persistence.Entity;
import javax.persistence.GeneratedValue;
import javax.persistence.GenerationType;
import javax.persistence.Id;

@Data
@Entity
@JsonIgnoreProperties({"hibernateLazyInitializer", "handler", "fieldHandler"})
public class Depart {
    @Id
    @GeneratedValue(strategy = GenerationType.IDENTITY)
    private Integer id;
    private String name;
}
(5)service接口
package com.abc.provider.service;


import com.abc.provider.bean.Depart;

import java.util.List;

public interface DepartService {
    Depart getDepartById(int id);
}
(6)service接口类
package com.abc.provider.service;
import com.abc.provider.bean.Depart;
import com.abc.provider.repository.DepartRepository;
import org.springframework.beans.factory.annotation.Autowired;
import org.springframework.stereotype.Service;
import java.util.List;
import java.util.concurrent.TimeUnit;
@Service
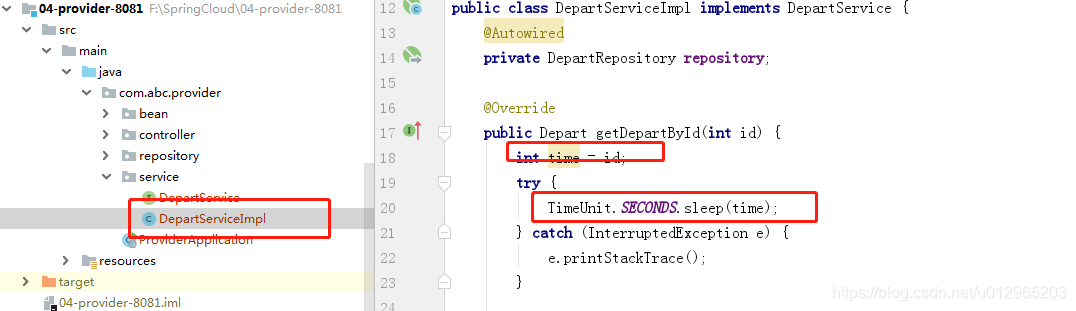
public class DepartServiceImpl implements DepartService {
@Autowired
private DepartRepository repository;
@Override
public Depart getDepartById(int id) {
int time = id;
try {
TimeUnit.SECONDS.sleep(time);
} catch (InterruptedException e) {
e.printStackTrace();
}
if(repository.existsById(id)) {
return repository.getOne(id);
}
Depart depart = new Depart();
depart.setName("no this depart");
return depart;
}
}
(7)数据链路层
package com.abc.provider.repository;

import com.abc.provider.bean.Depart;
import org.springframework.data.jpa.repository.JpaRepository;

// 第一个泛型:当前Repository的操作对象类型
// 第二个泛型:当前Repository的操作对象的id类型
public interface DepartRepository extends JpaRepository<Depart, Integer> {
}
(8)控制层
package com.abc.provider.controller;

import com.abc.provider.bean.Depart;
import com.abc.provider.service.DepartService;
import org.springframework.beans.factory.annotation.Autowired;
import org.springframework.cloud.client.ServiceInstance;
import org.springframework.cloud.client.discovery.DiscoveryClient;
import org.springframework.web.bind.annotation.*;

import java.util.List;

@RequestMapping("/provider/depart")
@RestController
public class DepartController {
    @Autowired
    private DepartService service;

    @GetMapping("/get/{id}")
    public Depart getHandle(@PathVariable("id") int id) {
        return service.getDepartById(id);
    }

}
(9)启动类
package com.abc.provider;

import org.springframework.boot.SpringApplication;
import org.springframework.boot.autoconfigure.SpringBootApplication;

@SpringBootApplication
public class ProviderApplication {

    public static void main(String[] args) {
        SpringApplication.run(ProviderApplication.class, args);
    }
}
三、创建eureka
(1)创建spring boot工程,命名00-eurekaserver-8000
(2)依赖
<?xml version="1.0" encoding="UTF-8"?>
<project xmlns="http://maven.apache.org/POM/4.0.0" xmlns:xsi="http://www.w3.org/2001/XMLSchema-instance"
         xsi:schemaLocation="http://maven.apache.org/POM/4.0.0 http://maven.apache.org/xsd/maven-4.0.0.xsd">
    <modelVersion>4.0.0</modelVersion>

    <groupId>com.abc</groupId>
    <artifactId>00-eurekaserver-8000</artifactId>
    <version>0.0.1-SNAPSHOT</version>
    <packaging>jar</packaging>

    <parent>
        <groupId>org.springframework.boot</groupId>
        <artifactId>spring-boot-starter-parent</artifactId>
        <version>2.1.7.RELEASE</version>
        <relativePath/> <!-- lookup parent from repository -->
    </parent>

    <properties>
        <java.version>1.8</java.version>
        <spring-cloud.version>Greenwich.SR2</spring-cloud.version>
    </properties>

    <dependencies>
        <dependency>
            <groupId>org.springframework.cloud</groupId>
            <artifactId>spring-cloud-starter-netflix-eureka-server</artifactId>
        </dependency>

        <dependency>
            <groupId>org.springframework.boot</groupId>
            <artifactId>spring-boot-starter-test</artifactId>
            <scope>test</scope>
        </dependency>
    </dependencies>

    <dependencyManagement>
        <dependencies>
            <dependency>
                <groupId>org.springframework.cloud</groupId>
                <artifactId>spring-cloud-dependencies</artifactId>
                <version>${spring-cloud.version}</version>
                <type>pom</type>
                <scope>import</scope>
            </dependency>
        </dependencies>
    </dependencyManagement>

    <build>
        <plugins>
            <plugin>
                <groupId>org.springframework.boot</groupId>
                <artifactId>spring-boot-maven-plugin</artifactId>
            </plugin>
        </plugins>
    </build>

</project>
(3)application.yml配置
server:
  port: 8000

eureka:
  instance:
    hostname: localhost  # 指定Eureka主机
  client:
    register-with-eureka: false   # 指定当前主机是否向Eureka服务器进行注册
    fetch-registry: false    # 指定当前主机是否要从Eurka服务器下载服务注册列表
    service-url:   # 服务暴露地址
     defaultZone: http://localhost:8000/eureka
#     defaultZone: http://${eureka.instance.hostname}:${server.port}/eureka

#  server:
#    enable-self-preservation: false    # 关闭自我保护
(4)启动类
package com.abc.eureka;

import org.springframework.boot.SpringApplication;
import org.springframework.boot.autoconfigure.SpringBootApplication;
import org.springframework.cloud.netflix.eureka.server.EnableEurekaServer;

@SpringBootApplication
@EnableEurekaServer   // 开启Eureka服务
public class EurekaServerApplication {

    public static void main(String[] args) {
        SpringApplication.run(EurekaServerApplication.class, args);
    }
}
四、测试
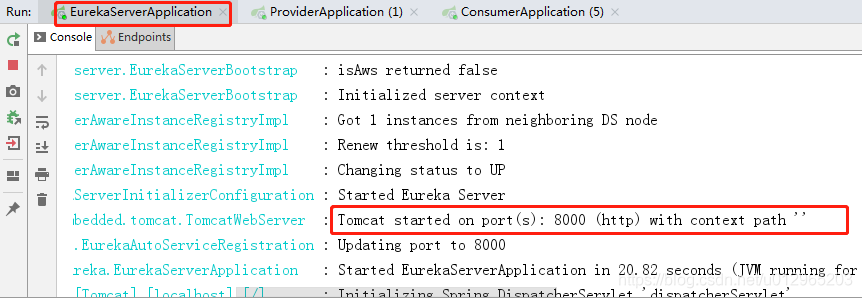
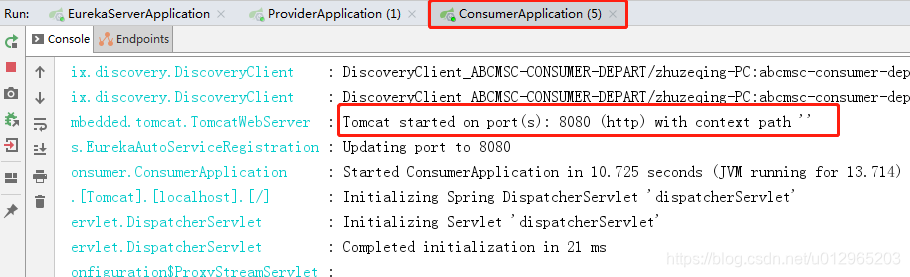
(1)启动eureka
(2)启动提供者

(3)消费者
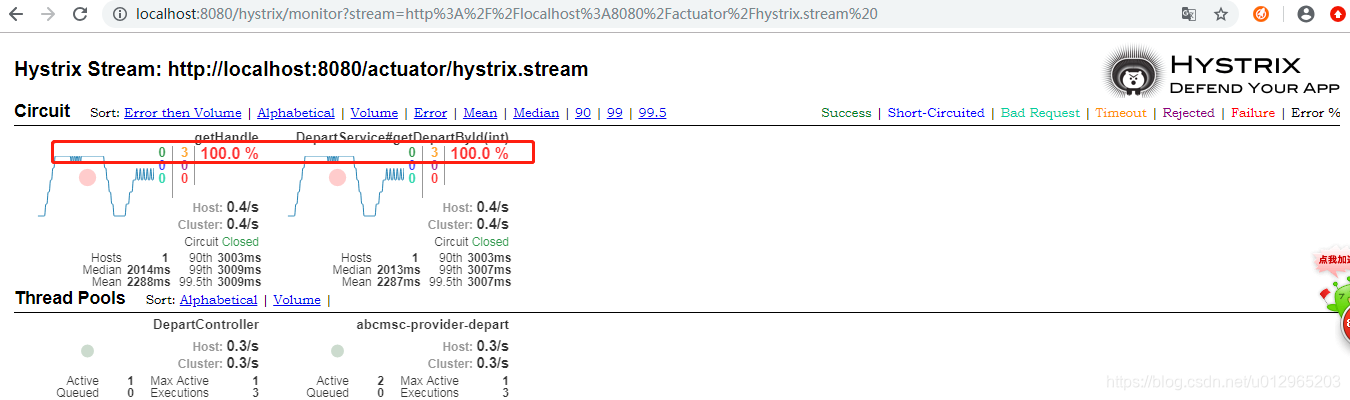
(4)访问仪表盘

A、请求超时
请求http://localhost:8080/consumer/depart/get/4
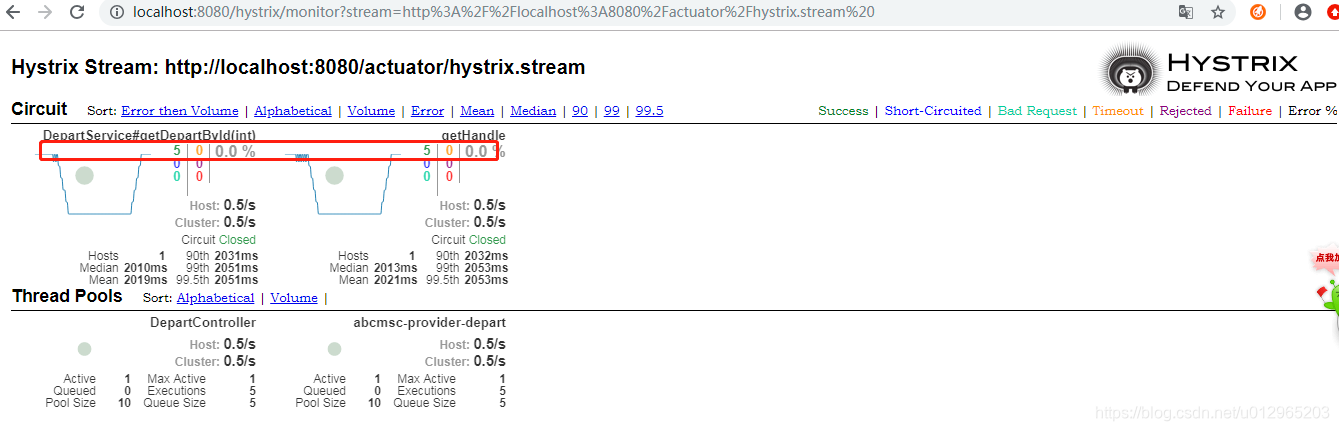
仪表盘效果
B、正常请求
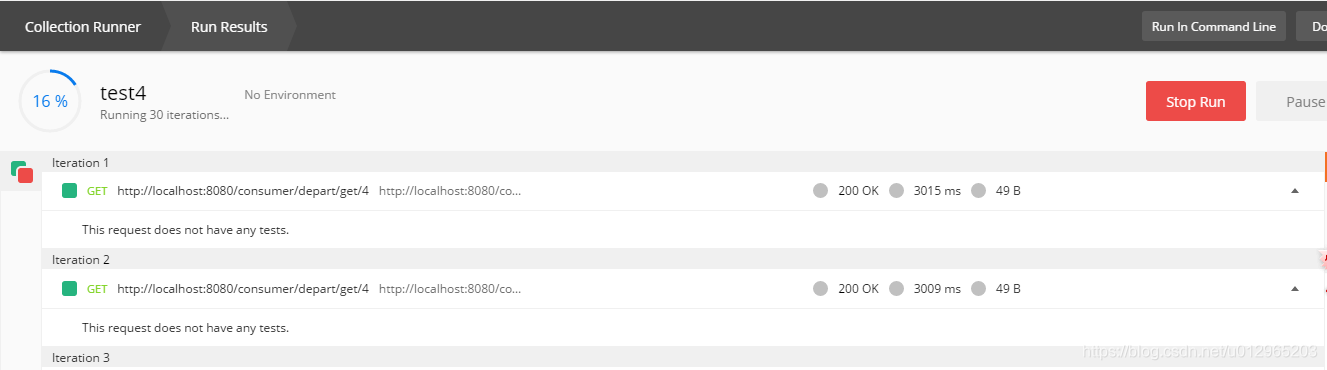
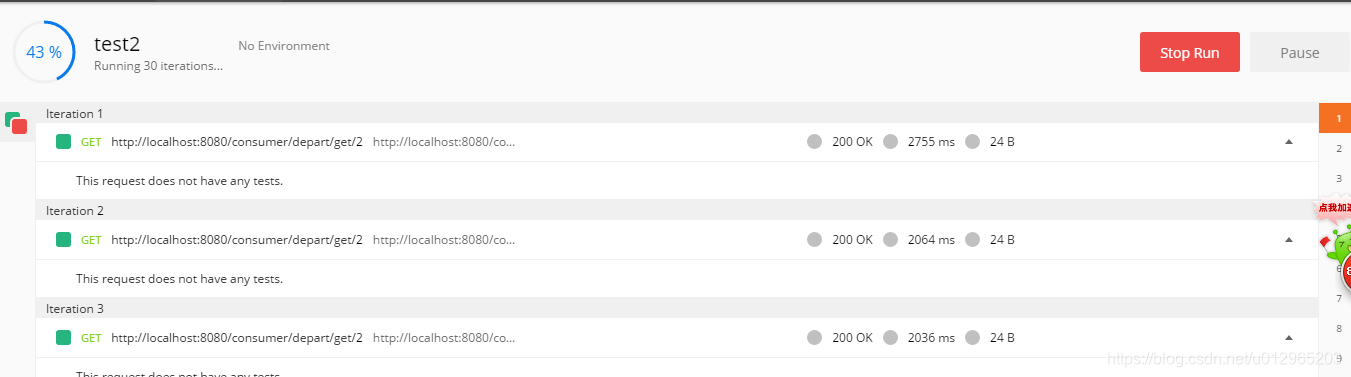
请求http://localhost:8080/consumer/depart/get/2
提供端接口实现类
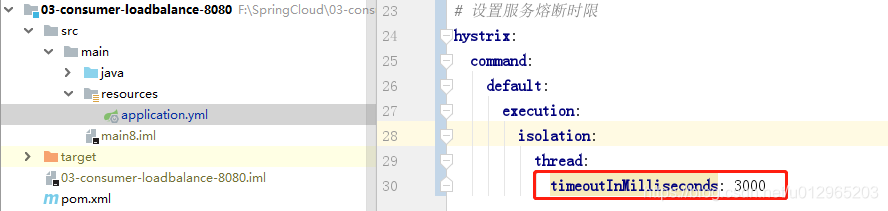
消费端配置因为超时设置3秒
提交请求30个
仪表盘效果
(5)其它
还有Turbine也是类似工具
使用Turbine对集群进行监控的实现步骤很简单,只需三步:
- 导入Turbine依赖
- 在配置文件中配置turbine
- 在启动类上添加@EnableTurbine注解


 491
491

 被折叠的 条评论
为什么被折叠?
被折叠的 条评论
为什么被折叠?
 到【灌水乐园】发言


