


ArkWeb(方舟Web)提供了Web组件,用于在应用程序中显示Web页面内容。
一、使用场景
常见使用场景包括:
-
应用集成Web页面:应用可以在页面中使用Web组件,嵌入Web页面内容,以降低开发成本,提升开发、运营效率。
-
浏览器网页浏览场景:浏览器类应用可以使用Web组件,打开三方网页,使用无痕模式浏览Web页面,设置广告拦截等。
-
小程序:小程序类宿主应用可以使用Web组件,渲染小程序的页面。
二、能力范围
Web组件为开发者提供了丰富的控制Web页面能力。
包括:
-
Web页面加载:声明式加载Web页面和离屏加载Web页面等。
-
生命周期管理:组件生命周期状态变化,通知Web页面的加载状态变化等。
-
常用属性与事件:UserAgent管理、Cookie与存储管理、字体与深色模式管理、权限管理等。
-
与应用界面交互:自定义文本选择菜单、上下文菜单、文件上传界面等与应用界面交互能力。
-
App通过JavaScriptProxy,与Web页面进行JavaScript交互。
-
安全与隐私:无痕浏览模式、广告拦截、坚盾守护模式等。
-
维测能力:DevTools工具调试能力,使用crashpad收集Web组件崩溃信息。
-
其他高阶能力:与原生组件同层渲染、Web组件的网络托管、Web组件的媒体播放托管、Web组件输入框拉起自定义输入法、网页接入密码保险箱等。
三、ArkWeb进程
ArkWeb是多进程模型,分为应用进程、Web渲染进程、Web GPU进程、Web孵化进程和Foundation进程。
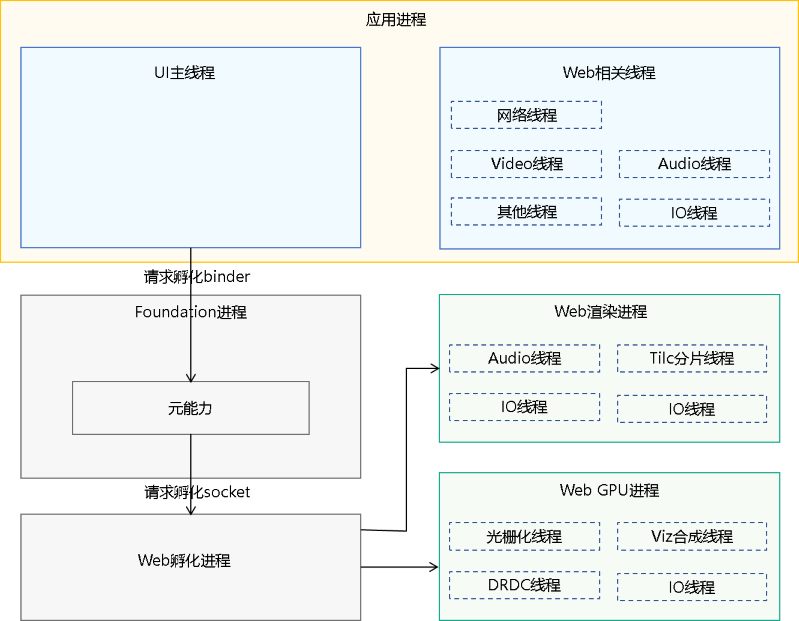
注:Web内核没有明确的内存大小申请约束,理论上可以无限大,直到被资源管理释放。
四、web组件生命周期
Web组件提供了丰富的组件生命周期回调接口,通过这些回调接口,开发者可以感知Web组件的生命周期状态变化,状态主要包括:Controller绑定到Web组件、网页加载开始、网页加载进度、网页加载结束、页面即将可见等。
状态说明:
-
aboutToAppear函数:在创建自定义组件的新实例后,在执行其build函数前执行。一般建议在此设置WebDebug调试模式setWebDebuggingAccess、设置Web内核自定义协议URL的跨域请求与fetch请求的权限customizeSchemes、设置Cookie(configCookie)等。
-
onControllerAttached事件:当Controller成功绑定到Web组件时触发该回调,且禁止在该事件回调前调用Web组件相关的接口,否则会抛出js-error异常。推荐在此事件中注入JS对象registerJavaScriptProxy、设置自定义用户代理setCustomUserAgent,可以在回调中使用loadUrl,getWebId等操作网页不相关的接口。但因该回调调用时网页还未加载,因此无法在回调中使用有关操作网页的接口,例如zoomIn、zoomOut等。
-
onLoadIntercept事件:当Web组件加载url之前触发该回调,用于判断是否阻止此次访问。默认允许加载。
-
onOverrideUrlLoading事件:当URL将要加载到当前Web中时,让宿主应用程序有机会获得控制权,回调函数返回true将导致当前Web中止加载URL,而返回false则会导致Web继续照常加载URL。onLoadIntercept接口和onOverrideUrlLoading接口行为不一致,触发时机也不同,所以在应用场景上存在一定区别。主要是在LoadUrl和iframe(HTML标签,表示HTML内联框架元素,用于将另一个页面嵌入到当前页面中)加载时,onLoadIntercept事件会正常回调到,但onOverrideUrlLoading事件在LoadUrl加载时不会触发,在iframe加载HTTP(s)协议或about:blank时也不会触发。详细介绍请见onLoadIntercept和onOverrideUrlLoading的说明。
-
onInterceptRequest事件:当Web组件加载url之前触发该回调,用于拦截url并返回响应数据。
-
onPageBegin事件:网页开始加载时触发该回调,且只在主frame(表示一个HTML元素,用于展示HTML页面的HTML元素)触发。如果是iframe或者frameset(用于包含frame的HTML标签)的内容加载时则不会触发此回调。多frame页面有可能同时开始加载,即使主frame已经加载结束,子frame也有可能才开始或者继续加载中。同一页面导航(片段、历史状态等)或者在提交前失败、被取消的导航等也不会触发该回调。
-
onProgressChange事件:告知开发者当前页面加载的进度。多frame页面或者子frame有可能还在继续加载而主frame可能已经加载结束,所以在onPageEnd事件后依然有可能收到该事件。
-
onPageEnd事件:网页加载完成时触发该回调,且只在主frame触发。多frame页面有可能同时开始加载,即使主frame已经加载结束,子frame也有可能才开始或者继续加载中。同一页面导航(片段、历史状态等)或者在提交前失败、被取消的导航等也不会触发该回调。推荐在此回调中执行JavaScript脚本loadUrl等。需要注意的是收到该回调并不能保证Web绘制的下一帧将反映此时DOM的状态。
-
onPageVisible事件:Web回调事件。渲染流程中当HTTP响应的主体开始加载,新页面即将可见时触发该回调。此时文档加载还处于早期,因此链接的资源比如在线CSS、在线图片等可能尚不可用。
-
onRenderExited事件:应用渲染进程异常退出时触发该回调,可以在此回调中进行系统资源的释放、数据的保存等操作。如果应用希望异常恢复,需要调用loadUrl接口重新加载页面。
-
onDisAppear事件:组件卸载消失时触发此回调。该事件为通用事件,指组件从组件树上卸载时触发的事件。
使用实例:
// xxx.ets
import { webview } from '@kit.ArkWeb';
import { BusinessError } from '@kit.BasicServicesKit';
import { promptAction } from '@kit.ArkUI';

@Entry
@Component
struct WebComponent {
  controller: webview.WebviewController = new webview.WebviewController();
  responseWeb: WebResourceResponse = new WebResourceResponse();
  heads: Header[] = new Array();
  @State webData: string = "<!DOCTYPE html>\n" +
    "<html>\n" +
    "<head>\n" +
    "<title>intercept test</title>\n" +
    "</head>\n" +
    "<body>\n" +
    "<h1>intercept test</h1>\n" +
    "</body>\n" +
    "</html>";

  aboutToAppear(): void {
    try {
      webview.WebviewController.setWebDebuggingAccess(true);
    } catch (error) {
      console.error(`ErrorCode: ${(error as BusinessError).code},  Message: ${(error as BusinessError).message}`);
    }
  }

  build() {
    Column() {
      Web({ src: $rawfile('index.html'), controller: this.controller })
        .onControllerAttached(() => {
          // 推荐在此loadUrl、设置自定义用户代理、注入JS对象等
          console.log('onControllerAttached execute')
        })
        .onLoadIntercept((event) => {
          if (event) {
            console.log('onLoadIntercept url:' + event.data.getRequestUrl())
            console.log('url:' + event.data.getRequestUrl())
            console.log('isMainFrame:' + event.data.isMainFrame())
            console.log('isRedirect:' + event.data.isRedirect())
            console.log('isRequestGesture:' + event.data.isRequestGesture())
          }
          // 返回true表示阻止此次加载,否则允许此次加载
          return false;
        })
        .onOverrideUrlLoading((webResourceRequest: WebResourceRequest) => {
          if (webResourceRequest && webResourceRequest.getRequestUrl() == "about:blank") {
            return true;
          }
          return false;
        })
        .onInterceptRequest((event) => {
          if (event) {
            console.log('url:' + event.request.getRequestUrl());
          }
          let head1: Header = {
            headerKey: "Connection",
            headerValue: "keep-alive"
          }
          let head2: Header = {
            headerKey: "Cache-Control",
            headerValue: "no-cache"
          }
          let length = this.heads.push(head1);
          length = this.heads.push(head2);
          this.responseWeb.setResponseHeader(this.heads);
          this.responseWeb.setResponseData(this.webData);
          this.responseWeb.setResponseEncoding('utf-8');
          this.responseWeb.setResponseMimeType('text/html');
          this.responseWeb.setResponseCode(200);
          this.responseWeb.setReasonMessage('OK');
          // 返回响应数据则按照响应数据加载,无响应数据则返回null表示按照原来的方式加载
          return this.responseWeb;
        })
        .onPageBegin((event) => {
          if (event) {
            console.log('onPageBegin url:' + event.url);
          }
        })
        .onFirstContentfulPaint(event => {
          if (event) {
            console.log("onFirstContentfulPaint:" + "[navigationStartTick]:" +
            event.navigationStartTick + ", [firstContentfulPaintMs]:" +
            event.firstContentfulPaintMs);
          }
        })
        .onProgressChange((event) => {
          if (event) {
            console.log('newProgress:' + event.newProgress);
          }
        })
        .onPageEnd((event) => {
          // 推荐在此事件中执行JavaScript脚本
          if (event) {
            console.log('onPageEnd url:' + event.url);
          }
        })
        .onPageVisible((event) => {
          console.log('onPageVisible url:' + event.url);
        })
        .onRenderExited((event) => {
          if (event) {
            console.log('onRenderExited reason:' + event.renderExitReason);
          }
        })
        .onDisAppear(() => {
          promptAction.showToast({
            message: 'The web is hidden',
            duration: 2000
          })
        })
    }
  }
}
五、web组件和JavaScript的交互
web组件和javaScript的交互中主要分为应用侧调用前端页面函数、前端页面调用应用侧函数、建立前端页面和应用侧数据通道。
1.应用侧调用前端页面函数
应用侧可以通过runJavaScript()和runJavaScriptExt()方法调用前端页面的JavaScript相关函数。
runJavaScript()和runJavaScriptExt()在参数类型上有些差异。runJavaScriptExt()入参类型不仅支持string还支持ArrayBuffer(从文件中获取JavaScript脚本数据),另外可以通过AsyncCallback的方式获取执行结果。
使用案例:
// xxx.ets
import { webview } from '@kit.ArkWeb';

@Entry
@Component
struct WebComponent {
  webviewController: webview.WebviewController = new webview.WebviewController();

  aboutToAppear() {
    // 配置Web开启调试模式
    webview.WebviewController.setWebDebuggingAccess(true);
  }

  build() {
    Column() {
      Button('runJavaScript')
        .onClick(() => {
          // 前端页面函数无参时,将param删除。
          this.webviewController.runJavaScript('htmlTest(param)');
        })
      Button('runJavaScriptCodePassed')
        .onClick(() => {
          // 传递runJavaScript侧代码方法。
          this.webviewController.runJavaScript(`function changeColor(){document.getElementById('text').style.color = 'red'}`);
        })
      Web({ src: $rawfile('index.html'), controller: this.webviewController })
    }
  }
}
2.前端页面调用应用侧函数
前端页面调用应用侧函数,主要是使用Web组件将应用侧代码注册到前端页面中,注册完成之后,前端页面中使用注册的对象名称就可以调用应用侧的函数,实现在前端页面中调用应用侧方法。注册应用侧代码有两种方式,一种在Web组件初始化调用,使用javaScriptProxy()接口。另外一种在Web组件初始化完成后调用,使用registerJavaScriptProxy()接口, 需要和deleteJavaScriptRegister接口配合使用,防止内存泄漏。使用registerJavaScriptProxy()接口注册方法时,注册后需调用refresh()接口生效。
使用案例:
(1).javaScriptProxy()接口使用示例如下。
// xxx.ets
import { webview } from '@kit.ArkWeb';
import { BusinessError } from '@kit.BasicServicesKit';

class testClass {
  constructor() {
  }

  test(): string {
    return 'ArkTS Hello World!';
  }
}

@Entry
@Component
struct WebComponent {
  webviewController: webview.WebviewController = new webview.WebviewController();
  // 声明需要注册的对象
  @State testObj: testClass = new testClass();

  build() {
    Column() {
      Button('deleteJavaScriptRegister')
        .onClick(() => {
          try {
            this.webviewController.deleteJavaScriptRegister("testObjName");
          } catch (error) {
            console.error(`ErrorCode: ${(error as BusinessError).code},  Message: ${(error as BusinessError).message}`);
          }
        })
      // Web组件加载本地index.html页面
      Web({ src: $rawfile('index.html'), controller: this.webviewController})
        // 将对象注入到web端
        .javaScriptProxy({
          object: this.testObj,
          name: "testObjName",
          methodList: ["test"],
          controller: this.webviewController,
          // 可选参数
          asyncMethodList: [],
          permission: '{"javascriptProxyPermission":{"urlPermissionList":[{"scheme":"resource","host":"rawfile","port":"","path":""},' +
                      '{"scheme":"e","host":"f","port":"g","path":"h"}],"methodList":[{"methodName":"test","urlPermissionList":' +
                      '[{"scheme":"https","host":"xxx.com","port":"","path":""},{"scheme":"resource","host":"rawfile","port":"","path":""}]},' +
                      '{"methodName":"test11","urlPermissionList":[{"scheme":"q","host":"r","port":"","path":"t"},' +
                      '{"scheme":"u","host":"v","port":"","path":""}]}]}}'
        })
    }
  }
}(2)应用侧使用registerJavaScriptProxy()接口注册。
// xxx.ets
import { webview } from '@kit.ArkWeb';
import { BusinessError } from '@kit.BasicServicesKit';

class testClass {
  constructor() {
  }

  test(): string {
    return "ArkUI Web Component";
  }

  toString(): void {
    console.log('Web Component toString');
  }
}

@Entry
@Component
struct Index {
  webviewController: webview.WebviewController = new webview.WebviewController();
  @State testObj: testClass = new testClass();

  build() {
    Column() {
      Button('refresh')
        .onClick(() => {
          try {
            this.webviewController.refresh();
          } catch (error) {
            console.error(`ErrorCode: ${(error as BusinessError).code},  Message: ${(error as BusinessError).message}`);
          }
        })
      Button('Register JavaScript To Window')
        .onClick(() => {
          try {
            this.webviewController.registerJavaScriptProxy(this.testObj, "testObjName", ["test", "toString"],
                    // 可选参数, asyncMethodList
                    [],
                    // 可选参数, permission
                    '{"javascriptProxyPermission":{"urlPermissionList":[{"scheme":"resource","host":"rawfile","port":"","path":""},' +
                    '{"scheme":"e","host":"f","port":"g","path":"h"}],"methodList":[{"methodName":"test","urlPermissionList":' +
                    '[{"scheme":"https","host":"xxx.com","port":"","path":""},{"scheme":"resource","host":"rawfile","port":"","path":""}]},' +
                    '{"methodName":"test11","urlPermissionList":[{"scheme":"q","host":"r","port":"","path":"t"},' +
                    '{"scheme":"u","host":"v","port":"","path":""}]}]}}'
            );
          } catch (error) {
            console.error(`ErrorCode: ${(error as BusinessError).code},  Message: ${(error as BusinessError).message}`);
          }
        })
      Button('deleteJavaScriptRegister')
        .onClick(() => {
          try {
            this.webviewController.deleteJavaScriptRegister("testObjName");
          } catch (error) {
            console.error(`ErrorCode: ${(error as BusinessError).code},  Message: ${(error as BusinessError).message}`);
          }
        })
      Web({ src: $rawfile('index.html'), controller: this.webviewController })
    }
  }
}
(3)前端页面调用
<!-- index.html -->
<!DOCTYPE html>
<html>
<body>
<button type="button" onclick="callArkTS()">Click Me!</button>
<p id="demo"></p>
<script>
    function callArkTS() {
        let str = testObjName.test();
        document.getElementById("demo").innerHTML = str;
        console.info('ArkTS Hello World! :' + str);
    }
</script>
</body>
</html>
3.建立前端页面和应用侧数据通道
前端页面和应用侧之间的通信,主要是应用侧页面中通过createWebMessagePorts方法创建消息端口,再把其中一个端口通过postMessage()接口发送到前端页面,便可以在前端页面和应用侧之间互相发送消息。
使用案例:
1.应用侧代码
// xxx.ets
import { webview } from '@kit.ArkWeb';
import { BusinessError } from '@kit.BasicServicesKit';

@Entry
@Component
struct WebComponent {
  controller: webview.WebviewController = new webview.WebviewController();
  ports: webview.WebMessagePort[] = [];
  @State sendFromEts: string = 'Send this message from ets to HTML';
  @State receivedFromHtml: string = 'Display received message send from HTML';

  build() {
    Column() {
      // 展示接收到的来自HTML的内容
      Text(this.receivedFromHtml)
      // 输入框的内容发送到HTML
      TextInput({ placeholder: 'Send this message from ets to HTML' })
        .onChange((value: string) => {
          this.sendFromEts = value;
        })

      // 该内容可以放在onPageEnd生命周期中调用。
      Button('postMessage')
        .onClick(() => {
          try {
            // 1、创建两个消息端口。
            this.ports = this.controller.createWebMessagePorts();
            // 2、在应用侧的消息端口(如端口1)上注册回调事件。
            this.ports[1].onMessageEvent((result: webview.WebMessage) => {
              let msg = 'Got msg from HTML:';
              if (typeof (result) === 'string') {
                console.info(`received string message from html5, string is: ${result}`);
                msg = msg + result;
              } else if (typeof (result) === 'object') {
                if (result instanceof ArrayBuffer) {
                  console.info(`received arraybuffer from html5, length is: ${result.byteLength}`);
                  msg = msg + 'length is ' + result.byteLength;
                } else {
                  console.info('not support');
                }
              } else {
                console.info('not support');
              }
              this.receivedFromHtml = msg;
            })
            // 3、将另一个消息端口(如端口0)发送到HTML侧,由HTML侧保存并使用。
            this.controller.postMessage('__init_port__', [this.ports[0]], '*');
          } catch (error) {
            console.error(`ErrorCode: ${(error as BusinessError).code},  Message: ${(error as BusinessError).message}`);
          }
        })

      // 4、使用应用侧的端口给另一个已经发送到html的端口发送消息。
      Button('SendDataToHTML')
        .onClick(() => {
          try {
            if (this.ports && this.ports[1]) {
              this.ports[1].postMessageEvent(this.sendFromEts);
            } else {
              console.error(`ports is null, Please initialize first`);
            }
          } catch (error) {
            console.error(`ErrorCode: ${(error as BusinessError).code},  Message: ${(error as BusinessError).message}`);
          }
        })
      Web({ src: $rawfile('index.html'), controller: this.controller })
    }
  }
}
2.前端页面代码
<!--index.html-->
<!DOCTYPE html>
<html>
<head>
    <meta name="viewport" content="width=device-width, initial-scale=1.0">
    <title>WebView Message Port Demo</title>
</head>
<body>
    <h1>WebView Message Port Demo</h1>
    <div>
        <input type="button" value="SendToEts" onclick="PostMsgToEts(msgFromJS.value);"/><br/>
        <input id="msgFromJS" type="text" value="send this message from HTML to ets"/><br/>
    </div>
    <p class="output">display received message send from ets</p>
</body>
<script>
var h5Port;
var output = document.querySelector('.output');
window.addEventListener('message', function (event) {
    if (event.data === '__init_port__') {
        if (event.ports[0] !== null) {
            h5Port = event.ports[0]; // 1. 保存从应用侧发送过来的端口。
            h5Port.onmessage = function (event) {
              // 2. 接收ets侧发送过来的消息。
              var msg = 'Got message from ets:';
              var result = event.data;
              if (typeof(result) === 'string') {
                console.info(`received string message from html5, string is: ${result}`);
                msg = msg + result;
              } else if (typeof(result) === 'object') {
                if (result instanceof ArrayBuffer) {
                  console.info(`received arraybuffer from html5, length is: ${result.byteLength}`);
                  msg = msg + 'length is ' + result.byteLength;
                } else {
                  console.info('not support');
                }
              } else {
                console.info('not support');
              }
              output.innerHTML = msg;
            }
        }
    }
})
// 3. 使用h5Port向应用侧发送消息。
function PostMsgToEts(data) {
    if (h5Port) {
      h5Port.postMessage(data);
    } else {
      console.error('h5Port is null, Please initialize first');
    }
}
</script>
</html>
六、设置基本属性
1.设置User-Agent
注:User-Agent(简称UA)是一个特殊的字符串,包含设备类型、操作系统及版本等关键信息。在Web开发中,这个字符串使服务器能够识别请求的来源设备及其特性,从而根据这些信息提供定制化的内容和服务。
自定义User-Agent结果设置使用案例
let currentUA = this.controller.getUserAgent();
            this.controller.setCustomUserAgent(`${currentUA} /APP-VERSION=${this.appVersion}/APP-NAME=${this.appName}`);
2.管理Cookie及数据存储
Web组件提供了WebCookieManager类,用于管理Web组件的Cookie信息。Cookie信息保存在应用沙箱路径下/proc/{pid}/root/data/storage/el2/base/cache/web/Cookiesd的文件中。当Cookie SameSite属性未指定时,默认值为SameSite=Lax,只在用户导航到cookie的源站点时发送cookie,不会在跨站请求中被发送。可以configCookieSync()设置单个cookie。
设置单个cookie使用案例:
webview.WebCookieManager.configCookieSync('https://www.example.com', 'value=test');开发者可以通过Cache、Dom Storage等手段将资源保存到本地,以提升访问同一网站的速度,我们也可以通过removeCache()接口清除已经缓存的资源
(1)Cache使用cacheMode()配置页面资源的缓存模式,Web组件为开发者提供四种缓存模式,分别为:
-
Default : 优先使用未过期的缓存,如果缓存不存在,则从网络获取。
-
None : 加载资源使用cache,如果cache中无该资源则从网络中获取。
-
Online : 加载资源不使用cache,全部从网络中获取。
-
Only :只从cache中加载资源。
使用案例
Web({ src: 'www.example.com', controller: this.controller })
        .cacheMode(this.mode)
(2)Dom Storage包含了Session Storage和Local Storage两类。前者为临时数据,其存储与释放跟随会话生命周期;后者为可持久化数据,落盘在应用目录下。两者的数据均通过Key-Value的形式存储,通常在访问需要客户端存储的页面时使用。开发者可以通过Web组件的属性接口domStorageAccess()进行使能配置
示例如下:
Web({ src: 'www.example.com', controller: this.controller })
        .domStorageAccess(true)
3.设置深色模式
Web组件支持对前端页面进行深色模式配置。主要通过darkMode()和forceDarkAccess()两种方式设置,通过darkMode()接口可以配置不同的深色模式,默认关闭。通过forceDarkAccess()接口可将前端页面强制配置深色模式,强制深色模式无法保证所有颜色转换符合预期,且深色模式不跟随前端页面和系统。配置该模式时候,需要将深色模式配置成WebDarkMode.On。
darkMode()使用案例
Web({ src: $rawfile('index.html'), controller: this.controller })
        .darkMode(this.mode)
forceDarkAccess()使用案例
Web({ src: $rawfile('index.html'), controller: this.controller })
        .darkMode(this.mode)
        .forceDarkAccess(this.access)
4.在新窗口中打开页面
Web组件提供了在新窗口打开页面的能力,开发者可以通过multiWindowAccess()接口来设置是否允许网页在新窗口打开。当有新窗口打开时,应用侧会在onWindowNew()接口中收到Web组件新窗口事件,开发者需要在此接口事件中,新建窗口来处理Web组件窗口请求。同时设置allowWindowOpenMethod()接口设置为true时,前端页面通过JavaScript函数调用的方式打开新窗口。
使用案例:
Web({ src: $rawfile("window.html"), controller: this.controller })
        .javaScriptAccess(true)
          // 需要使能multiWindowAccess
        .multiWindowAccess(true)
        .allowWindowOpenMethod(true)
        .onWindowNew((event) => {
          if (this.dialogController) {
            this.dialogController.close()
          }
          let popController: webview.WebviewController = new webview.WebviewController();
          this.dialogController = new CustomDialogController({
            builder: NewWebViewComp({ webviewController1: popController })
          })
          this.dialogController.open();
          // 将新窗口对应WebviewController返回给Web内核。
          // 若不调用event.handler.setWebController接口,会造成render进程阻塞。
          // 如果没有创建新窗口,调用event.handler.setWebController接口时设置成null,通知Web没有创建新窗口。
          event.handler.setWebController(popController);
        })
5.设置位置权限
Web组件提供位置权限管理能力。开发者可以通过onGeolocationShow()接口对某个网站进行位置权限管理,Web组件根据接口响应结果,决定是否赋予前端页面权限,使用前需要申请位置等权限。
使用案例:
Web({ src: $rawfile('getLocation.html'), controller: this.controller })
        .geolocationAccess(true)
        .onGeolocationShow((event) => { // 地理位置权限申请通知
          AlertDialog.show({
            title: '位置权限请求',
            message: '是否允许获取位置信息',
            primaryButton: {
              value: 'cancel',
              action: () => {
                if (event) {
                  event.geolocation.invoke(event.origin, false, false); // 不允许此站点地理位置权限请求
                }
              }
            },
            secondaryButton: {
              value: 'ok',
              action: () => {
                if (event) {
                  event.geolocation.invoke(event.origin, true, false); // 允许此站点地理位置权限请求
                }
              }
            },
            cancel: () => {
              if (event) {
                event.geolocation.invoke(event.origin, false, false); // 不允许此站点地理位置权限请求
              }
            }
          })
        })
6.设置隐私模式
开发者在创建Web组件时,可以将可选参数incognitoMode设置为true,来开启Web组件的隐私模式。通过isIncogntoMode 判断当前Web组件是否是隐私模式。
使用案例:
Web({ src: 'www.example.com', controller: this.controller, incognitoMode: true })let result = this.controller.isIncognitoMode();七、Web使用案例
import { webview } from "@kit.ArkWeb"

@Component
export  struct WebPage{

  webviewController=new  webview.WebviewController()
  responseWeb: WebResourceResponse = new WebResourceResponse();
  heads: Header[] = new Array();
  webData: string = "<!DOCTYPE html>\n" +
    "<html>\n" +
    "<head>\n" +
    "<title>intercept test</title>\n" +
    "</head>\n" +
    "<body>\n" +
    "<h1>intercept test</h1>\n" +
    "</body>\n" +
    "</html>";
  build() {
    NavDestination(){
      Column(){
        Web({src:'',controller:this.webviewController})
          .domStorageAccess(true) //设置是否允许执行JavaScript脚本,默认允许执行。
          .javaScriptAccess(true) //设置是否允许执行JavaScript脚本,默认允许执行。
          .zoomAccess(false) //设置是否支持手势进行缩放,默认允许执行缩放。
          .expandSafeArea(true ? [SafeAreaType.SYSTEM] : [], [SafeAreaEdge.TOP, SafeAreaEdge.BOTTOM]) //设置沉浸式
          .onControllerAttached(()=>{
            //注册交互
            /*if (this.fzJSExportObject) {
              this.webviewController.registerJavaScriptProxy(this.fzJSExportObject.getInstance(this.pathStack,
                this.webviewController), "fZJSExportObject", ["jsCallback"])
            }*/
            //设置UserAgent
            let currentUA = this.webviewController.getUserAgent();
            //this.webviewController.setCustomUserAgent(`${currentUA} /APP-VERSION=${this.appVersion}/APP-NAME=${this.appName}`);
            //初始化目标链接
            this.webviewController.loadUrl('https://developer.huawei.com/consumer/cn/doc/harmonyos-guides/web-in-page-app-function-invoking')

          })
          .onLoadIntercept((event)=>{
            //当Web组件加载url之前触发该回调,用于判断是否阻止此次访问。默认允许加载。
            return false
          })
          .onInterceptRequest((event)=>{
            //当Web组件加载url之前触发该回调,用于拦截url并返回响应数据。
            if (event) {
              console.log('url:' + event.request.getRequestUrl());
            }
            let head1: Header = {
              headerKey: "Connection",
              headerValue: "keep-alive"
            }
            let head2: Header = {
              headerKey: "Cache-Control",
              headerValue: "no-cache"
            }
            // 将新元素追加到数组的末尾,并返回数组的新长度。
            let length = this.heads.push(head1);
            length = this.heads.push(head2);
            console.log('The response header result length is :' + length);
            const promise: Promise<String> = new Promise((resolve: Function, reject: Function) => {
              this.responseWeb.setResponseHeader(this.heads);
              this.responseWeb.setResponseData(this.webData);
              this.responseWeb.setResponseEncoding('utf-8');
              this.responseWeb.setResponseMimeType('text/html');
              this.responseWeb.setResponseCode(200);
              this.responseWeb.setReasonMessage('OK');
              resolve("success");
            })
            promise.then(() => {
              console.log("prepare response ready");
              this.responseWeb.setResponseIsReady(true);
            })
            this.responseWeb.setResponseIsReady(false);
            return this.responseWeb;
          })
          .onPageBegin((event)=>{
            //网页开始加载时触发该回调,且只在主frame触发
          })
          .onProgressChange((event)=>{
            //网页加载进度变化时触发该回调。
          })
          .onPageEnd(()=>{
            //网页加载完成时触发该回调,且只在主frame触发。

          })
          .onTitleReceive((event) => {
            // 加载标题获取 网页document标题更改时触发该回调,当H5未设置<title>元素时会返回对应的URL。
            if (event) {
              console.log('title:' + event.title);
              if (!/((((25[0-5])|(2[0-4]\d)|(1\d{2})|([1-9]?\d)\.){3}((25[0-5])|(2[0-4]\d)|(1\d{2})|([1-9]?\d)))|(([\w-]+\.)*(net|com|org|gov|edu|mil|info|travel|pro|museum|biz|[a-z]{2})))(\/[w-\~#]+)*(\/[w-]+.[w]{2,4})?([\?=&%_]?[w-]+)*/.test(event.title)) {
                //this.title = event.title;
              }
            }
          })
          .darkMode(WebDarkMode.Auto)//设置Web深色模式
          .cacheMode(CacheMode.Default)  //cacheMode
          .multiWindowAccess(true) //设置是否开启多窗口权限,默认不开启。
          .allowWindowOpenMethod(true) //设置网页是否可以通过JavaScript自动打开新窗口。


      }
      .height('100%')
      .width('100%')
    }.hideTitleBar(true)
    .height('100%')
    .width('100%')

  }

}


 1185
1185

 被折叠的 条评论
为什么被折叠?
被折叠的 条评论
为什么被折叠?
 到【灌水乐园】发言


