


 本文介绍如何使用SpringBoot框架整合RabbitMQ消息队列,实现消息的发送和接收。通过创建SpringBoot项目,配置RabbitMQ连接,定义生产者和消费者角色,演示了消息在队列中的传递过程。
文章目录
开发版本为 Spring Boot 2.2.4.RELEASE 版本,开发工具为 Eclipse IDE for Enterprise Java Developers(Version: 2019-09 R (4.13.0)),Jave 版本为 1.8,RabbitMQ 3.8.2,Erlang 22.2。
参考资料
本文为 https://windmt.com/2018/04/12/rabbitmq-1-hello-world/ 的学习笔记。
在阅读本文前需先安装 RabbitMQ,安装教程可参考文章 https://editor.youkuaiyun.com/md/?articleId=104516792。
前言
本文通过 Spring Boot 应用,结合 RabbitMQ,实现如下图所示的一个简单的发送、接收消息的例子:

叫做 P 表示 生产者(producer),C 表示消费者(consumer),中间部分表示队列(queue),即 RabbitMQ 替消费者保存消息的消息缓冲区。
Hello World
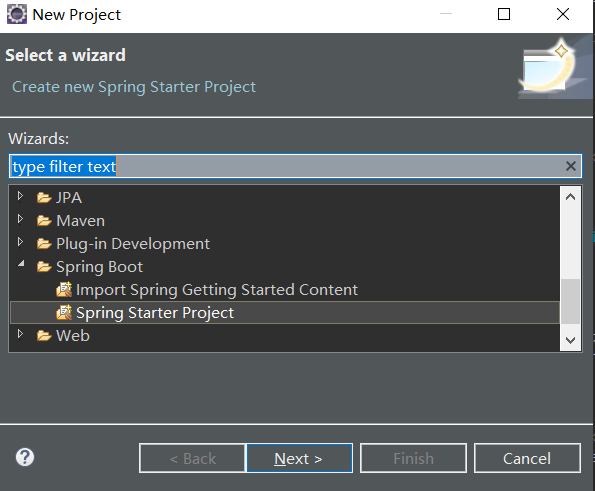
- 创建一个 Spring boot 工程
打开 File -> New -> Project,选择 Spring Starter Project,点击 Next。
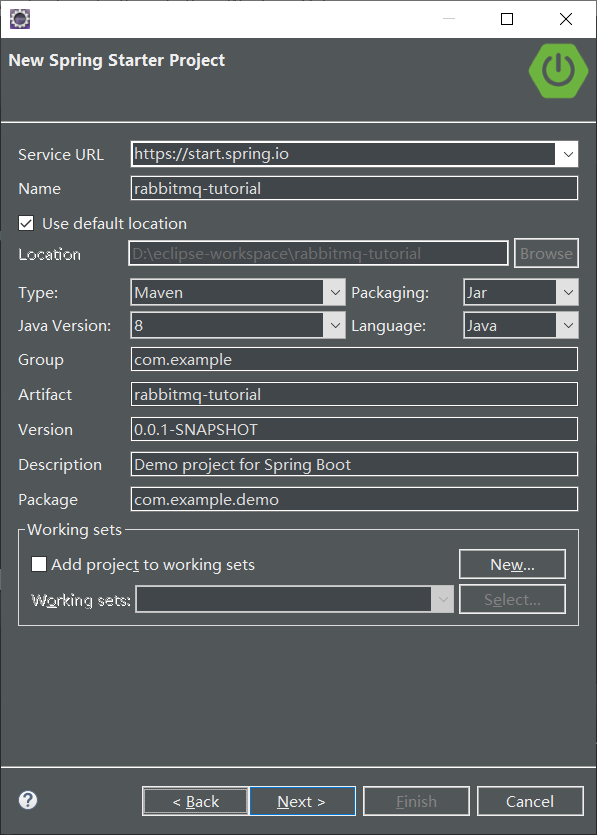
name 设置为 rabbitmq-tutorial,点击 Next。
选择 Spring For RabbitMQ,点击 Finish。

- 自动生成的 pom.xml 文件内容如下:
<?xml version="1.0" encoding="UTF-8"?>
<project xmlns="http://maven.apache.org/POM/4.0.0" xmlns:xsi="http://www.w3.org/2001/XMLSchema-instance"
	xsi:schemaLocation="http://maven.apache.org/POM/4.0.0 https://maven.apache.org/xsd/maven-4.0.0.xsd">
	<modelVersion>4.0.0</modelVersion>
	<parent>
		<groupId>org.springframework.boot</groupId>
		<artifactId>spring-boot-starter-parent</artifactId>
		<version>2.2.4.RELEASE</version>
		<relativePath/> <!-- lookup parent from repository -->
	</parent>
	<groupId>com.example</groupId>
	<artifactId>rabbitmq-tutorial</artifactId>
	<version>0.0.1-SNAPSHOT</version>
	<name>rabbitmq-tutorial</name>
	<description>Demo project for Spring Boot</description>

	<properties>
		<java.version>1.8</java.version>
	</properties>

	<dependencies>
		<dependency>
			<groupId>org.springframework.boot</groupId>
			<artifactId>spring-boot-starter-amqp</artifactId>
		</dependency>

		<dependency>
			<groupId>org.springframework.boot</groupId>
			<artifactId>spring-boot-starter-test</artifactId>
			<scope>test</scope>
			<exclusions>
				<exclusion>
					<groupId>org.junit.vintage</groupId>
					<artifactId>junit-vintage-engine</artifactId>
				</exclusion>
			</exclusions>
		</dependency>
		<dependency>
			<groupId>org.springframework.amqp</groupId>
			<artifactId>spring-rabbit-test</artifactId>
			<scope>test</scope>
		</dependency>
	</dependencies>

	<build>
		<plugins>
			<plugin>
				<groupId>org.springframework.boot</groupId>
				<artifactId>spring-boot-maven-plugin</artifactId>
			</plugin>
		</plugins>
	</build>

</project>
其中关键依赖为:
<dependency>
    <groupId>org.springframework.boot</groupId>
	<artifactId>spring-boot-starter-amqp</artifactId>
</dependency>
- 在 resource 文件夹下添加 application.yml 配置文件
spring:
  profiles:
    active: usage_message
  rabbitmq:
    port: 5672
tutorial:
  client:
    duration: 10000
- 创建 package
tut1,新增配置类 Tut1Config:
package com.example.demo.tut1;

import org.springframework.amqp.core.Queue;
import org.springframework.context.annotation.Bean;
import org.springframework.context.annotation.Configuration;
import org.springframework.context.annotation.Profile;

@Profile({ "tut1", "hello-world" })
@Configuration
public class Tut1Config {
	@Bean
	public Queue hello() {
		return new Queue("hello-world");
	}

	@Profile("receiver")
	@Bean
	public Tut1Receiver receiver() {
		return new Tut1Receiver();
	}

	@Profile("sender")
	@Bean
	public Tut1Sender sender() {
		return new Tut1Sender();
	}
}
其中,我们使用 @Configuration 让 Spring 知道这是一个 Java 配置,并定义了生产者、消费者和一个名为”hello-world” 的队列。
- 修改应用主类 RabbitmqTutorialApplication:
package com.example.demo;

import org.springframework.boot.SpringApplication;
import org.springframework.boot.autoconfigure.SpringBootApplication;
import org.springframework.boot.CommandLineRunner;
import org.springframework.context.annotation.Bean;
import org.springframework.context.annotation.Profile;
import org.springframework.scheduling.annotation.EnableScheduling;

@SpringBootApplication
@EnableScheduling
public class RabbitmqTutorialApplication {
	@Profile("usage_message")
	@Bean
	public CommandLineRunner usage() {
		return args -> {
			System.out.println("This app uses Spring Profiles to control its behavior.\n");
			System.out.println("Options are: ");
			System.out.println("java -jar rabbit-tutorials.jar --spring.profiles.active=hello-world,receiver");
			System.out.println("java -jar rabbit-tutorials.jar --spring.profiles.active=hello-world,sender");
		};
	}

	@Profile("!usage_message")
	@Bean
	public CommandLineRunner tutorial() {
		return new RabbitAmqpTutorialsRunner();
	}
	public static void main(String[] args) {
		SpringApplication.run(RabbitmqTutorialApplication.class, args);
	}

}
其中类 RabbitAmqpTutorialsRunner 如下:
package com.example.demo;

import org.springframework.beans.factory.annotation.Autowired;
import org.springframework.beans.factory.annotation.Value;
import org.springframework.boot.CommandLineRunner;
import org.springframework.context.ConfigurableApplicationContext;

public class RabbitAmqpTutorialsRunner implements CommandLineRunner {
	@Value("${tutorial.client.duration:0}")
	private int duration;

	@Autowired
	private ConfigurableApplicationContext ctx;

	@Override
	public void run(String... arg0) throws Exception {
		System.out.println("Ready ... running for " + duration + "ms");
		Thread.sleep(duration);
		ctx.close();
	}
}
- 创建生产者类 Tut1Sender:
package com.example.demo.tut1;

import java.util.Date;

import org.springframework.amqp.core.Queue;
import org.springframework.amqp.rabbit.core.RabbitTemplate;
import org.springframework.beans.factory.annotation.Autowired;
import org.springframework.scheduling.annotation.Scheduled;

public class Tut1Sender {
	@Autowired
	private RabbitTemplate template;

	@Autowired
	private Queue queue;

	/**
	 * 用定时任务来模拟生产者定时发送消息
	 */
	@Scheduled(fixedDelay = 1000, initialDelay = 500)
	public void send() {
		String message = "Hello World!" + new Date();
		this.template.convertAndSend(queue.getName(), message);
		System.out.println(" [x] Sent '" + message + "'" );
	}
}
其中通过注入 RabbitTemplate 来实现消息的发送,通过注解 Scheduled 来模拟定时发送。
- 消费者
package com.example.demo.tut1;

import org.springframework.amqp.rabbit.annotation.RabbitHandler;
import org.springframework.amqp.rabbit.annotation.RabbitListener;

@RabbitListener(queues = "hello-world")
public class Tut1Receiver {
	@RabbitHandler
	public void receive(String in) {
		System.out.println(" [x] Received '" + in + "'");
	}
}
运行
- 右键项目,依次执行 Run As -> Maven clean 和 Run As -> Maven install,生成 jar 包。
- 打开 cmd,切换到工程目录,如
D:\eclipse-workspace\rabbitmq-tutorial,执行以下语句,发送消息到队列:
java -jar target/rabbitmq-tutorial-0.0.1-SNAPSHOT.jar --spring.profiles.active=tut1,sender
结果如下:
D:\eclipse-workspace\rabbitmq-tutorial>java -jar target/rabbitmq-tutorial-0.0.1-SNAPSHOT.jar --spring.profiles.active=tut1,sender

  .   ____          _            __ _ _
 /\\ / ___'_ __ _ _(_)_ __  __ _ \ \ \ \
( ( )\___ | '_ | '_| | '_ \/ _` | \ \ \ \
 \\/  ___)| |_)| | | | | || (_| |  ) ) ) )
  '  |____| .__|_| |_|_| |_\__, | / / / /
 =========|_|==============|___/=/_/_/_/
 :: Spring Boot ::        (v2.2.4.RELEASE)

2020-03-09 15:05:58.056  INFO 85796 --- [           main] c.e.demo.RabbitmqTutorialApplication     : Starting RabbitmqTutorialApplication v0.0.1-S
orkspace\rabbitmq-tutorial\target\rabbitmq-tutorial-0.0.1-SNAPSHOT.jar started by iamve in D:\eclipse-workspace\rabbitmq-tutorial)
2020-03-09 15:05:58.058  INFO 85796 --- [           main] c.e.demo.RabbitmqTutorialApplication     : The following profiles are active: tut1,sende
2020-03-09 15:05:58.838  INFO 85796 --- [           main] o.s.s.c.ThreadPoolTaskScheduler          : Initializing ExecutorService 'taskScheduler'
2020-03-09 15:05:58.882  INFO 85796 --- [           main] c.e.demo.RabbitmqTutorialApplication     : Started RabbitmqTutorialApplication in 1.153
Ready ... running for 10000ms
2020-03-09 15:05:59.385  INFO 85796 --- [   scheduling-1] o.s.a.r.c.CachingConnectionFactory       : Attempting to connect to: [localhost:5672]
2020-03-09 15:05:59.442  INFO 85796 --- [   scheduling-1] o.s.a.r.c.CachingConnectionFactory       : Created new connection: rabbitConnectionFacto
legate=amqp://guest@127.0.0.1:5672/, localPort= 59538]
 [x] Sent 'Hello World!Mon Mar 09 15:05:59 CST 2020'
 [x] Sent 'Hello World!Mon Mar 09 15:06:00 CST 2020'
 [x] Sent 'Hello World!Mon Mar 09 15:06:01 CST 2020'
 [x] Sent 'Hello World!Mon Mar 09 15:06:02 CST 2020'
 [x] Sent 'Hello World!Mon Mar 09 15:06:03 CST 2020'
 [x] Sent 'Hello World!Mon Mar 09 15:06:04 CST 2020'
 [x] Sent 'Hello World!Mon Mar 09 15:06:05 CST 2020'
 [x] Sent 'Hello World!Mon Mar 09 15:06:06 CST 2020'
 [x] Sent 'Hello World!Mon Mar 09 15:06:07 CST 2020'
 [x] Sent 'Hello World!Mon Mar 09 15:06:08 CST 2020'
2020-03-09 15:06:08.889  INFO 85796 --- [           main] o.s.s.c.ThreadPoolTaskScheduler          : Shutting down ExecutorService 'taskScheduler'
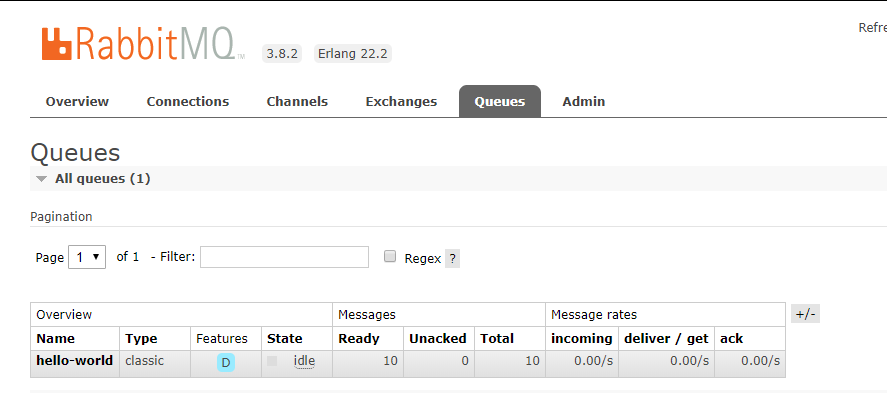
这时访问 http://localhost:15672/,可以看到存在名为 hello-world的队列,且存在数量为10的代发消息。
- 打开 cmd,切换到工程目录,如
D:\eclipse-workspace\rabbitmq-tutorial,执行以下语句,接收消息到队列:
java -jar target/rabbitmq-tutorial-0.0.1-SNAPSHOT.jar --spring.profiles.active=tut1,receiver
结果如下:
D:\eclipse-workspace\rabbitmq-tutorial>java -jar target/rabbitmq-tutorial-0.0.1-SNAPSHOT.jar --spring.profiles.active=tut1,receiver

  .   ____          _            __ _ _
 /\\ / ___'_ __ _ _(_)_ __  __ _ \ \ \ \
( ( )\___ | '_ | '_| | '_ \/ _` | \ \ \ \
 \\/  ___)| |_)| | | | | || (_| |  ) ) ) )
  '  |____| .__|_| |_|_| |_\__, | / / / /
 =========|_|==============|___/=/_/_/_/
 :: Spring Boot ::        (v2.2.4.RELEASE)

2020-03-09 15:13:29.356  INFO 40640 --- [           main] c.e.demo.RabbitmqTutorialApplication     : Starting RabbitmqTutorialApplication v0.0.1-SNAPSHOT on Q
orkspace\rabbitmq-tutorial\target\rabbitmq-tutorial-0.0.1-SNAPSHOT.jar started by iamve in D:\eclipse-workspace\rabbitmq-tutorial)
2020-03-09 15:13:29.358  INFO 40640 --- [           main] c.e.demo.RabbitmqTutorialApplication     : The following profiles are active: tut1,receiver
2020-03-09 15:13:30.142  INFO 40640 --- [           main] o.s.s.c.ThreadPoolTaskScheduler          : Initializing ExecutorService 'taskScheduler'
2020-03-09 15:13:30.204  INFO 40640 --- [           main] o.s.a.r.c.CachingConnectionFactory       : Attempting to connect to: [localhost:5672]
2020-03-09 15:13:30.250  INFO 40640 --- [           main] o.s.a.r.c.CachingConnectionFactory       : Created new connection: rabbitConnectionFactory#75881071:
legate=amqp://guest@127.0.0.1:5672/, localPort= 59973]
2020-03-09 15:13:30.292  INFO 40640 --- [           main] c.e.demo.RabbitmqTutorialApplication     : Started RabbitmqTutorialApplication in 1.254 seconds (JVM
Ready ... running for 10000ms
 [x] Received 'Hello World!Mon Mar 09 15:05:59 CST 2020'
 [x] Received 'Hello World!Mon Mar 09 15:06:00 CST 2020'
 [x] Received 'Hello World!Mon Mar 09 15:06:01 CST 2020'
 [x] Received 'Hello World!Mon Mar 09 15:06:02 CST 2020'
 [x] Received 'Hello World!Mon Mar 09 15:06:03 CST 2020'
 [x] Received 'Hello World!Mon Mar 09 15:06:04 CST 2020'
 [x] Received 'Hello World!Mon Mar 09 15:06:05 CST 2020'
 [x] Received 'Hello World!Mon Mar 09 15:06:06 CST 2020'
 [x] Received 'Hello World!Mon Mar 09 15:06:07 CST 2020'
 [x] Received 'Hello World!Mon Mar 09 15:06:08 CST 2020'
2020-03-09 15:13:40.298  INFO 40640 --- [           main] o.s.a.r.l.SimpleMessageListenerContainer : Waiting for workers to finish.
2020-03-09 15:13:40.317  INFO 40640 --- [           main] o.s.a.r.l.SimpleMessageListenerContainer : Successfully waited for workers to finish.
2020-03-09 15:13:40.319  INFO 40640 --- [           main] o.s.s.c.ThreadPoolTaskScheduler          : Shutting down ExecutorService 'taskScheduler'
2020-03-09 15:13:40.319  INFO 40640 --- [           main] o.s.a.r.l.SimpleMessageListenerContainer : Shutdown ignored - container is not active already
这时可以看到名为 hello-world的队列中已不存在代发消息。


 2万+
2万+

 被折叠的 条评论
为什么被折叠?
被折叠的 条评论
为什么被折叠?
 到【灌水乐园】发言


