


maven是个好东西,是项目构建和管理的工具。感觉跟anaconda有一拼,都可以很方便的自动把所需要的包搞定,省得自己一个一个去下载,很省事。
记录下过程,供日后参考使用。
1.配置环境变量
2.配置maven的setting.xml(本地仓库地址,默认jdk版本,添加国内镜像源)
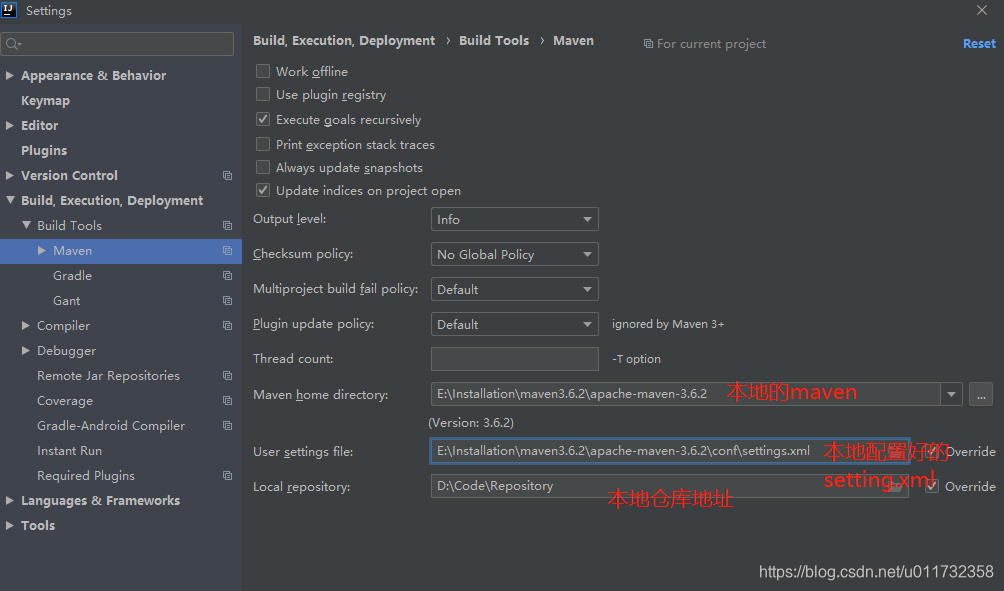
3.配置intellij idea
上传了一份3.6版本的到百度云盘中,自取
https://pan.baidu.com/s/1XpeVBp8OlhP9BtHKLMdlIw
这是解压版本,建议放到英文路径的文件下
1.配置环境变量
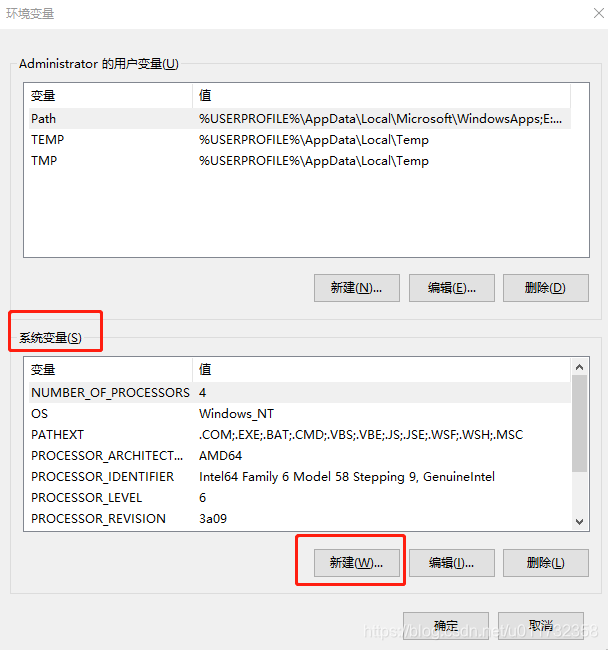
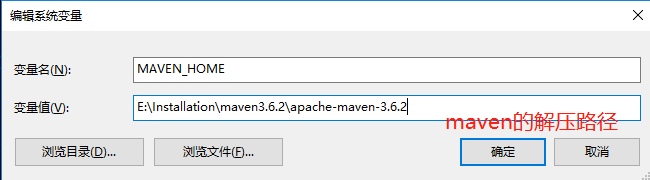
然后编辑Path 添加 %MAVEN_HOME%\bin
然后在windows命令行中使用mvn -v查看是否配置成功

看起来貌似是成功了,但是多出来了点东西“cmd”不是内部或外部命令,也不是可运行的程序。 不要慌,估计是环境变量配置的有点问题。搜索一波,发现设置环境变量path的时候,可能覆盖了原先设置着的变量,所以需要改一下即可。在最前面加上%SystemRoot%\system32;。


接下来,
2.配置setting.xml文件
(1)需要配置Maven的本地仓库路径。
在conf的settings.xml这个配置文件中,修改为自己存放jar包的路径。
<localRepository>D:\Code\Repository</localRepository>

(2)修改默认的jdk版本
在profiles标签下添加一个profile标签,修改maven默认的JDK版本。
<profile>
	<id>JDK-1.8</id>
	<activation>
		<activeByDefault>true</activeByDefault>
		<jdk>1.8</jdk>
	</activation>
	<properties>
		<maven.compiler.source>1.8</maven.compiler.source>
		<maven.compiler.target>1.8</maven.compiler.target>
		<maven.compiler.compilerVersion>1.8</maven.compiler.compilerVersion>
	</properties>
</profile>
(3)添加国内镜像源
在mirrors标签下添加mirror标签,添加国内镜像源,提高jar包下载速度
<mirror>
	<id>alimaven</id>
	<mirrorOf>central</mirrorOf>
	<name>aliyun maven</name>
	<url>http://maven.aliyun.com/nexus/content/repositories/central/</url>
</mirror>

<!-- 中央仓库1 -->
<mirror>
	<id>repo1</id>
	<mirrorOf>central</mirrorOf>
	<name>Human Readable Name for this Mirror.</name>
	<url>http://repo1.maven.org/maven2/</url>
</mirror>

<!-- 中央仓库2 -->
<mirror>
	<id>repo2</id>
	<mirrorOf>central</mirrorOf>
	<name>Human Readable Name for this Mirror.</name>
	<url>http://repo2.maven.org/maven2/</url>
</mirror>
3.配置intellij idea
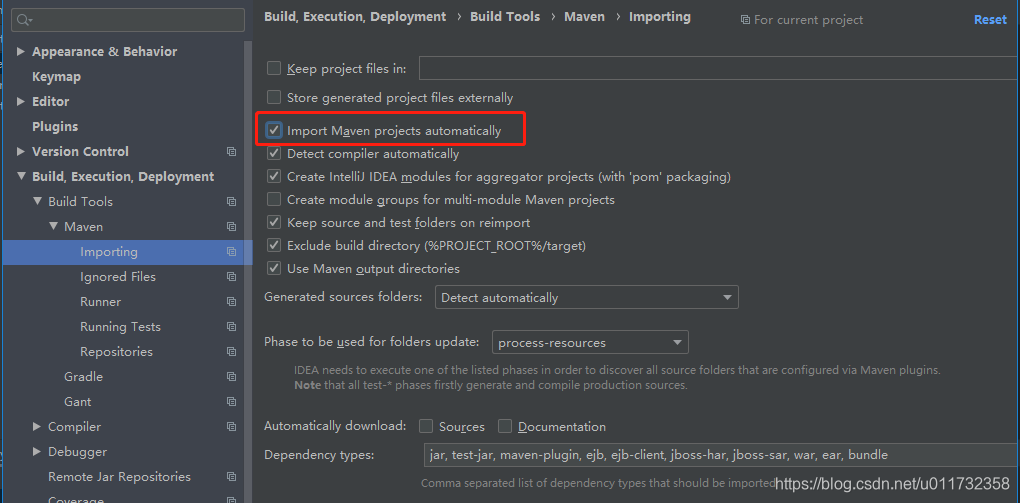
自动导包!配置结束,可以愉快的玩耍了。
参考:https://blog.youkuaiyun.com/westos_linux/article/details/78968012
https://blog.youkuaiyun.com/huo920/article/details/82082403
写在最后,可以按这个哥们对idea进行一些简单的设置
https://www.cnblogs.com/qinxu/p/9323656.html
如果是专业版的intellij idea,破解可以参考这个
https://www.jiweichengzhu.com/article/93afbed1245d4ee69b82ed1b067f48a4


 被折叠的 条评论
为什么被折叠?
被折叠的 条评论
为什么被折叠?
 到【灌水乐园】发言


