


简介
- 本文将整体介绍一下如何使用安装docker、获取docker资源、使用docker获得MySQL、redis等中间件服务并快速搭建,以及管理和使用这些中间件服务,docker容器和宿主机如何交互、如何构建我们自己的服务镜像等等。
本文内容有
- 我们为啥要用docker?
- 管理docker image镜像
- 使用镜像创建docker container容器服务
- 管理docker container容器服务
- 查看docker container容器服务状态
- 容器服务和宿主机如何交互
- 使用docker搭建中间件基础服务示例
- 使用docker构建我们自己的服务镜像
- 搭建docker UI工具服务portainer
- 更多docker资料
参考文章
1、我们为啥要用docker?
1.1 docker能给我们带来哪些好处?
传统的服务器系统更新的步骤是这样的,我们使用归档后的服务发布包,上传到不同环境的服务器上,进行部署。很多公司的服务发版流程中各个环境的发布包更新顺序是这样的:开发环境–>测试环境–>预发布环境–>线上灰度环境–>线上环境(有的大公司环境可能更多,小公司也许就两套环境)。只有前面的环境都验证通过后,才能把服务发布包更新到线上环境。
先说说上面这种发布流程存在哪些弊端吧:
- 服务发布包操作和管理不方便,导致发布效率低
- 各个环境很难做到完全一致(如操作系统、网络环境、基础服务版本、jdk版本等等),可能导致服务在不同环境中存在兼容性问题
- 服务发布流程想要做到自动化难度大,浪费人力成本
- 系统中的服务会互相争抢资源,如果某个服务耗费了所有的系统资源(如:CPU、内存等等)就会导致其他服务也无法使用
- 不同服务如果使用了相同的端口号,会互相竞争,导致某些服务无法正常工作
- 传统服务很难做到服务自动伸缩和故障转移
- 很多时候研发人员需要花费不少时间来排查由于环境不一致导致的问题,排查难度高
- 无法完全控制服务的行为,比如服务内某些不法研发人员给自己开后门,访问其他资源。
- 项目整体的迭代速度低
使用docker管理我们的服务后,有如下优点:
- 服务发布包可以做成镜像,稳定且使用方便,可以做到一次构建,多处运行
- 降低了服务部署的复杂性,减少了因环境不一致导致的兼容性问题。由于服务运行在docker的虚拟容器中,容器中包含了该服务运行所需的所有环境信息,包括操作系统和jdk等等资源。所以无需担心环境不一致导致的兼容性问题
- docker可以对服务的可使用资源进行限制,比如说限制服务只使用多少cpu和内存等等
- docker可以管理容器服务的网络,服务间可以做到互不影响
- docker容器服务很轻量。也许你会有疑问,docker既然把服务所需要的环境都打包到镜像一起发布,会不会非常占用服务器资源呀?其实docker早就考虑了这一点,docker提供的是一个轻量级的VM,而且同主机上的基础镜像可以被不同的docker服务所共用,所以不会有很大的资源浪费,当然会比传统的服务占用的资源稍微多一些。
- docker服务性能稳定,较传统服务部署方式有些微性能损耗。也许你会担心docker服务的性能问题,其实docker经过多年的迭代更新,现在产品已经非常稳定,经测试,使用docker部署的服务在性能上的损耗非常小。
- 使用docker的集群功能可以带来更多的好处,比如:服务实例数动态伸缩、故障转移、滚动发布、统一协调管理服务器资源等等功能,能够提高服务器资源整体的利用率,而且大大提升了服务的可用性和稳定性,服务的并发能力也能动态提升。
- 使用docker可以提高服务的安全性,控制服务所能访问的资源范围和提供的服务范围。
- 使用docker部署服务非常容易做到完全自动化,节省研发和运维成本
- 服务资源备份、迁移更容易,由于服务都是运行在docker虚拟的容器内,所以可以非常方便的将服务转移到其他服务器上运行
1.2 docker的组成结构
- docker容器的整体结构

-
docker基础组件介绍

-
DockerClient客户端
docker客户端提供了人机交互命令,用来向docker的服务器端(守护进程)发出请求,守护进程处理完所有的工作,并返回结果客户端对服务器端的访问既可以在本地也可以在远程来访问。
-
Docker Daemon守护进程
docker提供的后台服务,用于管理image镜像、container容器和其他docker组件,接收并执行docker client发送的命令。
-
Docker Image镜像
功能跟传统的服务发布包类似,提供了服务运行所需要的所有信息。服务发布包可以被打包成镜像,以供后续的部署。
-
DockerContainer容器
运行服务的载体,提供了一个轻量级的VM环境,这个环境里提供了服务运行所需要的所有资源,包括操作系统、jdk、网络环境等等。
-
-
docker 镜像仓库Registry介绍
安装了docker的主机上都会有一个本地仓库,docker可以从不同的远程仓库中拉取镜像到本地仓库,然后使用拉取下来的镜像创建可运行的容器服务。
常见的远程仓库有:
- Docker Hub(docker官方镜像仓库): https://hub.docker.com/
- docker官方中国区 https://registry.docker-cn.com
- ustc http://docker.mirrors.ustc.edu.cn
- 阿里云 http://<你的ID>.mirror.aliyuncs.com
如果需要使用某些国内镜像源,可以在/etc/docker/daemon.json中添加内容:
{
    "registry-mirrors": ["https://registry.docker-cn.com","http://hub-mirror.c.163.com"]
 }
当然你也可以搭建自己的docker镜像私服,常见的有Docker Registry 、nexus3等等
-
docker 其他组件介绍
-
docker swarm集群管理组件
可以将不同的服务器都加入到集群中进行管理,统一分配服务器资源给业务服务部署和运行,包括服务伸缩、故障转移、滚动发布等等功能。
-
docker compose服务编排工具
可以提供一个模板配置文件,控制服务自己的子元素使用以及服务间的依赖关系等等,可以提供整个平台的服务一键部署能力。
-
-
docker第三方管理平台介绍
Kubernetes(K8s)、Apache Mesos等等,可以提供比docker swarm更强大的集群能力,目前比较推荐使用k8s,毕竟更成熟,很多业界主流大平台都在用它,中小企业可以选择用云平台提供的k8s服务即可,自建成本太高。
1.3 docker如何工作的?
Docker 采用的是 Client/Server 架构。客户端向服务器发送请求,服务器负责构建、运行和分发容器。客户端和服务器可以运行在同一个 Host 上,客户端也可以通过 socket 或 REST API 与远程的服务器通信。
Docker daemon 一般在宿主主机后台运行,等待接收来自客户端的消息。 Docker 客户端则为用户提供一系列可执行命令,用户用这些命令实现跟 Docker daemon 交互。
容器提供了在计算机上的隔离环境中安装和运行应用程序的方法。在容器内运行的应用程序仅可使用于为该容器分配的资源,例如:CPU,内存,磁盘,进程空间,用户,网络,卷等。在使用有限的容器资源的同时,并不与其他容器冲突。您可以将容器视为简易计算机上运行应用程序的隔离沙箱。
1.4 我们如何使用docker?
传统企业如何过渡到docker生态,可以参考如下步骤:
- 先将部分业务服务进行容器化,并使用容器化部署;
- 待企业内容技术人员对容器化相关技术熟悉后,逐步将所有服务全部容器化
- 整合企业内部所有服务器资源,使用docker集群工具进行统一管理和分配资源,提高资源使用率
- 搭建整个devops技术体系,研发、测试、发布流程逐步自动化
- 继而使用docker集群工具如docker swarm或者k8s管理所有线上服务
2、管理docker image镜像
docker客户端账号相关命令
登录服务器
有的docker远程仓库开启了登录认证,需要登录后才能拉取镜像、推送镜像等等
docker login [参数] [服务器地址]
#####参数说明######
# --password , -p		登录密码
# --password-stdin		从标准输入流获取密码,也就是说通过shell命令输入密码的意思,不带password参数默认就是这种方式
# --username , -u		登录账号
#######使用示例#######
docker login --username=admin --password=123456 192.168.10.12:5000
登出命令
登出当前的docker账号,下次使用前需要先登录
docker logout [服务器地址]
#eg. docker logout 192.168.10.12:5000
2.1 docker search 镜像搜索命令
通过命令查找远程仓库里匹配的镜像信息
docker search [参数] 关键字
#比如搜索redis的镜像
docker search redis
#也可以配合shell命令一起使用
docker search redis |grep sentinel
详细示例如下:
#比如搜索redis的镜像
docker search redis
#结果
NAME                             DESCRIPTION                                     STARS               OFFICIAL            AUTOMATED
redis                            Redis is an open source key-value store that…   8204                [OK]
bitnami/redis                    Bitnami Redis Docker Image                      145                                     [OK]
sameersbn/redis                                                                  80                                      [OK]
grokzen/redis-cluster            Redis cluster 3.0, 3.2, 4.0, 5.0, 6.0           68
#更多的就不展开了
当然也可以到 Docker Hub官网进行搜索
2.2 docker pull 镜像拉取命令
从远程仓库拉取镜像到本地仓库
docker pull [参数] NAME[:TAG|@DIGEST]
#####参数说明######
# --all-tags , -a		下载该镜像的所有版本
# --disable-content-trust	true	跳过安全认证
# --platform		平台兼容性相关的参数
# --quiet , -q		不显示详细信息

#比如拉取某个redis镜像
docker pull grokzen/redis-cluster:5.0
2.3 docker rmi 删除本地镜像命令
删除本地仓库中不需要再使用的镜像,比如一些过时的镜像
docker rmi [参数] 镜像名或者镜像ID [IMAGE...] #可以同时删除多个镜像
#####参数说明######
# --force , -f		强制删除
# --no-prune		不删除未标记的父镜像
2.4 docker images 查看镜像信息
docker images [参数] [REPOSITORY[:TAG]]
#####参数说明######
# --all , -a		展示所有镜像,默认就是这个操作
# --digests		展示镜像包签名信息
# --filter , -f		通过镜像某些信息过滤镜像,如镜像名、ID、标签等等
# --format		指定一个展示模板用于镜像信息的展示,比如说需要展示的内容及顺序,感觉没啥卵用
# --no-trunc	展示完整的容器ID信息
# --quiet , -q		只展示镜像ID
示例如下:
#查看所有镜像信息
docker images
#查看带关键字redis的镜像
docker images redis #或者 docker images |grep redis
docker images java:8 #带版本信息筛选
#查看未标记的镜像
docker images --filter "dangling=true"
#查看带某个标签的镜像
docker images --filter "label=com.example.version"
#注:构建镜像时可以打label标签哦
过滤器支持如下条件
- dangling (boolean - true or false) 筛选未tag的镜像
- label (
label=<key>orlabel=<key>=<value>) 筛选带某个标记的镜像 - before (
<image-name>[:<tag>],<image id>or<image@digest>) - 筛选某镜像某版本之前的镜像 - since (
<image-name>[:<tag>],<image id>or<image@digest>) - 筛选某镜像某版本开始以及之后的镜像 - reference (pattern of an image reference) - 筛选匹配描述信息的镜像
2.5 docker tag 给镜像重命名
docker tag SOURCE_IMAGE[:TAG] TARGET_IMAGE[:TAG]
#示例如下
docker tag redis 192.168.10.12:5000/danyuan/redis #将官方的redis镜像更名为自己的私服的镜像,之后可以push到私服中
2.4 docker build 构建自己的镜像
docker build [参数] PATH | URL | -
#####参数说明######
--add-host		Add a custom host-to-IP mapping (host:ip) 给容器内的/etc/hosts添加记录
--build-arg		Set build-time variables
--cache-from		Images to consider as cache sources
--cgroup-parent		Optional parent cgroup for the container
--compress		Compress the build context using gzip 镜像使用gzip进行压缩存储
--cpu-period		Limit the CPU CFS (Completely Fair Scheduler) period
--cpu-quota		Limit the CPU CFS (Completely Fair Scheduler) quota
--cpu-shares , -c		CPU shares (relative weight)
--cpuset-cpus		CPUs in which to allow execution (0-3, 0,1)
--cpuset-mems		MEMs in which to allow execution (0-3, 0,1)
--disable-content-trust	true	Skip image verification
--file , -f		Name of the Dockerfile (Default is ‘PATH/Dockerfile’) 指定文件进行构建,默认为当前目录下的Dockerfile
--force-rm		Always remove intermediate containers
--iidfile		Write the image ID to the file
--isolation		Container isolation technology
--label		Set metadata for an image
--memory , -m		Memory limit
--memory-swap		Swap limit equal to memory plus swap: ‘-1’ to enable unlimited swap
--network		API 1.25+ Set the networking mode for the RUN instructions during build
--no-cache		Do not use cache when building the image
--output , -o		API 1.40+ Output destination (format: type=local,dest=path) 输出构建信息到文件
--platform		API 1.38+ Set platform if server is multi-platform capable
--progress	auto	Set type of progress output (auto, plain, tty). Use plain to show container output
--pull		Always attempt to pull a newer version of the image
--quiet , -q		Suppress the build output and print image ID on success
--rm	true	Remove intermediate containers after a successful build
--secret		API 1.39+
Secret file to expose to the build (only if BuildKit enabled): id=mysecret,src=/local/secret
--security-opt		Security options
--shm-size		Size of /dev/shm
--squash		experimental (daemon)API 1.25+ Squash newly built layers into a single new layer
--ssh		API 1.39+ SSH agent socket or keys to expose to the build (only if BuildKit enabled) (format: default|[=|[,]])
--stream		experimental (daemon)API 1.31+ Stream attaches to server to negotiate build context
--tag , -t		Name and optionally a tag in the ‘name:tag’ format,给镜像重命名
--target		Set the target build stage to build.
--ulimit		Ulimit options
示例如下:
#执行当前目录下的Dockerfile文件内的镜像构建命令,并将生成的镜像命名
docker build -t 192.168.56.22:5000/danyuanblog/elk .
#执行指定目录下的Dockerfile文件内的镜像构建命令,并将生成的镜像命名
docker build -f /data/docker/elk/Dockerfile -t 192.168.56.22:5000/danyuanblog/elk .
2.5 docker push 推送镜像到远程仓库命令
docker push [参数] NAME[:TAG]
#####参数说明######
--disable-content-trust	true	是否需要跳过镜像内容信任,默认跳过

#示例
docker push registry-host:5000/myadmin/rhel-httpd
3、使用镜像创建docker container容器服务
3.1 docker create 容器创建命令
docker create [参数] IMAGE [COMMAND] [ARG...]
#####参数说明######
--add-host		Add a custom host-to-IP mapping (host:ip)
--attach , -a		Attach to STDIN, STDOUT or STDERR
--blkio-weight		Block IO (relative weight), between 10 and 1000, or 0 to disable (default 0)
--blkio-weight-device		Block IO weight (relative device weight)
--cap-add		Add Linux capabilities
--cap-drop		Drop Linux capabilities
--cgroup-parent		Optional parent cgroup for the container
--cidfile		Write the container ID to the file
--cpu-count		CPU count (Windows only)
--cpu-percent		CPU percent (Windows only)
--cpu-period		Limit CPU CFS (Completely Fair Scheduler) period
--cpu-quota		Limit CPU CFS (Completely Fair Scheduler) quota
--cpu-rt-period		API 1.25+
Limit CPU real-time period in microseconds
--cpu-rt-runtime		API 1.25+
Limit CPU real-time runtime in microseconds
--cpu-shares , -c		CPU shares (relative weight)
--cpus		API 1.25+
Number of CPUs
--cpuset-cpus		CPUs in which to allow execution (0-3, 0,1)
--cpuset-mems		MEMs in which to allow execution (0-3, 0,1)
--device		Add a host device to the container
--device-cgroup-rule		Add a rule to the cgroup allowed devices list
--device-read-bps		Limit read rate (bytes per second) from a device
--device-read-iops		Limit read rate (IO per second) from a device
--device-write-bps		Limit write rate (bytes per second) to a device
--device-write-iops		Limit write rate (IO per second) to a device
--disable-content-trust	true	Skip image verification
--dns		Set custom DNS servers
--dns-opt		Set DNS options
--dns-option		Set DNS options
--dns-search		Set custom DNS search domains
--domainname		Container NIS domain name
--entrypoint		Overwrite the default ENTRYPOINT of the image
--env , -e		Set environment variables
--env-file		Read in a file of environment variables
--expose		Expose a port or a range of ports
--gpus		API 1.40+
GPU devices to add to the container (‘all’ to pass all GPUs)
--group-add		Add additional groups to join
--health-cmd		Command to run to check health
--health-interval		Time between running the check (ms|s|m|h) (default 0s)
--health-retries		Consecutive failures needed to report unhealthy
--health-start-period		API 1.29+
Start period for the container to initialize before starting health-retries countdown (ms|s|m|h) (default 0s)
--health-timeout		Maximum time to allow one check to run (ms|s|m|h) (default 0s)
--help		Print usage
--hostname , -h		Container host name
--init		API 1.25+
Run an init inside the container that forwards signals and reaps processes
--interactive , -i		Keep STDIN open even if not attached
--io-maxbandwidth		Maximum IO bandwidth limit for the system drive (Windows only)
--io-maxiops		Maximum IOps limit for the system drive (Windows only)
--ip		IPv4 address (e.g., 172.30.100.104)
--ip6		IPv6 address (e.g., 2001:db8::33)
--ipc		IPC mode to use
--isolation		Container isolation technology
--kernel-memory		Kernel memory limit
--label , -l		Set meta data on a container
--label-file		Read in a line delimited file of labels
--link		Add link to another container
--link-local-ip		Container IPv4/IPv6 link-local addresses
--log-driver		Logging driver for the container
--log-opt		Log driver options
--mac-address		Container MAC address (e.g., 92:d0:c6:0a:29:33)
--memory , -m		Memory limit
--memory-reservation		Memory soft limit
--memory-swap		Swap limit equal to memory plus swap: ‘-1’ to enable unlimited swap
--memory-swappiness	-1	Tune container memory swappiness (0 to 100)
--mount		Attach a filesystem mount to the container
--name		Assign a name to the container
--net		Connect a container to a network
--net-alias		Add network-scoped alias for the container
--network		Connect a container to a network
--network-alias		Add network-scoped alias for the container
--no-healthcheck		Disable any container-specified HEALTHCHECK
--oom-kill-disable		Disable OOM Killer
--oom-score-adj		Tune host’s OOM preferences (-1000 to 1000)
--pid		PID namespace to use
--pids-limit		Tune container pids limit (set -1 for unlimited)
--platform		experimental (daemon)API 1.32+
Set platform if server is multi-platform capable
--privileged		Give extended privileges to this container
--publish , -p		Publish a container’s port(s) to the host
--publish-all , -P		Publish all exposed ports to random ports
--read-only		Mount the container’s root filesystem as read only
--restart	no	Restart policy to apply when a container exits
--rm		Automatically remove the container when it exits
--runtime		Runtime to use for this container
--security-opt		Security Options
--shm-size		Size of /dev/shm
--stop-signal	SIGTERM	Signal to stop a container
--stop-timeout		API 1.25+
Timeout (in seconds) to stop a container
--storage-opt		Storage driver options for the container
--sysctl		Sysctl options
--tmpfs		Mount a tmpfs directory
--tty , -t		Allocate a pseudo-TTY
--ulimit		Ulimit options
--user , -u		Username or UID (format: <name|uid>[:<group|gid>])
--userns		User namespace to use
--uts		UTS namespace to use
--volume , -v		Bind mount a volume
--volume-driver		Optional volume driver for the container
--volumes-from		Mount volumes from the specified container(s)
--workdir , -w		Working directory inside the container
常用示例如下:
-
指定基本信息,如名字、重启策略等等
#创建一个redis服务,当检测到redis服务挂了,自动重启 docker create --restart always --name my-redis redis -
指定端口映射
#创建一个redis服务,当检测到redis服务挂了,自动重启,对外端口为2379 docker create -p 2379:6379 --restart always --name my-redis redis -
指定磁盘目录挂载
#创建一个redis服务,当检测到redis服务挂了,自动重启,对外端口为2379,并将配置文件挂载出来 docker create -p 2379:6379 -v /data/docker-data/service/redis/conf/redis.conf:/usr/local/etc/redis/redis.conf --restart always --name my-redis redis -
指定网络模式
#创建一个redis服务,当检测到redis服务挂了,自动重启,对外端口为2379,并将配置文件挂载出来,指定为自定义的网络模式 docker create --network some-network -p 2379:6379 -v /data/docker-data/service/redis/conf/redis.conf:/usr/local/etc/redis/redis.conf --restart always --name my-redis redis -
指定资源限制
#创建一个redis服务,当检测到redis服务挂了,自动重启,对外端口为2379,并将配置文件挂载出来,指定为自定义的网络模式,限制cpu使用权重、内存、磁盘使用 docker create --cpu-shares 512 -m 1G --memory-swap 3G --storage-opt size=10G --network some-network -p 2379:6379 -v /data/docker-data/service/redis/conf/redis.conf:/usr/local/etc/redis/redis.conf --restart always --name my-redis redis #单个 CPU 为 1024,两个为 2048,以此类推 -
指定环境变量
#创建一个redis服务,当检测到redis服务挂了,自动重启,对外端口为2379,并将配置文件挂载出来,指定为自定义的网络模式,限制cpu使用权重、内存、磁盘使用 docker create --cpu-shares 512 -m 1G --memory-swap 3G --storage-opt size=10G --network some-network -p 2379:6379 -v /data/docker-data/service/redis/conf/redis.conf:/usr/local/etc/redis/redis.conf -e HOST_NAME=danyuan --restart always --name my-redis redis #单个 CPU 为 1024,两个为 2048,以此类推 -
指定服务参数
#创建一个redis服务,当检测到redis服务挂了,自动重启,对外端口为2379,并将配置文件挂载出来,指定为自定义的网络模式,限制cpu使用权重、内存、磁盘使用,指定redis服务参数
docker create --cpu-shares 512 -m 1G --memory-swap 3G --storage-opt size=10G --network some-network -p 2379:6379 -v /data/docker-data/service/redis/conf/redis.conf:/usr/local/etc/redis/redis.conf --restart always --name my-redis redis --appendonly yes
#单个 CPU 为 1024,两个为 2048,以此类推
3.2 docker run 创建并运行容器
docker run [OPTIONS] IMAGE [COMMAND] [ARG...]
#参数和docker create大多相同
#多了以下参数
--detach , -d		Run container in background and print container ID,后台运行服务
--detach-keys		Override the key sequence for detaching a container
示例如下
#创建并后台启动一个redis服务,当检测到redis服务挂了,自动重启,对外端口为6379,指定为共享主机网络模式,限制cpu使用权重、内存使用,指定redis服务参数
docker run -d --cpu-shares 512 -m 512M --memory-swap 1G --network host --restart always --name my-redis redis --appendonly yes
#单个 CPU 为 1024,两个为 2048,以此类推
3.3 docker start 启动已存在的容器
docker start [参数] CONTAINER [CONTAINER...]
#####参数说明######
--attach , -a		Attach STDOUT/STDERR and forward signals
--checkpoint		experimental (daemon)
Restore from this checkpoint
--checkpoint-dir		experimental (daemon)
Use a custom checkpoint storage directory
--detach-keys		Override the key sequence for detaching a container
--interactive , -i		Attach container’s STDIN
示例如下
#启动刚刚的redis服务
docker start my-redis
3.4 docker stop 停止正在运行的容器
docker stop [OPTIONS] CONTAINER [CONTAINER...]
#####参数说明######
--time , -t	10	Seconds to wait for stop before killing it
示例如下
docker stop my-redis
3.5 docker restart 重启容器
docker restart [OPTIONS] CONTAINER [CONTAINER...]
#####参数说明######
--time , -t	10	Seconds to wait for stop before killing the container
示例如下
docker restart my-redis
3.6 docker pause 暂停容器服务
暂停状态的容器服务,无法对外提供服务
docker pause CONTAINER [CONTAINER...]
#示例如下
docker pause my-redis
3.7 docker kill 杀掉某容器服务
docker kill [参数] CONTAINER [CONTAINER...]
#####参数说明######
--signal , -s	KILL	Signal to send to the container
#示例
docker kill my_redis  #作用和 kill pid 相同
docker kill --signal=9 my_redis #作用和 kill -9 pid 相同
3.8 docker rm 删除容器
docker rm [参数] CONTAINER [CONTAINER...]
#####参数说明######
--force , -f		Force the removal of a running container (uses SIGKILL),强制删除正在运行的容器
--link , -l		Remove the specified link
--volumes , -v		Remove anonymous volumes associated with the container
示例如下
docker rm my-redis
docker rm -f my-redis
3.9 docker update 更新容器信息
docker update [参数] CONTAINER [CONTAINER...]
#####参数说明######
--blkio-weight		Block IO (relative weight), between 10 and 1000, or 0 to disable (default 0)
--cpu-period		Limit CPU CFS (Completely Fair Scheduler) period
--cpu-quota		Limit CPU CFS (Completely Fair Scheduler) quota
--cpu-rt-period		API 1.25+
Limit the CPU real-time period in microseconds
--cpu-rt-runtime		API 1.25+
Limit the CPU real-time runtime in microseconds
--cpu-shares , -c		CPU shares (relative weight)
--cpus		API 1.29+
Number of CPUs
--cpuset-cpus		CPUs in which to allow execution (0-3, 0,1)
--cpuset-mems		MEMs in which to allow execution (0-3, 0,1)
--kernel-memory		Kernel memory limit
--memory , -m		Memory limit
--memory-reservation		Memory soft limit
--memory-swap		Swap limit equal to memory plus swap: ‘-1’ to enable unlimited swap
--pids-limit		API 1.40+
Tune container pids limit (set -1 for unlimited)
--restart		Restart policy to apply when a container exits
示例如下
#更新容器启动策略
docker update --restart=always my-redis
4、查看docker container容器服务状态
4.1 docker ps 查看容器信息
docker ps [参数]
#####参数说明######
--all , -a		Show all containers (default shows just running)
--filter , -f		Filter output based on conditions provided
--format		Pretty-print containers using a Go template
--last , -n	-1	Show n last created containers (includes all states)
--latest , -l		Show the latest created container (includes all states)
--no-trunc		Don’t truncate output
--quiet , -q		Only display numeric IDs
--size , -s		Display total file sizes
示例如下
#查看所有正在运行的容器
docker ps
#查看所有的容器
docker ps -a
#查看最近创建的容器
docker ps -l
#查看名字匹配的容器
docker ps -a |grep my-redis
4.2 docker stats 查看正在运行的容器资源使用情况
docker stats [参数] [CONTAINER...]
#####参数说明######
--all , -a		Show all containers (default shows just running)
--format		Pretty-print images using a Go template
--no-stream		Disable streaming stats and only pull the first result
--no-trunc		Do not truncate output
示例如下
#查看所有容器资源使用情况
docker stats
#查看某个容器资源占用情况
docker stats |grep my-redis
4.3 docker logs 查看容器的日志信息
docker logs [参数] CONTAINER
#####参数说明######
--details		Show extra details provided to logs
--follow , -f		Follow log output
--since		Show logs since timestamp (e.g. 2013-01-02T13:23:37) or relative (e.g. 42m for 42 minutes)
--tail	all	Number of lines to show from the end of the logs
--timestamps , -t		Show timestamps
--until		API 1.35+ Show logs before a timestamp (e.g. 2013-01-02T13:23:37) or relative (e.g. 42m for 42 minutes)
示例如下
#查看最后500条日志信息
docker logs --tail 500 my-redis
#查看最新500条日志,并持续查看最新的日志
docker logs --tail 500 -f my-redis
4.4 docker top 查看容器内服务资源使用情况
docker top CONTAINER [ps OPTIONS]
#相当于你在linux上输入top命令一样的效果
#示例如下
docker top my-redis
4.5 docker inspect 查看某个容器的详细信息
docker inspect [参数] NAME|ID [NAME|ID...]
#####参数说明######
--format , -f		Format the output using the given Go template
--size , -s		Display total file sizes if the type is container
--type		Return JSON for specified type
示例如下
#查看容器所有信息
docker inspect my-redis
#查看容器网络信息
docker inspect my-redis|grep Network
#查看容器ip信息
docker inspect my-redis|grep IP
4.6 docker port 查看容器端口映射情况
docker port CONTAINER [PRIVATE_PORT[/PROTO]]
#示例如下
 docker port my-redis #查看网络映射情况
 docker port my-redis 6379/tcp #查看改端口映射情况
5、容器服务和宿主机如何交互
docker exec [参数] CONTAINER COMMAND [ARG...]
#####参数说明######
--detach , -d		Detached mode: run command in the background
--detach-keys		Override the key sequence for detaching a container
--env , -e		API 1.25+ Set environment variables
--interactive , -i		Keep STDIN open even if not attached 开启可交互性能力,进入容器执行命令
--privileged		Give extended privileges to the command
--tty , -t		Allocate a pseudo-TTY
--user , -u		Username or UID (format: <name|uid>[:<group|gid>])
--workdir , -w		API 1.35+
Working directory inside the container
示例如下
#进入容器执行命令,就跟登录到linux主机上一样的操作
docker exec -it my-redis /bin/bash
6、使用docker搭建中间件基础服务示例
6.1 搭建redis服务
docker run -d --cpu-shares 512 -m 512M --memory-swap 1G --restart always --name redis redis --appendonly yes
6.2 搭建MariaDB服务
sudo docker run -d --restart always --name mysql -p 3306:3306 -v /data/workspace/service/mysql/old-data/mysql:/var/lib/mysql -v /data/workspace/service/mysql/conf.d:/etc/mysql/conf.d -v /data/workspace/service/mysql/my.cnf:/etc/mysql/my.cnf -e MYSQL_ROOT_PASSWORD="123456" mariadb:10.3
6.3 搭建MongoDB服务
docker run -p 8069:80 -v /var/data/mongodb:/var/lib/mongodb -v /var/data/mongo_conf/config.js:/opt/countly/api/config.js -v /var/data/mongo_conf/web/config.js:/opt/countly/frontend/express/config.js -d countly/countly-server
6.4 搭建RabbitMQ服务
docker run -d --restart always --name rabbitmq -p 15672:15672 -p 5672:5672 -e RABBITMQ_DEFAULT_USER=admin -e RABBITMQ_DEFAULT_PASS=admin rabbitmq:3-management
7、使用docker构建我们自己的服务镜像
参考地址如下:
8、搭建portainer服务管理宿主机上的docker服务
-
安装步骤
mkdir -p /data/workspace/service/portainer/data mkdir -p /data/workspace/service/portainer/public wget http://www.danyuanblog.com/file-gateway/mediaDownload.do?mediaId=5ec04f7b4c63637cd6ab5763 #下载汉化包 unzip public.zip #解压汉化包 mv public/* /data/workspace/service/portainer/public/ #移动汉化内容到需要挂载的资源目录下 docker run -d --restart always --name portainer -p 9000:9000 -v /var/run/docker.sock:/var/run/docker.sock -v /data/workspace/service/portainer/data:/data -v /data/workspace/service/portainer/public:/public portainer/portainer -
添加需要管理的主机
-
访问地址:
http://192.168.56.22:9000打开web后台 -
初次进入设置管理员登录密码,然后登录
[外链图片转存失败,源站可能有防盗链机制,建议将图片保存下来直接上传(img-dh3kwgy8-1590333357272)(http://www.danyuanblog.com/file-gateway//ueditor/jsp/upload/image/20200517/1589662278830069192.png)]
进入后:
[外链图片转存失败,源站可能有防盗链机制,建议将图片保存下来直接上传(img-kFp08xzQ-1590333357275)(http://www.danyuanblog.com/file-gateway//ueditor/jsp/upload/image/20200517/1589662351411086467.png)]
-
添加节点到protainer中
-
点击菜单: 端点 --> 添加端点
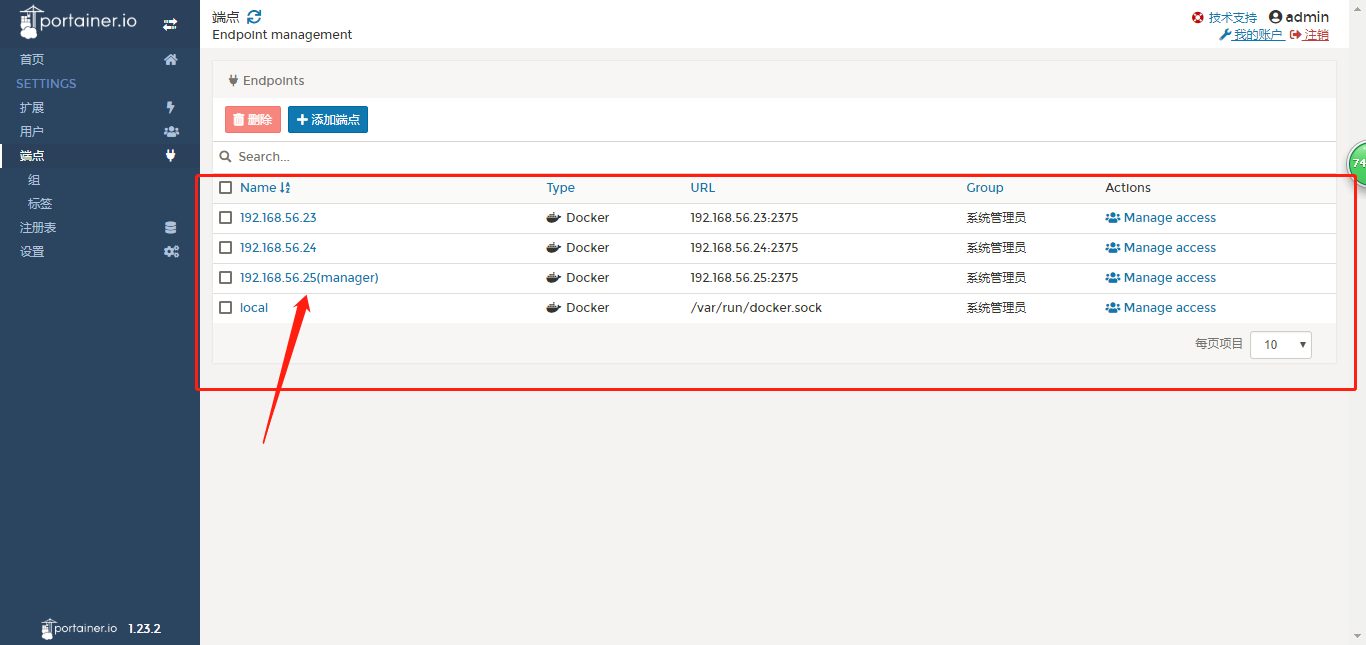
[外链图片转存失败,源站可能有防盗链机制,建议将图片保存下来直接上传(img-9hlHkYM4-1590333357278)(http://www.danyuanblog.com/file-gateway//ueditor/jsp/upload/image/20200517/1589662488794083232.png)]
-
-
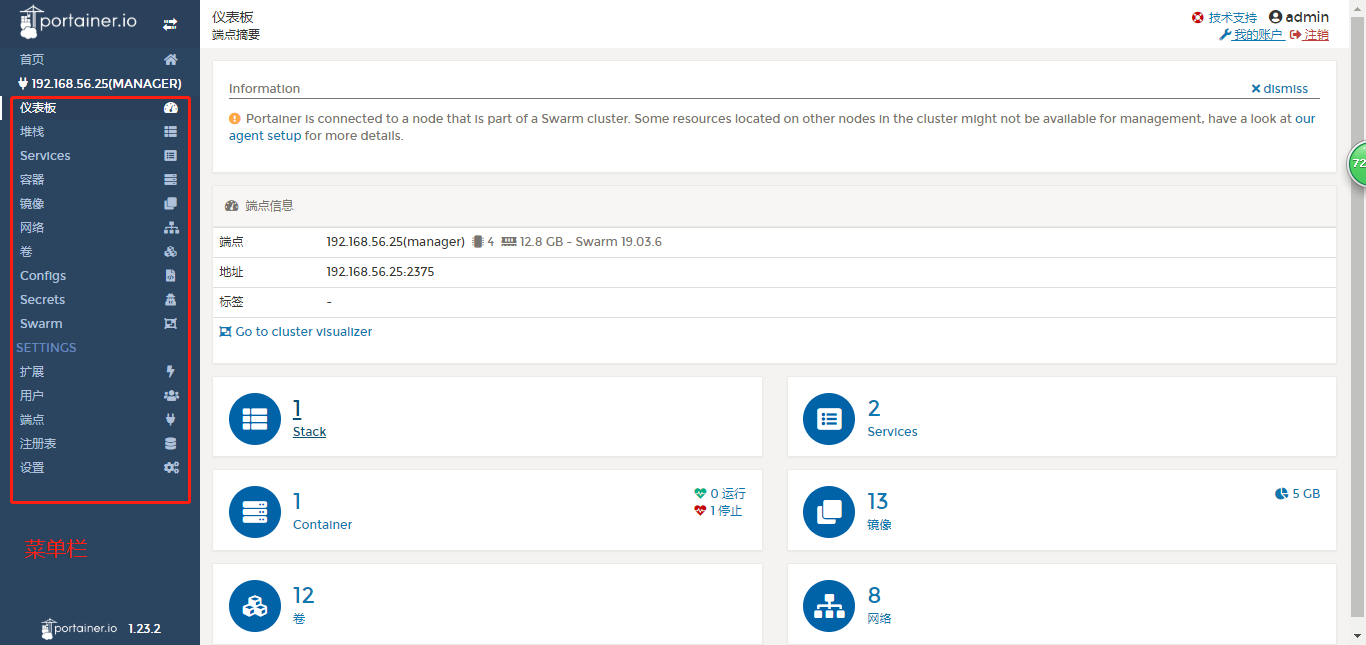
管理节点
进入某个管理节点: 首页 --> 点击某个管理节点
-


 被折叠的 条评论
为什么被折叠?
被折叠的 条评论
为什么被折叠?
 到【灌水乐园】发言


