


目录
三-当表格超出页面时,使用\scalebox{0.74}对表格进行放缩
注:stat的Latex模板可以从stat官网上下载:Stat - Wiley Online Library
一-表格样式1:
Tex表格代码1:
\begin{center}
\begin{table*}[t]%
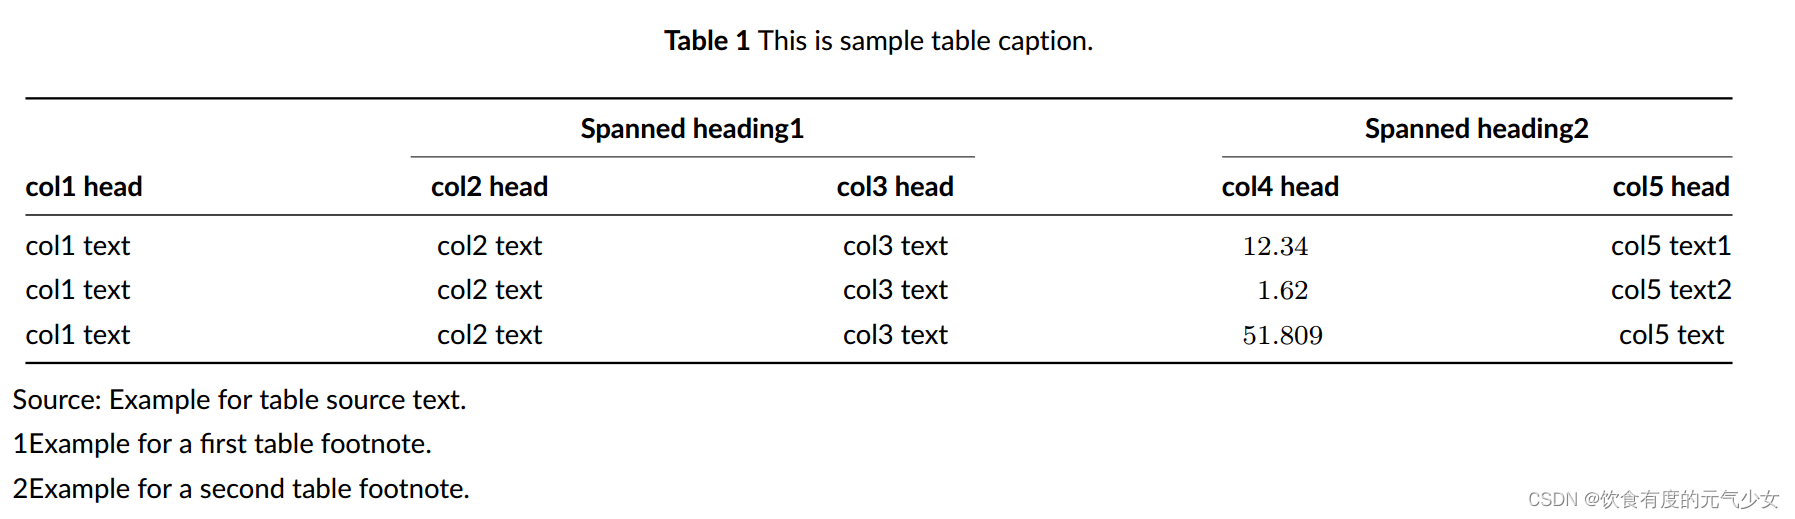
\caption{AAAAAA.\label{Table:BBB}}
\centering
\begin{tabular*}{500pt}{@{\extracolsep\fill}lccD{.}{.}{3}c@{\extracolsep\fill}}
\toprule
&\multicolumn{2}{@{}c@{}}{\textbf{Spanned heading\tnote{1}}} & \multicolumn{2}{@{}c@{}}{\textbf{Spanned heading\tnote{2}}} \\\cmidrule{2-3}\cmidrule{4-5}
\textbf{col1 head} & \textbf{col2 head} & \textbf{col3 head} & \multicolumn{1}{@{}l@{}}{\textbf{col4 head}} & \textbf{col5 head} \\
\midrule
col1 text & col2 text & col3 text & 12.34 & col5 text\tnote{1} \\
col1 text & col2 text & col3 text & 1.62 & col5 text\tnote{2} \\
col1 text & col2 text & col3 text & 51.809 & col5 text \\
\bottomrule
\end{tabular*}
\begin{tablenotes}%%[341pt]
\item Source: Example for table source text.
\item[1] Example for a first table footnote.
\item[2] Example for a second table footnote.
\end{tablenotes}
\end{table*}
\end{center}代码解读:
这段代码是一个LaTeX代码片段,用于创建一个包含表格的文档。下面是代码的解释:
1. `\begin{center}` 和 `\end{center}`:这是一个LaTeX环境,用于将表格居中显示。
2. `\begin{table*}[t]` 和 `\end{table*}`:这是一个表格环境,用于创建一个跨页宽的表格。方括号中的 `[t]` 指定了表格的位置为页顶(top)。
3. `\caption{AAAAAA.\label{Table:BBB}}`:这是一个表格标题,显示在表格上方。其中的 `AAAAAA.` 是标题的内容,`Table:BBB` 是标签,用于引用表格。
4. `\centering`:此命令用于将表格内容居中对齐。
5. `\begin{tabular*}{500pt}{@{\extracolsep\fill}lccD{.}{.}{3}c@{\extracolsep\fill}}` 和 `\end{tabular*}`:这是一个表格环境,用于创建一个表格。`500pt` 指定了表格的宽度为500个点(point)。`lccD{.}{.}{3}c` 指定了表格的列格式,其中的 `l` 表示左对齐,`c` 表示居中对齐,`D{.}{.}{3}` 是一个自定义的列格式,用于将列的内容按小数点对齐并保留3位小数,`@{\extracolsep\fill}` 用于在列之间平分额外的空间。
6. `\multicolumn{2}{@{}c@{}}{\textbf{Spanned heading\tnote{1}}}` 和 `\multicolumn{2}{@{}c@{}}{\textbf{Spanned heading\tnote{2}}}`:这两个命令用于创建一个跨列的表头,`2` 表示跨两列,`@{}c@{}` 用于将表头内容居中对齐。
7. `\cmidrule{2-3}\cmidrule{4-5}`:这两个命令用于在表头下方画出横线,`2-3` 表示从第2列到第3列画线,`4-5` 表示从第4列到第5列画线。
8. `\textbf{col1 head}`, `\textbf{col2 head}`, `\textbf{col3 head}`, `\textbf{col4 head}`, `\textbf{col5 head}`:这是表头的内容。`\textbf{}` 用于将内容加粗显示。
9. `\midrule` 和 `\bottomrule`:这两个命令用于在表头和表格内容之间以及表格内容和表格底部之间画出横线。
10. `col1 text`, `col2 text`, `col3 text`, `12.34`, `col5 text\tnote{1}`:这是表格中的内容,分别对应于每一列中的一个单元格。其中的 `\tnote{1}` 表示这是一个表注的引用,与 `\begin{tablenotes}` 和 `\end{tablenotes}` 中的 `\item[1]` 对应。
11. `\begin{tablenotes}` 和 `\end{tablenotes}`:这是一个表注环境,用于放置表格的注释。注释的内容使用 `\item` 命令添加。
总体而言,这段代码创建了一个包含表格的文档,并设置了表格的标题、表头、表格内容和表注。
如何将其修改成你想要的表格形式?
- 认真阅读上述Tex代码解读部分,确保自己知道每行代码的意思,这一点很重要!
- 关于表格内容部分,可以将表格的内容部分在Excel中完成,进而通过复制粘贴或者将Excel文件转换成CSV格式,上传到Latex table online<Create LaTeX tables online – TablesGenerator.com>,生成相应的Tex代码,可以直接将表格内容部分的Tex代码进行复制粘贴,这样避免了自己将表格内容一个字一个字的敲到Tex中,浪费不必要的精力。
- 对照Latex table online 和stat提供的表格代码,进而在相应部分进行微调。
二-表格样式2:
代码:
\begin{center}
\begin{table}[t]%
\centering
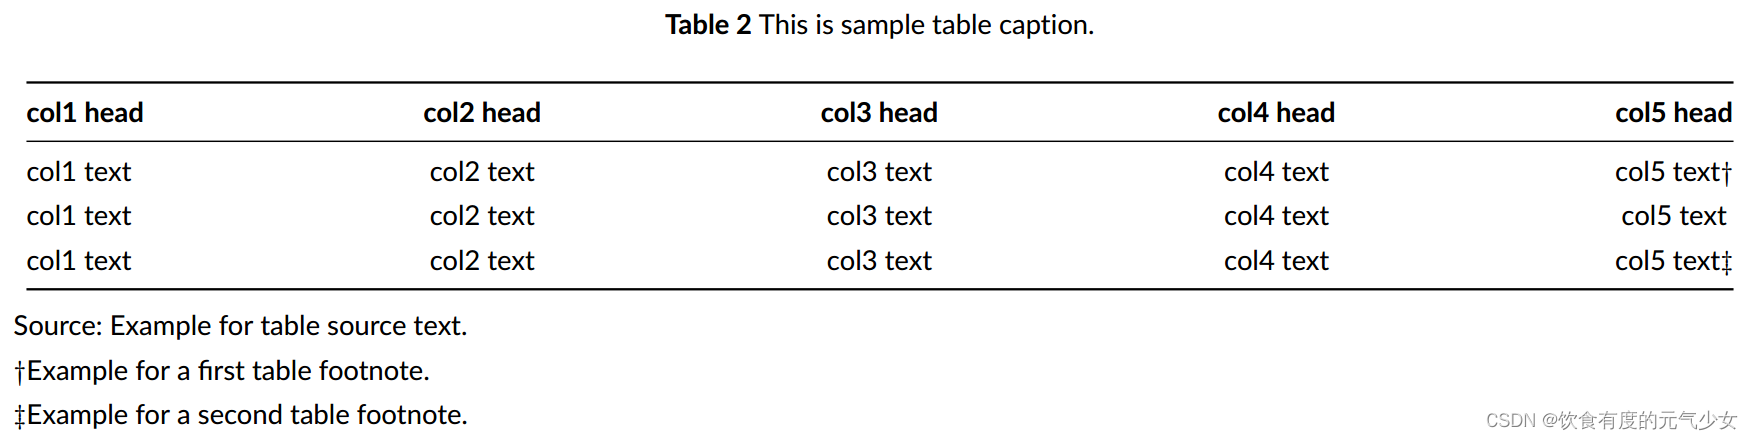
\caption{This is sample table caption.\label{tab2}}%
\begin{tabular*}{500pt}{@{\extracolsep\fill}lcccc@{\extracolsep\fill}}
\toprule
\textbf{col1 head} & \textbf{col2 head} & \textbf{col3 head} & \textbf{col4 head} & \textbf{col5 head} \\
\midrule
col1 text & col2 text & col3 text & col4 text & col5 text\tnote{$\dagger$} \\
col1 text & col2 text & col3 text & col4 text & col5 text \\
col1 text & col2 text & col3 text & col4 text & col5 text\tnote{$\ddagger$} \\
\bottomrule
\end{tabular*}
\begin{tablenotes}
\item Source: Example for table source text.
\item[$\dagger$] Example for a first table footnote.
\item[$\ddagger$] Example for a second table footnote.
\end{tablenotes}
\end{table}
\end{center}代码解读:
这段代码是一个用LaTeX编写的表格。它使用了table环境来创建一个带有标题和脚注的表格。下面是对代码中各部分的解释:
- `\begin{center}`和`\end{center}`: 将表格居中显示。
- `\begin{table}[t]`和`\end{table}`: 创建一个浮动环境的表格,其中[t]表示表格应该尽量放在页面的顶部。
- `\centering`: 将表格内容居中。
- `\caption{This is sample table caption.}`: 设置表格标题为"This is sample table caption."。
- `\begin{tabular*}{500pt}{@{\extracolsep\fill}lcccc@{\extracolsep\fill}}`和`\end{tabular*}`: 创建一个表格,该表格具有自动调整列宽的能力,并设置了表格的总宽度为500pt。
- `\toprule`: 添加表格的顶部水平线。
- `\textbf{col1 head} & \textbf{col2 head} & \textbf{col3 head} & \textbf{col4 head} & \textbf{col5 head} \\`: 定义表头的五列,使用加粗的文本。
- `\midrule`: 添加表格的中间水平线。
- `col1 text & col2 text & col3 text & col4 text & col5 text\tnote{$\dagger$} \\`: 添加表格的数据行。每一列的内容按顺序列出,并在最后一列的文本后面添加了一个脚注符号$\dagger$。
- `\bottomrule`: 添加表格的底部水平线。
- `\begin{tablenotes}`和`\end{tablenotes}`: 创建一个表格脚注的环境。
- `\item Source: Example for table source text.`: 设置一个表格脚注,内容为"Source: Example for table source text."。
- `\item[$\dagger$] Example for a first table footnote.`: 设置第一个脚注符号$\dagger$对应的脚注内容为"Example for a first table footnote."。
- `\item[$\ddagger$] Example for a second table footnote.`: 设置第二个脚注符号$\ddagger$对应的脚注内容为"Example for a second table footnote."。
三-当表格超出页面时,使用\scalebox{0.74}对表格进行放缩
注意,增加\scalebox{0.74}(其中里面的数字表示放缩比例)时,一定要对\begin{tabular*}{700pt}中的数字进行相应的修改,700pt表示表格的宽度为700个点(point),自己根据效果不断做相应的调试即可。
代码:
\begin{center}
\begin{table}[t]%
\centering
\caption{This is sample table caption.\label{tab2}}%
\scalebox{0.74}{
\begin{tabular*}{700pt}{@{\extracolsep\fill}lcccc@{\extracolsep\fill}}
\toprule
\textbf{col1 head} & \textbf{col2 head}  & \textbf{col3 head}  & \textbf{col4 head}  & \textbf{col5 head}  & \textbf{col6 head}  & \textbf{col7 head}  & \textbf{col8 head}\\
\midrule
col1 text & col2 text  & col3 text  & col4 text  & col5 text\tnote{$\dagger$}  & col 5 text & col6 text & col7 text & col8 text  \\
col1 text & col2 text  & col3 text  & col4 text  & col5 text   & col6 text & col7 text & col8 text \\
col1 text & col2 text  & col3 text  & col4 text  & col5 text\tnote{$\ddagger$}   & col6 text & col7 text & col8 text  \\
\bottomrule
\end{tabular*}
}
\begin{tablenotes}
\item Source: Example for table source text.
\item[$\dagger$] Example for a first table footnote.
\item[$\ddagger$] Example for a second table footnote.
\end{tablenotes}
\end{table}
\end{center}
其他的一些函数,如使用\resizebox命令放缩表格大小也尝试过,效果没有\scalebox好。


 被折叠的 条评论
为什么被折叠?
被折叠的 条评论
为什么被折叠?
 到【灌水乐园】发言


