


一 Nginx搭建高可用集群
1.1 架构图
1.程序部署信息:
| Ip | 服务 | 路径 |
| 192.168.152.131 | nginx、keepalived | /usr/local/nginx /etc/keepalived |
| 192.168.152.132 | nginx、keepalived | /usr/local/nginx /etc/keepalived |
| 192.168.152.129 | Tomcat:8080 | /root/export/servers/apache-tomcat-8.5.6 |
| 192.168.152.130 | Tomcat:8080 | /root/export/servers/apache-tomcat-8.5.6 |
2.架构图
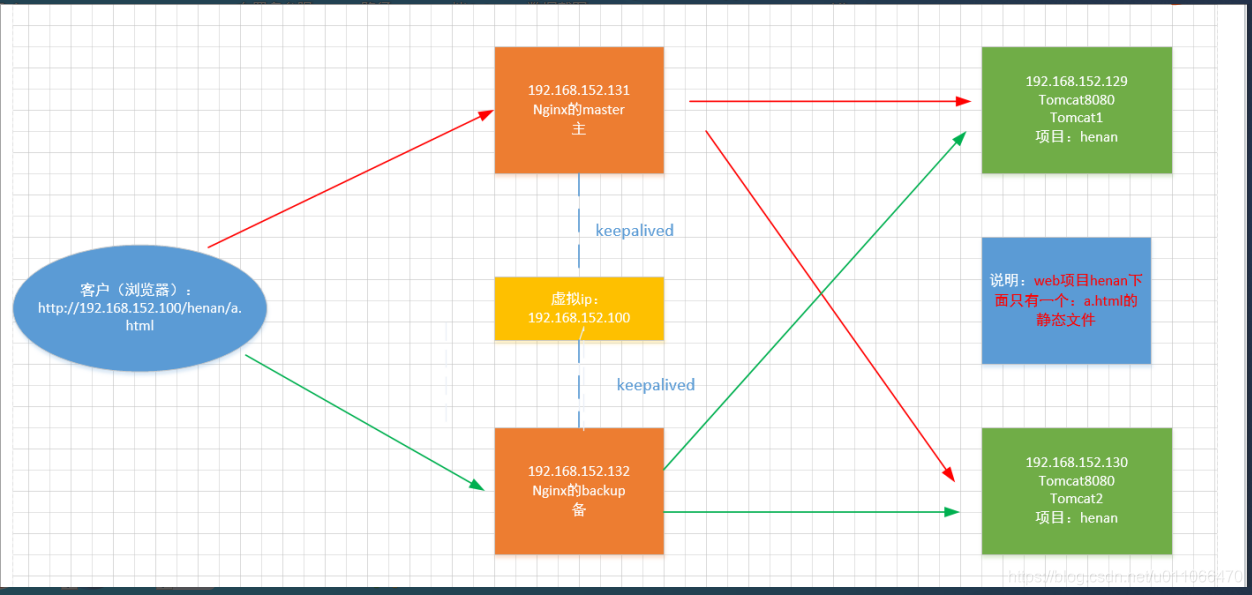
3.说明:
192.168.152.131的nginx为主服务,可以访问tomcat1和tomcat2服务器下的web项目:henan。
192.168.152.132的nginx为备份服务,也可以访问tomcat1和tomcat2服务器下的web项目:henan。
192.168.152.131和192.168.152.132这两台服务器都安装了keepalived;通过虚拟ip(192.168.152.100)进行访问。
当用户通过浏览器访问代理服务器提供的地址:http://192.168.152.100/henan/a.html,当192.168.152.131为主服务的nginx挂掉之后,备份服务192.168.152.132的nginx仍可进行访问后面的web服务tomcat1和tomcat2。如果能够成功切换,则实现了nginx+keepalive的主从高可用功能。
1.2 基础的配置
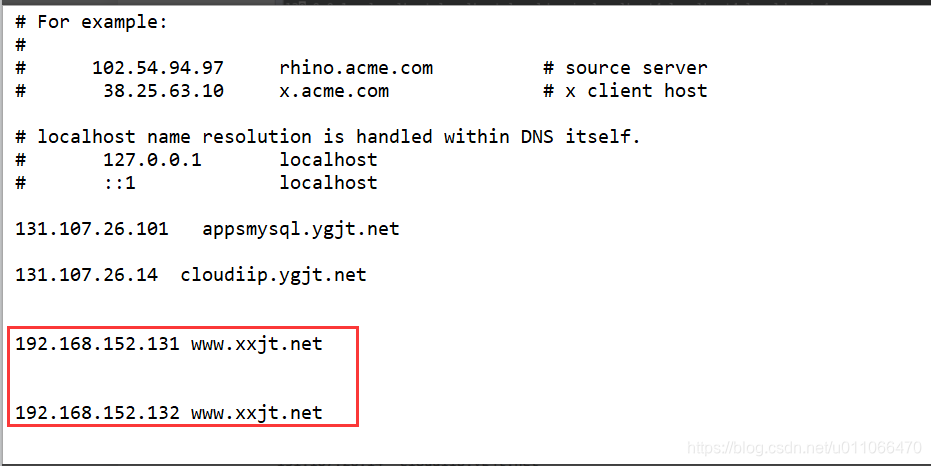
1.2.1 配置ip和域名的映射
#1.在192.168.152.131 配置ip和域名的映射

#2.在192.168.152.132配置ip和域名的映射

#3.在windows上配置域名映射
1.2.2 192.168.152.132关闭防火墙
#关闭192.168.152.132的防火墙
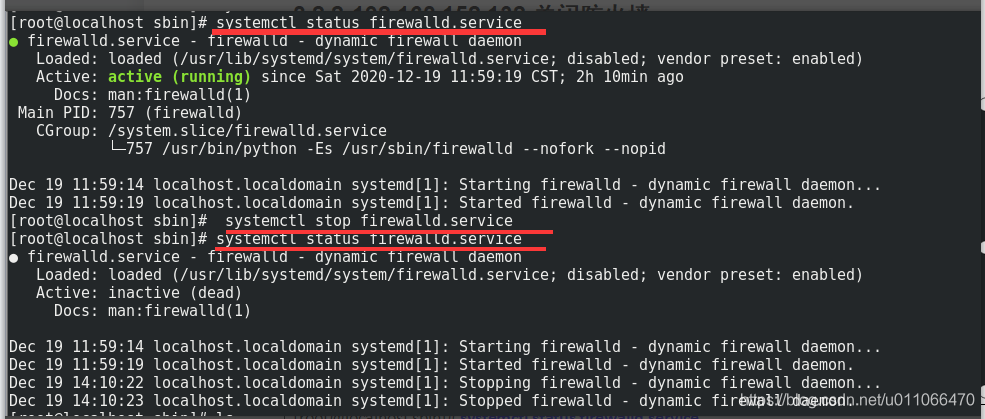
| [root@localhost sbin]# systemctl status firewalld.service ● firewalld.service - firewalld - dynamic firewall daemon Loaded: loaded (/usr/lib/systemd/system/firewalld.service; disabled; vendor preset: enabled) Active: active (running) since Sat 2020-12-19 11:59:19 CST; 2h 10min ago Docs: man:firewalld(1) Main PID: 757 (firewalld) CGroup: /system.slice/firewalld.service └─757 /usr/bin/python -Es /usr/sbin/firewalld --nofork --nopid Dec 19 11:59:14 localhost.localdomain systemd[1]: Starting firewalld - dynamic firewall daemon... Dec 19 11:59:19 localhost.localdomain systemd[1]: Started firewalld - dynamic firewall daemon. [root@localhost sbin]# systemctl stop firewalld.service [root@localhost sbin]# systemctl status firewalld.service ● firewalld.service - firewalld - dynamic firewall daemon Loaded: loaded (/usr/lib/systemd/system/firewalld.service; disabled; vendor preset: enabled) Active: inactive (dead) Docs: man:firewalld(1) Dec 19 11:59:14 localhost.localdomain systemd[1]: Starting firewalld - dynamic firewall daemon... Dec 19 11:59:19 localhost.localdomain systemd[1]: Started firewalld - dynamic firewall daemon. Dec 19 14:10:22 localhost.localdomain systemd[1]: Stopping firewalld - dynamic firewall daemon... Dec 19 14:10:23 localhost.localdomain systemd[1]: Stopped firewalld - dynamic firewall daemon. |
1.2.3 192.168.152.131关闭防火墙
#关闭192.168.152.132的防火墙

| [root@localhost sbin]# systemctl status firewalld.service ● firewalld.service - firewalld - dynamic firewall daemon Loaded: loaded (/usr/lib/systemd/system/firewalld.service; disabled; vendor preset: enabled) Active: active (running) since Sat 2020-12-19 11:59:19 CST; 2h 10min ago Docs: man:firewalld(1) Main PID: 757 (firewalld) CGroup: /system.slice/firewalld.service └─757 /usr/bin/python -Es /usr/sbin/firewalld --nofork --nopid Dec 19 11:59:14 localhost.localdomain systemd[1]: Starting firewalld - dynamic firewall daemon... Dec 19 11:59:19 localhost.localdomain systemd[1]: Started firewalld - dynamic firewall daemon. [root@localhost sbin]# systemctl stop firewalld.service [root@localhost sbin]# systemctl status firewalld.service ● firewalld.service - firewalld - dynamic firewall daemon Loaded: loaded (/usr/lib/systemd/system/firewalld.service; disabled; vendor preset: enabled) Active: inactive (dead) Docs: man:firewalld(1) Dec 19 11:59:14 localhost.localdomain systemd[1]: Starting firewalld - dynamic firewall daemon... Dec 19 11:59:19 localhost.localdomain systemd[1]: Started firewalld - dynamic firewall daemon. Dec 19 14:10:22 localhost.localdomain systemd[1]: Stopping firewalld - dynamic firewall daemon... Dec 19 14:10:23 localhost.localdomain systemd[1]: Stopped firewalld - dynamic firewall daemon. |
1.3 安装nginx
1.3.1 在主服务(192.168.152.131)上安装nginx
详情见第三部分
1.3.2 在主服务(192.168.152.132)上安装nginx
详情见第三部分
1.4 安装tomcat
1.4.1 在192.168.152.129上安装tomcat,并部署应用
1. 将tomcat的安装包上传到上传到服务器上:

2.解压tomcat:
| [root@localhost bigdata-softwares]# tar -zxvf apache-tomcat-8.5.6.tar.gz -C /root/bigdata apache-tomcat-8.5.6/conf/ apache-tomcat-8.5.6/conf/catalina.policy apache-tomcat-8.5.6/conf/catalina.properties |
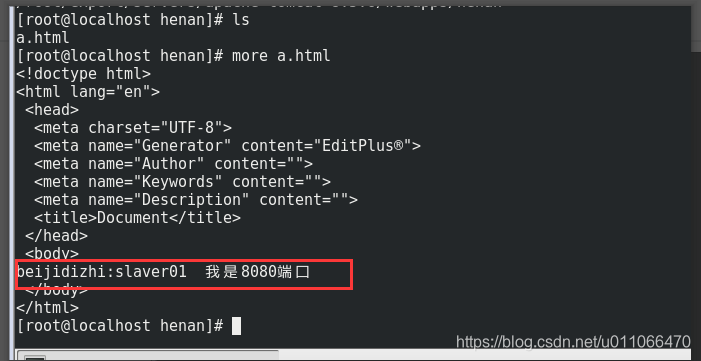
3.将项目:henan部署到tomcat下的webapps:

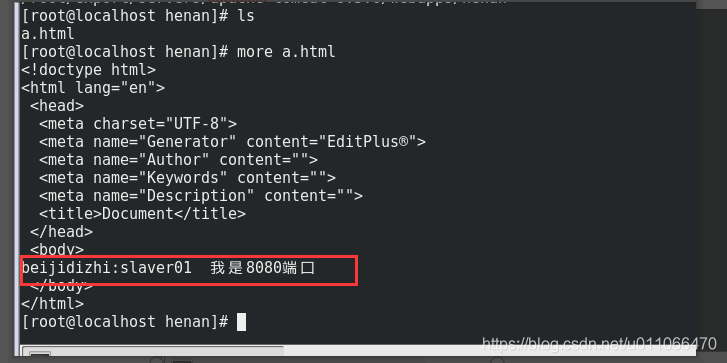
4.项目hennan的内容如下:
#5.启动tomcat
| [root@localhost bin]# sh startup.sh ;tail -f ../logs/catalina.out; Using CATALINA_BASE: /root/bigdata/apache-tomcat-8.5.6 Using CATALINA_HOME: /root/bigdata/apache-tomcat-8.5.6 Using CATALINA_TMPDIR: /root/bigdata/apache-tomcat-8.5.6/temp Using JRE_HOME: /usr Using CLASSPATH: /root/bigdata/apache-tomcat-8.5.6/bin/bootstrap.jar:/root/bigdata/apache-tomcat-8.5.6/bin/tomcat-juli.jar Tomcat started. 11-Dec-2020 11:16:23.723 INFO [localhost-startStop-1] org.apache.catalina.startup.HostConfig.deployDirectory Deployment of web application directory /root/bigdata/apache-tomcat-8.5.6/webapps/manager has finished in 79 ms 11-Dec-2020 11:16:23.752 INFO [main] org.apache.coyote.AbstractProtocol.start Starting ProtocolHandler [http-nio-8080] 11-Dec-2020 11:16:23.801 INFO [main] org.apache.coyote.AbstractProtocol.start Starting ProtocolHandler [ajp-nio-8009] 11-Dec-2020 11:16:23.846 INFO [main] org.apache.catalina.startup.Catalina.start Server startup in 1936 ms |
1.4.2 在192.168.152.130上安装tomcat,并部署应用
1. 将tomcat的安装包上传到上传到服务器上:

2.解压tomcat:
| [root@localhost bigdata-softwares]# tar -zxvf apache-tomcat-8.5.6.tar.gz -C /root/bigdata apache-tomcat-8.5.6/conf/ apache-tomcat-8.5.6/conf/catalina.policy apache-tomcat-8.5.6/conf/catalina.properties |
3.将项目:henan部署到tomcat下的webapps:

4.项目hennan的内容如下:
#5.启动tomcat
| [root@localhost bin]# sh startup.sh ;tail -f ../logs/catalina.out; Using CATALINA_BASE: /root/bigdata/apache-tomcat-8.5.6 Using CATALINA_HOME: /root/bigdata/apache-tomcat-8.5.6 Using CATALINA_TMPDIR: /root/bigdata/apache-tomcat-8.5.6/temp Using JRE_HOME: /usr Using CLASSPATH: /root/bigdata/apache-tomcat-8.5.6/bin/bootstrap.jar:/root/bigdata/apache-tomcat-8.5.6/bin/tomcat-juli.jar Tomcat started. 11-Dec-2020 11:16:23.723 INFO [localhost-startStop-1] org.apache.catalina.startup.HostConfig.deployDirectory Deployment of web application directory /root/bigdata/apache-tomcat-8.5.6/webapps/manager has finished in 79 ms 11-Dec-2020 11:16:23.752 INFO [main] org.apache.coyote.AbstractProtocol.start Starting ProtocolHandler [http-nio-8080] 11-Dec-2020 11:16:23.801 INFO [main] org.apache.coyote.AbstractProtocol.start Starting ProtocolHandler [ajp-nio-8009] 11-Dec-2020 11:16:23.846 INFO [main] org.apache.catalina.startup.Catalina.start Server startup in 1936 ms |
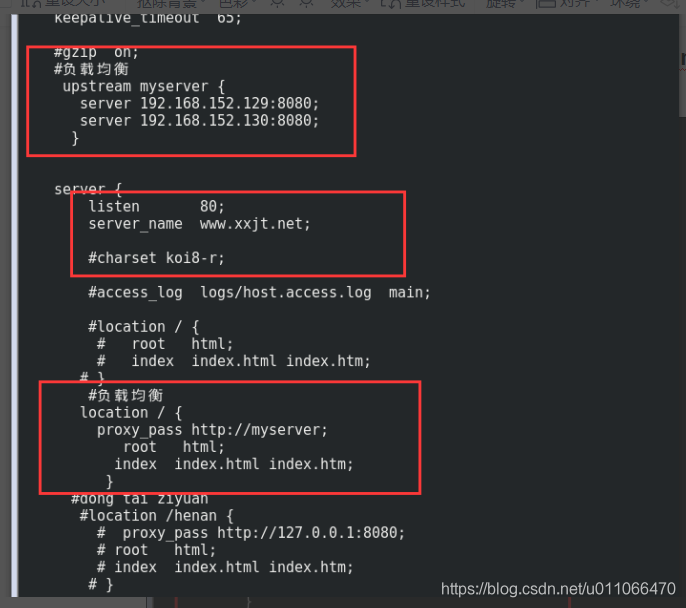
1.5 在nginx配置负载均衡
1.5.1 在nginx主服务器192.168.152.131上配置nginx
代码:
#user  nobody;

 user root;

worker_processes  1;

#error_log  logs/error.log;

#error_log  logs/error.log  notice;

#error_log  logs/error.log  info;


#pid        logs/nginx.pid;

events {

    worker_connections  1024;

}

http {

    include       mime.types;

    default_type  application/octet-stream;


    #log_format  main  '$remote_addr - $remote_user [$time_local] "$request" '

    #                  '$status $body_bytes_sent "$http_referer" '

    #                  '"$http_user_agent" "$http_x_forwarded_for"';


    #access_log  logs/access.log  main;


    sendfile        on;

    #tcp_nopush     on;


    #keepalive_timeout  0;

    keepalive_timeout  65;


    #gzip  on;

    #负载均衡

     upstream myserver {

       server 192.168.152.129:8080;

       server 192.168.152.130:8080;

      }

 server {

        listen       80;

        server_name  www.xxjt.net;


        #charset koi8-r;


        #access_log  logs/host.access.log  main;


        #location / {

         #   root   html;

         #   index  index.html index.htm;

       # }

        #负载均衡

       location / {

         proxy_pass http://myserver;

            root   html;

           index  index.html index.htm;

          }

      #dong tai ziyuan

       #location /henan {

         #  proxy_pass http://127.0.0.1:8080;

         # root   html;

         # index  index.html index.htm;

        # }

     #jing tai ziyuan

      # location /sohu-portal {

           #proxy_pass /root/bigdata-softwares/;

           #root  /dongjing-split/;

           #root    /root/bigdata-softwares/;

       #     root  /home/t14-jurf/;

        #   index  index.html index.htm;

       # }

#error_page  404              /404.html;


        # redirect server error pages to the static page /50x.html

        #

        error_page   500 502 503 504  /50x.html;

        location = /50x.html {

            root   html;

        }


        # proxy the PHP scripts to Apache listening on 127.0.0.1:80

        #

        #location ~ \.php$ {

        #    proxy_pass   http://127.0.0.1;

        #}


        # pass the PHP scripts to FastCGI server listening on 127.0.0.1:9000

        #

        #location ~ \.php$ {

        #    root           html;

        #    fastcgi_pass   127.0.0.1:9000;

        #    fastcgi_index  index.php;

        #    fastcgi_param  SCRIPT_FILENAME  /scripts$fastcgi_script_name;

        #    include        fastcgi_params;

        #}


        # deny access to .htaccess files, if Apache's document root

        # concurs with nginx's one

        #

        #location ~ /\.ht {

        #    deny  all;

        #}


# another virtual host using mix of IP-, name-, and port-based configuration

    #

    server {

        listen       8090;

        server_name  192.168.152.131;


        location ~ /nginx-demo/ {

        proxy_pass   http://127.0.0.1:8080;

            root   html;

            index  index.html index.htm;

        }

         location ~ /nginx-test/ {

        proxy_pass   http://127.0.0.1:8081;

            root   html;

            index  index.html index.htm;

        }

          location ~ / {

        proxy_pass   http://127.0.0.1:9090;

            root   html;

            index  index.html index.htm;

        }


    }


    # HTTPS server

    #

    #server {

    #    listen       443 ssl;

    #    server_name  localhost;


    #    ssl_certificate      cert.pem;

    #    ssl_certificate_key  cert.key;


    #    ssl_session_cache    shared:SSL:1m;

    #    ssl_ciphers  HIGH:!aNULL:!MD5;

    #    ssl_prefer_server_ciphers  on;

#    location / {

    #        root   html;

    #        index  index.html index.htm;

    #    }

    #}

}
1.5.2 在nginx主服务器192.168.152.132上配置nginx

#user  nobody;
worker_processes  1;

#error_log  logs/error.log;
#error_log  logs/error.log  notice;
#error_log  logs/error.log  info;

#pid        logs/nginx.pid;


events {
    worker_connections  1024;
}


http {
    include       mime.types;
    default_type  application/octet-stream;

    #log_format  main  '$remote_addr - $remote_user [$time_local] "$request" '
    #                  '$status $body_bytes_sent "$http_referer" '
    #                  '"$http_user_agent" "$http_x_forwarded_for"';

    #access_log  logs/access.log  main;

    sendfile        on;
    #tcp_nopush     on;

    #keepalive_timeout  0;
    keepalive_timeout  65;

    #gzip  on;
   #负载均衡
     upstream myserver {
       server 192.168.152.129:8080;
       server 192.168.152.130:8080;
      }
server {
        listen       80;
        server_name  www.xxjt.net;

        #charset koi8-r;

        #access_log  logs/host.access.log  main;

        location / {
             proxy_pass http://myserver;
            root   html;
            index  index.html index.htm;
        }

        #error_page  404              /404.html;

        # redirect server error pages to the static page /50x.html
        #
        error_page   500 502 503 504  /50x.html;
        location = /50x.html {
            root   html;
        }

        # proxy the PHP scripts to Apache listening on 127.0.0.1:80
        #
        #location ~ \.php$ {
        #    proxy_pass   http://127.0.0.1;
        #}

        # pass the PHP scripts to FastCGI server listening on 127.0.0.1:9000
        #
        #location ~ \.php$ {
        #    root           html;
        #    fastcgi_pass   127.0.0.1:9000;
        #    fastcgi_index  index.php;
        #    fastcgi_param  SCRIPT_FILENAME  /scripts$fastcgi_script_name;
        #    include        fastcgi_params;
        #}
 # another virtual host using mix of IP-, name-, and port-based configuration
    #
    #server {
    #    listen       8000;
    #    listen       somename:8080;
    #    server_name  somename  alias  another.alias;

    #    location / {
    #        root   html;
    #        index  index.html index.htm;
    #    }
    #}


    # HTTPS server
    #
    #server {
    #    listen       443 ssl;
    #    server_name  localhost;

    #    ssl_certificate      cert.pem;
    #    ssl_certificate_key  cert.key;

    #    ssl_session_cache    shared:SSL:1m;
    #    ssl_session_timeout  5m;

    #    ssl_ciphers  HIGH:!aNULL:!MD5;
    #    ssl_prefer_server_ciphers  on;

    #    location / {
    #        root   html;
    #        index  index.html index.htm;
    #    }
    #}

}
1.5.3 访问两个web服务器的负载均衡
#访问192.168.152.131上的nginx,第一次访问:http://www.xxjt.net/henan/a.html

第二次访问:http://www.xxjt.net/henan/a.html

#访问192.168.152.132上的nginx,第一次访问:http://192.168.152.132/henan/a.html

第二次访问:http://192.168.152.132/henan/a.html

总结:可以看到两个nginx均可实现反向代理两个tomcat(192.168.152.131,和192.168.152.132)的web应用henan。
1.6 配置keepalived
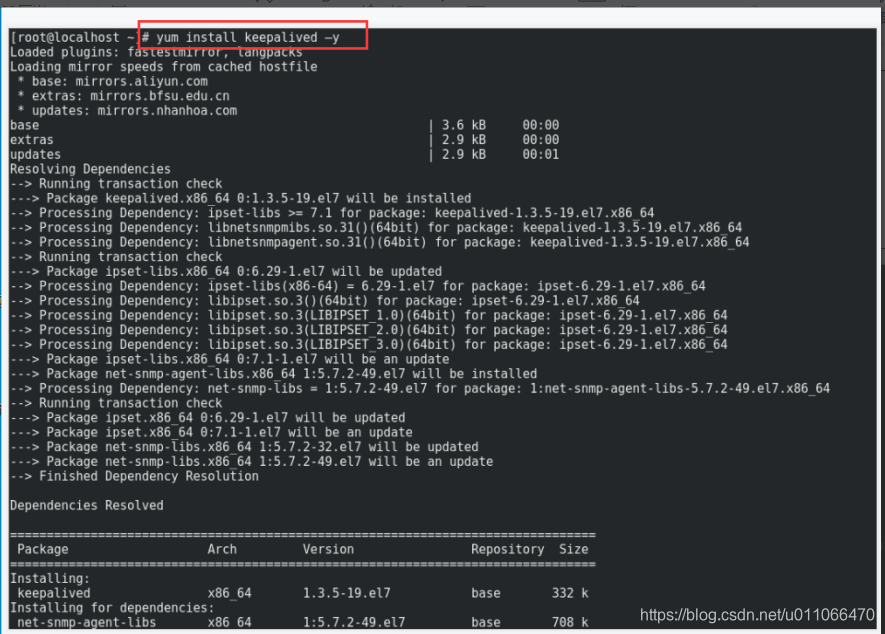
1.6.1 在192.168.152.131上安装keepalived
输入命令:yum install keepalived -y
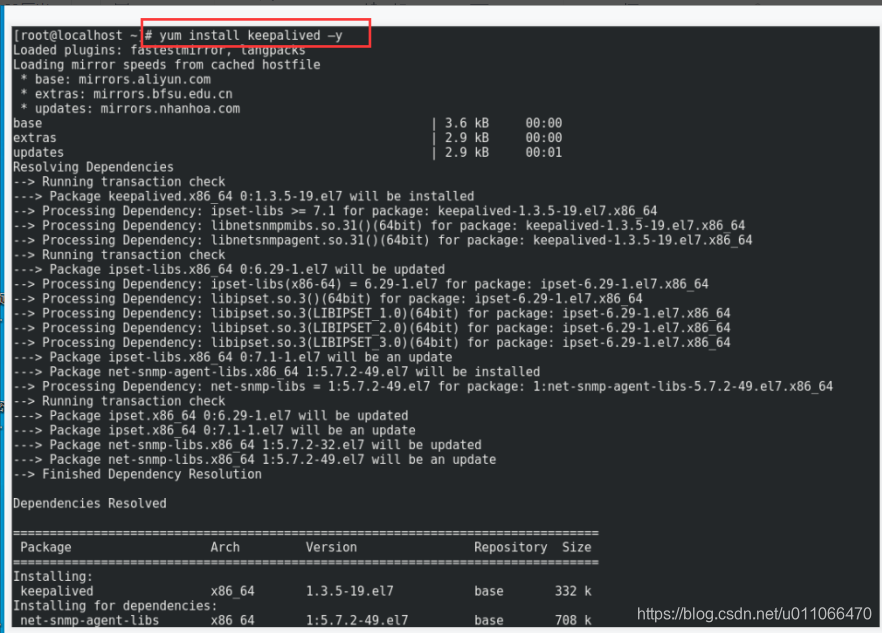
默认安装的路径为:/etc/keepalived/keepalived.conf
修改此配置文件keepalived.conf:
注意配置内容说明:
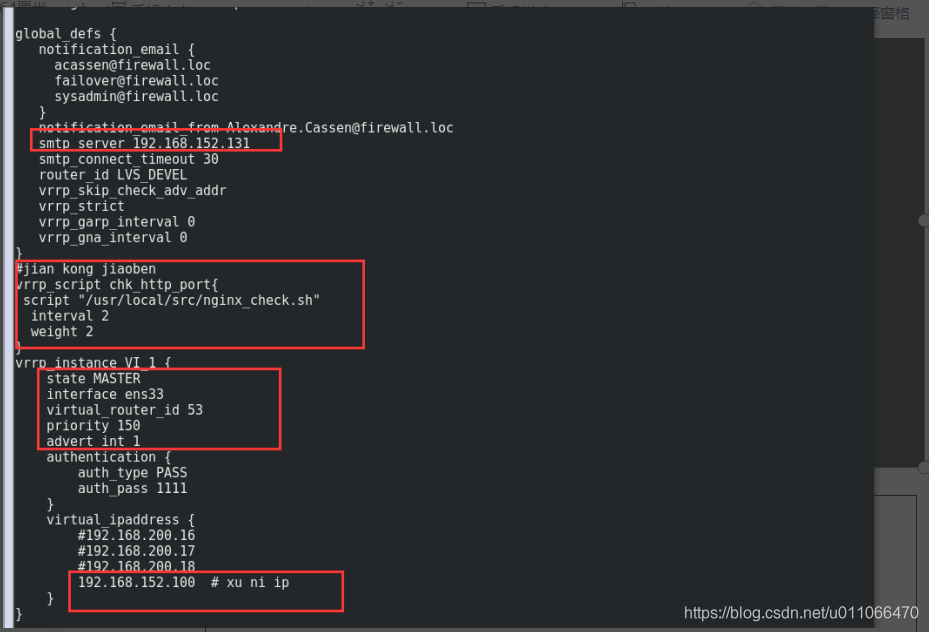
内容如下:
global_defs {
notification_email {
acassen@firewall.loc
failover@firewall.loc
sysadmin@firewall.loc
}
notification_email_from Alexandre.Cassen@firewall.loc
smtp_server 192.168.152.131
smtp_connect_timeout 30
router_id ww.xxjt.net #参考hosts文件的主机名
vrrp_skip_check_adv_addr
vrrp_strict
vrrp_garp_interval 0
vrrp_gna_interval 0
}
#jian kong jiaoben
vrrp_script chk_http_port{
script "/usr/local/src/nginx_check.sh"
interval 3
weight 2
}
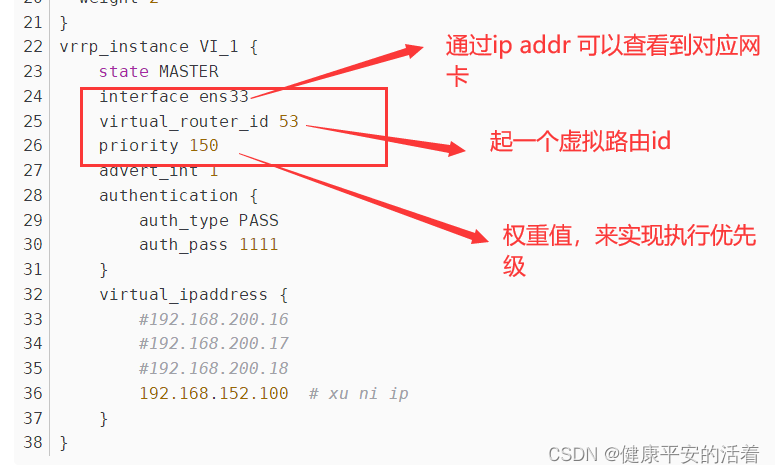
vrrp_instance VI_1 {
state MASTER
interface ens33
virtual_router_id 53
priority 150
advert_int 1
authentication {
auth_type PASS
auth_pass 1111
}
virtual_ipaddress {
#192.168.200.16
#192.168.200.17
#192.168.200.18
192.168.152.100 # xu ni ip
}
}1.6.2 在192.168.152.132上安装keepalived
输入命令:yum install keepalived -y
默认安装的路径为:/etc/keepalived/keepalived.conf
修改此配置文件keepalived.conf:
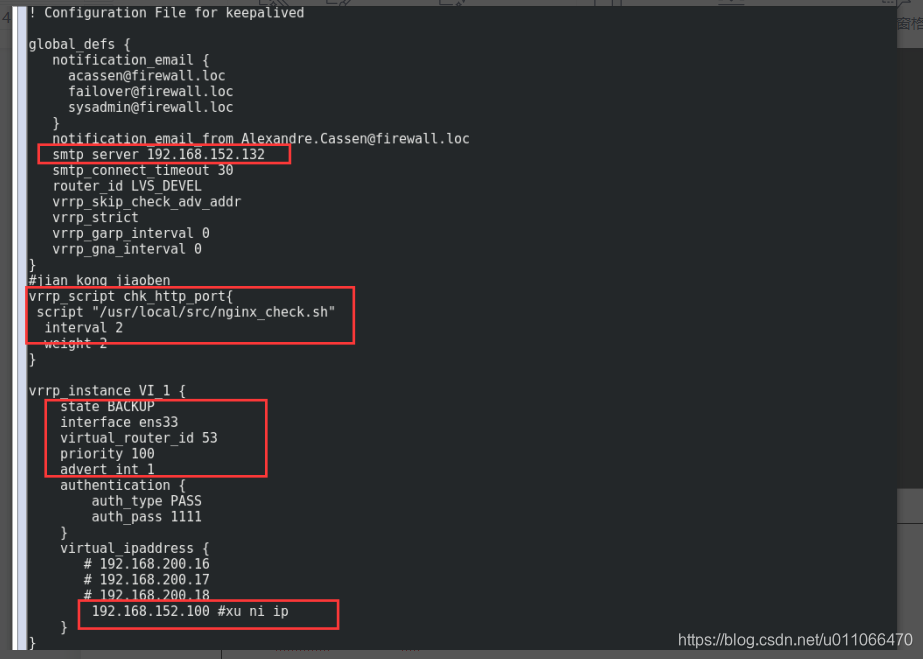
内容如下:
| #全局配置 global_defs { notification_email { acassen@firewall.loc failover@firewall.loc sysadmin@firewall.loc } notification_email_from Alexandre.Cassen@firewall.loc smtp_server 192.168.152.132 smtp_connect_timeout 30 router_id ww.xxjt.net #参考hosts文件的主机名 vrrp_skip_check_adv_addr vrrp_strict vrrp_garp_interval 0 vrrp_gna_interval 0 } #空脚本的配置 vrrp_script chk_http_port{ script "/usr/local/src/nginx_check.sh" interval 2 weight 2 } # vrrp_instance VI_1 { state BACKUP #备份服务器上将master 改为backup interface ens33 #网卡 virtual_router_id 53 #主、备机的virtual_router_id必须相同 priority 100 #主、备机取不同的优先级,主机值较大,备份机值较小 advert_int 1 authentication { auth_type PASS auth_pass 1111 } virtual_ipaddress { # 192.168.200.16 # 192.168.200.17 # 192.168.200.18 192.168.152.100 #虚拟ip } } |
1.7 编写切换脚本
脚本内容:
| #!/bin/bash A=`ps -C nginx –no-header |wc -l` if [ $A -eq 0 ];then /usr/local/nginx/sbin/nginx sleep 2 if [ `ps -C nginx --no-header |wc -l` -eq 0 ];then killall keepalived fi fi |
在192.168.152.131服务器上,将脚本放置到:/usr/local/src/nginx_check.sh

在192.168.152.132服务器上,将脚本放置到:/usr/local/src/nginx_check.sh

1.8 启动nginx,keepalived
1.8.1 在192.168.152.131上启动nginx、keepalived
首先进入到:/usr/local/nginx/sbin
| [root@localhost sbin]# ./nginx -s stop [root@localhost sbin]# ps -ef|grep nginx root 7502 2909 0 15:14 pts/1 00:00:00 grep --color=auto nginx [root@localhost sbin]# ./nginx [root@localhost sbin]# ps -ef|grep nginx root 7510 1 0 15:14 ? 00:00:00 nginx: master process ./nginx root 7512 7510 0 15:14 ? 00:00:00 nginx: worker process root 7519 2909 0 15:14 pts/1 00:00:00 grep --color=auto nginx |
进入到: /etc/keepalived/
| [root@localhost ~]# cd /etc/keepalived/ [root@localhost keepalived]# ls keepalived.conf [root@localhost keepalived]# vi keepalived.conf [root@localhost keepalived]# ls keepalived.conf [root@localhost keepalived]# systemctl start keepalived.service [root@localhost keepalived]# ps -ef|grep keepalived root 7461 1 0 15:13 ? 00:00:00 /usr/sbin/keepalived -D root 7462 7461 0 15:13 ? 00:00:00 /usr/sbin/keepalived -D root 7463 7461 0 15:13 ? 00:00:00 /usr/sbin/keepalived -D root 7484 6532 0 15:13 pts/2 00:00:00 grep --color=auto keepalived |
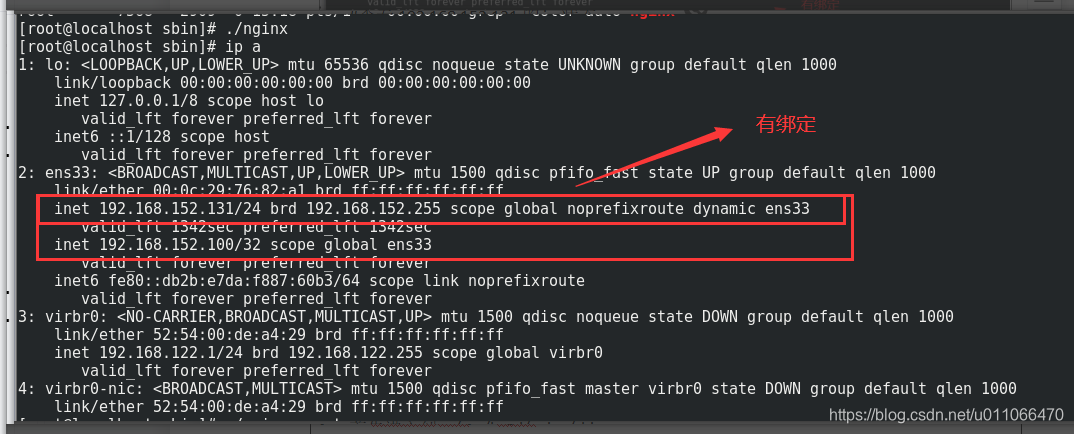
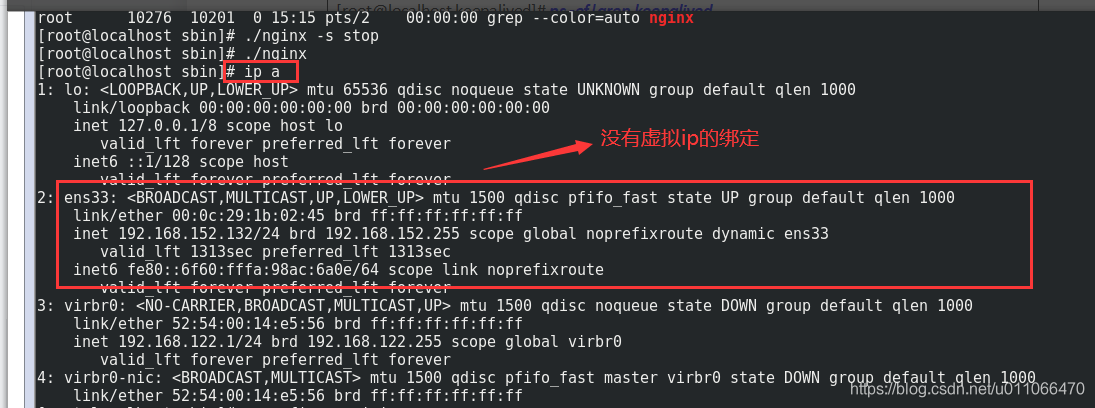
#查看192.168.152.131的ip状态:
1.8.2 在192.168.152.132 上启动nginx、keepalived
首先进入到:/usr/local/nginx/sbin
| [root@localhost sbin]# ./nginx -s stop [root@localhost sbin]# ps -ef|grep nginx root 7502 2909 0 15:14 pts/1 00:00:00 grep --color=auto nginx [root@localhost sbin]# ./nginx [root@localhost sbin]# ps -ef|grep nginx root 7510 1 0 15:14 ? 00:00:00 nginx: master process ./nginx root 7512 7510 0 15:14 ? 00:00:00 nginx: worker process root 7519 2909 0 15:14 pts/1 00:00:00 grep --color=auto nginx |
进入到: /etc/keepalived/
| [root@localhost ~]# cd /etc/keepalived/ [root@localhost keepalived]# ls keepalived.conf [root@localhost keepalived]# vi keepalived.conf [root@localhost keepalived]# ls keepalived.conf [root@localhost keepalived]# systemctl start keepalived.service [root@localhost keepalived]# ps -ef|grep keepalived root 7461 1 0 15:13 ? 00:00:00 /usr/sbin/keepalived -D root 7462 7461 0 15:13 ? 00:00:00 /usr/sbin/keepalived -D root 7463 7461 0 15:13 ? 00:00:00 /usr/sbin/keepalived -D root 7484 6532 0 15:13 pts/2 00:00:00 grep --color=auto keepalived |
#查看192.168.152.131的ip状态:
1.8.3 页面访问
访问页面,通过虚拟ip访问:http://192.168.152.100/henan/a.html
第一次访问:http://192.168.152.100/henan/a.html

第二次访问:http://192.168.152.100/henan/a.html

1.8.4 测试高可用的性能
现在将192.168.152.131这个nginx,keepalived进行关闭,再次通过http://192.168.152.100/henan/a.html进行访问,查看是否能否访问,如果能够访问,则说明成功切换到备份的nginx上去请求服务了。
#将192.168.152.131这个nginx,keepalived进行关闭
| [root@localhost sbin]# ./nginx -s stop [root@localhost sbin]# ps -ef|grep nginx root 7568 2909 0 15:18 pts/1 00:00:00 grep --color=auto nginx [root@localhost sbin]# systemctl stop keepalived.service |
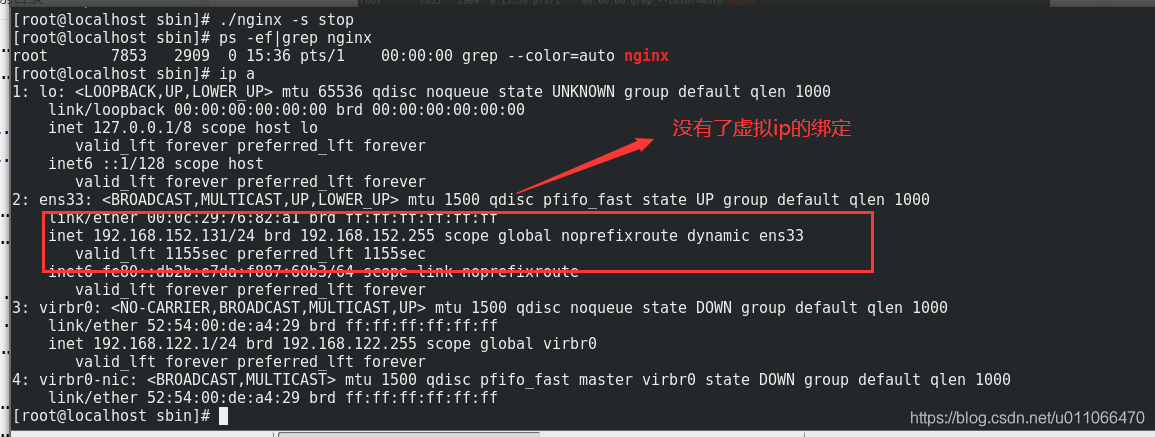
#查看192.168.152.132这个服务器上的ip绑定
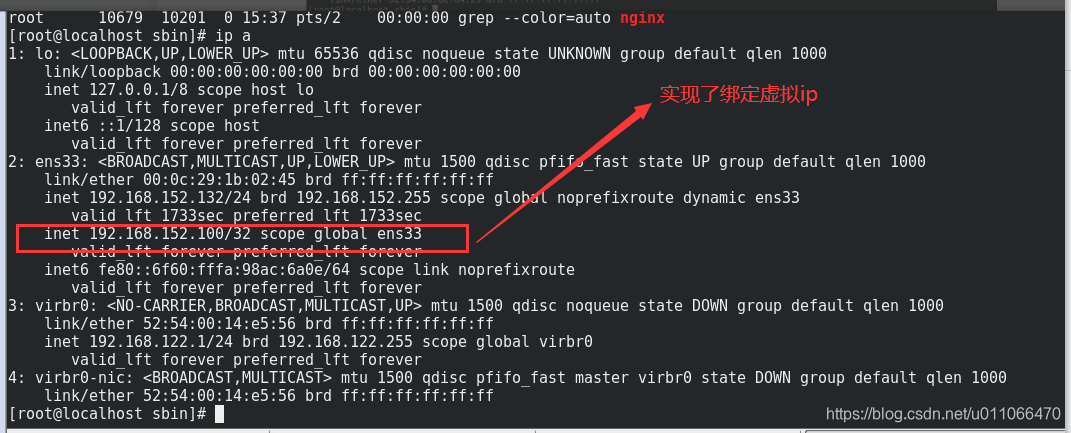
总结:结合8.1,8.2和上面可以得知:刚开始时,主服务nginx绑定了虚拟ip,backup的nginx服务没有绑定虚拟ip;经过将主服务nginx,keepalived关闭之后,backup的nginx服务实现了绑定虚拟ip。
1.8.5 页面再次访问
访问页面,通过虚拟ip访问:http://192.168.152.100/henan/a.html
第一次访问:

第二次访问:http://192.168.152.100/henan/a.html

最后,我们成功实现了通过nginx+keepalive实现了高可用的配置。


 1289
1289

 被折叠的 条评论
为什么被折叠?
被折叠的 条评论
为什么被折叠?
 到【灌水乐园】发言


