


 本文详细介绍RabbitMQ在Spring Boot中的安装、配置与使用方法,并深入探讨简单模式、工作队列模式、发布订阅模式、路由模式及主题模式的具体实现。
我用的是win10系统,想看linux系统下操作的请出门右转其他博主的文章。
一、安装rabbitmq
1.要安装RabbitMQ先必须安装erlang。 官网地址:http://www.erlang.org/downloads。选择wind 64位安装。
2.安装rabbitmq,官网地址:http://www.rabbitmq.com/download.html。
(1). rabbitmq在安装过程中需要特别注意 两个.erlang.cookie里面的内容必须一致。否则会一直报:
TCP connection succeeded but Erlang distribution failed
* suggestion: hostname mismatch?
* suggestion: is the cookie set correctly?
* suggestion: is the Erlang distribution using TLS?
一个在C:\Windows,这个文件夹下的.erlang.cookie。一个在C:\Users\sdc 这个文件夹下,
这两个文件里的内容必须一致。如果不一致或者你只发现了一个,就把另一个复制到那里就行了。
(2).安装rabbit好之后就可以在电脑的服务上看到rabbitmq了。我们还需要安装 rabbitmq management来在web上
对rabbit进行管理。
Program Files是rabbitmq默认的文件夹,在C:\Program Files\RabbitMQ Server\rabbitmq_server-3.6.9\sbin 处
运行shell命令
./rabbitmq-plugins enable rabbitmq_management 注意 前面的./。我的wind10不加 ./ 是会报错,安装失败的。
(3).安装成功之后,在浏览器输入http://127.0.0.1:15672/,输入默认用户名“guest”和默认密码"guest"就可以登录管理页面了。
二、springboot整合rabbitmq
1.在pom.xml里引入 下面代码spring-boot-starter-amqp。
- <dependency>
- <groupId>org.springframework.boot</groupId>
- <artifactId>spring-boot-starter-amqp</artifactId>
- </dependency>
2.不需要在启动类前加@EnableRabbit 和 新建 ConnectionFactory(),不需要。因为可以在propertires里配置rabbitmq的选项。
#rabbitmq
spring.rabbitmq.addresses=127.0.0.1:5672
spring.rabbitmq.username=wangjk
spring.rabbitmq.password=wangjk
spring.rabbitmq.publisher-confirms=true
spring.rabbitmq.virtual-host=/
spring.rabbitmq.listener.acknowledge-mode=manual
为什么不用默认的用户名guest和密码,因为guest帐号只能用来在管理端,远程连接rabbitmq会被拒绝的。所以只好自己新建了一个用户,分配了管理员的权限。
至此,rabbitmq就算是整合到springboot里了。下面开始介绍在springboot中如何使用rabbitmq。
三、springboot中使用各种模式的rabbitmq
《rabbitmq实战》中说的rabbitmq 的5种模式
1.简单模式 2.工作队列模式 3.发布订阅模式 4.路由模式 5.主题模式
简单模式
其中1跟2只是消费者C是一个还是多个的问题,可以归纳到一起。简单发送模式看起来是没有用到交换机的,
类似于P -> Q -> C(C1,C2)的。一个生产者P发送消息到队列Q,一个或者多个消费者C接收。
我的P和C是写在两个springboot项目上的
producerClient的 Sender类代码。
package com.beltoo.producer.rabbitmq;

import java.util.Map;

import org.springframework.amqp.rabbit.core.RabbitTemplate;
import org.springframework.beans.factory.annotation.Autowired;
import org.springframework.stereotype.Component;

@Component
public class Sender {

	@Autowired
	private RabbitTemplate  rabbitTemplate;


	//简单发送队列
	public static final  String SIMPLE_QUEUE = "tea";
    // 发布/订阅模式
	public static final  String FANOUT_EXCHANGE = "fanout_exchange";

	//路由模式
	public static final String DIRECT_EXCHANGE = "direct_exchange";

	//主题模式
	public static final String TOPIC_EXCHANGE = "topic_exchange";

	/**
	 * 简单模式发送 String类型消息
	 * @param message
	 */

	public void send(String message) {

		this.rabbitTemplate.convertAndSend(SIMPLE_QUEUE,message);
	}

	/**
	 * 简单模式发送 Map类型消息
	 * @param message
	 */

	public void sendMapMessage(Map map) {

		this.rabbitTemplate.convertAndSend(SIMPLE_QUEUE,map);
	}

	/**
	 * 发布/订阅模式发送
	 * @param message
	 */
	public void psSend(String message) {
		this.rabbitTemplate.convertAndSend(FANOUT_EXCHANGE, "", message);
	}

	/**
     * 路由模式发送
     *
     * @param message
     */
    public void routingSend(String routingKey, String message) {
        this.rabbitTemplate.convertAndSend(DIRECT_EXCHANGE, routingKey, message);
    }

    /**
     * 主题模式发送
     *
     * @param routingKey
     * @param message
     */
    public void topicSend(String routingKey, String message) {
        this.rabbitTemplate.convertAndSend(TOPIC_EXCHANGE, routingKey, message);
    }


}
单独把简单发送模式的代码拿出来讲:
//简单发送队列
	public static final  String SIMPLE_QUEUE = "tea";

/**
	 * 简单模式发送 String类型消息
	 * @param message
	 */

	public void send(String message) {

		this.rabbitTemplate.convertAndSend(SIMPLE_QUEUE,message);
	}

	/**
	 * 简单模式发送 Map类型消息
	 * @param message
	 */

	public void sendMapMessage(Map map) {

		this.rabbitTemplate.convertAndSend(SIMPLE_QUEUE,map);
}rabbitTemplate.convertAndSend(SIMPLE_QUEUE,message); 看看源码:
@Override
	public void convertAndSend(String routingKey, final Object object) throws AmqpException {
		convertAndSend(this.exchange, routingKey, object, (CorrelationData) null);
}Controller 代码
package com.beltoo.producer.controller;

import java.util.HashMap;
import java.util.Map;

import org.slf4j.Logger;
import org.slf4j.LoggerFactory;
import org.springframework.beans.factory.annotation.Autowired;
import org.springframework.http.HttpHeaders;
import org.springframework.web.bind.annotation.GetMapping;
import org.springframework.web.bind.annotation.PostMapping;
import org.springframework.web.bind.annotation.RequestBody;
import org.springframework.web.bind.annotation.RequestHeader;
import org.springframework.web.bind.annotation.RequestParam;
import org.springframework.web.bind.annotation.RestController;

import com.alibaba.fastjson.JSON;
import com.alibaba.fastjson.JSONArray;
import com.alibaba.fastjson.JSONObject;
import com.beltoo.producer.common.ResultUtils;
import com.beltoo.producer.entity.Book;
import com.beltoo.producer.entity.Result;
import com.beltoo.producer.rabbitmq.Sender;

import io.swagger.annotations.Api;
import io.swagger.annotations.ApiImplicitParam;
import io.swagger.annotations.ApiImplicitParams;
import io.swagger.annotations.ApiOperation;

/**
 * rabbitmq测试contronller
 * @author wang
 * @date 2018年4月3日
 */
@RestController
@Api(value="rabbitMqContronller",description="rabbitmq测试类")
public class RabbitMqContronller {

	public static final Logger logger  = LoggerFactory.getLogger(RabbitMqContronller.class);

	@Autowired
	private Sender sender ;

	@ApiOperation(value = "简单模式发送String消息",notes = "简单模式发送String消息" )
	@ApiImplicitParams({
    	@ApiImplicitParam(name="Accept",value="接收属性",required=true,dataType="String",paramType="header",defaultValue="application/json"),
    	@ApiImplicitParam(name="Accept-Charset",value="接受字符集",required=true,dataType="String",paramType="header",defaultValue="utf-8"),
    	@ApiImplicitParam(name="Content-Type",value="内容类型",required=false,dataType="String",paramType="header",defaultValue="application/json")
    })
    @GetMapping("/rabbitmq/directsend/a")
    public Result<?> sendStringMq( @RequestParam String message, @RequestHeader HttpHeaders headers){   //这里用于测试,key值可以自定义实现

		try {
			sender.send(message);
	        return ResultUtils.success(message);
		} catch (Exception e) {
			// TODO: handle exception
			logger.error("mq发送消息失败:"+e.getMessage(), e);
		}

		return ResultUtils.error(1, "mq发送消息失败");

    }

	@ApiOperation(value = "简单模式发送Map消息",notes = "简单模式发送Map消息" )
	@ApiImplicitParams({
    	@ApiImplicitParam(name="Accept",value="接收属性",required=true,dataType="String",paramType="header",defaultValue="application/json"),
    	@ApiImplicitParam(name="Accept-Charset",value="接受字符集",required=true,dataType="String",paramType="header",defaultValue="utf-8"),
    	@ApiImplicitParam(name="Content-Type",value="内容类型",required=false,dataType="String",paramType="header",defaultValue="application/json")
    })
    @GetMapping("/rabbitmq/directsend/b")
    public Result<?> sendMapMq( @RequestParam String message, @RequestHeader HttpHeaders headers){   //这里用于测试,key值可以自定义实现

		try {
			Map<String,String> map = new HashMap<>();
			map.put("name", "蚂蚁上树");
			map.put("age", "20");
			sender.sendMapMessage(map);
	        return ResultUtils.success(map);
		} catch (Exception e) {
			// TODO: handle exception
			logger.error("mq发送消息失败:"+e.getMessage(), e);
		}

		return ResultUtils.error(1, "mq发送消息失败");

    }

	@ApiOperation(value = "发布/订阅模式发送消息",notes = "发布/订阅模式发送消息" )
	@ApiImplicitParams({
    	@ApiImplicitParam(name="Accept",value="接收属性",required=true,dataType="String",paramType="header",defaultValue="application/json"),
    	@ApiImplicitParam(name="Accept-Charset",value="接受字符集",required=true,dataType="String",paramType="header",defaultValue="utf-8"),
    	@ApiImplicitParam(name="Content-Type",value="内容类型",required=false,dataType="String",paramType="header",defaultValue="application/json")
    })
    @GetMapping("/rabbitmq/pssend")
    public Result<?> sendPsMq( @RequestParam String message, @RequestHeader HttpHeaders headers){   //这里用于测试,key值可以自定义实现

		try {

			sender.psSend(message);
	        return ResultUtils.success(message);
		} catch (Exception e) {
			// TODO: handle exception
			logger.error(" 发布/订阅模式下发送mq消息失败:"+e.getMessage(), e);
		}

		return ResultUtils.error(101, "发布/订阅模式下发送mq消息失败");

    }


	/*
	 * 路由模式发送mq
	 */
	@ApiOperation(value = "路由模式发送消息",notes = "路由模式发送消息" )
	@ApiImplicitParams({
		@ApiImplicitParam(name = "message",value="要传送的消息jsonArray",required = true,dataType = "String" , paramType ="body"),
    	@ApiImplicitParam(name="Accept",value="接收属性",required=true,dataType="String",paramType="header",defaultValue="application/json"),
    	@ApiImplicitParam(name="Accept-Charset",value="接受字符集",required=true,dataType="String",paramType="header",defaultValue="utf-8"),
    	@ApiImplicitParam(name="Content-Type",value="内容类型",required=false,dataType="String",paramType="header",defaultValue="application/json")
    })
    @PostMapping(value = "/rabbitmq/routingsend" ,produces ="application/json;charset=UTF-8")
    public Result<?> sendRoutingMq( @RequestBody String message, @RequestHeader HttpHeaders headers){   //这里用于测试,key值可以自定义实现

		JSONArray jsonArray = JSON.parseArray(message);
		if(jsonArray == null || jsonArray.size() <= 0) {
			return ResultUtils.error(102, "请输入有效message参数");
		}

		try {
			jsonArray.forEach(( json ) -> sender.routingSend("order",JSONObject.toJSONString(json)));
	        return ResultUtils.success(message);
		} catch (Exception e) {
			// TODO: handle exception
			logger.error(" 路由模式下发送mq消息失败:"+e.getMessage(), e);
		}

		return ResultUtils.error(101, "路由模式下发送mq消息失败");

    }

	/*
	 * 主题模式发送mq
	 */
	@ApiOperation(value = "主题模式发送消息",notes = "主题模式发送消息" )
	@ApiImplicitParams({
		@ApiImplicitParam(name = "message",value="要传送的消息jsonArray",required = true,dataType = "String" , paramType ="body"),
    	@ApiImplicitParam(name="Accept",value="接收属性",required=true,dataType="String",paramType="header",defaultValue="application/json"),
    	@ApiImplicitParam(name="Accept-Charset",value="接受字符集",required=true,dataType="String",paramType="header",defaultValue="utf-8"),
    	@ApiImplicitParam(name="Content-Type",value="内容类型",required=false,dataType="String",paramType="header",defaultValue="application/json")
    })
    @PostMapping(value = "/rabbitmq/topicsend" ,produces ="application/json;charset=UTF-8")
    public Result<?> sendTopicMq( @RequestBody String message, @RequestHeader HttpHeaders headers){   //这里用于测试,key值可以自定义实现

		JSONArray jsonArray = JSON.parseArray(message);
		if(jsonArray == null || jsonArray.size() <= 0) {
			return ResultUtils.error(102, "请输入有效message参数");
		}

		try {
			jsonArray.forEach(( json ) -> sender.topicSend("user.add",JSONObject.toJSONString(json)));
	        return ResultUtils.success(message);
		} catch (Exception e) {
			// TODO: handle exception
			logger.error(" 主题模式下发送mq消息失败:"+e.getMessage(), e);
		}

		return ResultUtils.error(101, "主题模式下发送mq消息失败");

    }


}
C端监听器代码:
package com.beltoo.customer.rabbitmq;

import java.util.Map;

import org.slf4j.Logger;
import org.slf4j.LoggerFactory;
import org.springframework.amqp.core.Queue;
import org.springframework.amqp.rabbit.annotation.RabbitHandler;
import org.springframework.amqp.rabbit.annotation.RabbitListener;
import org.springframework.context.annotation.Bean;
import org.springframework.context.annotation.Configuration;
import org.springframework.messaging.handler.annotation.Payload;

@Configuration
@RabbitListener(queues = "tea")
public class Listener {

	private  static final Logger logger = LoggerFactory.getLogger(Listener.class);

	/**
	 * 简单发送模式
	 * @return
	 */
	@Bean
	public Queue teaQueue() {
		return new Queue("tea",true);
	}


	@RabbitHandler
	public void process(@Payload String message) {

		logger.info("Listener收到String类型mq消息:" + message );

	}

//	@RabbitListener(queues = "tea")
	@RabbitHandler
	public void process1(@Payload Map map) {

		logger.info("Listener收到Map类型mq消息:" + map );

	}

}
在类上 加
@Configuration
@RabbitListener(queues = "tea")
说明这个类是配置类,这个rabbit监听器监听name 为 tea 的消息队列。
@RabbitHandler是对不同类型的消息进行处理(知道为什么写了两个不同的Sender方法了吗)
@Payload有效载荷,即消息的有用部分。这个注解不加也没问题。
发布/订阅模式(Publish/Subscribe)

P Sender
// 发布/订阅模式
	public static final  String FANOUT_EXCHANGE = "fanout_exchange";

/**
	 * 发布/订阅模式发送
	 * @param message
	 */
	public void psSend(String message) {
		this.rabbitTemplate.convertAndSend(FANOUT_EXCHANGE, "", message);
	}
rabbitTemplate.convertAndSend(FANOUT_EXCHANGE, "", message);第二个参数 routingKey是空的。
Controller里代码 和简单模式的在一起。
P 的监听器 代码 :
package com.beltoo.customer.rabbitmq;

import org.slf4j.Logger;
import org.slf4j.LoggerFactory;
import org.springframework.amqp.core.Binding;
import org.springframework.amqp.core.BindingBuilder;
import org.springframework.amqp.core.FanoutExchange;
import org.springframework.amqp.core.Queue;
import org.springframework.amqp.rabbit.annotation.RabbitListener;
import org.springframework.context.annotation.Bean;
import org.springframework.context.annotation.Configuration;

/**
 * 发布/订阅模式监听器
 * @author wang
 * @date 2018年4月3日
 */
@Configuration
public class PSListener {

	public static final Logger logger = LoggerFactory.getLogger(PSListener.class);
	public static final String PS_QUEUE_1 = "ps_queue_1";
    public static final String PS_QUEUE_2 = "ps_queue_2";
    public static final String FANOUT_EXCHANGE = "fanout_exchange";

    @Bean
    public Queue psQueue1() {
        return new Queue(PS_QUEUE_1, true);
    }

    @Bean
    public Queue psQueue2() {
        return new Queue(PS_QUEUE_2, true);
    }

    @Bean
    public FanoutExchange fanoutExchange() {
        return new FanoutExchange(FANOUT_EXCHANGE);
    }

    @Bean
    public Binding fanoutBinding1() {
        return BindingBuilder.bind(psQueue1()).to(fanoutExchange());
    }

    @Bean
    public Binding fanoutBinding2() {
        return BindingBuilder.bind(psQueue2()).to(fanoutExchange());
    }


    /**
     * 发布/订阅模式接收
     *
     * @param message
     */
    @RabbitListener(queues = PS_QUEUE_1)
    public void psReceive1(String message) {
        System.out.println(PS_QUEUE_1 + "接收消息:" + message);
        logger.info(PS_QUEUE_1 + "接收消息:" + message);
    }
    @RabbitListener(queues = PS_QUEUE_2)
    public void psReceive2(String message) {
        System.out.println(PS_QUEUE_2 + "接收消息:" + message);
        logger.info(PS_QUEUE_2 + "接收消息:" + message);
    }


}
我的项目中都是在消费者端的监听器中声明并创建交换器和队列的,其实这样不安全。因为生产者将消息发布到交换器后,而这个交换器并没有绑定队列的话,这些消息就会丢失。所以最好的方法在生产者和消费者两端都声明交换器和队列。因为new Queue()在发现队列已经创建的情况下,什么都不做并且返回已经存在的 队列。
监听器中创建两个 队列 psQueue1和psQueue2,两个fanout类型交换机 fanoutExchange1和 fanoutExchange2。并且把psQueue1绑定到fanoutExchange1上。psQueue2绑定到fanoutExchange2.绑定时没有指明bindingKey
如果有多个C端都有Q绑定这个X的话,所有的Q都会收到传递的这个M的复制。
路由模式(Routing)

/**
     * 路由模式发送
     *
     * @param message
     */
    public void routingSend(String routingKey, String message) {
        this.rabbitTemplate.convertAndSend(DIRECT_EXCHANGE, routingKey, message);
}package com.beltoo.customer.rabbitmq;
import org.slf4j.Logger;
import org.slf4j.LoggerFactory;
import org.springframework.amqp.core.Binding;
import org.springframework.amqp.core.BindingBuilder;
import org.springframework.amqp.core.DirectExchange;
import org.springframework.amqp.core.Queue;
import org.springframework.amqp.rabbit.annotation.RabbitListener;
import org.springframework.context.annotation.Bean;
import org.springframework.context.annotation.Configuration;
/**
* 路由模式监听器
* @author wang
* @date 2018年4月4日
*/
@Configuration
public class RoutingListener {
public static final Logger logger = LoggerFactory.getLogger(RoutingListener.class);
public static final String ROUTING_QUEUE_1 = "routing_queue_1";
public static final String ROUTING_QUEUE_2 = "routing_queue_2";
public static final String DIRECT_EXCHANGE = "direct_exchange";
@Bean
public Queue routingQueue1() {
return new Queue(ROUTING_QUEUE_1, true);
}
@Bean
public Queue routingQueue2() {
return new Queue(ROUTING_QUEUE_2, true);
}
@Bean
public DirectExchange directExchange() {
return new DirectExchange(DIRECT_EXCHANGE);
}
@Bean
public Binding directBinding1() {
return BindingBuilder.bind(routingQueue1()).to(directExchange()).with("user");
}
@Bean
public Binding directBinding2() {
return BindingBuilder.bind(routingQueue2()).to(directExchange()).with("order");
}
/**
* 路由模式接收
*
* @param message
*/
@RabbitListener(queues = ROUTING_QUEUE_1 )
public void routingReceive1(String message) {
System.out.println( ROUTING_QUEUE_1 + "接收路由模式消息:" + message);
logger.info(ROUTING_QUEUE_1 + "接收路由模式消息:" + message);
}
@RabbitListener(queues = ROUTING_QUEUE_2 )
public void routingReceive2(String message) {
System.out.println( ROUTING_QUEUE_2 + "接收路由模式消息:" + message);
logger.info(ROUTING_QUEUE_2 + "接收路由模式消息:" + message);
}
}
主题模式(Topic)
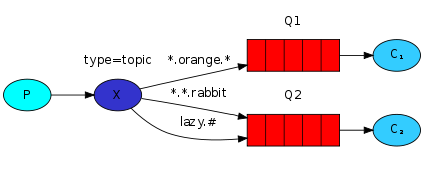
P端Sender代码
/**
     * 主题模式发送
     *
     * @param routingKey
     * @param message
     */
    public void topicSend(String routingKey, String message) {
        this.rabbitTemplate.convertAndSend(TOPIC_EXCHANGE, routingKey, message);
    }
C端Lisenter代码:
package com.beltoo.customer.rabbitmq;

import java.io.IOException;

import org.slf4j.Logger;
import org.slf4j.LoggerFactory;
import org.springframework.amqp.core.Binding;
import org.springframework.amqp.core.BindingBuilder;
import org.springframework.amqp.core.Message;
import org.springframework.amqp.core.Queue;
import org.springframework.amqp.core.TopicExchange;
import org.springframework.amqp.rabbit.annotation.RabbitListener;
import org.springframework.context.annotation.Bean;
import org.springframework.context.annotation.Configuration;
import org.springframework.messaging.handler.annotation.Payload;

import com.rabbitmq.client.Channel;


/**
 * 主题模式监听器
 * @author wang
 * @date 2018年4月4日
 */
@Configuration
public class TopicListenter {

	public static final Logger logger = LoggerFactory.getLogger(RoutingListener.class);

	public static final String TOPIC_QUEUE_1 = "topic_queue_1";
    public static final String TOPIC_QUEUE_2 = "topic_queue_2";
    public static final String TOPIC_EXCHANGE = "topic_exchange";

    public static final String TOPIC_ROUTINGKEY1 = "user.*";
    public static final String TOPIC_ROUTINGKEY2 = "order.#";

    @Bean
    public TopicExchange topicExchange() {
        return new TopicExchange(TOPIC_EXCHANGE);
    }

    @Bean
    public Queue topicQueue1() {

    	//第二个参数 是durable 队列持久化
    	return new Queue(TOPIC_QUEUE_1,true);
    }

    @Bean
    public Queue topicQueue2() {

    	//第二个参数 是durable 队列持久化
    	return new Queue(TOPIC_QUEUE_2,true);
    }

    @Bean
    public Binding topicBinding1() {
        return BindingBuilder.bind(topicQueue1()).to(topicExchange()).with(TOPIC_ROUTINGKEY1);
    }
    @Bean
    public Binding topicBinding2() {
        return BindingBuilder.bind(topicQueue2()).to(topicExchange()).with(TOPIC_ROUTINGKEY2);
    }


    /**
     * 主题模式接收
     *
     * @param message
     */

    @RabbitListener(queues = TOPIC_QUEUE_1)
    public void topicReceive1(@Payload String message, Message mes, Channel channel) throws IOException {
    	channel.basicAck(mes.getMessageProperties().getDeliveryTag(), false);
        System.out.println(TOPIC_QUEUE_1 + "接收消息:" + mes.getMessageProperties().getDeliveryTag() + message);
        logger.info(TOPIC_QUEUE_1 + "接收消息id为:" + mes.getMessageProperties().getDeliveryTag() + "内容为: "+ message);
    }

    @RabbitListener(queues = TOPIC_QUEUE_2)
    public void topicReceive2(@Payload String message, Message mes, Channel channel) throws IOException {

    	channel.basicAck(mes.getMessageProperties().getDeliveryTag(), false);
        System.out.println(TOPIC_QUEUE_2 + "接收消息:" + mes.getMessageProperties().getDeliveryTag() + message);
        logger.info(TOPIC_QUEUE_2 + "接收消息id为" + mes.getMessageProperties().getDeliveryTag() + "内容为: "+ message);
    }

}
四、rabbitmq中交换机Exchange的类型
fanout、direct、topic在前面讲发布模式的已经讲到了。
还有headers类型没讲:
五、ACK 消息的确认机制
 @RabbitListener(queues = TOPIC_QUEUE_1)
    public void topicReceive1(@Payload String message, Message mes, Channel channel) throws IOException {
    	channel.basicAck(mes.getMessageProperties().getDeliveryTag(), false);
        System.out.println(TOPIC_QUEUE_1 + "接收消息:" + mes.getMessageProperties().getDeliveryTag() + message);
        logger.info(TOPIC_QUEUE_1 + "接收消息id为:" + mes.getMessageProperties().getDeliveryTag() + "内容为: "+ message);
    }
方法里多了 两个参数
Message mes, Channel channel
好了,以前都是用的activemq,最近项目里因为有用到rabbitmq,才去看了《rabbitmq实战》和网上的博文,发现要不是linux环境下的,要不没有一篇文章能讲的很细。在练习过程中经常出现错误。所以就记录下来,供大家交流。如果有什么问题,可以联系我的邮箱673748314@qq.com。


 962
962

 被折叠的 条评论
为什么被折叠?
被折叠的 条评论
为什么被折叠?
 到【灌水乐园】发言


