


第一步:引入pom.xml
<?xml version="1.0" encoding="UTF-8"?>
<project xmlns="http://maven.apache.org/POM/4.0.0"
         xmlns:xsi="http://www.w3.org/2001/XMLSchema-instance"
         xsi:schemaLocation="http://maven.apache.org/POM/4.0.0 http://maven.apache.org/xsd/maven-4.0.0.xsd">
    <modelVersion>4.0.0</modelVersion>
    <groupId>com.hikvision.zl</groupId>
    <artifactId>websocket</artifactId>
    <version>1.0-SNAPSHOT</version>
    <packaging>war</packaging>
    <name>websocket</name>
    <description>Demo project for Spring Boot</description>
    <parent>
        <groupId>org.springframework.boot</groupId>
        <artifactId>spring-boot-starter-parent</artifactId>
        <version>2.1.4.RELEASE</version>
        <relativePath/> <!-- lookup parent from repository -->
    </parent>
    <properties>
        <java.version>1.8</java.version>
    </properties>
    <dependencies>
        <dependency>
            <groupId>org.springframework.boot</groupId>
            <artifactId>spring-boot-starter-thymeleaf</artifactId>
        </dependency>
        <dependency>
            <groupId>org.springframework.boot</groupId>
            <artifactId>spring-boot-starter-web</artifactId>
        </dependency>
        <dependency>
            <groupId>org.projectlombok</groupId>
            <artifactId>lombok</artifactId>
            <optional>true</optional>
        </dependency>
        <dependency>
            <groupId>org.springframework.boot</groupId>
            <artifactId>spring-boot-starter-test</artifactId>
            <scope>test</scope>
        </dependency>
        <dependency>
            <groupId>org.springframework.boot</groupId>
            <artifactId>spring-boot-devtools</artifactId>
            <optional>true</optional>
        </dependency>
        <dependency>
            <groupId>org.springframework.boot</groupId>
            <artifactId>spring-boot-starter-websocket</artifactId>
            <version>2.1.4.RELEASE</version>
        </dependency>
        <!--socket前端库-->
        <dependency>
            <groupId>org.webjars.npm</groupId>
            <artifactId>mdui</artifactId>
            <version>0.4.0</version>
        </dependency>
        <dependency>
            <groupId>org.webjars</groupId>
            <artifactId>webjars-locator-core</artifactId>
            <version>0.37</version>
        </dependency>
        <dependency>
            <groupId>org.webjars</groupId>
            <artifactId>sockjs-client</artifactId>
            <version>1.1.2</version>
        </dependency>
        <dependency>
            <groupId>org.webjars</groupId>
            <artifactId>stomp-websocket</artifactId>
            <version>2.3.3-1</version>
        </dependency>
        <dependency>
            <groupId>org.webjars</groupId>
            <artifactId>jquery</artifactId>
            <version>3.4.0</version>
        </dependency>
        <dependency>
            <groupId>com.alibaba</groupId>
            <artifactId>fastjson</artifactId>
            <version>1.2.49</version>
        </dependency>

        <!--war包添加外部tomcat依赖-->
        <dependency>
            <groupId>org.springframework.boot</groupId>
            <artifactId>spring-boot-starter-tomcat</artifactId>
            <scope>provided</scope>
        </dependency>
    </dependencies>
    <build>
        <finalName>websocket</finalName>
        <plugins>
            <plugin>
                <groupId>org.springframework.boot</groupId>
                <artifactId>spring-boot-maven-plugin</artifactId>
            </plugin>
        </plugins>
    </build>
</project>
第二步:配置Websocket
package com.zl.config;

import org.springframework.context.annotation.Configuration;
import org.springframework.messaging.simp.config.MessageBrokerRegistry;
import org.springframework.web.socket.config.annotation.EnableWebSocketMessageBroker;
import org.springframework.web.socket.config.annotation.StompEndpointRegistry;
import org.springframework.web.socket.config.annotation.WebSocketMessageBrokerConfigurer;

/**
 * @packagb:com.zl.config
 * @Author: fab
 * @Description:websocket配置类
 * @Date:Create:in 2019/11/22
 * @Modified By:
 */
@Configuration
@EnableWebSocketMessageBroker//使用此注解来标识使能WebSocket的broker.即使用broker来处理消息.
public class WebSocketConfig implements WebSocketMessageBrokerConfigurer {
    /**
     * 连接路径配置
     *
     * @param registry
     */
    @Override
    public void registerStompEndpoints(StompEndpointRegistry registry) {

        /*
         * 路径"/websocket"被注册为STOMP端点,对外暴露,客户端通过该路径获取与socket的连接
         */
        registry.addEndpoint("/chat").setAllowedOrigins("*").withSockJS();
    }

    /**
     * 服务端接收消息路径配置
     *
     * @param config
     */
    @Override
    public void configureMessageBroker(MessageBrokerRegistry config) {
        //消息代理的前缀 该路径消息会被代理通过广播方式发给客户端(广播路径)
        config.enableSimpleBroker("/topic");

        /*
         * 过滤该路径集合发送过来的消息,被@MessageMapping注解的方法接收处理具体决定广播还是单点发送到客户端
         */
        config.setApplicationDestinationPrefixes("/app", "/queue");
    }


}
第三步:消息实体类
package com.zl.model;

import lombok.AllArgsConstructor;
import lombok.Data;
import lombok.NoArgsConstructor;

/**
 * @packagb:com.zl.model
 * @Author: fab
 * @Description: 消息类
 * @Date:Create:in 2019/11/22
 * @Modified By:
 */
@Data
@AllArgsConstructor
@NoArgsConstructor
public class Message {
    private String name; //发送人
    private String content; //发送消息
    private String date;

}
第四步:控制类
package com.zl.controller;

import com.zl.model.Message;
import lombok.extern.slf4j.Slf4j;
import org.springframework.beans.factory.annotation.Autowired;
import org.springframework.messaging.handler.annotation.MessageMapping;
import org.springframework.messaging.handler.annotation.SendTo;
import org.springframework.messaging.simp.SimpMessagingTemplate;
import org.springframework.stereotype.Controller;
import org.springframework.web.bind.annotation.RequestMapping;

/**
 * @packagb:com.zl.controller
 * @Author: fab
 * @Description:websoket控制类
 * @Date:Create:in 2019/11/22
 * @Modified By:
 */
@Controller
@Slf4j
public class WebSocketController {
    @Autowired
    private SimpMessagingTemplate messagingTemplate;

    /*页面入口*/
    @RequestMapping("/chat")
    public String chat() {
        return "chat";
    }
    /**
     * 群发
     *
     * @param message
     * @return
     * @throws Exception
     */
    @MessageMapping("/hello") //接收/app/hello路径发来的信息:/app被@MessageMapping拦截,/hello被注解内参数拦截
    @SendTo("/topic/greetings")//接收上面路径发来的消息后在发送到广播的路径上 即会被代理进行广播群发
    public Message messageHandling(Message message) throws Exception {
        return message;
    }
}
注意:
1.要用Spring的原生注解@Controller,而不是SpringBoot的RestController注解。
2. @RequestMapping("/chat")而不是要用@RequestMapping("/chat")和
@ResponseBody组合的注解。
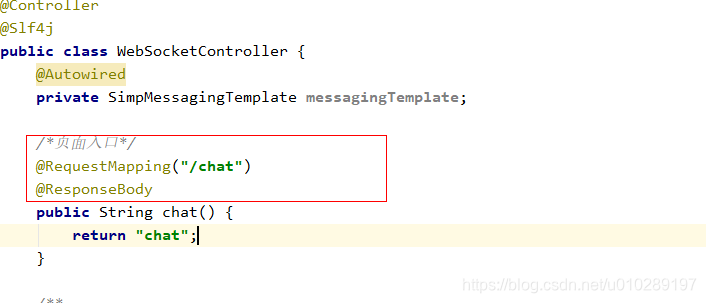
和
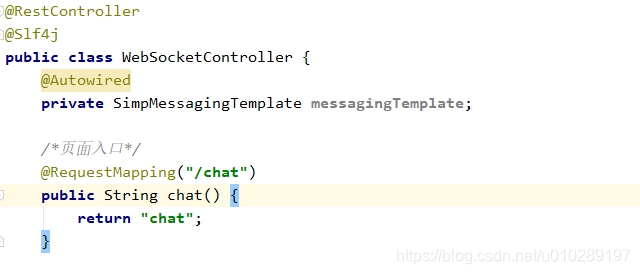
访问时不能跳转到制定的页面。

第五步:定时任务
package com.zl.job;

import com.zl.model.Message;
import lombok.extern.slf4j.Slf4j;
import org.springframework.beans.factory.annotation.Autowired;
import org.springframework.context.annotation.Configuration;
import org.springframework.messaging.simp.SimpMessagingTemplate;
import org.springframework.scheduling.annotation.Scheduled;
import org.springframework.stereotype.Component;

import java.text.SimpleDateFormat;
import java.util.Date;

/**
 * @packagb:com.zl.job
 * @Author: fab
 * @Description:定时任务
 * @Date:Create:in 2019/11/22
 * @Modified By:
 */
@Component
@Slf4j
public class MyJob {
    @Autowired
    private SimpMessagingTemplate messagingTemplate;

    @Scheduled(fixedDelay = 1000)
    public void send() {
        log.info("8888");
        SimpleDateFormat sdf=new SimpleDateFormat();
        String formatDate = sdf.format(new Date());
        messagingTemplate.convertAndSend("/topic/greetings", new Message("定时任务:", "通信", formatDate));
    }

}
第六步:配置文件application.properties
spring.thymeleaf.prefix=classpath:/templates/
spring.thymeleaf.suffix=.html
spring.thymeleaf.mode=HTML
spring.thymeleaf.encoding=UTF-8
spring.thymeleaf.cache=false
server.port=8081
server.servlet.context-path=/websocket
第七部:创建服务启动类
package com.zl;
import org.springframework.boot.SpringApplication;
import org.springframework.boot.autoconfigure.SpringBootApplication;
import org.springframework.scheduling.annotation.EnableScheduling;
/**
 * @packagb:com.zl
 * @Author: fab
 * @Description:程序启动类
 * @Date:Create:in 2019/11/22
 * @Modified By:
 */
@EnableScheduling
@SpringBootApplication
public class WebSocketApplication {
    public static void main(String[] args) {
        SpringApplication.run(WebSocketApplication.class, args);
    }

}
特别注意:@EnableScheduling开启定时任务。
第七步:前端模板代码
创建chat.html文件代码如下所示:
<!DOCTYPE html>
<html xmlns:th="http://www.thymeleaf.org">
<head>
    <title>777</title>
    <meta charset="utf-8" name="viewport" content="width=device-width">
    <link rel="stylesheet" th:href="@{/webjars/mdui/dist/css/mdui.css}">
    <script th:src="@{/webjars/mdui/dist/js/mdui.js}"></script>
    <script th:src="@{/webjars/jquery/jquery.min.js}"></script>
    <script th:src="@{/webjars/sockjs-client/sockjs.min.js}"></script>
    <script th:src="@{/webjars/stomp-websocket/stomp.min.js}"></script>
</head>
<body class="mdui-theme-primary-indigo mdui-theme-accent-pink" th:style="'background:url(' + '/static/background.png'+ ');'">
<div class="mdui-container">
    <span class="mdui-typo-title">聊天室</span>
    <a class="mdui-btn mdui-btn-icon" th:href="@{/}"><i
            class="mdui-icon material-icons">exit</i></a>
</div>
</div>
<div>
    <label for="name">用户名</label>
    <input type="text" id="name" placeholder="用户名">
</div>
<div>
    <button id="connect" type="button">连接</button>
    <button id="disconnect" type="button" disabled="disabled">断开连接</button>
</div>
<div id="chat" style="display: none;">
    <div>
        <label for="name">请输入聊天内容</label>
        <input type="text" id="content" placeholder="聊天内容">
    </div>
    <button id="send" type="button">发送</button>
    <div id="greetings" class="marquee">
        <div id="conversation" style="display: none;">群聊进行中。。。</div>
    </div>
</div>

<script th:inline="javascript">
    debugger;
    var stompClient = null;

    function setConnected(connected) {
        $("#connect").prop("disabled", connected);
        $("#disconnect").prop("disabled", !connected);
        if (connected) {
            $("#conversation").show();
            $("#chat").show();
        } else {
            $("#conversation").hide();
            $("#chat").hide();
        }
        $("#greetings").html("");
    }

    function connect() {
        if (!$("#name").val()) {
            return;
        }
        /*1.与服务端连接,客户端通过/chat路径接入WebSocket服务*/
        var socket = new SockJS('/websocket/chat');
        stompClient = Stomp.over(socket);
        stompClient.connect({}, function (frame) {
            setConnected(true);
            /*2.接收来自服务端的广播消息,通过/topic路径*/
            stompClient.subscribe('/topic/greetings', function (greetings) {
                showGreeting(JSON.parse(greetings.body));
                console.log(greetings.body);
            });
        });
    }

    function disconnect() {
        if (stompClient !== null) {
            stompClient.disconnect();
        }
        setConnected(false);
    }

    /*3.向服务端发送消息*/
    function sendname() {
        //获取当前时间
        var date = new Date().toLocaleString();
        // 该web客户端通过/app/hello路径(被@MessageMapping接收)向服务端发送消息(json格式)
        stompClient.send("/app/hello", {},
            JSON.stringify({'name': $("#name").val(), 'content': $("#content").val(), 'date': date}));

    }

    function showGreeting(message) {
        $("#greetings").append("<div class='marquee'>" + message.name + ":" + message.content + "-------time:" + message.date + "</div>");
    }

    $(function () {
        $("#connect").click(function () {
            connect();
        });
        $("#disconnect").click(function () {
            disconnect();
        });
        $("#send").click(function () {
            sendname();
        });

    });
</script>
</body>
</html>
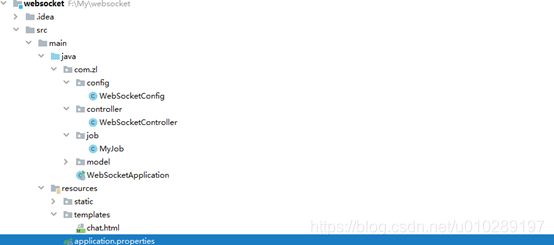
第八步:最终创建工程如下所示
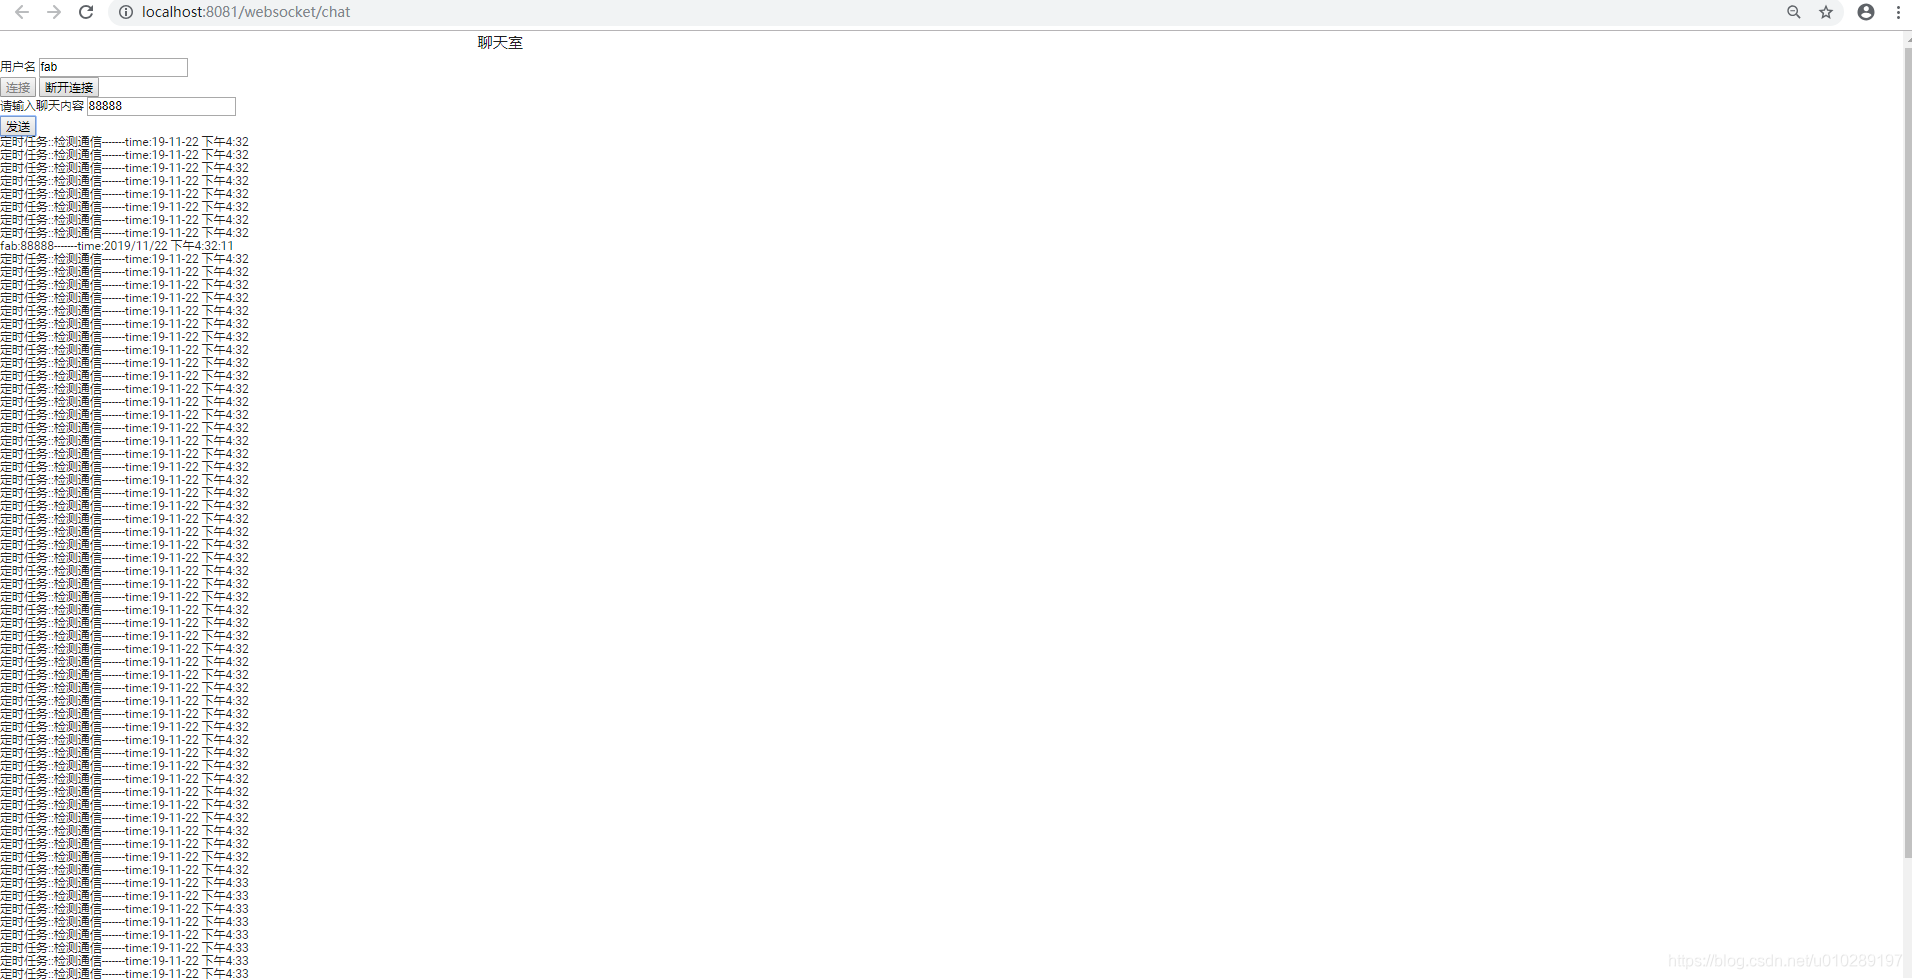
第九步:测试
访问路径:http://localhost:8081/websocket/chat


 515
515

 被折叠的 条评论
为什么被折叠?
被折叠的 条评论
为什么被折叠?
 到【灌水乐园】发言


