


 本文介绍了在Web开发中使用Vue、Element和Flask技术栈时遇到的前后端问题及其解决方案,包括前端如何传递token、处理请求、避免OPTIONS预检请求,未登录页面跳转到登录页,以及后端返回JSON数据的方法。同时讲解了前端渲染表格数据、分页操作和防止浏览器登录弹窗的策略。
1、前端在登录后的每次请求如何传token?
答:可以设Authorization头部来传token,但因为跨域会一直触发options请求(按http协议有多种情况会触发浏览器固定发options请求,详见参考:跨域请求避免OPTIONS请求(预检请求)_Turbo-优快云博客_跨域预检请求),解决方法见问题3。
2、前端如何高效处理请求?
答:常规的方式是自己用axios封装一个请求拦截器(前端请求和响应拦截器(技术栈vue)_飞起来的喵-优快云博客)。包括request和response请求。因为拦截request请求可以很方便的在每次发请求的时候塞token。而拦截response请求,可以很方便的进行后端返回状态码的翻译。(如果翻译放前端处理的话。)
3、跨域请求如何避免每次都先发起预检请求(OPTIONS)?
答:后端在跨域全局处理,用max_age为全局跨域请求的response头部设置Access-Control-Max-Age的值。单位是s。flask实现token验证及跨域问题options请求问题_飞起来的喵-优快云博客
# max_age设置全局请求的OPtions预检请求最长时间6000s
CORS(app, supports_credentials=True, max_age=6000)
4、如何将未登录的页面调整到登录页?
答:通过前端处理,判断是否有token,如果没有,则跳转到登录页,实现示例如下(index.vue)
在<script>,export default的methods下,加入载入页面自动触发的方法,即在mounted下添加方法来判断。(前提:如果有登录,前端会先把token取出放本地存储。)
mounted:function () {   //自动触发写入的函数
    if (localStorage.getItem("userToken")){
      this.getLoginName();
    } else {
      this.$router.push({path: '/login'});
    }
  }
5、前端封装api请求时,针对login请求的特殊处理,避免有浏览器的模态登录弹窗:
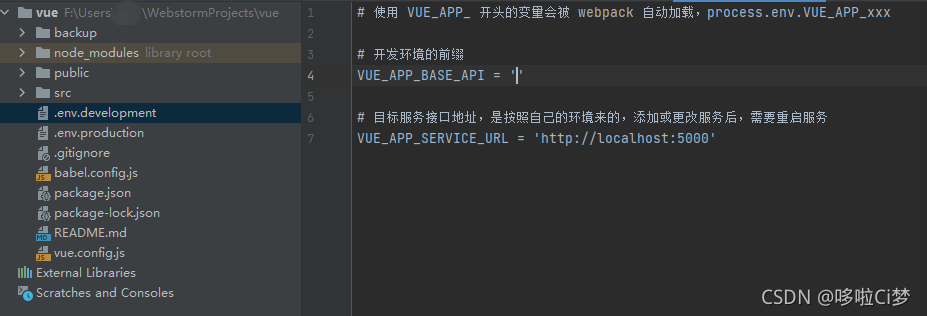
这里url额外增加了配置文件里的后端地址变量:env.VUE_APP_SERVICE_URL,如果没有加,在其他页面跳转过来再发起login请求,会触发Chrome浏览器的机制,产生login请求模态弹窗。类似这样:
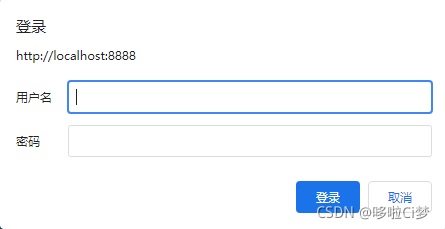
如果弹窗未被点击,login请求的status会变成canceled。

以下是配置文件:
login.js
import request from '@/utils/request'
import { Base64 } from 'js-base64';

// 导出的是普通成员函数

// 登录
export function SysLogin(username,password){
    return request({
        url: process.env.VUE_APP_SERVICE_URL+'/login',// 这里要指明后端路径,否则由于浏览器的机制会产生登录的自带弹窗
        method: 'get',
        headers:{
            Authorization: 'Basic '+Base64.encode(username + ':' +password)
        }
    })
}
6、前端在渲染表格数据时,首次页面加载的注意点
从vue的生命周期来讲(参考:Vue生命周期中mounted和created的区别_xdnloveme的博客-优快云博客_mounted和created的区别)created方法更早,在生成html前就完成,所以,可以把获取后端列表数据及计算页数、当前页的逻辑放在created方法里实现。
例如:(写在index.vue的<script>中export default{})
  created() {
    // 调接口请求数据,将调接口定义一个方法,在created里调用这个方法
    this.fetchData()
    this.totalPage = Math.ceil(this.tableData.length / this.pageSize);
    // 计算得0时设置为1
    this.totalPage = this.totalPage === 0 ? 1 : this.totalPage;
  },
  methods: {
    fetchData(){
      msgApi.getMsgList().then( response=>{
        const res = response.data
        this.total = res.total
        this.tableData = res.data
        // console.log(res)
        // console.log(this.tableData)
        this.setCurrentPageData();
      })
    },
    // 设置当前页面数据,对数组操作的截取规则为[0~10],[10~20]...,
    setCurrentPageData() {
      let begin = (this.currentPage - 1) * this.pageSize;
      let end = this.currentPage * this.pageSize;
      this.currentPageData = this.tableData.slice(
          begin,
          end
      );
      // console.log('begin')
      // console.log(begin)
      // console.log('end')
      // console.log(end)
      // console.log('当前页面数据')
      // console.log(this.currentPageData)
    },
7、前端利用element的表格结合vue方便地做分页
首先使用element分页控件:(在index.vue的<template>标签中)
<el-footer><div class="block">
      <el-pagination
          @current-change="setCurrentPageData"
          @prev-click="prevPage"
          @next-click="nextPage"
          :current-page.sync="currentPage"
          :page-size="10"
          :page-count="totalPage"
          layout="total, prev, pager, next"
          :total="total">
      </el-pagination>
    </div>
    </el-footer>
然后实例化3个方法,分别作用当前页、上一页、下一页:(写在index.vue的<script>中export default{methods: 下面)
// 设置当前页面数据,对数组操作的截取规则为[0~10],[10~20]...,下面的pageSize=10
// this.curretPage初始值为1
setCurrentPageData() {
      let begin = (this.currentPage - 1) * this.pageSize;
      let end = this.currentPage * this.pageSize;
      this.currentPageData = this.tableData.slice(
          begin,
          end
      );
      // console.log('begin')
      // console.log(begin)
      // console.log('end')
      // console.log(end)
      // console.log('当前页面数据')
      // console.log(this.currentPageData)
    },
    //上一页
    prevPage() {
      console.log(this.currentPage);
      if (this.currentPage === 1) return;

      this.currentPage--;
      this.setCurrentPageData();
    },
    // 下一页
    nextPage() {
      if (this.currentPage === this.totalPage)return ;
      this.currentPage++;
      this.setCurrentPageData();

    },
8、后端(flask)如何拼接出json作为response的data?
从数据库查询返回字典数据,然后用flask框架自带的jsonify来做封装Json,具体如下:(msgHandleLook.py接口代码)
import mysql.connector as mc
import configparser
from flask import jsonify

# 读取配置文件
config = configparser.ConfigParser()
config.read('config.conf', encoding='utf8')
db_host = config['db']['host']
db_database = config['db']['database']
db_user = config['db']['user']
db_password = config['db']['password']


# 查询消息列表的信息
def handleLook(user_id):
    conn = mc.connect(host=db_host, user=db_user, passwd=db_password, database=db_database)
    cursor = conn.cursor(dictionary=True)
    # 1、先把数据库的数据查出来
    # 2、再把数据进行整理组装成json格式
    # 3、把json对象返回出去
    verify_sql = "SELECT id,msg,recipient,msg_channel,msg_type,msg_frequency FROM message WHERE user_id = ('%s');" % user_id
    cursor.execute(verify_sql)
    data = cursor.fetchall()
    # print(data)
    conn.close()
    if data:
        code = 200
        total = len(data)
    else:
        code = 501
        total = 0
    return jsonify({'code': code, 'total': total, 'data': data})


 713
713

 被折叠的 条评论
为什么被折叠?
被折叠的 条评论
为什么被折叠?
 到【灌水乐园】发言


