


 本文介绍使用FFmpeg录制桌面视频并分离系统声音和麦克风声音为不同音轨的方法。通过调整音频采样率和通道布局,实现了系统声音和麦克风声音的独立录制。然而,播放时发现大部分播放器无法同时播放多个音轨。
之前本人写过下面一篇博客:
ffmpeg 本地麦克风声音和系统声音混音后,再混合本地桌面成最终的mp4文件-修正
里面的麦克风声音和系统声音利用滤镜进行了混音处理,昨天夜晚再想如果麦克风声音和系统声音不混合,各自成一路音轨,最终生成的mp4文件能否播放,是否能达到预期的效果。
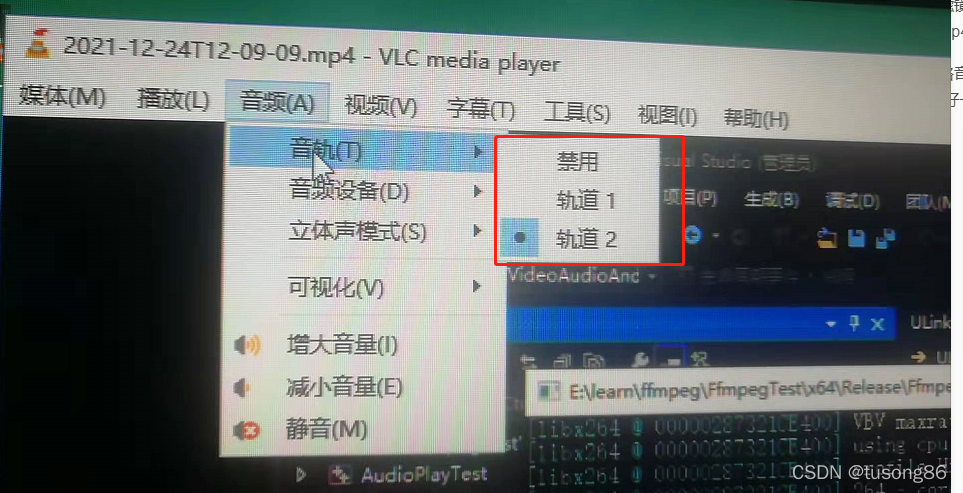
结果就是不及预期,生成视频文件2021-12-24T12-09-09.mp4的两路音轨,只能播放序号小的音轨,没法同时播放,我尝试了很多播放器,都是这样,vlc和potplayer做的好一些,可以检测到音轨的数量,并让用户选择播放哪一路,如下图所示:
读者可以用ffmpeg命令分离出视频和两路音轨,如下三个命令。
ffmpeg -i 2021-12-24T12-09-09.mp4 -map 0:0 -c copy output_video.mp4
ffmpeg -i 2021-12-24T12-09-09.mp4 -map 0:1 -c copy output_innersound.mp4
ffmpeg -i 2021-12-24T12-09-09.mp4 -map 0:2 -c copy output_micsound.mp4
然后读者可以分别播放它们,发现完全是ok的。
在写代码的时候,有一个地方需要注意,我两路音频最终的编码器参数是一样的,所以最开始时,共用一个AVCodecContext,但是生成的文件,播放起来,声音很嘈杂,后来分成两个AVCodecContext就可以了,如下所示:
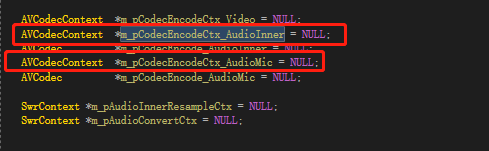
两路音频不能同时播放,具体原因暂不清楚,为日后方便排查实验,这里先记录。
代码结构如下:
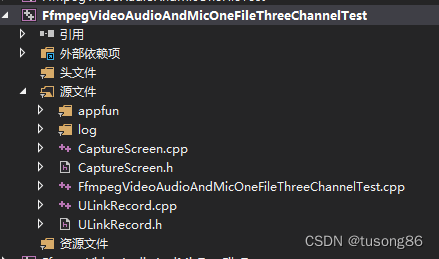
其中appfun和log两个文件夹是简单的函数,不进行列举
main函数所在文件FfmpegVideoAudioAndMicOneFileThreeChannelTest.cpp的内容如下:
#include "ULinkRecord.h"
#include <stdio.h>
#include <conio.h>


int main()
{


	ULinkRecord cULinkRecord;

	cULinkRecord.SetMicName(L"麦克风 (2- Synaptics HD Audio)");
	cULinkRecord.SetRecordPath("E:\\learn\\ffmpeg\\FfmpegTest\\x64\\Release");

	RECT rect;
	rect.left = 0;
	rect.top = 0;
	rect.right = 1920;
	rect.bottom = 1080;

	cULinkRecord.SetRecordRect(rect);

	cULinkRecord.StartRecord();

	Sleep(30000);

	printf("begin StopRecord\n");
	cULinkRecord.StopRecord();
	printf("end StopRecord\n");
	return 0;
}
CaptureScreen.cpp的代码如下:
//#include "stdafx.h"
#include "CaptureScreen.h"

CCaptureScreen::CCaptureScreen(void)
{


	m_hdib = NULL;
	m_hSavedCursor = NULL;
	hScreenDC = NULL;
	hMemDC = NULL;
	hbm = NULL;
	m_width = 1920;
	m_height = 1080;
	FetchCursorHandle();
}
//
// 释放资源
//
CCaptureScreen::~CCaptureScreen(void)
{


	if (hbm)
	{


		DeleteObject(hbm);
		hbm = NULL;
	}

	if (m_hdib){


		free(m_hdib);
		m_hdib = NULL;
	}
	if (hScreenDC){


		::ReleaseDC(NULL, hScreenDC);
	}
	if (hMemDC) {


		DeleteDC(hMemDC);
	}
}

//
// 初始化
//
int CCaptureScreen::Init(int iPosX, int iPosY, int iWidth, int iHeight)
{


	HWND hDeskTop = GetDesktopWindow();
	RECT rc;
	GetWindowRect(hDeskTop, &rc);
	hScreenDC = ::GetDC(NULL);
	if (hScreenDC == NULL) return 0;

	hMemDC = ::CreateCompatibleDC(hScreenDC);
	if (hMemDC == NULL) return 0;

	m_iXPos = iPosX;
	m_iYPos = iPosY;
	m_width = iWidth;
	m_height = iHeight;

	if (!m_hdib){


		m_hdib = (PRGBTRIPLE)malloc(m_width * m_height * 3);//24位图像大小
	}
	//位图头信息结构体
	pbi.bmiHeader.biSize = sizeof(BITMAPINFOHEADER);
	pbi.bmiHeader.biWidth = m_width;
	pbi.bmiHeader.biHeight = m_height;
	pbi.bmiHeader.biPlanes = 1;
	pbi.bmiHeader.biBitCount = 24;
	pbi.bmiHeader.biCompression = BI_RGB;

	hbm = CreateCompatibleBitmap(hScreenDC, m_width, m_height);
	SelectObject(hMemDC, hbm);

	wLineLen = ((m_width * 24 + 31) & 0xffffffe0) / 8;
	wColSize = sizeof(RGBQUAD)* ((24 <= 8) ? 1 << 24 : 0);
	dwSize = (DWORD)(UINT)wLineLen * (DWORD)(UINT)m_height;

	return 1;
}

//抓取屏幕数据
BYTE* CCaptureScreen::CaptureImage()
{


	VOID*  alpbi = CaptureScreenFrame(m_iXPos, m_iYPos, m_width, m_height);
	return (BYTE*)(alpbi);
}


void* CCaptureScreen::CaptureScreenFrame(int left, int top, int width, int height)
{


	if (hbm == NULL || hMemDC == NULL || hScreenDC == NULL) return NULL;

	//BitBlt(hMemDC, 0, 0, width, height, hScreenDC, left, top, SRCCOPY);
	BOOL bRet = StretchBlt(hMemDC, 0, 0, width, height, hScreenDC, left, top, width, height, SRCCOPY);
	/*-------------------------捕获鼠标-------------------------------*/
	{


		POINT xPoint;
		GetCursorPos(&xPoint);
		HCURSOR hcur = FetchCursorHandle();
		xPoint.x -= left;
		xPoint.y -= top;

		ICONINFO iconinfo;
		BOOL ret;
		ret = GetIconInfo(hcur, &iconinfo);
		if (ret){


			xPoint.x -= iconinfo.xHotspot;
			xPoint.y -= iconinfo.yHotspot;

			if (iconinfo.hbmMask) DeleteObject(iconinfo.hbmMask);
			if (iconinfo.hbmColor) DeleteObject(iconinfo.hbmColor);
		}
		/*画鼠标*/
		::DrawIcon(hMemDC, xPoint.x, xPoint.y, hcur);
	}
	//动态分配的内存
	PRGBTRIPLE hdib = m_hdib;
	if (!hdib)
		return hdib;

	GetDIBits(hMemDC, hbm, 0, m_height, hdib, (LPBITMAPINFO)&pbi, DIB_RGB_COLORS);
	return hdib;
}

//
// 获取窗体鼠标光标
//
HCURSOR CCaptureScreen::FetchCursorHandle()
{


	if (m_hSavedCursor == NULL)
	{


		m_hSavedCursor = GetCursor();
	}
	return m_hSavedCursor;
}
CaptureScreen.h的代码如下:
#ifndef _CCAPTURE_SCREEN_HH
#define _CCAPTURE_SCREEN_HH

#include<time.h>
#include <d3d9.h>
#include <stdio.h>
#include <stdlib.h>
#include <stdarg.h>
#include <windows.h>

#include <tchar.h>
#include <winbase.h>
#include <winreg.h>
#include <Strsafe.h>


//
// ---抓屏类----
//
class CCaptureScreen
{


public:
	CCaptureScreen(void);
	~CCaptureScreen(void);

public:
	/*-----------定义外部调用函数-----------*/
	int Init(int iPosX, int iPosY, int iWidth, int iHeight);//初始化
	BYTE* CaptureImage(); //抓取屏幕

private:
	/*-----------定义内部调用函数-----------*/
	void* CaptureScreenFrame(int, int, int, int);//抓屏
	HCURSOR FetchCursorHandle(); //获取鼠标光标

private:
	/*-----------定义私有变量-----------*/
	int m_iXPos;
	int m_iYPos;
	int m_width;
	int m_height;
	UINT   wLineLen;
	DWORD  dwSize;
	DWORD  wColSize;

	//设备句柄
	HDC hScreenDC;
	HDC hMemDC;
	//图像RGB内存缓存
	PRGBTRIPLE m_hdib;
	//位图头信息结构体
	BITMAPINFO pbi;

	HBITMAP hbm = NULL;
	//鼠标光标
	HCURSOR m_hSavedCursor;


};

#endif //--_CCAPTURE_SCREEN_HH
ULinkRecord.cpp的代码如下:
#include "ULinkRecord.h"
#include "log/log.h"
#include "appfun/appfun.h"

#include "CaptureScreen.h"


typedef struct BufferSourceContext {


	const AVClass    *bscclass;
	AVFifoBuffer     *fifo;
	AVRational        time_base;     ///< time_base to set in the output link
	AVRational        frame_rate;    ///< frame_rate to set in the output link
	unsigned          nb_failed_requests;
	unsigned          warning_limit;

	/* video only */
	int               w, h;
	enum AVPixelFormat  pix_fmt;
	AVRational        pixel_aspect;
	char              *sws_param;

	AVBufferRef *hw_frames_ctx;

	/* audio only */
	int sample_rate;
	enum AVSampleFormat sample_fmt;
	int channels;
	uint64_t channel_layout;
	char    *channel_layout_str;

	int got_format_from_params;
	int eof;
} BufferSourceContext;


static char *dup_wchar_to_utf8(const wchar_t *w)
{


	char *s = NULL;
	int l = WideCharToMultiByte(CP_UTF8, 0, w, -1, 0, 0, 0, 0);
	s = (char *)av_malloc(l);
	if (s)
		WideCharToMultiByte(CP_UTF8, 0, w, -1, s, l, 0, 0);
	return s;
}


/* just pick the highest supported samplerate */
static int select_sample_rate(const AVCodec *codec)
{


	const int *p;
	int best_samplerate = 0;

	if (!codec->supported_samplerates)
		return 44100;

	p = codec->supported_samplerates;
	while (*p) {


		if (!best_samplerate || abs(44100 - *p) < abs(44100 - best_samplerate))
			best_samplerate = *p;
		p++;
	}
	return best_samplerate;
}


/* select layout with the highest channel count */
static int select_channel_layout(const AVCodec *codec)
{


	const uint64_t *p;
	uint64_t best_ch_layout = 0;
	int best_nb_channels = 0;

	if (!codec->channel_layouts)
		return AV_CH_LAYOUT_STEREO;

	p = codec->channel_layouts;
	while (*p) {


		int nb_channels = av_get_channel_layout_nb_channels(*p);

		if (nb_channels > best_nb_channels) {


			best_ch_layout = *p;
			best_nb_channels = nb_channels;
		}
		p++;
	}
	return best_ch_layout;
}


unsigned char clip_value(unsigned char x, unsigned char min_val, unsigned char  max_val) {


	if (x > max_val) {


		return max_val;
	}
	else if (x < min_val) {


		return min_val;
	}
	else {


		return x;
	}
}

//RGB to YUV420
bool RGB24_TO_YUV420(unsigned char *RgbBuf, int w, int h, unsigned char *yuvBuf)
{


	unsigned char*ptrY, *ptrU, *ptrV, *ptrRGB;
	memset(yuvBuf, 0, w*h * 3 / 2);
	ptrY = yuvBuf;
	ptrU = yuvBuf + w * h;
	ptrV = ptrU + (w*h * 1 / 4);
	unsigned char y, u, v, r, g, b;
	for (int j = h - 1; j >= 0; j--) {


		ptrRGB = RgbBuf + w * j * 3;
		for (int i = 0; i < w; i++) {


			b = *(ptrRGB++);
			g = *(ptrRGB++);
			r = *(ptrRGB++);


			y = (unsigned char)((66 * r + 129 * g + 25 * b + 128) >> 8) + 16;
			u = (unsigned char)((-38 * r - 74 * g + 112 * b + 128) >> 8) + 128;
			v = (unsigned char)((112 * r - 94 * g - 18 * b + 128) >> 8) + 128;
			*(ptrY++) = clip_value(y, 0, 255);
			if (j % 2 == 0 && i % 2 == 0) {


				*(ptrU++) = clip_value(u, 0, 255);
			}
			else {


				if (i % 2 == 0) {


					*(ptrV++) = clip_value(v, 0, 255);
				}
			}
		}
	}
	return true;
}


ULinkRecord::ULinkRecord()
{


	InitializeCriticalSection(&m_csVideoSection);
	InitializeCriticalSection(&m_csAudioInnerSection);
	InitializeCriticalSection(&m_csAudioInnerResampleSection);
	InitializeCriticalSection(&m_csAudioMicSection);
	InitializeCriticalSection(&m_csAudioMixSection);

	avdevice_register_all();
}

ULinkRecord::</
最低0.47元/天 解锁文章


 1519
1519


 到【灌水乐园】发言


