


 本文介绍如何在Spring Boot项目中使用MyBatis,包括通过注解方式和配置文件方式进行数据库操作。涵盖依赖引入、数据源配置、实体类定义、Mapper接口编写、Controller层实现及自定义配置规则等内容。
一.注解方式
1.引入依赖
<dependency>
<groupId>org.mybatis.spring.boot</groupId>
<artifactId>mybatis-spring-boot-starter</artifactId>
<version>1.3.2</version>
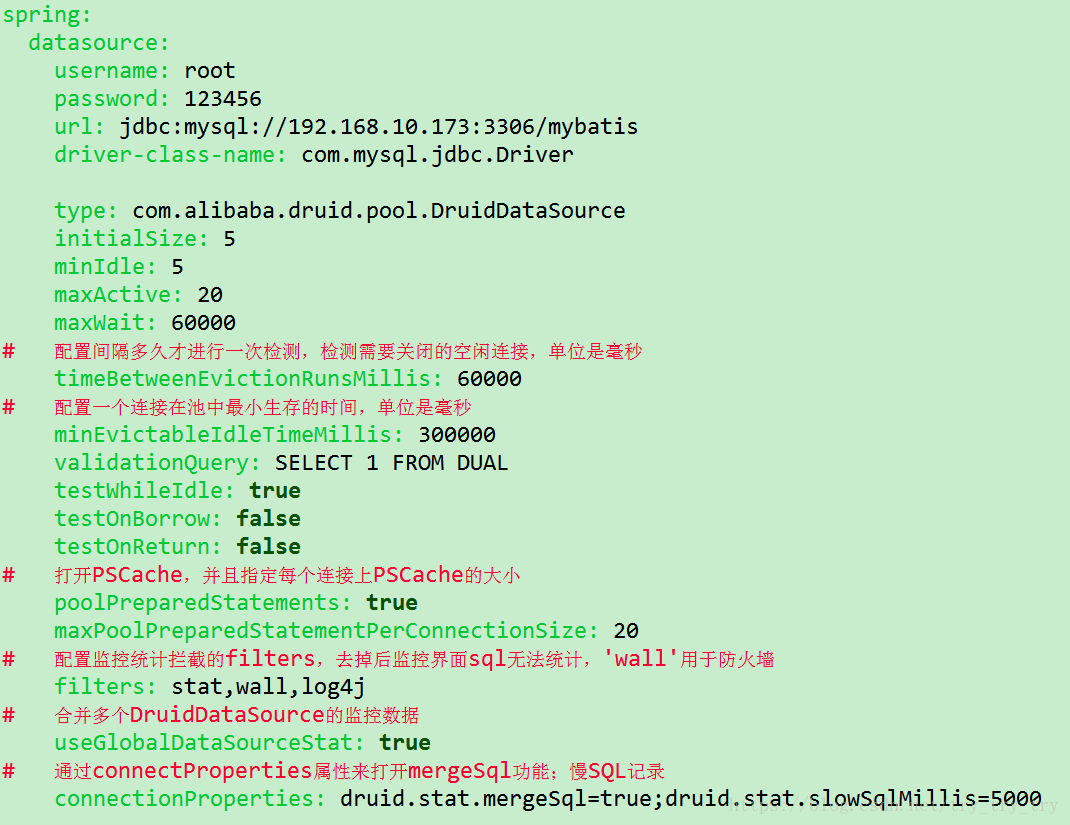
</dependency>2.配置数据源 application.yml
3.数据库建表以及创建javabean
public class Department {

    private Integer id;
    private String departmentName;
    ...
}
4.mapper编写
//此注解必写
@Mapper
public interface DepartmentMapper {

    @Select("select * from department where id=#{id}")
    public Department getById(Integer id);

    @Delete("delete from department where id=#{id}")
    public int deleteById(Integer id);

    //返回自增主键
    @Options(useGeneratedKeys = true,keyProperty = "id")
    @Insert("insert into department(departmentName) values(#{departmentName})")
    public int insert(Department department);

    @Insert("update department set departmentName=#{departmentName} where id=#{id}")
    public int update(Department department);
}
5.controller编写
@RestController
@RequestMapping("/dept")
public class DepartmentContoller {

    @Autowired
    DepartmentMapper deptMapper;

    @RequestMapping("/getById/{id}")
    public Department getById(@PathVariable("id") Integer id){
        return deptMapper.getById(id);
    }

    @RequestMapping("/delete/{id}")
    public Integer delete(@PathVariable("id") Integer id){
        return deptMapper.deleteById(id);
    }

    @RequestMapping("/save")
    public Department save(Department department){
        deptMapper.insert(department);
        return department;
    }

}
6.自定义配置规则-开启驼峰命名规则
@org.springframework.context.annotation.Configuration
public class MybatisConfig {

    @Bean
    public ConfigurationCustomizer configurationCustomizer() {
        return new ConfigurationCustomizer(){

            @Override
            public void customize(Configuration configuration) {
                configuration.setMapUnderscoreToCamelCase(true);//开启驼峰命名规则
            }};

    }
}
7.批量扫描Mapper(Mapper多的情况可以使用批量扫描)
//使用MapperScan批量扫描所有的Mapper接口
@MapperScan(value = "com.example.demo.mapper")
@SpringBootApplication
public class SpringBootDataMybatisApplication {

    public static void main(String[] args) {
        SpringApplication.run(SpringBootDataMybatisApplication.class, args);
    }
}
二.配置文件方式
1.添加mapper映射文件 departmentMapper.xml
<?xml version="1.0" encoding="UTF-8"?>
<!DOCTYPE mapper
        PUBLIC "-//mybatis.org//DTD Mapper 3.0//EN"
        "http://mybatis.org/dtd/mybatis-3-mapper.dtd">

<mapper namespace="com.example.demo.mapper.DepartmentMapper">

    <select id="getById" resultType="com.example.demo.bean.Department">
        SELECT * FROM department WHERE id=#{id}
    </select>

    <insert id="insert">
        INSERT INTO department(department_name) VALUES (#{departmentName})
    </insert>
</mapper>
2.添加mybatis全局配置文件 mybatis-config.xml
<?xml version="1.0" encoding="UTF-8"?>
<!DOCTYPE configuration
        PUBLIC "-//mybatis.org//DTD Config 3.0//EN"
        "http://mybatis.org/dtd/mybatis-3-config.dtd">
<configuration>
    <settings>
         //驼峰命名规则
        <setting name="mapUnderscoreToCamelCase" value="true" />
    </settings>
</configuration>
3.mybatis文件配置 application.yml
mybatis:
  # 指定全局配置文件位置
  config-location: classpath:mybatis/mybatis-config.xml
  # 指定sql映射文件位置
  mapper-locations: classpath:mybatis/mapper/*.xml
4.DepartmentMapper 修改
//此注解必写
@Mapper
public interface DepartmentMapper {
    public Department getById(Integer id);
    public int insert(Department department);
}


 254
254

 被折叠的 条评论
为什么被折叠?
被折叠的 条评论
为什么被折叠?
 到【灌水乐园】发言


