


自动化部署k8s,自动化部署监控、告警、日志组件以及在k8s上用vLLM部署大模型详细图文教程
阅读原文
建议阅读原文以获得最佳阅读体验:《自动化部署k8s,自动化部署监控、告警、日志组件以及在k8s上用vLLM部署大模型详细图文教程》
引言
本文首先详细介绍了如何利用juju高度自动化部署高可用kubernetes集群,然后再利用juju部署COS(canonical开源的一套监控、告警以及日志套件),如何高效部署ceph集群。
接着介绍了如何利用helm部署NVIDIA GPU operator
最后详细说明了如何在kubernetes集群上运行vLLM,不仅介绍了在单个k8s节点中运行vLLM,还说明了如何进行多节点并行推理。
用juju快速部署charmed kubernetes
规划:主机清单
| 节点名称 | 主机名 | OS | 型号 | ip | 序列号 | 备注(用途) |
|---|---|---|---|---|---|---|
| client | client | ubuntu desktop 24.04 | 虚拟机 | 172.16.0.9 | IT管理员工作站,可以是虚拟机 | |
| maas-system | maas-system | ubuntu server 24.04 | dell precision 5810 tower | 172.16.0.2 | 1W38HP2 | 管理裸金属(也可以管理虚拟机) |
| juju-controller | juju-controller | ubuntu server 24.04 | dell precision 5810 tower | 172.16.0.1 | 1W2CHP2 | juju-controller,建议用虚拟机(本实验使用的是物理PC) |
| etcd00 | etcd00 | ubuntu server 22.04 | 虚拟机 | etcd存储 | ||
| etcd01 | etcd01 | ubuntu server 22.04 | 虚拟机 | etcd存储 | ||
| etcd02 | etcd02 | ubuntu server 22.04 | 虚拟机 | etcd存储 | ||
| kubernetes-control-plane00 | kubernetes-control-plane00 | ubuntu server 22.04 | 虚拟机 | k8s控制平面节点 | ||
| kubernetes-control-plane01 | kubernetes-control-plane01 | ubuntu server 24.04 | 虚拟机 | k8s控制平面节点 | ||
| easyrsa | easyrsa | ubuntu server 22.04 | 虚拟机 | EasyRSA 作为 证书颁发机构(CA),负责生成和管理k8s集群所需的 TLS 证书 | ||
| kubeapi-load-balancer | kubeapi-load-balancer | ubuntu server 22.04 | 虚拟机 | kubernetes api负载均衡节点 | ||
| kubernetes-workernode00 | kubernetes-workernode00 | ubuntu server 22.04 | dell precision 5810 tower | FS8RM63 | worker node(charmed-kubernetes工作节点) | |
| kubernetes-workernode01 | kubernetes-workernode01 | ubuntu server 22.04 | Lenovo system x3650 M5 | 06HDHVL | worker node(charmed-kubernetes工作节点) | |
| kubernetes-workernode02 | kubernetes-workernode02 | ubuntu server 24.04 | dell precision 7920 tower | DYNZK93 | worker node(charmed-kubernetes工作节点) | |
| kubernetes-workernode03 | kubernetes-workernode03 | ubuntu server 22.04 | dell precision 7920 tower | 4VPMJJ3 | worker node(charmed-kubernetes工作节点) | |
| kubernetes-workernode04 | kubernetes-workernode04 | ubuntu server 22.04 | dell precision 5820 tower | 6YBPLR2 | worker node(charmed-kubernetes工作节点) | |
| kubernetes-workernode05 | kubernetes-workernode05 | ubuntu server 22.04 | dell precision 5820 tower | 6Y62NR2 | worker node(charmed-kubernetes工作节点) | |
| kubernetes-workernode06 | kubernetes-workernode06 | ubuntu server 22.04 | dell precision 5820 tower | FS8TM63 | worker node(charmed-kubernetes工作节点) | |
| kubernetes-workernode07 | kubernetes-workernode07 | ubuntu server 22.04 | dell precision 5820 tower | FS8SM63 | worker node(charmed-kubernetes工作节点) | |
| kubernetes-workernode08 | kubernetes-workernode08 | ubuntu server 22.04 | dell precision 5820 tower | FS8VM63 | worker node(charmed-kubernetes工作节点) |
准备client计算机
client计算机主要是用于输入命令的,juju就是在此计算机上执行命令的,然后通过api对maas和juju controller发出指令。
首先配置好代理,然后安装juju
/etc/environment文件内容设置如下:

http_proxy=http://<此处替换为实际的代理服务器地址或域名>:port
https_proxy=http://<此处替换为实际的代理服务器地址或域名>:port
no_proxy="fe80::/10,::1/128,10.0.0.0/8,192.168.0.0/16,127.0.0.1,172.16.0.0/12,.svc,localhost,.dltornado2.com,.security.ubuntu.com,.aliyuncs.com"
安装juju
sudo snap install juju
部署maas
下面的命令是在maas上执行的,为了方便可以直接通过client计算机 ssh过去执行命令
#在执行以下命令之前,建议设置系统级代理,因为大陆访问snap store是不稳定的,而且后续还需要访问maas.io以下载Linux系统镜像,也是很不稳定的,编辑/etc/environment文件配置系统级代理

sudo hostnamectl hostname MAAS-system
sudo snap install maas-test-db
sudo snap install maas
sudo maas init region+rack --maas-url http://172.16.0.2:5240/MAAS --database-uri maas-test-db:///
sudo maas createadmin --username admin --password ubuntu --email tornado@dltornado2.com
sudo maas apikey --username admin > ./admin-api-key
配置maas
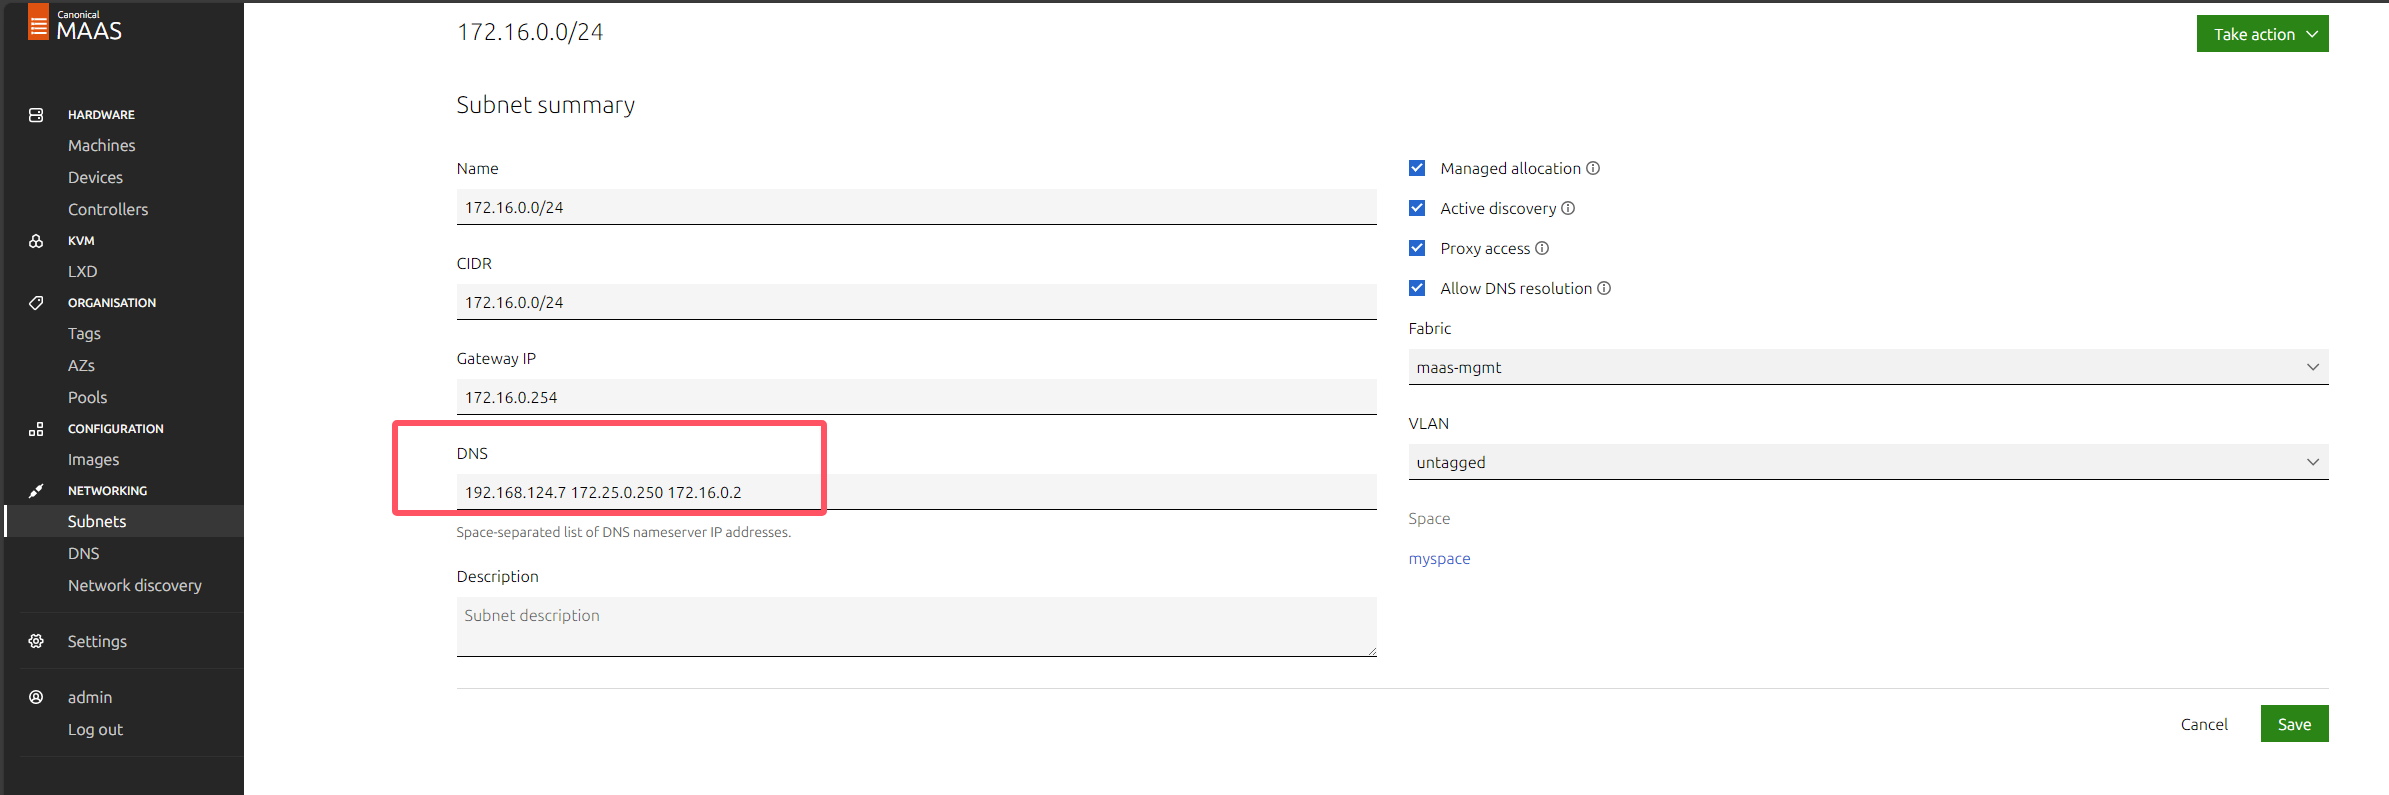
主要是第一次进入maas webUI时的初始化,然后是启用dhcp,配置DNS
特别注意:关于dhcp的dns设置
首选dns不能填写maas服务器的ip地址,否则会导致后续步骤部署的k8s集群中的pod无法访问外部网络,因为无法进行域名解析。
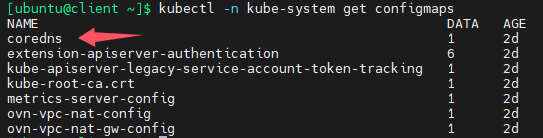
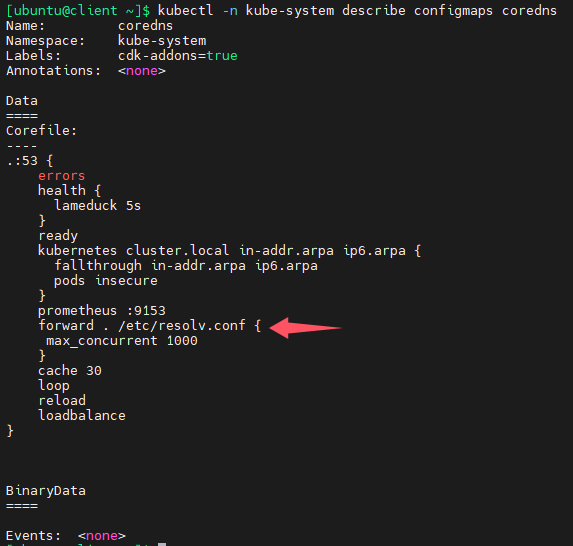
k8s的dns是通过coredns实现的,pod内部如果要访问集群内部的pod或者service,coredns即可完成,但是如果要访问外部网络,如baidu.com,则需要转发给另外一个dns服务器,默认情况下,coredns会将自己无法解析的域名转发给所在节点的设置的dns服务器(/etc/resolv.conf),这是通过configmap实现的,如下图:
下图其实就是coredns的配置文件,可以看出coredns会将自己无法解析的域名转发给/etc/resolve.conf文件中配置的dns服务器地址,errors指的是日志级别
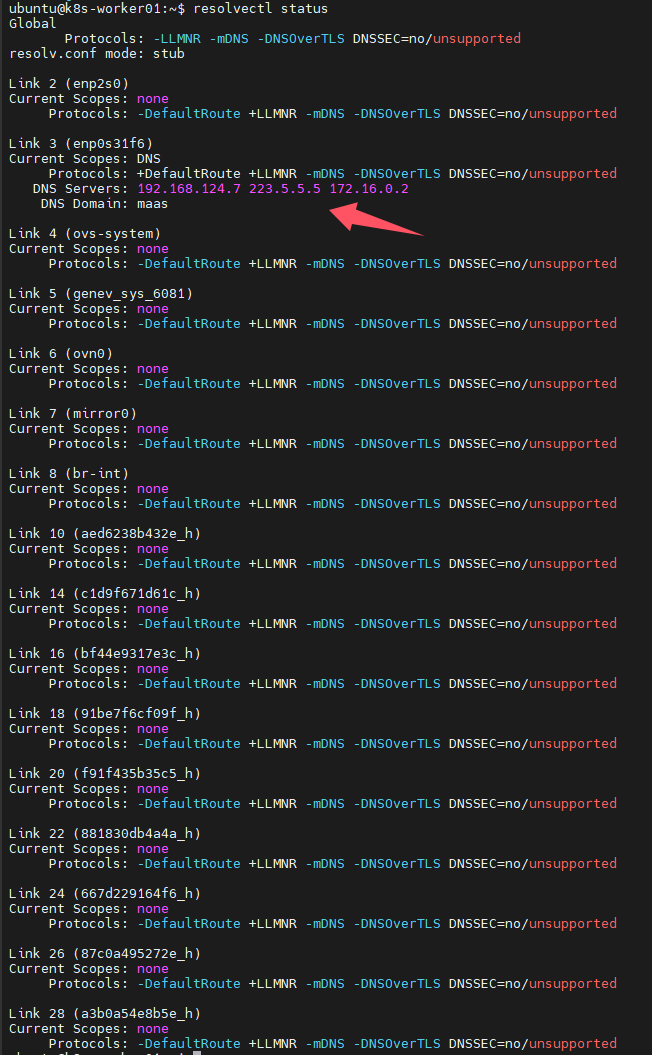
下面是k8s其中一个节点(coredns pod位于此节点)的dns配置,这样的配置是正确的,因为172.16.0.2不是首选dns
准备machines
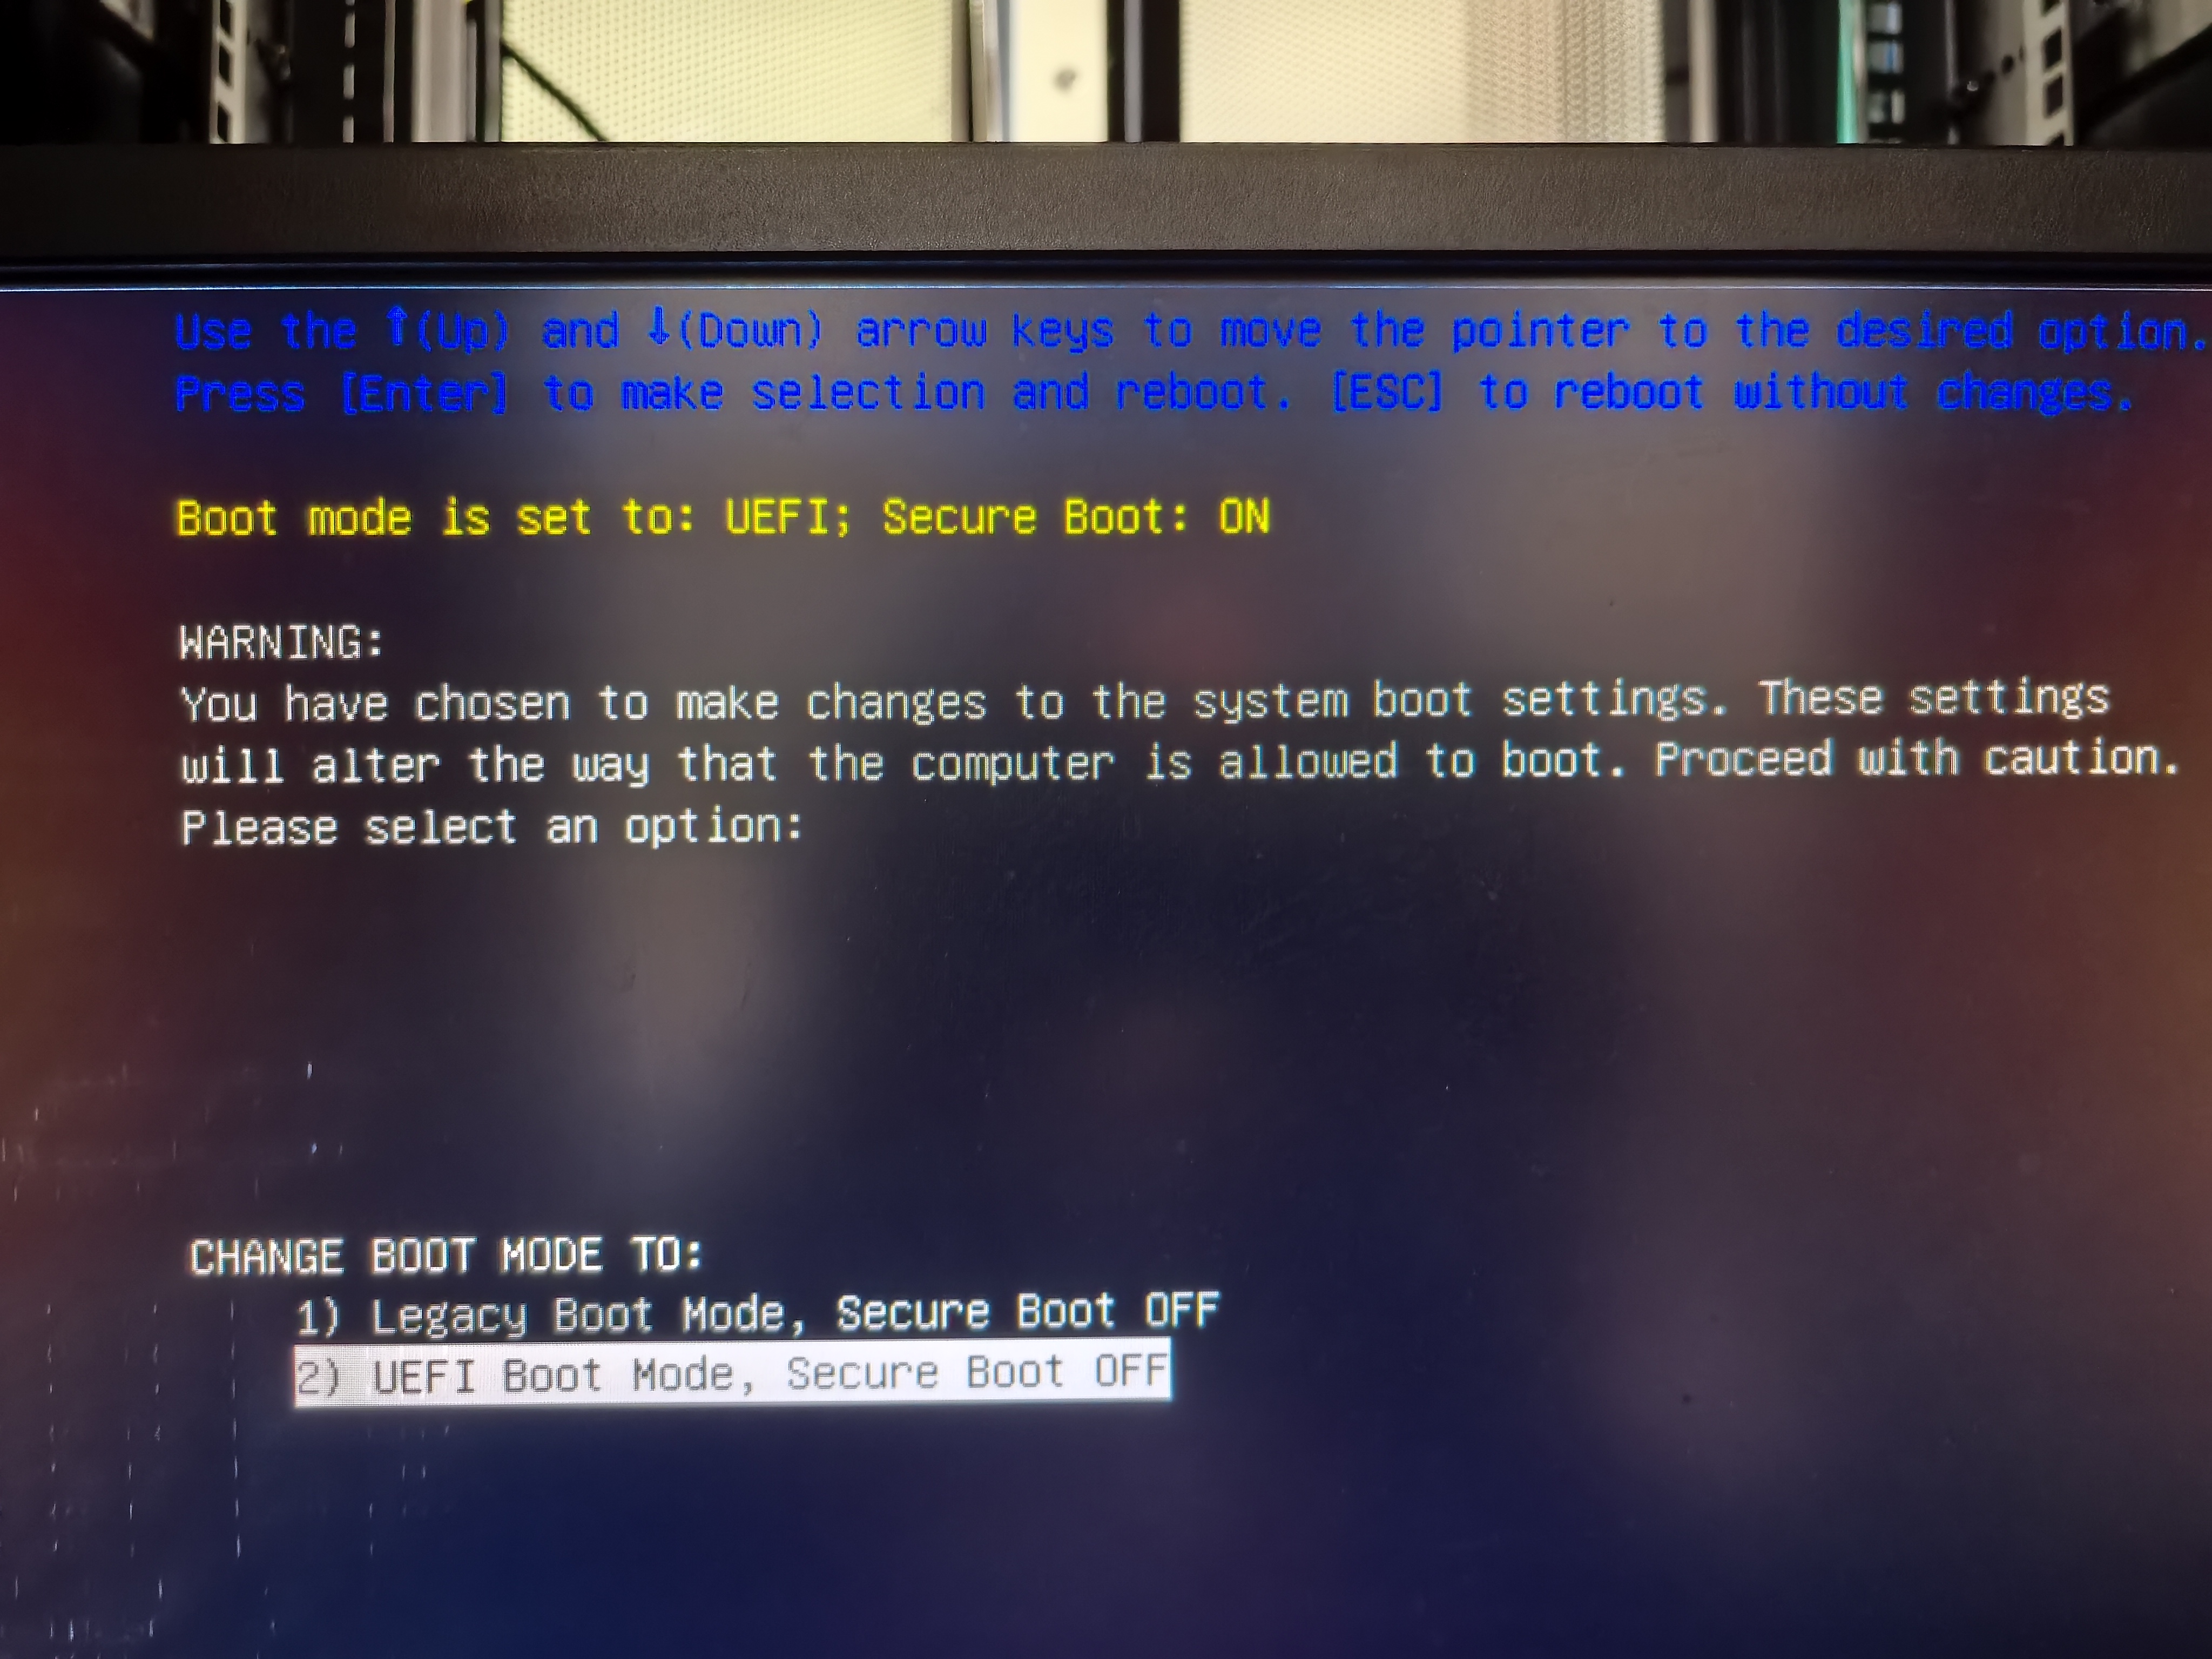
注意:禁用secure boot
如果要在k8s集群上部署NVIDIA GPU operator,则必须在bios上禁用secure boot,否则operator无法正常安装NVIDIA驱动。
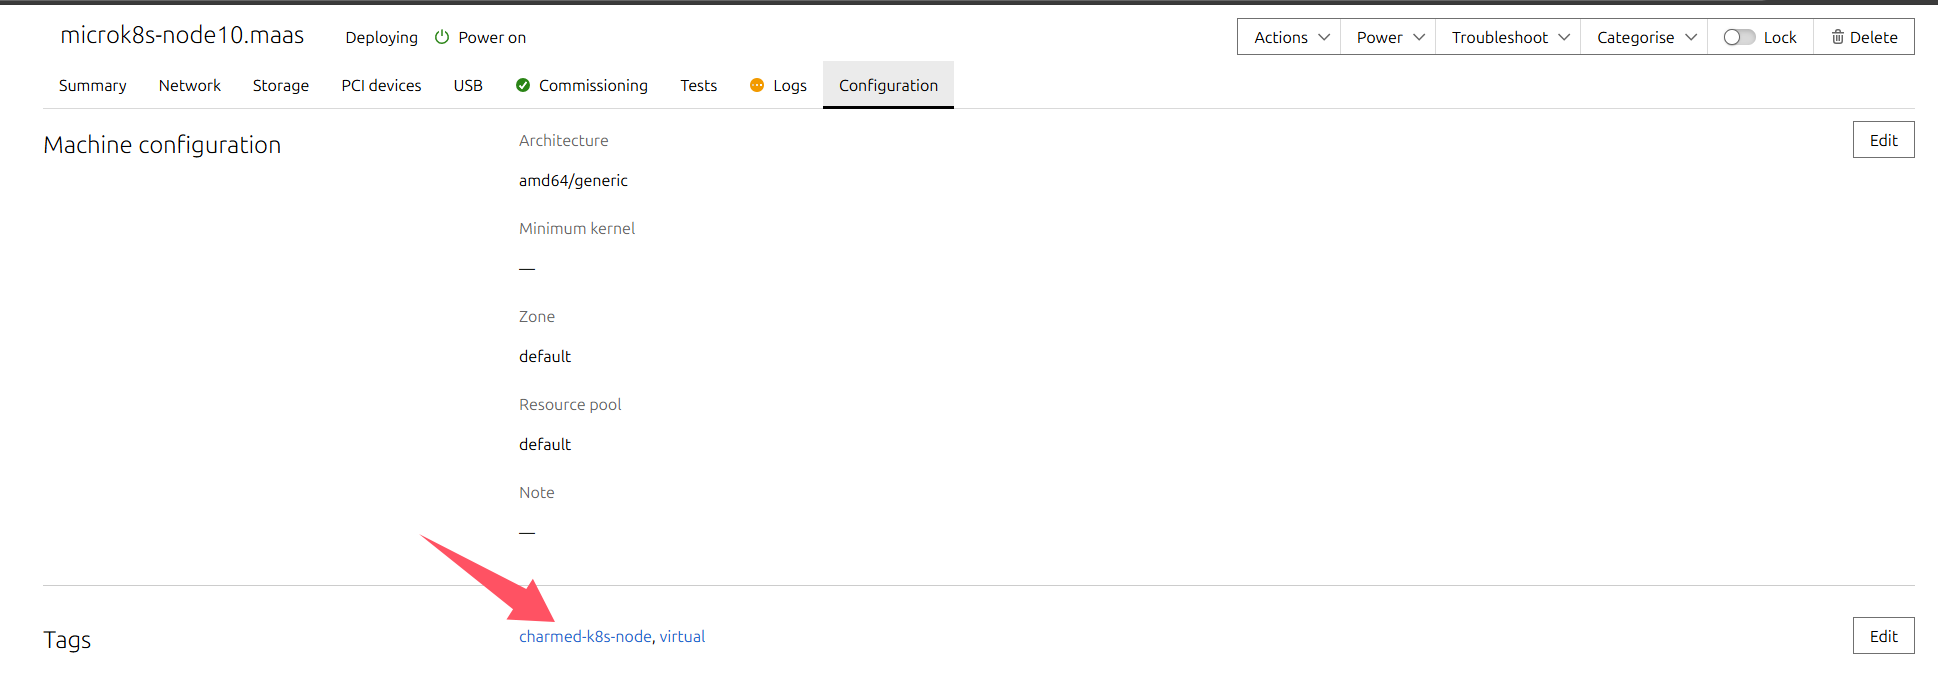
通过PXE启动,之后commission,再添加合适的machine标签和storage标签(用于之后部署ceph),详情省略
juju添加maas cloud和其凭据
为了让client计算机上的juju客户端程序可以访问maas,需要先添加一个cloud并授权,如此juju就可以管理maas了
juju add-cloud
juju add-credential maas-one
创建juju controller
下面这段命令用于创建一个juju controller,会在machine上有tag为juju-controller上创建,并配置代理,前面的–config指的是为juju controller配置代理,后面的–model-default指的是为后续的所有models配置默认值,这样就不用每个model都单独设置了,maas-one是cloud的名称,maas-controller是新创建的controller名称,可以随意命名方便识别就行。
–config bootstrap-timeout=3600指的是设置创建controller的超时时间为3600秒(1小时)
juju bootstrap --constraints tags=juju-controller \
  --bootstrap-base=ubuntu@24.04 \
  --config bootstrap-timeout=3600 \
  --config http-proxy=http://<此处替换为实际的代理服务器地址或域名>:port \
  --config https-proxy=http://<此处替换为实际的代理服务器地址或域名>:port \
  --config no-proxy=10.0.0.0/8,192.168.0.0/16,127.0.0.1,172.16.0.0/16,.svc,dltornado2.com,geekery.cn,daocloud.io,aliyun.com,mywind.com.cn,hf-mirror.com,quay.io,localhost,security.ubuntu.com \
  --model-default http-proxy=http://<此处替换为实际的代理服务器地址或域名>:port \
  --model-default https-proxy=http://<此处替换为实际的代理服务器地址或域名>:port \
  --model-default no-proxy=10.0.0.0/8,192.168.0.0/16,127.0.0.1,172.16.0.0/16,.svc,dltornado2.com,geekery.cn,daocloud.io,aliyun.com,mywind.com.cn,hf-mirror.com,quay.io,localhost,security.ubuntu.com \
  --model-default snap-http-proxy=http://<此处替换为实际的代理服务器地址或域名>:port \
  --model-default snap-https-proxy=http://<此处替换为实际的代理服务器地址或域名>:port \
  maas-one maas-controller
添加一个model
juju add-model charmed-k8s maas-one
部署charmed kubernetes bundle
注意:根据实践,我发现如果用默认的calico作为CNI,则calico pod会反复重启,一直不能就绪,至今没有找出原因,所以此处使用的是kube-ovn,这个cni其实比calico更加强大,吞吐量更大,兼容性更好,很多金融单位都是用这个cni
先准备一个bundle yaml文件,用于对此bundle进行自定义
说明:charmed-k8s-overlay.yaml文件用于覆盖此bundle默认的值,可以在github上查看默认的yaml文件:bundle/releases/1.32/bundle.yaml at main · charmed-kubernetes/bundle
cat <<EOF > charmed-k8s-overlay.yaml
applications:
  kubernetes-control-plane:
    constraints: tags=k8s-control-plane
    options:
      allow-privileged: "true"
    num_units: 2
  kubernetes-worker:
    constraints: tags=k8s-workernode
    num_units: 9
  calico: null
  kube-ovn:
    charm: kube-ovn
  etcd:
    constraints: tags=etcd
    num_units: 3
  easyrsa:
    constraints: tags=easyrsa
    num_units: 1
  kubeapi-load-balancer:
    constraints: tags=kubeapi-load-balancer
    num_units: 1
relations:
- [kube-ovn:cni, kubernetes-control-plane:cni]
- [kube-ovn:cni, kubernetes-worker:cni]
EOF
开始部署charmed-kubernetes
juju deploy charmed-kubernetes --overlay=charmed-k8s-overlay.yaml
输出如下:
Located bundle "charmed-kubernetes" in charm-hub, revision 1277
Located charm "containerd" in charm-hub, channel latest/stable
Located charm "easyrsa" in charm-hub, channel latest/stable
Located charm "etcd" in charm-hub, channel latest/stable
Located charm "kube-ovn" in charm-hub, channel latest/stable
Located charm "kubeapi-load-balancer" in charm-hub, channel latest/stable
Located charm "kubernetes-control-plane" in charm-hub, channel latest/stable
Located charm "kubernetes-worker" in charm-hub, channel latest/stable
Executing changes:
- upload charm containerd from charm-hub for base ubuntu@22.04/stable from channel stable with architecture=amd64
- deploy application containerd from charm-hub on ubuntu@22.04/stable with stable
  added resource containerd
- set annotations for containerd
- upload charm easyrsa from charm-hub for base ubuntu@22.04/stable from channel stable with architecture=amd64
- deploy application easyrsa from charm-hub on ubuntu@22.04/stable with stable
  added resource easyrsa
- set annotations for easyrsa
- upload charm etcd from charm-hub for base ubuntu@22.04/stable from channel stable with architecture=amd64
- deploy application etcd from charm-hub on ubuntu@22.04/stable with stable
  added resource core
  added resource etcd
  added resource snapshot
- set annotations for etcd
- upload charm kube-ovn from charm-hub for base ubuntu@22.04/stable with architecture=amd64
- deploy application kube-ovn from charm-hub on ubuntu@22.04/stable
  added resource kubectl-ko
- upload charm kubeapi-load-balancer from charm-hub for base ubuntu@22.04/stable from channel stable with architecture=amd64
- deploy application kubeapi-load-balancer from charm-hub on ubuntu@22.04/stable with stable
  added resource nginx-prometheus-exporter
- expose all endpoints of kubeapi-load-balancer and allow access from CIDRs 0.0.0.0/0 and ::/0
- set annotations for kubeapi-load-balancer
- upload charm kubernetes-control-plane from charm-hub for base ubuntu@22.04/stable from channel stable with architecture=amd64
- deploy application kubernetes-control-plane from charm-hub on ubuntu@22.04/stable with stable
  added resource cni-plugins
- set annotations for kubernetes-control-plane
- upload charm kubernetes-worker from charm-hub for base ubuntu@22.04/stable from channel stable with architecture=amd64
- deploy application kubernetes-worker from charm-hub on ubuntu@22.04/stable with stable
  added resource cni-plugins
- expose all endpoints of kubernetes-worker and allow access from CIDRs 0.0.0.0/0 and ::/0
- set annotations for kubernetes-worker
- add relation kubernetes-control-plane:loadbalancer-external - kubeapi-load-balancer:lb-consumers
- add relation kubernetes-control-plane:loadbalancer-internal - kubeapi-load-balancer:lb-consumers
- add relation kubernetes-control-plane:kube-control - kubernetes-worker:kube-control
- add relation kubernetes-control-plane:certificates - easyrsa:client
- add relation etcd:certificates - easyrsa:client
- add relation kubernetes-control-plane:etcd - etcd:db
- add relation kubernetes-worker:certificates - easyrsa:client
- add relation kubeapi-load-balancer:certificates - easyrsa:client
- add relation containerd:containerd - kubernetes-worker:container-runtime
- add relation containerd:containerd - kubernetes-control-plane:container-runtime
- add relation kube-ovn:cni - kubernetes-control-plane:cni
- add relation kube-ovn:cni - kubernetes-worker:cni
- add unit easyrsa/0 to new machine 0
- add unit etcd/0 to new machine 1
- add unit etcd/1 to new machine 2
- add unit etcd/2 to new machine 3
- add unit kubeapi-load-balancer/0 to new machine 4
- add unit kubernetes-control-plane/0 to new machine 5
- add unit kubernetes-control-plane/1 to new machine 6
- add unit kubernetes-worker/0 to new machine 7
- add unit kubernetes-worker/1 to new machine 8
- add unit kubernetes-worker/2 to new machine 9
- add unit kubernetes-worker/3 to new machine 10
- add unit kubernetes-worker/4 to new machine 11
- add unit kubernetes-worker/5 to new machine 12
- add unit kubernetes-worker/6 to new machine 13
- add unit kubernetes-worker/7 to new machine 14
- add unit kubernetes-worker/8 to new machine 15
Deploy of bundle completed.
监控部署
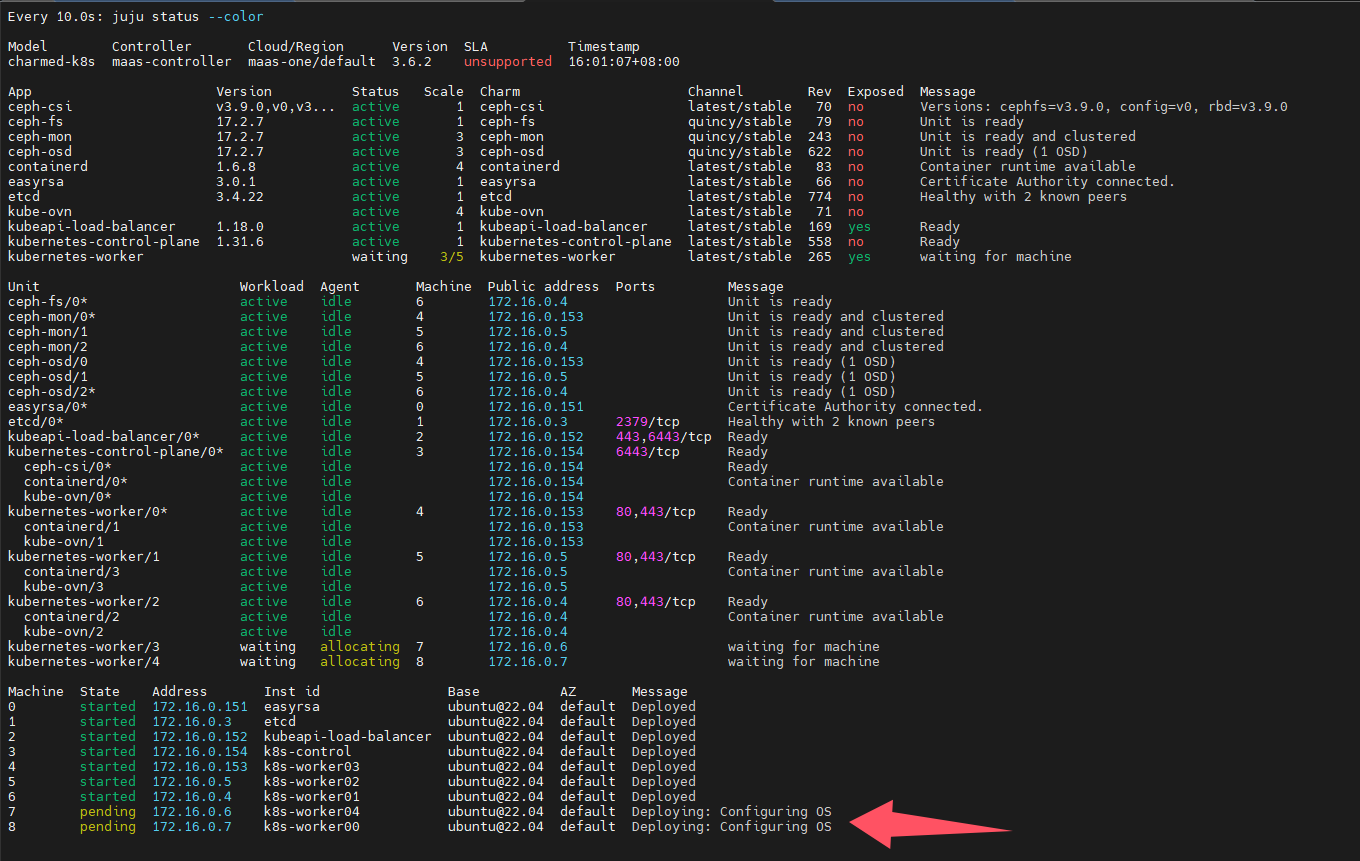
watch -n 10 -c juju status --color
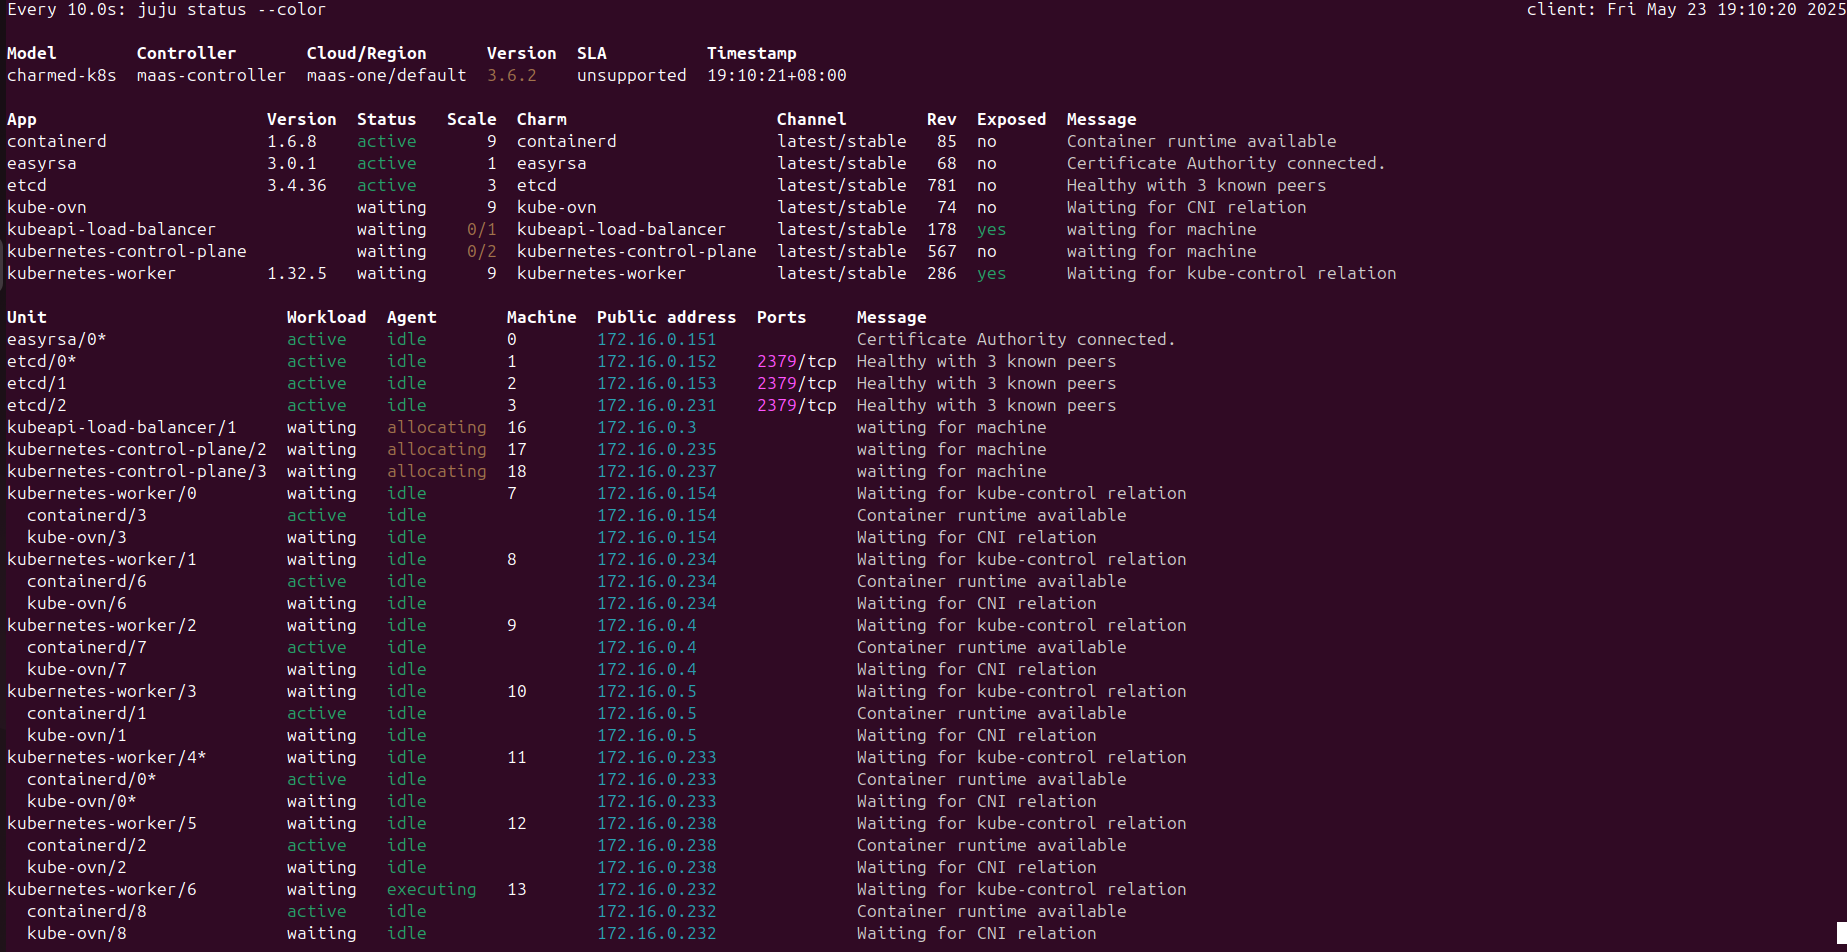
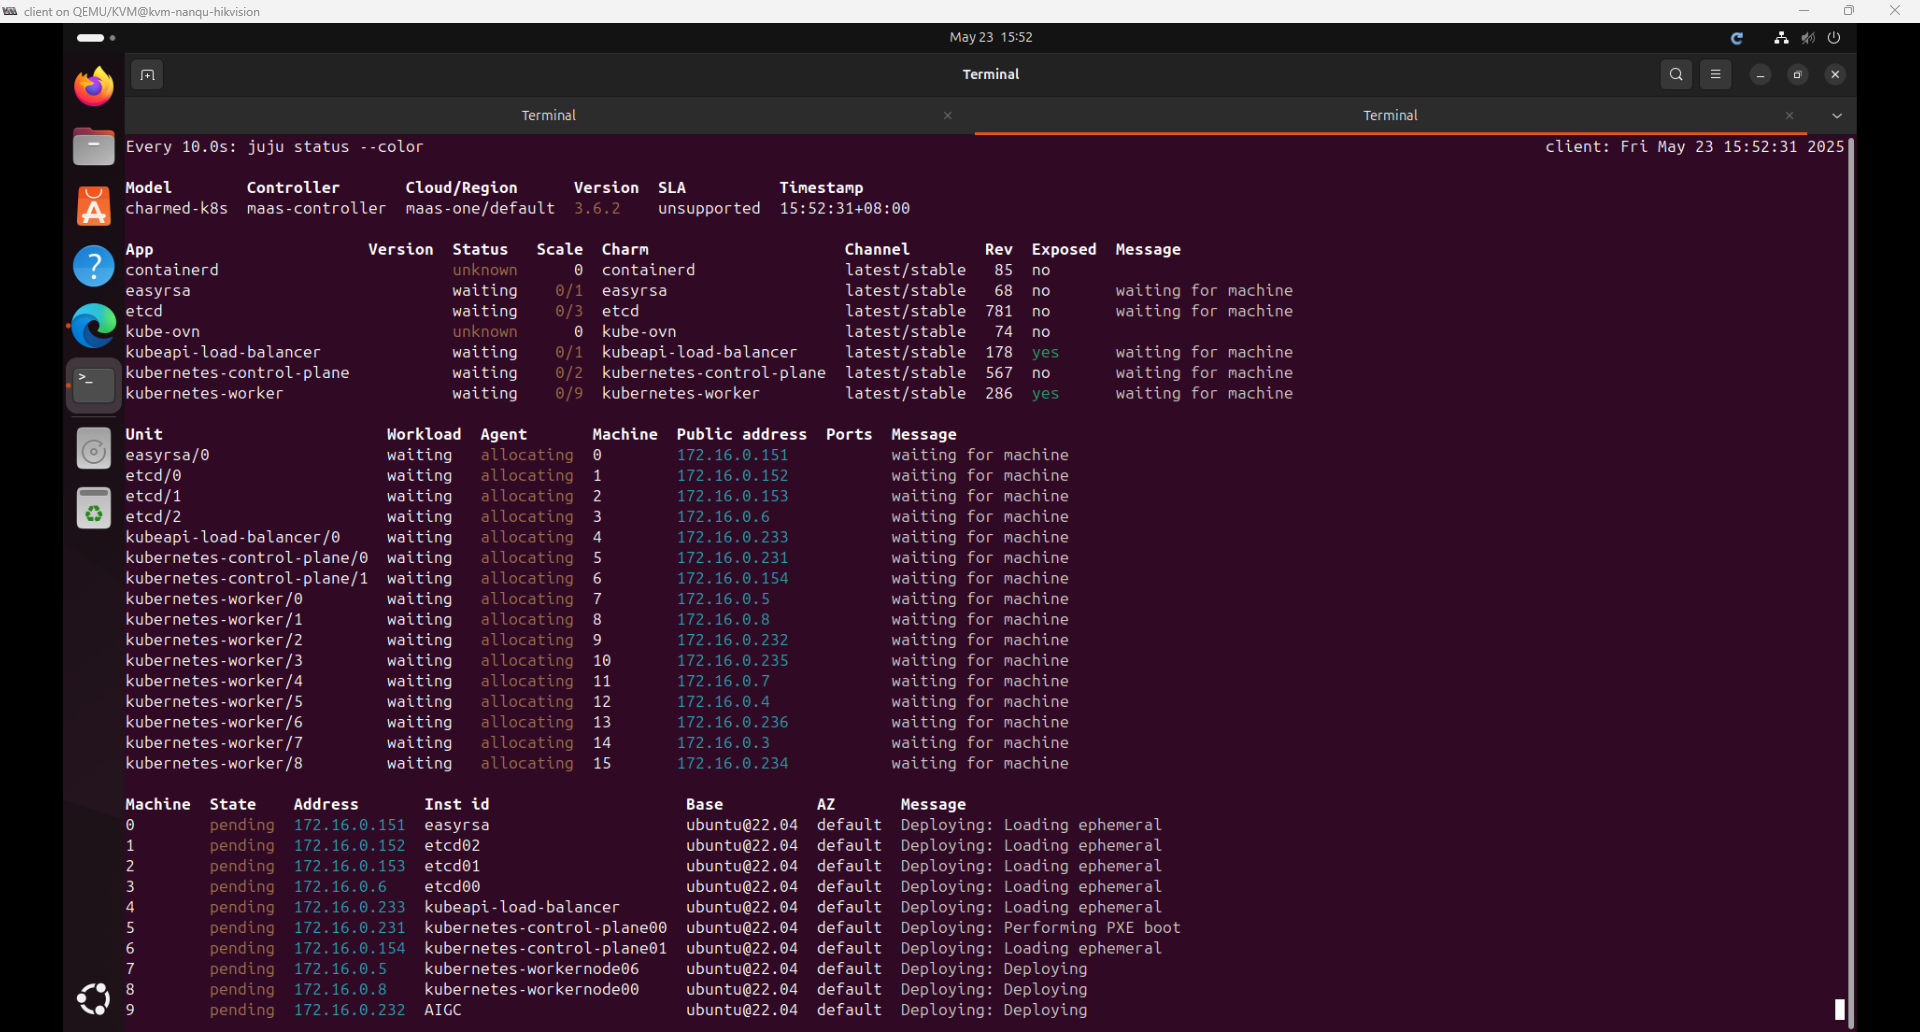
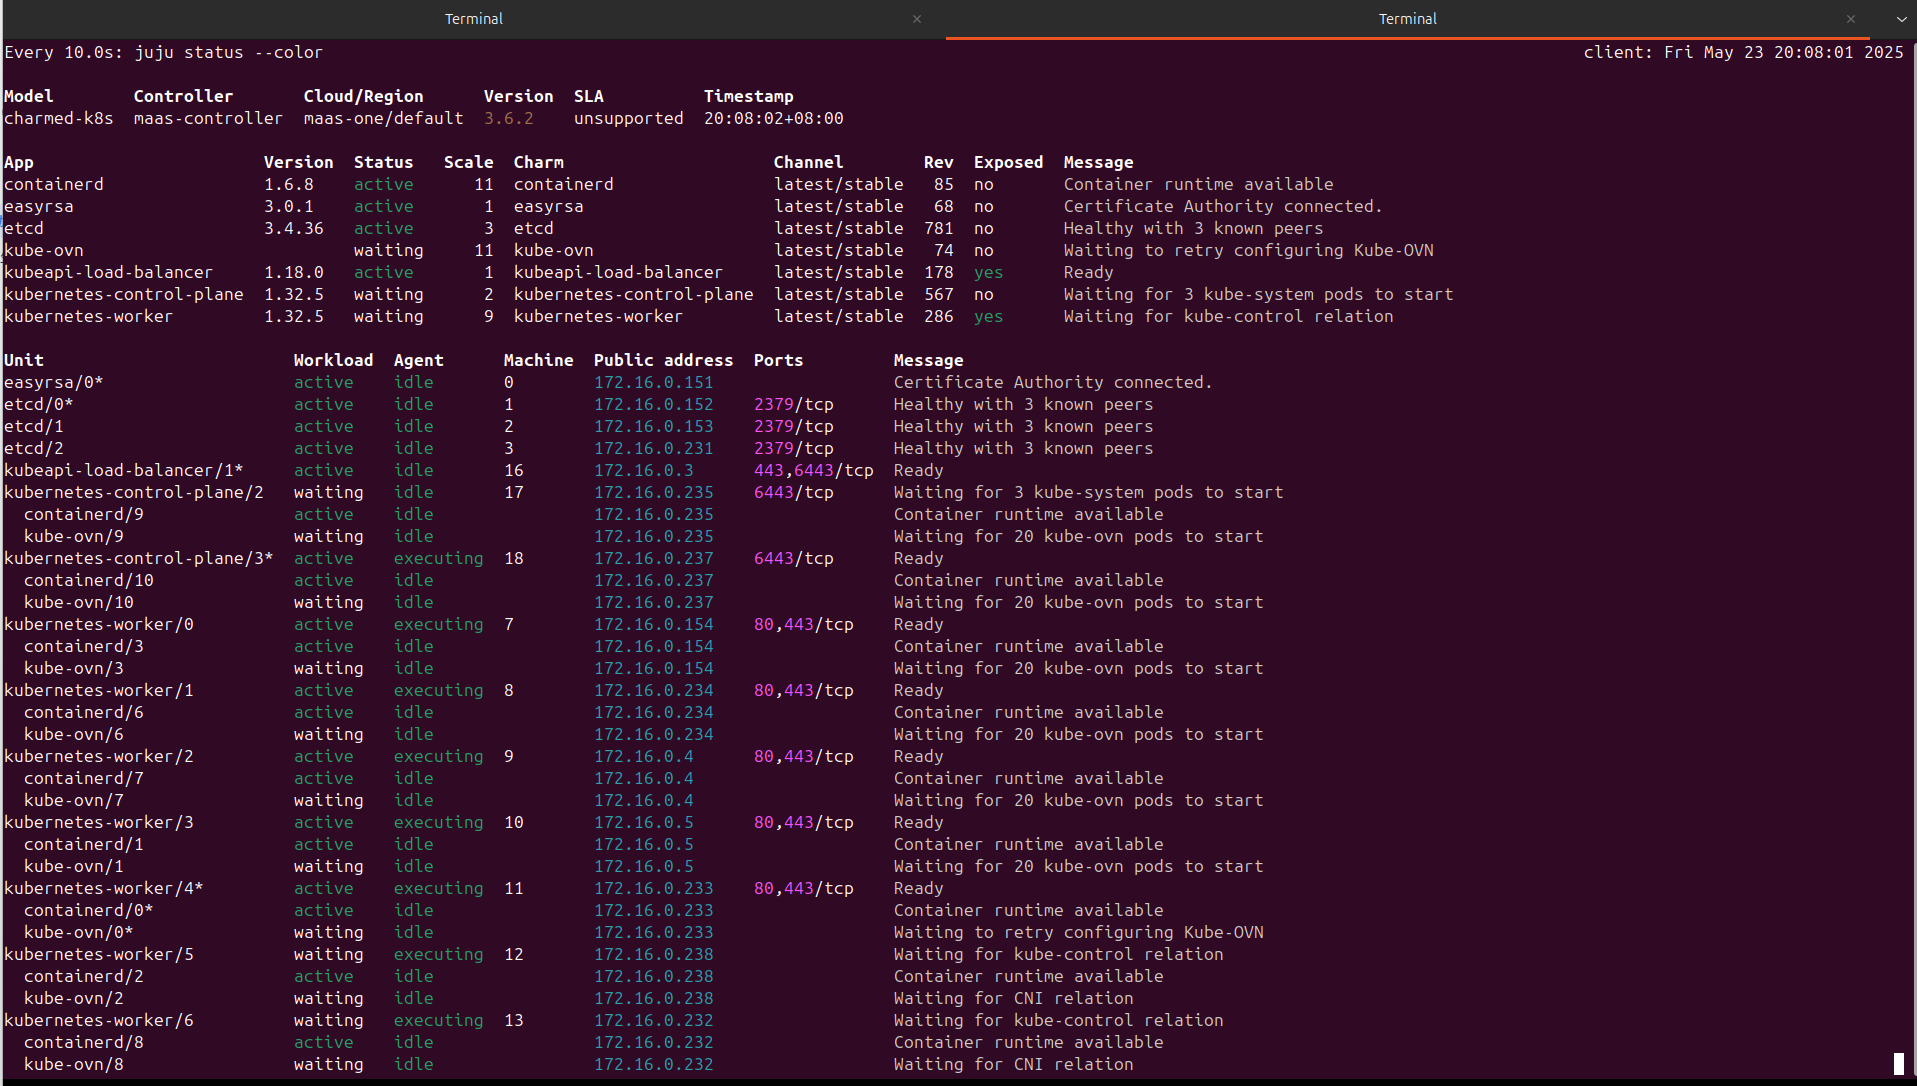
大概3小时后,部署完成
部署失败解决方案
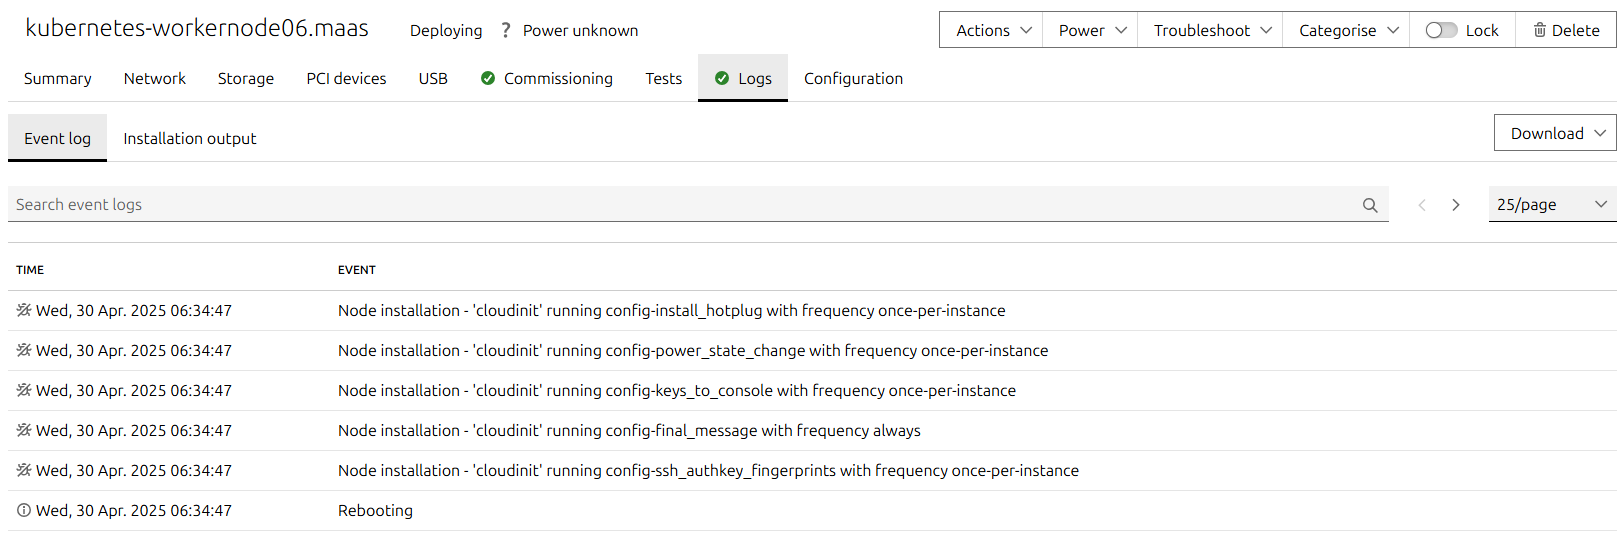
自动化部署ubuntu系统失败
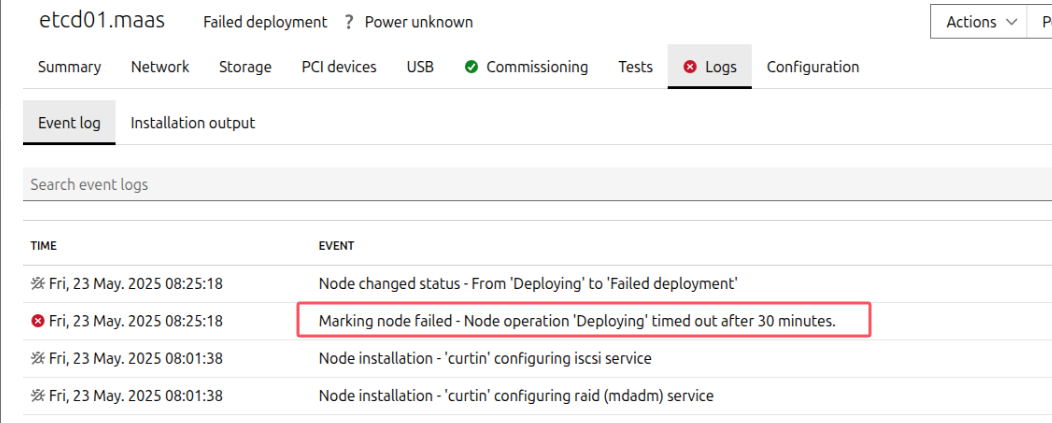
如果遇到自动化部署ubuntu系统失败的问题,一般有两种情况,
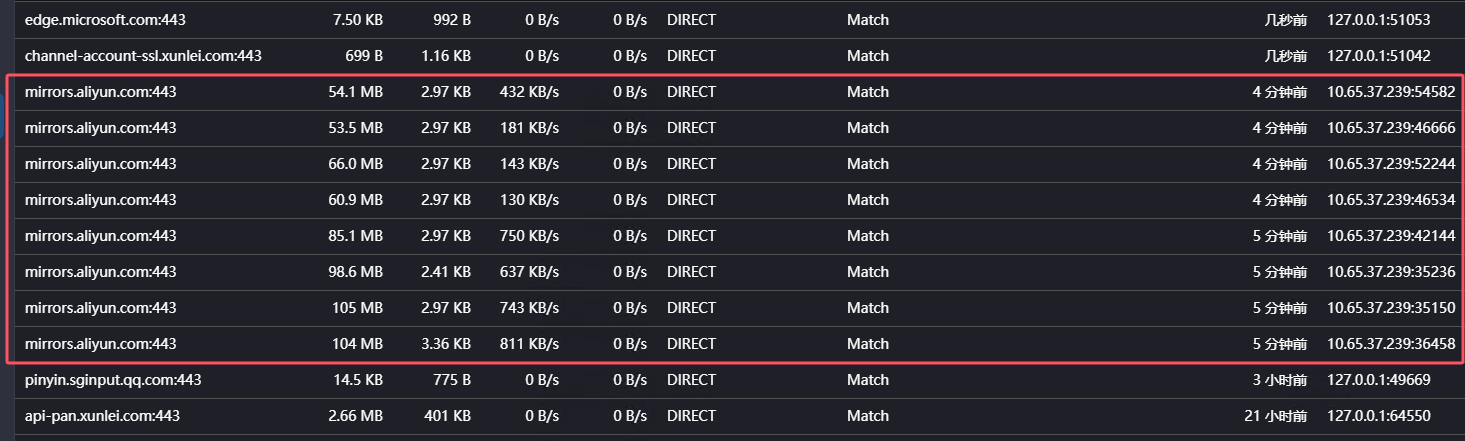
第一,超时了,默认情况下,部署系统需要在30分钟内完成,否则就会提示报错;一般超时的原因是因为,部署ubuntu系统时,会自动进行apt update和apt upgrade操作,下载的时间比较长,所以最好是确保网速够快,很大程度上可以避免这个问题。
第二,如下图所示,系统已经部署了,但是一直提示正在重启中,卡住了
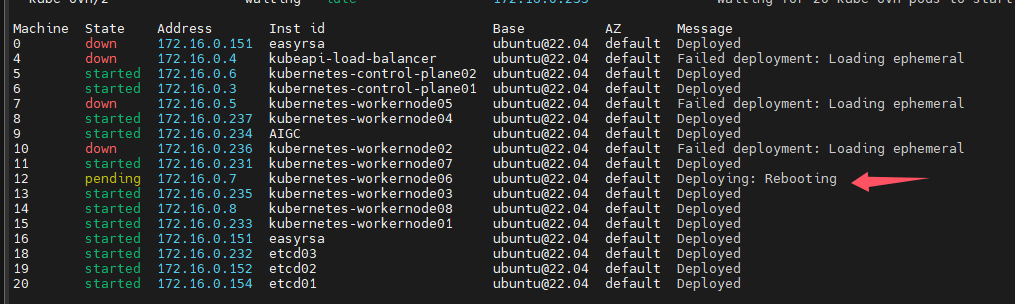
解决方案:
可以先用命令juju retry-provisioning --all让部署失败的machines自动重新开始部署ubuntu系统。
如果上面的方法不奏效的话,那就用终极方法,直接强制移除与失败的machines有关的units,例如(假设3个etcd都部署失败了):
juju remove-unit etcd/0 etcd/1 etcd/2 --force #注意一定要加上参数--force,否则,可能不会自动删除有关的machines
然后重新添加units
juju add-unit etcd -n 3
建议配置registry mirror
国内无法直接访问docker.io,建议配置registry mirror已方便下载容器镜像,可以在一开始就指定,也可以在部署之后再配置
下行命令指的是若是kubelet从docker hub拉取镜像,则将url替换为https://registry.dockermirror.com,如此就能高速下载容器镜像了
juju config containerd custom_registries='[{"host": "docker.io", "url": "https://registry.dockermirror.com"}]'
#上面的registry可能速率比较慢,也可以用下面这个2025年4月4日实测速率非常快,而且几乎所有容器镜像都能拉取
juju config containerd custom_registries='[{"host": "docker.io", "url": "https://docker.1ms.run"}]'
下面这个也行,但是我发现拉取镜像很慢,上面的很快
juju config containerd custom_registries='[{"host": "docker.io", "url": "https://docker.m.daocloud.io"}]'
用juju ssh命令随便远程连接到一个k8s节点中,然后查看config.toml内容,可以看到确实已经更改生效了
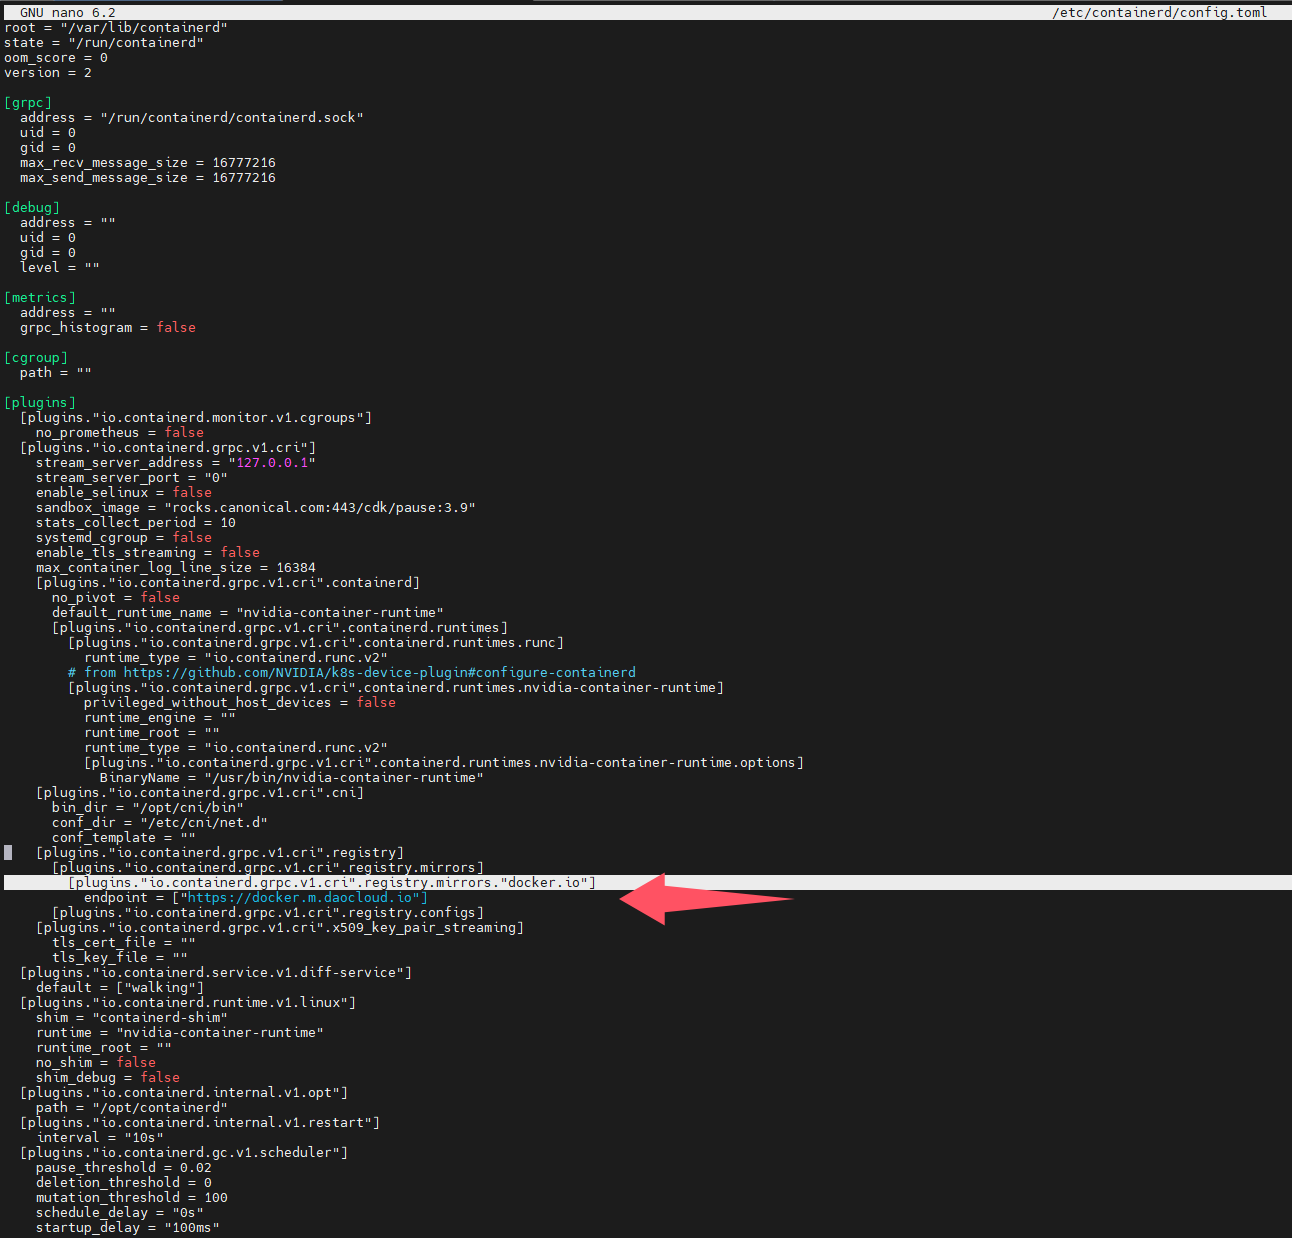
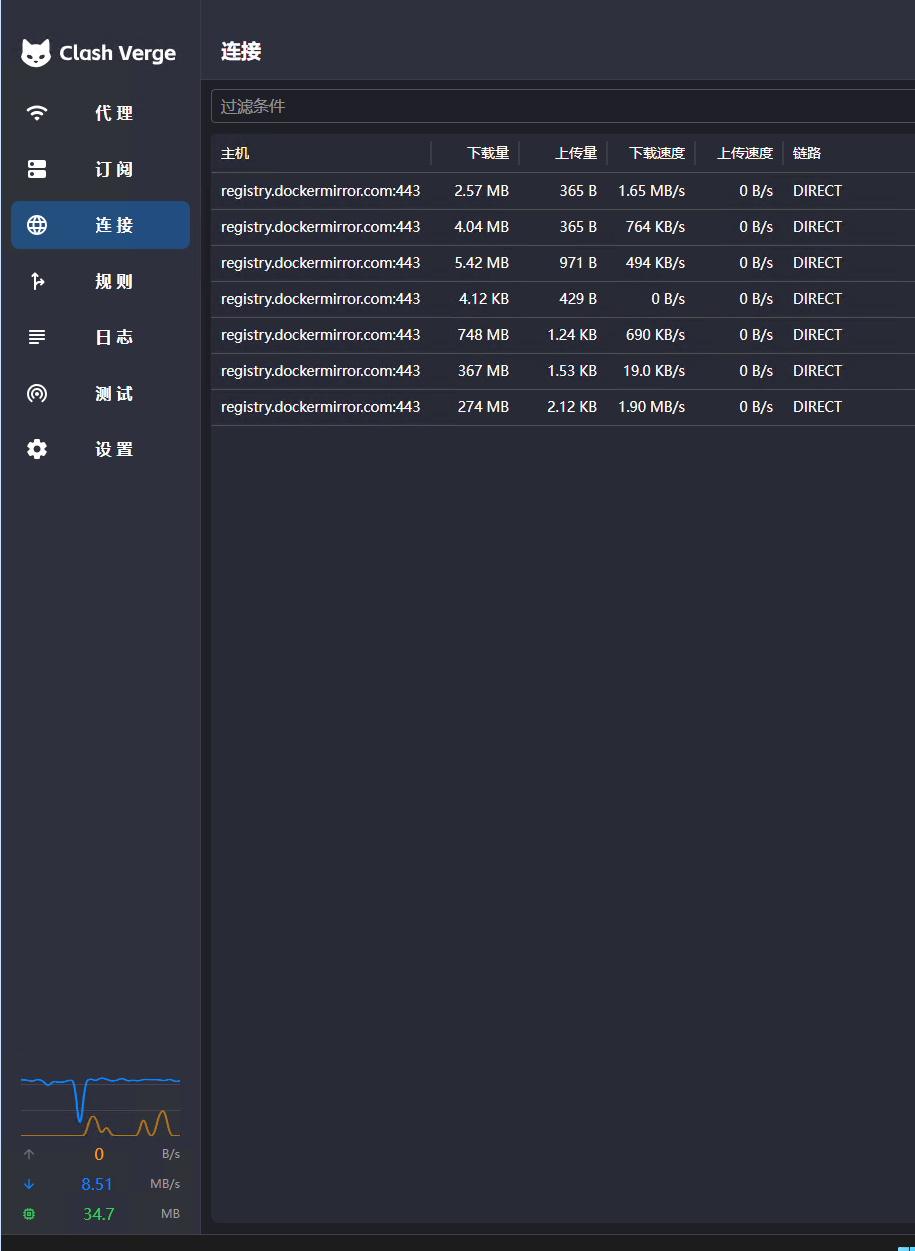
可以用juju config containerd查看当前所有的charm containerd的配置,还有配置的释义
验证已部署的charmed-kubernetes
安装kubectl
sudo snap install kubectl --classic
获取k8s集群的配置文件
mkdir .kube
juju ssh kubernetes-control-plane/leader -- cat config > ~/.kube/config
实现kubectl命令自动补全
参考资料:在 Linux 系统中安装并设置 kubectl | Kubernetes
apt-get install bash-completion -y
source /usr/share/bash-completion/bash_completion
#下面的命令仅对于当前用户生效
echo 'source <(kubectl completion bash)' >>~/.bashrc
查询k8s集群信息
kubectl cluster-info

查询nodes信息
kubectl get nodes -o wide

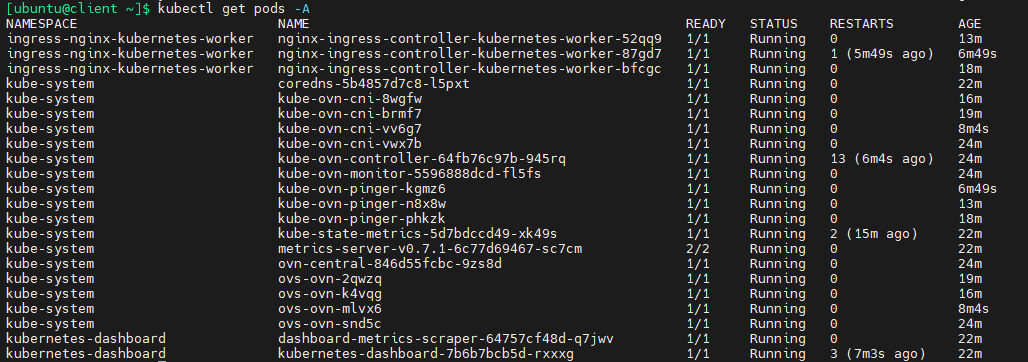
查询所有pods
kubectl get pods -A
k8s集群横向扩容
参考资料:Scaling | Ubuntu
可以轻松利用juju对k8s集群进行横向扩容,控制平面与数据平面是分开扩容的,本节介绍如何进行数据平面横向扩容。
扩容worker node,下行命令表示新增两个k8s worker nodes,这里是无法直接指定contraints的,可以指定–to参数(如果指定了,则忽略contraints)。其实juju在选择新的machines时也是根据之前部署k8s时指定的contraints来定的。如何查看某个app当前的contraints呢?很简单juju constraints kubernetes-worker,所以事先要对两台machines添加相应tag
juju add-unit kubernetes-worker -n 2
查询kubernetes-worker当前的contraints
juju constraints kubernetes-worker

监控状态:
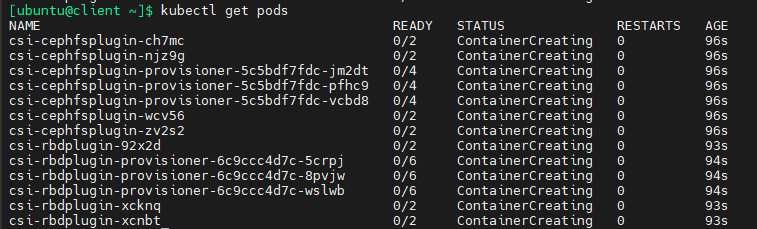
juju会指示maas部署machines,然后自动安装charm、snap等,自动进行配置,自动加入k8s集群,总之是完全自动化的,我发现在这个过程中,kubectl命令无法连接到k8s api endpoint
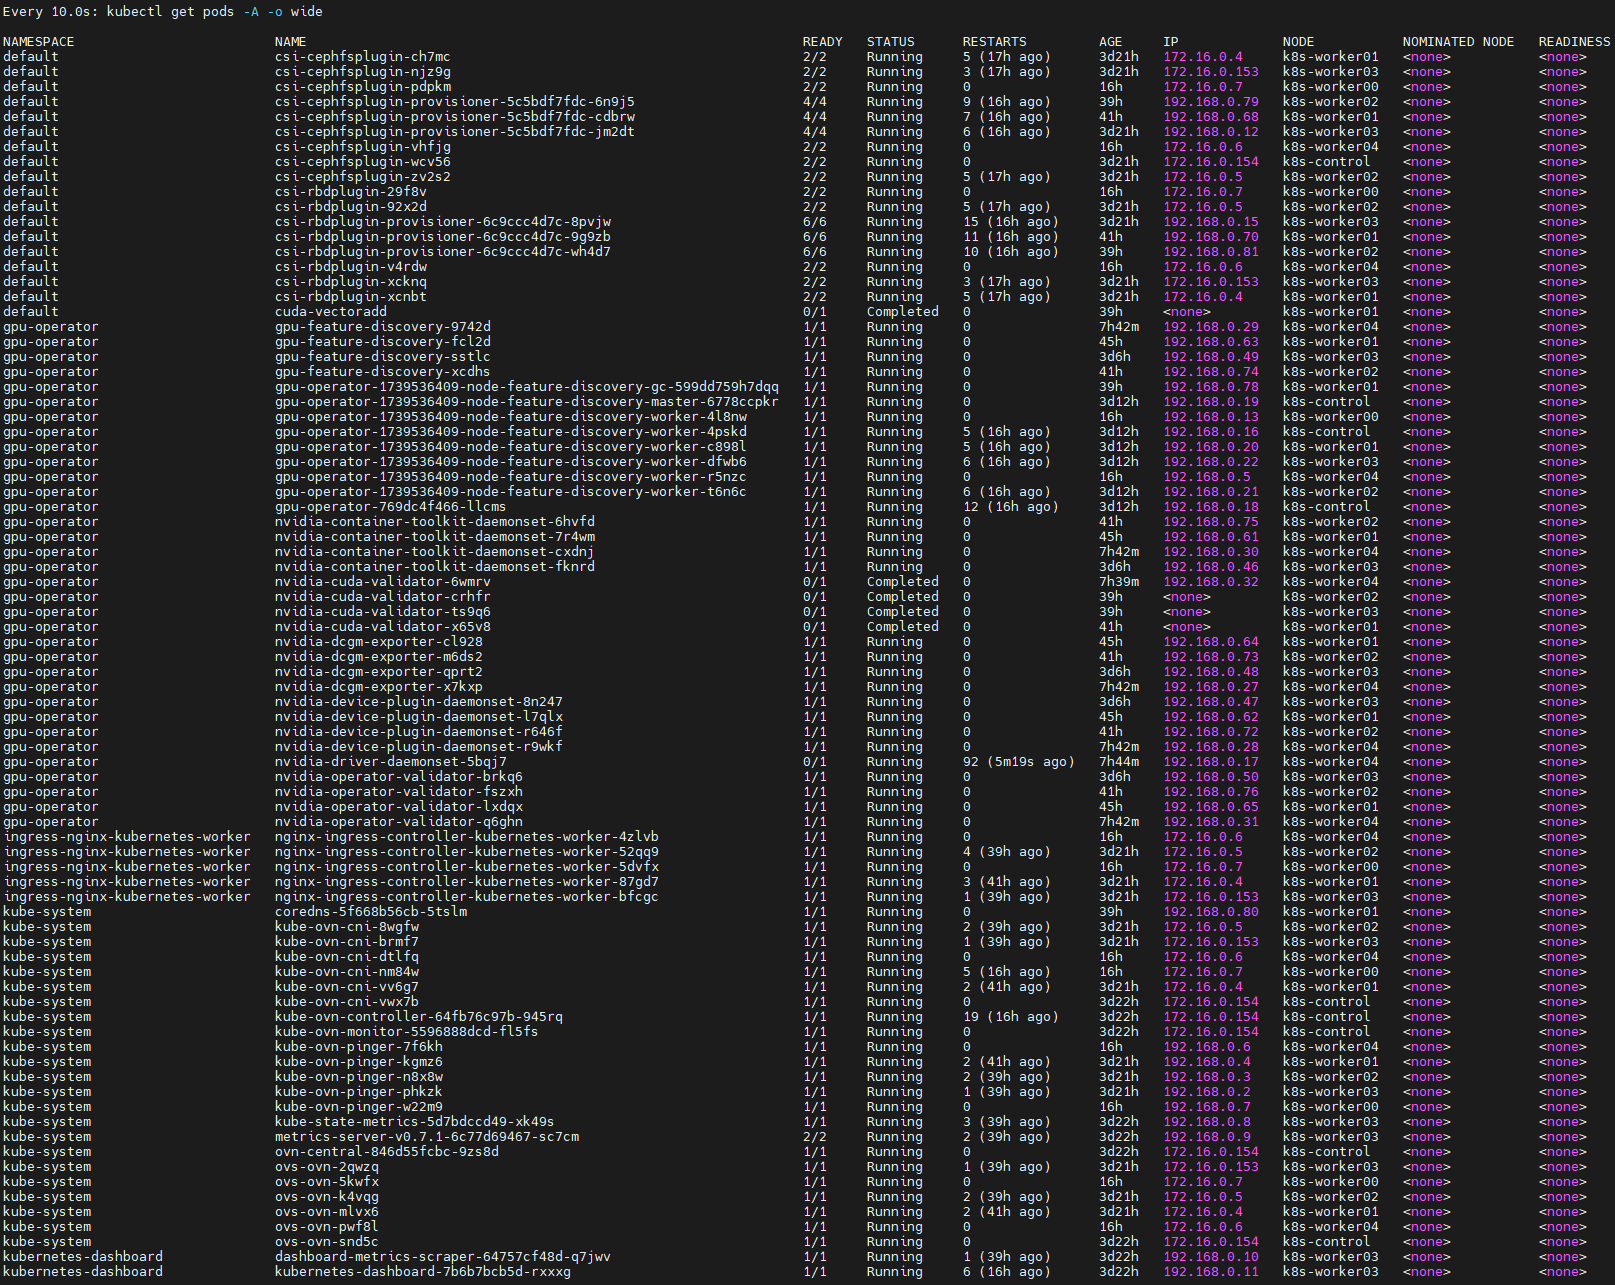
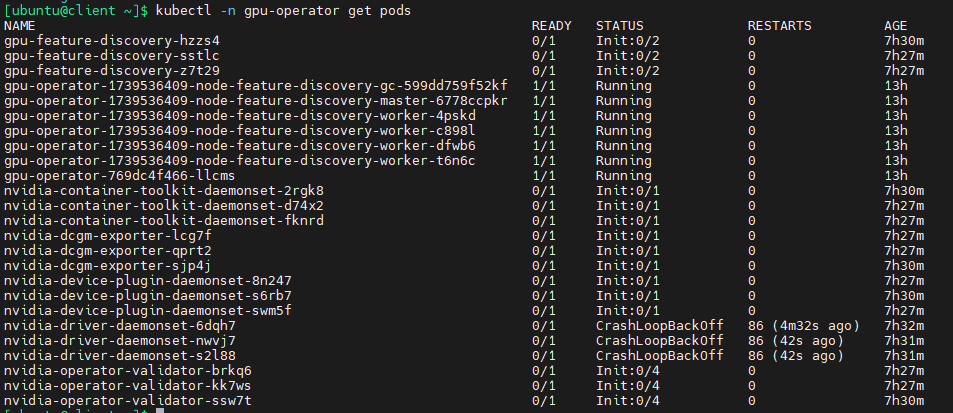
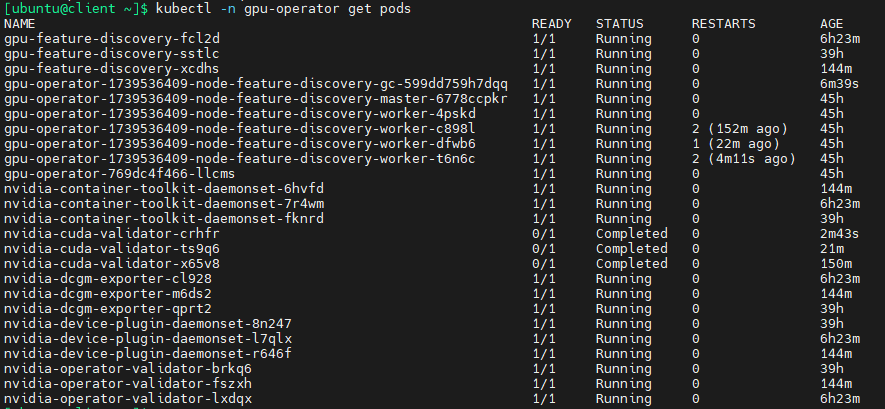
过一段时间后查看pods状态:
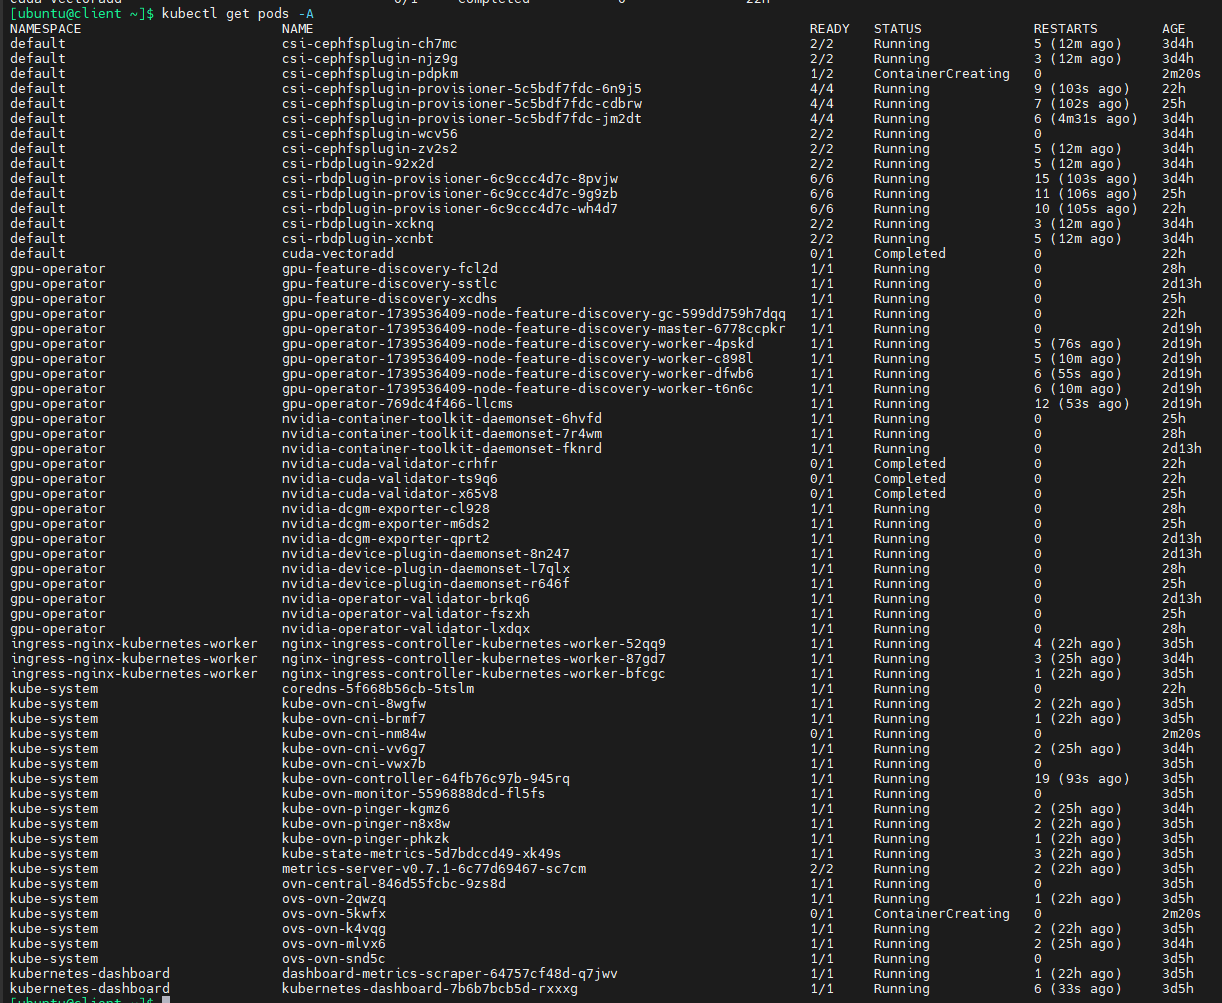
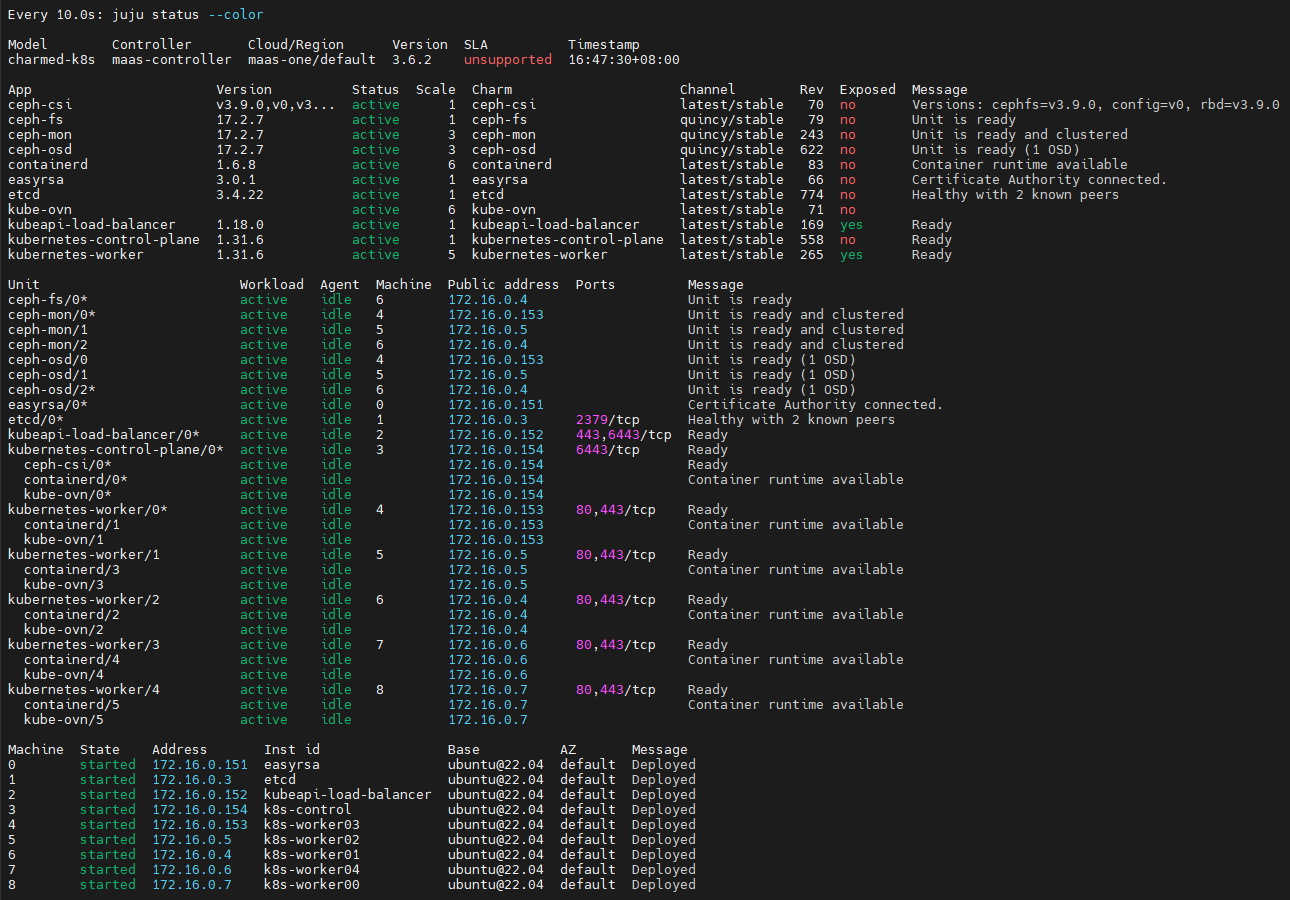
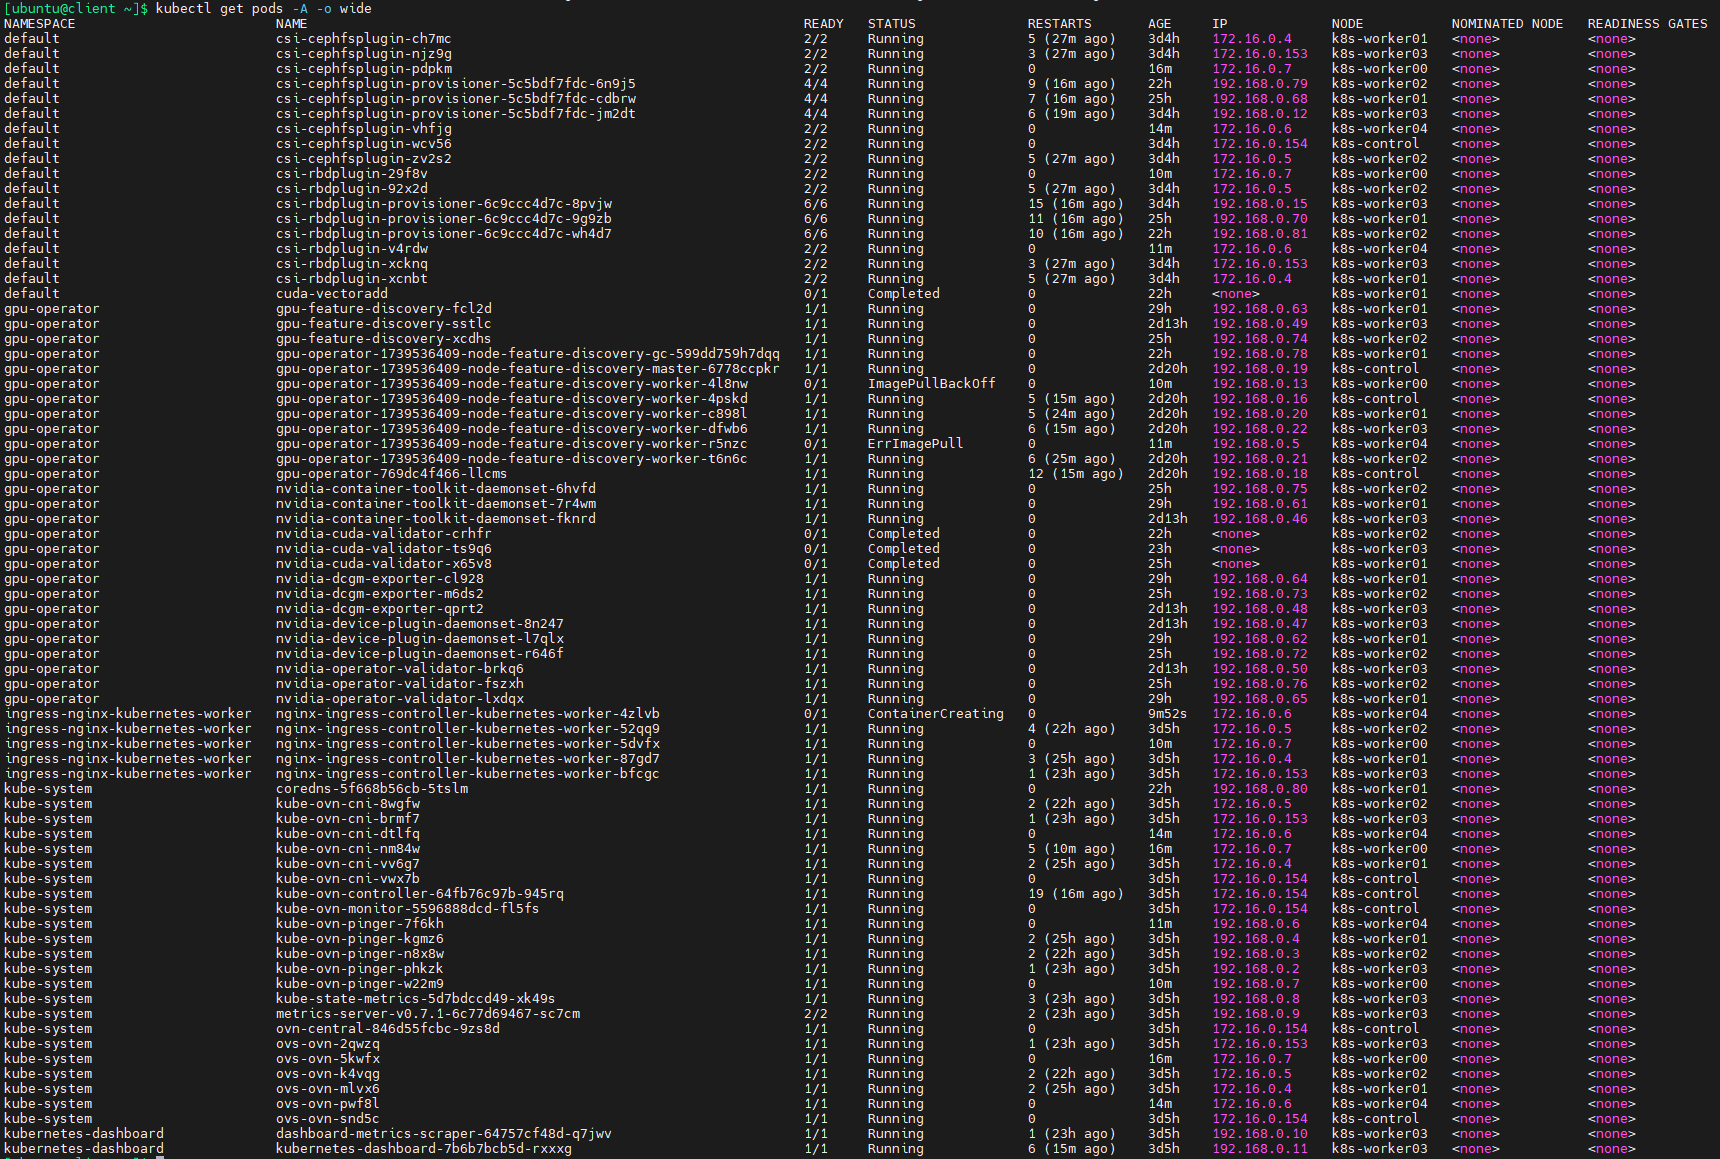
等待比较长的时间之后,所有pods都已经就绪,可以看到,NVIDIA GPU operator会自动对安装了GPU的节点(k8s-worker04)运行有关pods
同样的,如何想对etcd进行扩容,可以用下面的命令
juju add-unit etcd -n 2
用juju快速部署ceph
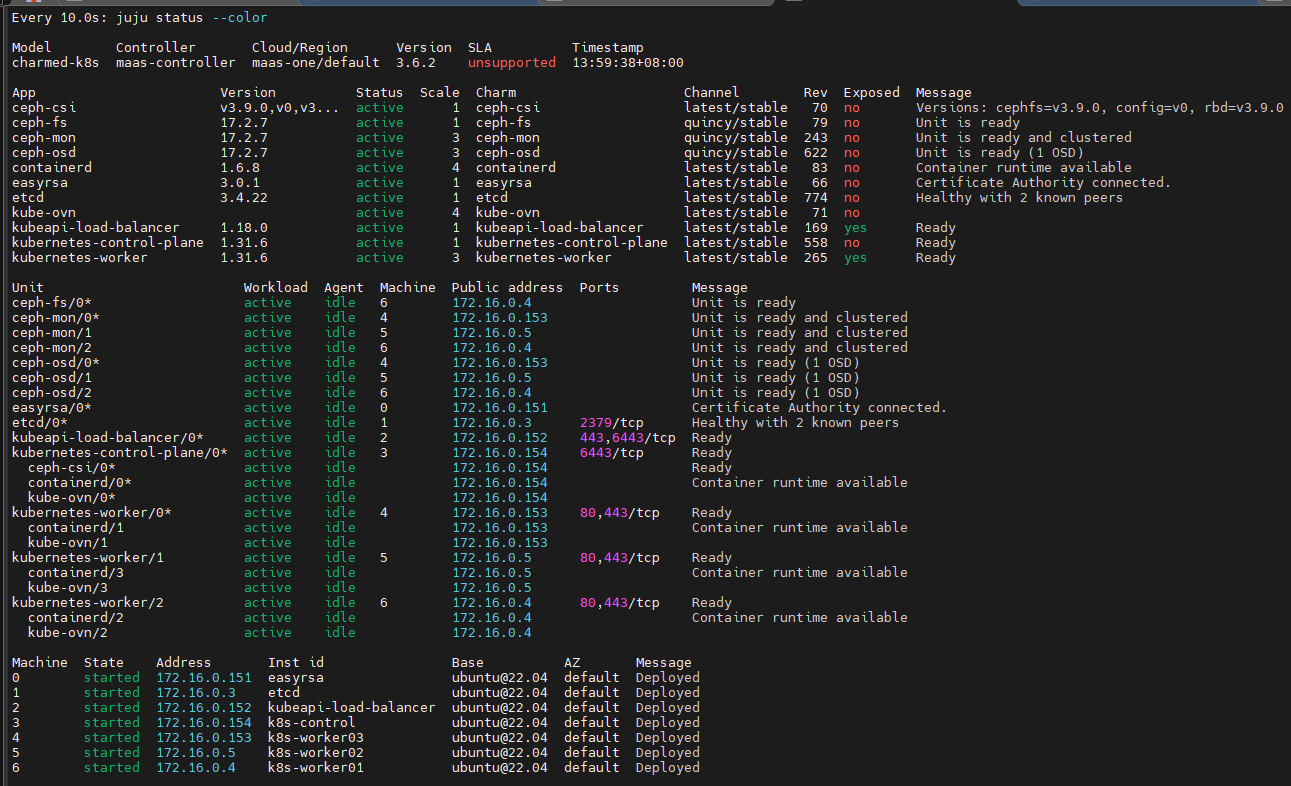
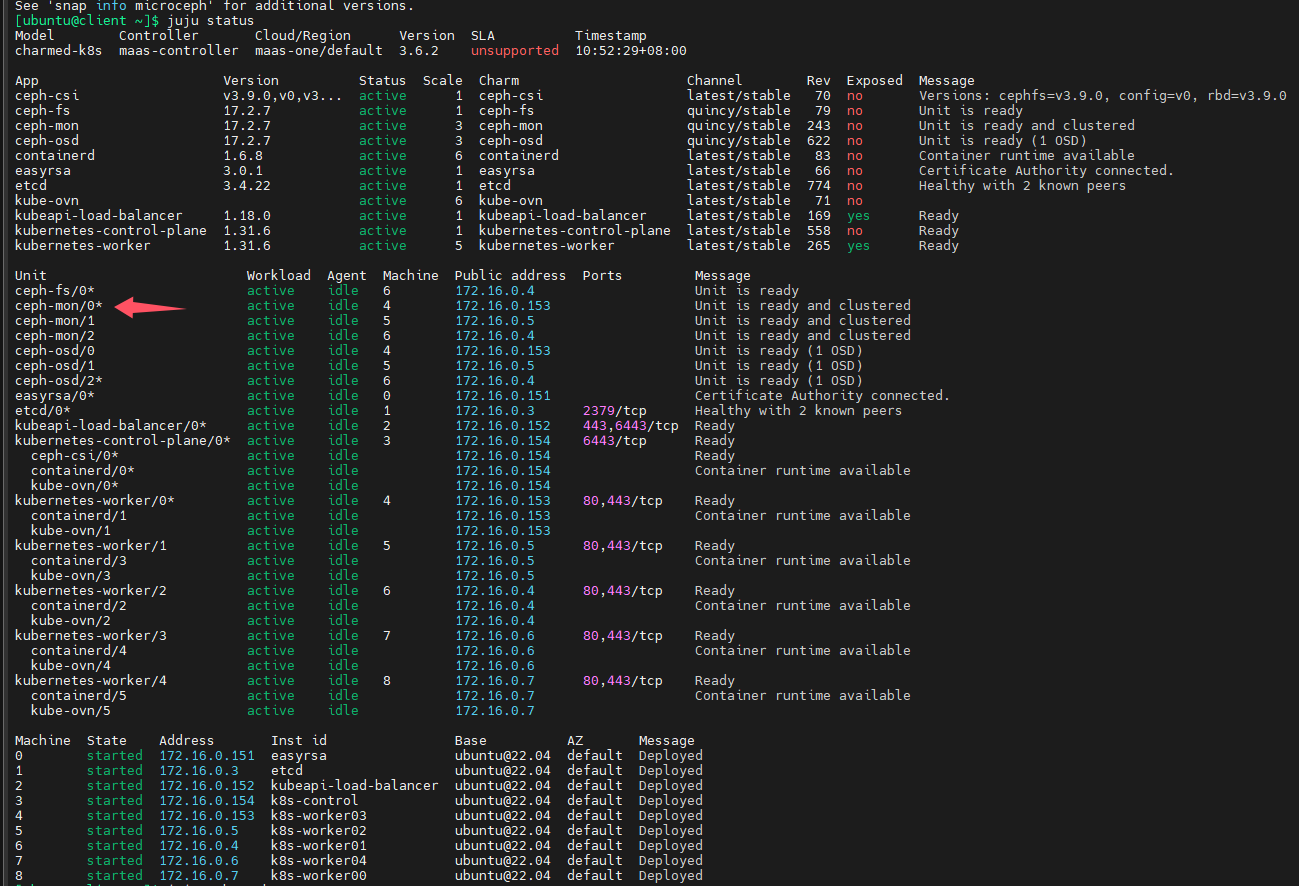
可以用juju machines命令查询juju管理的machines信息

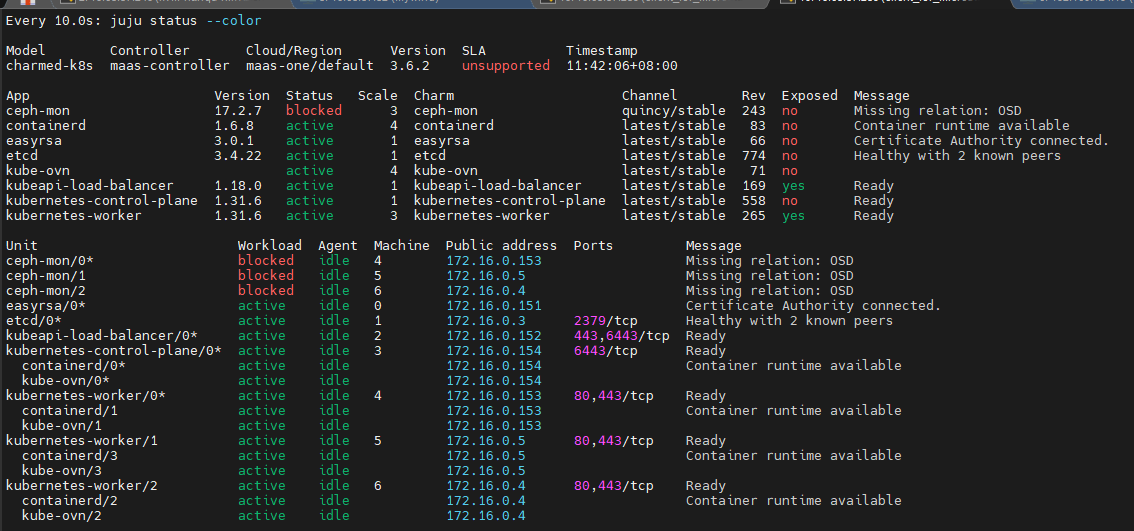
下行命令表示部署ceph-mon到指定machines上,4,5,6对应的就是上图的k8s-worker03,k8s-worker02,k8s-worker01
juju deploy -n 3 ceph-mon --to 4,5,6
查看部署状态:
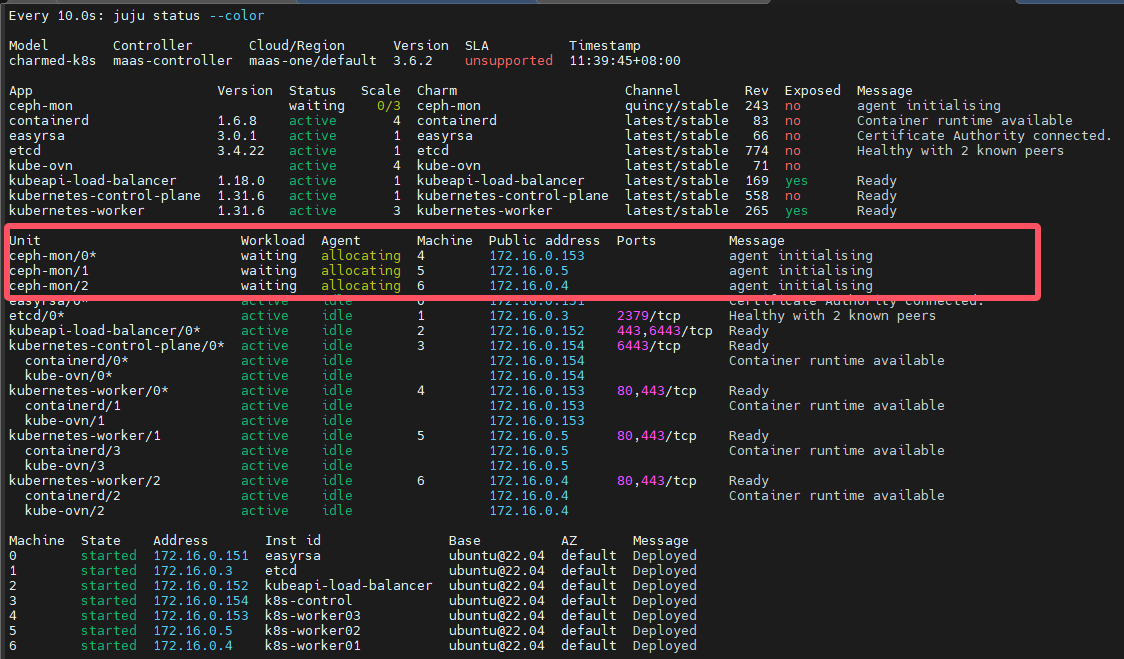
很快就会看到blocked,这是正常的,因为还没有部署osd,也还没有关联起来,继续执行下面的命令即可
创建一个yaml文件,用于定义osd存储设备
cat <<EOF > ceph-osd.yaml
ceph-osd:
  osd-devices:  maas:ceph-osd,300G
EOF
juju deploy -n 3 ceph-osd --config ceph-osd.yaml --to 4,5,6
blocked是正常的,因为还没有关联
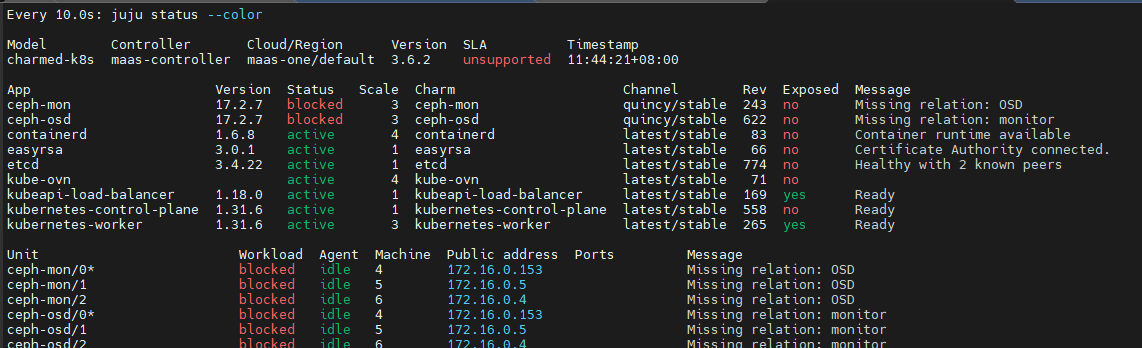
juju integrate ceph-osd ceph-mon
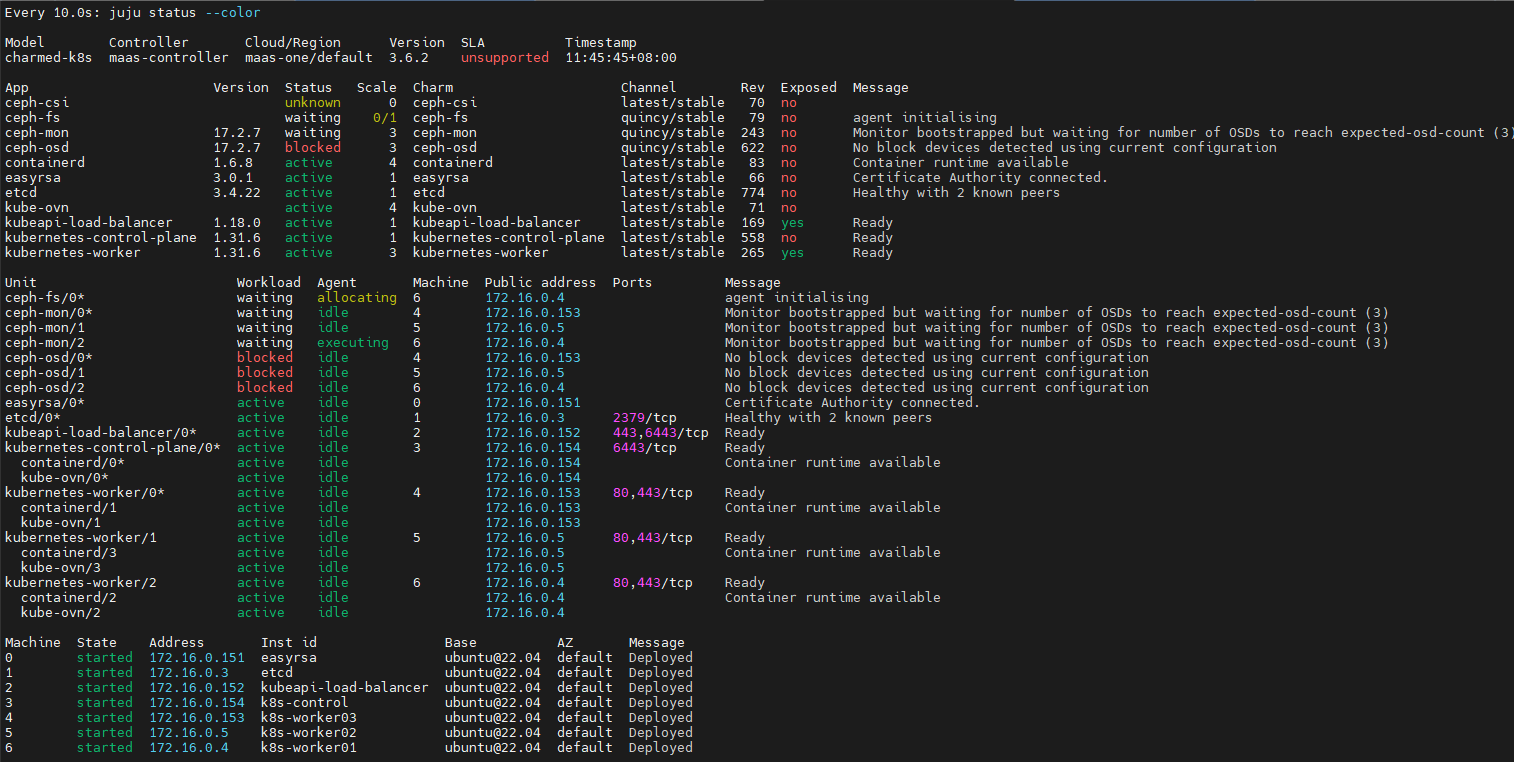
juju deploy ceph-csi
juju deploy ceph-fs --to 6
juju config ceph-csi cephfs-enable=True
一开始ceph-csi显示unknown是正常的,继续执行下面的命令,最终会显示active
juju integrate ceph-csi:kubernetes kubernetes-control-plane:juju-info
juju integrate ceph-csi:ceph-client ceph-mon:client
juju integrate ceph-fs:ceph-mds ceph-mon:mds
监控部署状态:
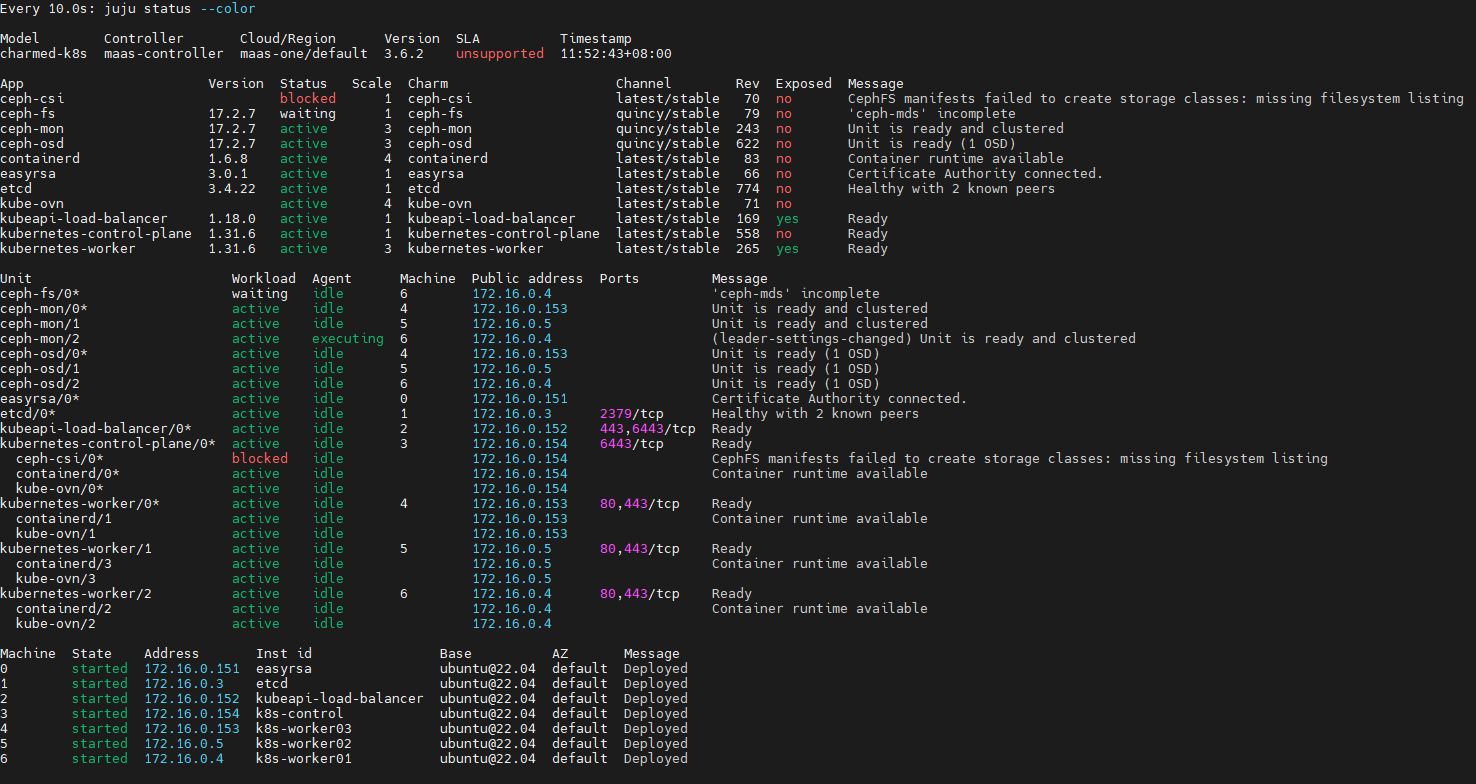
ceph部署完成
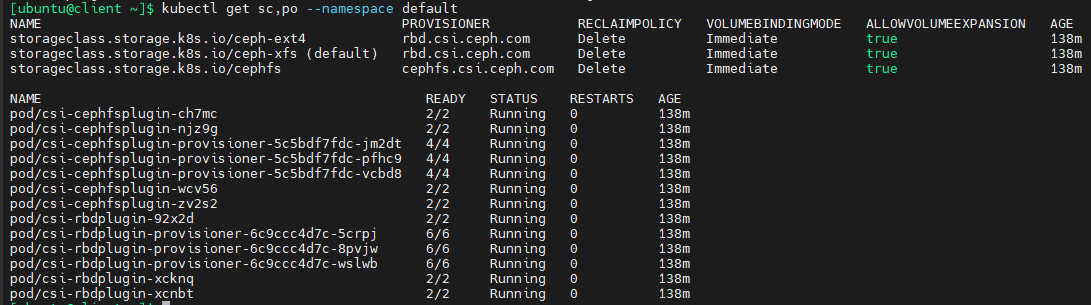
验证已部署的ceph
kubectl get sc,po --namespace default
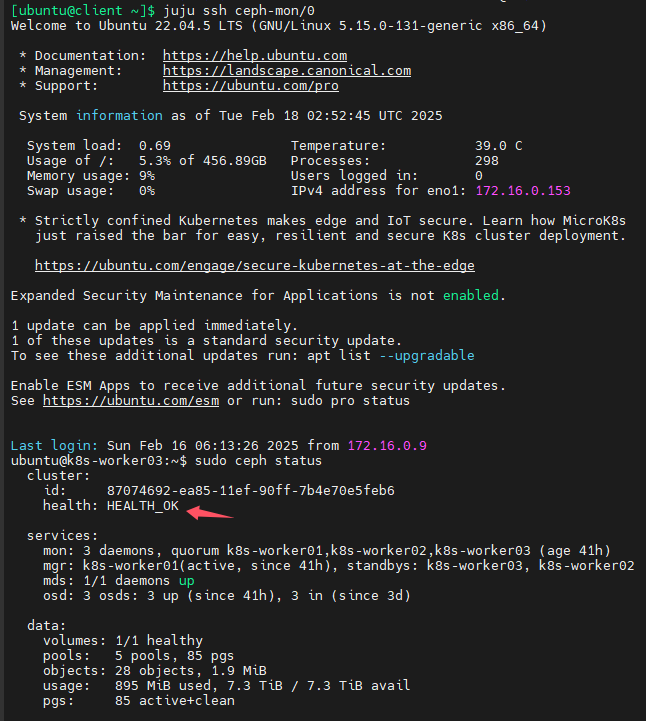
找到带有*号的mon,然后用juju ssh命令连接
juju ssh ceph-mon/0 -- sudo ceph status
部署ceph dashboard
#注意不要指定具体的machine,因为这是附属于ceph之上的,juju会自动决定部署在哪儿
juju deploy --channel quincy/stable ceph-dashboard
juju integrate ceph-dashboard:dashboard ceph-mon:dashboard
juju integrate ceph-dashboard:certificates vault:certificates
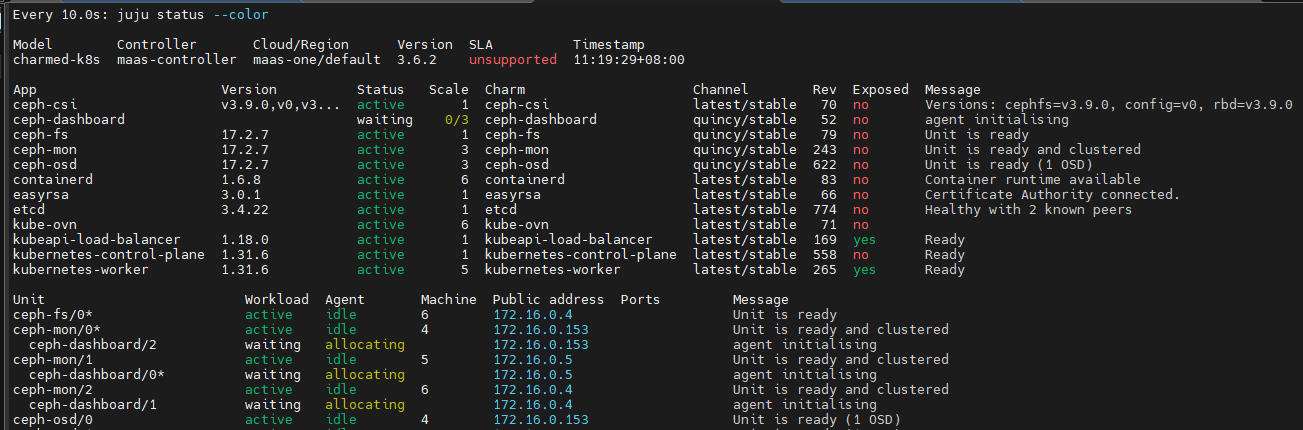
报错:可以看出先要部署vault才行
ERROR application “vault” not found (not found)

用juju部署vault
juju deploy vault
可以看到juju自动选择了一台闲置的machine,自动安装操作系统
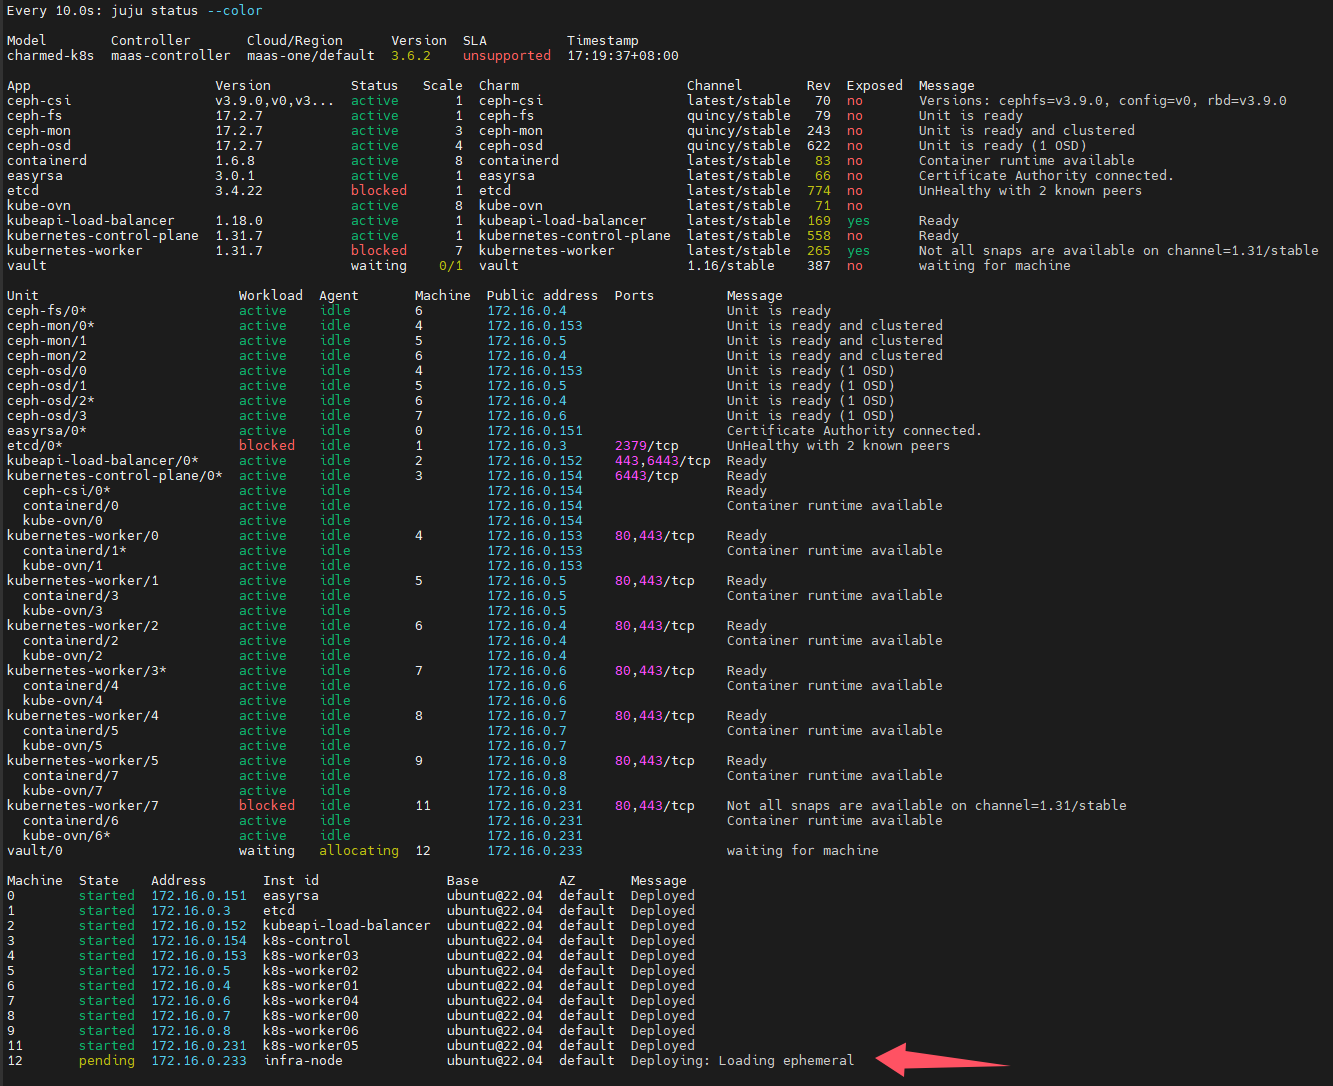
等machine部署完成后,会提示需要对vault进行初始化和解封,具体操作可以参考此文《hashicorp-vault》
完成vault初始化和解封后,还要对charm进行授权
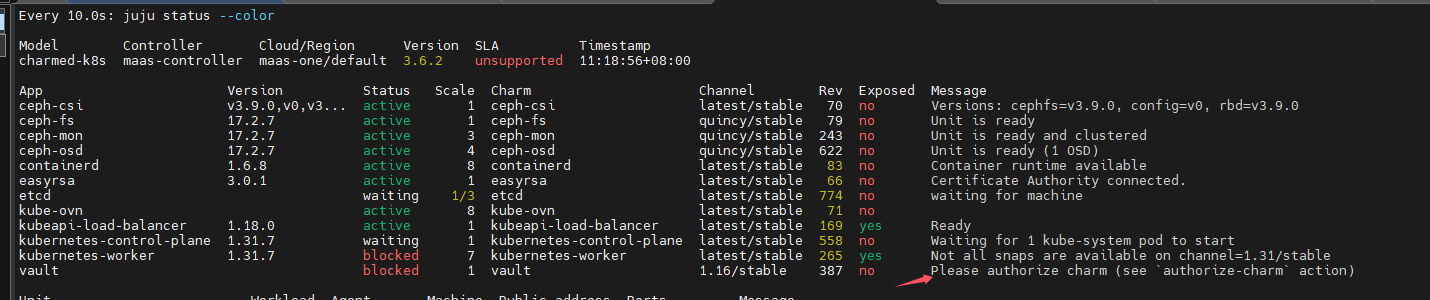
authorize charm
juju run vault/0 authorize-charm secret-id=cvl39ve675ec0r6jvocg
报错了:提示没有权限,仔细查看,日志,还能发现安装snap超时了,这很有可能是网络限制导致无法正常下载snap包
juju run vault/0 authorize-charm secret-id=cvl39ve675ec0r6jvocg
Running operation 1 with 1 task
  - task 2 on unit-vault-0

Waiting for task 2...
Action id 2 failed: exit status 1

Uncaught ModelError in charm code: ERROR permission denied

Use `juju debug-log` to see the full traceback.
ERROR the following task failed:
 - id "2" with return code 1

use 'juju show-task' to inspect the failure

[ubuntu@client ~]$ juju debug-log --include vault/0
unit-vault-0: 14:21:46 INFO juju.worker.uniter.operation ran "update-status" hook (via hook dispatching script: dispatch)
unit-vault-0: 14:27:14 ERROR unit.vault/0.juju-log Uncaught exception while in charm code:
Traceback (most recent call last):
  File "/var/lib/juju/agents/unit-vault-0/charm/./src/charm.py", line 1405, in <module>
    main(VaultOperatorCharm)
  File "/var/lib/juju/agents/unit-vault-0/charm/venv/ops/main.py", line 553, in main
    manager.run()
  File "/var/lib/juju/agents/unit-vault-0/charm/venv/ops/main.py", line 529, in run
    self._emit()
  File "/var/lib/juju/agents/unit-vault-0/charm/venv/ops/main.py", line 518, in _emit
    _emit_charm_event(self.charm, self.dispatcher.event_name, self._juju_context)
  File "/var/lib/juju/agents/unit-vault-0/charm/venv/ops/main.py", line 139, in _emit_charm_event
    event_to_emit.emit(*args, **kwargs)
  File "/var/lib/juju/agents/unit-vault-0/charm/venv/ops/framework.py", line 347, in emit
    framework._emit(event)
  File "/var/lib/juju/agents/unit-vault-0/charm/venv/ops/framework.py", line 853, in _emit
    self._reemit(event_path)
  File "/var/lib/juju/agents/unit-vault-0/charm/venv/ops/framework.py", line 943, in _reemit
    custom_handler(event)
  File "/var/lib/juju/agents/unit-vault-0/charm/./src/charm.py", line 575, in _configure
    self._install_vault_snap()
  File "/var/lib/juju/agents/unit-vault-0/charm/./src/charm.py", line 1173, in _install_vault_snap
    snap_cache = snap.SnapCache()
  File "/var/lib/juju/agents/unit-vault-0/charm/lib/charms/operator_libs_linux/v2/snap.py", line 838, in __init__
    self._load_installed_snaps()
  File "/var/lib/juju/agents/unit-vault-0/charm/lib/charms/operator_libs_linux/v2/snap.py", line 888, in _load_installed_snaps
    installed = self._snap_client.get_installed_snaps()
  File "/var/lib/juju/agents/unit-vault-0/charm/lib/charms/operator_libs_linux/v2/snap.py", line 811, in get_installed_snaps
    return self._request("GET", "snaps")
  File "/var/lib/juju/agents/unit-vault-0/charm/lib/charms/operator_libs_linux/v2/snap.py", line 772, in _request
    response = self._request_raw(method, path, query, headers, data)
  File "/var/lib/juju/agents/unit-vault-0/charm/lib/charms/operator_libs_linux/v2/snap.py", line 793, in _request_raw
    response = self.opener.open(request, timeout=self.timeout)
  File "/usr/lib/python3.10/urllib/request.py", line 519, in open
    response = self._open(req, data)
  File "/usr/lib/python3.10/urllib/request.py", line 536, in _open
    result = self._call_chain(self.handle_open, protocol, protocol +
  File "/usr/lib/python3.10/urllib/request.py", line 496, in _call_chain
    result = func(*args)
  File "/var/lib/juju/agents/unit-vault-0/charm/lib/charms/operator_libs_linux/v2/snap.py", line 709, in http_open
    return self.do_open(_UnixSocketConnection, req, socket_path=self.socket_path)
  File "/usr/lib/python3.10/urllib/request.py", line 1352, in do_open
    r = h.getresponse()
  File "/usr/lib/python3.10/http/client.py", line 1375, in getresponse
    response.begin()
  File "/usr/lib/python3.10/http/client.py", line 318, in begin
    version, status, reason = self._read_status()
  File "/usr/lib/python3.10/http/client.py", line 279, in _read_status
    line = str(self.fp.readline(_MAXLINE + 1), "iso-8859-1")
  File "/usr/lib/python3.10/socket.py", line 705, in readinto
    return self._sock.recv_into(b)
TimeoutError: timed out
unit-vault-0: 14:27:14 ERROR juju.worker.uniter.operation hook "update-status" (via hook dispatching script: dispatch) failed: exit status 1
unit-vault-0: 14:27:17 ERROR unit.vault/0.juju-log Uncaught exception while in charm code:
Traceback (most recent call last):
  File "/var/lib/juju/agents/unit-vault-0/charm/venv/ops/model.py", line 3213, in _run
    result = subprocess.run(args, **kwargs)  # type: ignore
  File "/usr/lib/python3.10/subprocess.py", line 526, in run
    raise CalledProcessError(retcode, process.args,
subprocess.CalledProcessError: Command '('/var/lib/juju/tools/unit-vault-0/secret-get', 'secret:cvl39ve675ec0r6jvocg', '--format=json')' returned non-zero exit status 1.

The above exception was the direct cause of the following exception:

Traceback (most recent call last):
  File "/var/lib/juju/agents/unit-vault-0/charm/./src/charm.py", line 1405, in <module>
    main(VaultOperatorCharm)
  File "/var/lib/juju/agents/unit-vault-0/charm/venv/ops/main.py", line 553, in main
    manager.run()
  File "/var/lib/juju/agents/unit-vault-0/charm/venv/ops/main.py", line 529, in run
    self._emit()
  File "/var/lib/juju/agents/unit-vault-0/charm/venv/ops/main.py", line 518, in _emit
    _emit_charm_event(self.charm, self.dispatcher.event_name, self._juju_context)
  File "/var/lib/juju/agents/unit-vault-0/charm/venv/ops/main.py", line 139, in _emit_charm_event
    event_to_emit.emit(*args, **kwargs)
  File "/var/lib/juju/agents/unit-vault-0/charm/venv/ops/framework.py", line 347, in emit
    framework._emit(event)
  File "/var/lib/juju/agents/unit-vault-0/charm/venv/ops/framework.py", line 853, in _emit
    self._reemit(event_path)
  File "/var/lib/juju/agents/unit-vault-0/charm/venv/ops/framework.py", line 943, in _reemit
    custom_handler(event)
  File "/var/lib/juju/agents/unit-vault-0/charm/./src/charm.py", line 438, in _on_authorize_charm_action
    token_secret = self.model.get_secret(id=secret_id)
  File "/var/lib/juju/agents/unit-vault-0/charm/venv/ops/model.py", line 299, in get_secret
    content = self._backend.secret_get(id=id, label=label)
  File "/var/lib/juju/agents/unit-vault-0/charm/venv/ops/model.py", line 3579, in secret_get
    result = self._run('secret-get', *args, return_output=True, use_json=True)
  File "/var/lib/juju/agents/unit-vault-0/charm/venv/ops/model.py", line 3215, in _run
    raise ModelError(e.stderr) from e
ops.model.ModelError: ERROR permission denied

unit-vault-0: 14:27:17 WARNING unit.vault/0.authorize-charm Uncaught ModelError in charm code: ERROR permission denied
unit-vault-0: 14:27:17 WARNING unit.vault/0.authorize-charm
unit-vault-0: 14:27:17 WARNING unit.vault/0.authorize-charm Use `juju debug-log` to see the full traceback.
unit-vault-0: 14:27:18 INFO juju.worker.uniter awaiting error resolution for "update-status" hook
unit-vault-0: 14:27:23 INFO juju.worker.uniter awaiting error resolution for "update-status" hook
unit-vault-0: 14:27:27 INFO juju.worker.uniter.operation ran "update-status" hook (via hook dispatching script: dispatch)
安装helm
sudo snap install helm --classic
用helm部署NVIDIA GPU operator
参考资料:Installing the NVIDIA GPU Operator — NVIDIA GPU Operator
部署
helm repo add nvidia https://helm.ngc.nvidia.com/nvidia \
    && helm repo update
helm install --wait --generate-name \
    -n gpu-operator --create-namespace \
    nvidia/gpu-operator \
    --version=v24.9.2
我发现即使用了代理,网速还是非常慢

troubleshooting
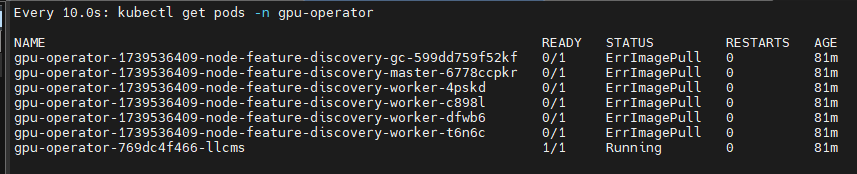
nvidia-driver pods反复提示CrashLoopBackOff
查看pods日志:
kubectl -n gpu-operator logs pods/nvidia-driver-daemonset-6dqh7 --previous
原因是无法解析archive.ubuntu.com
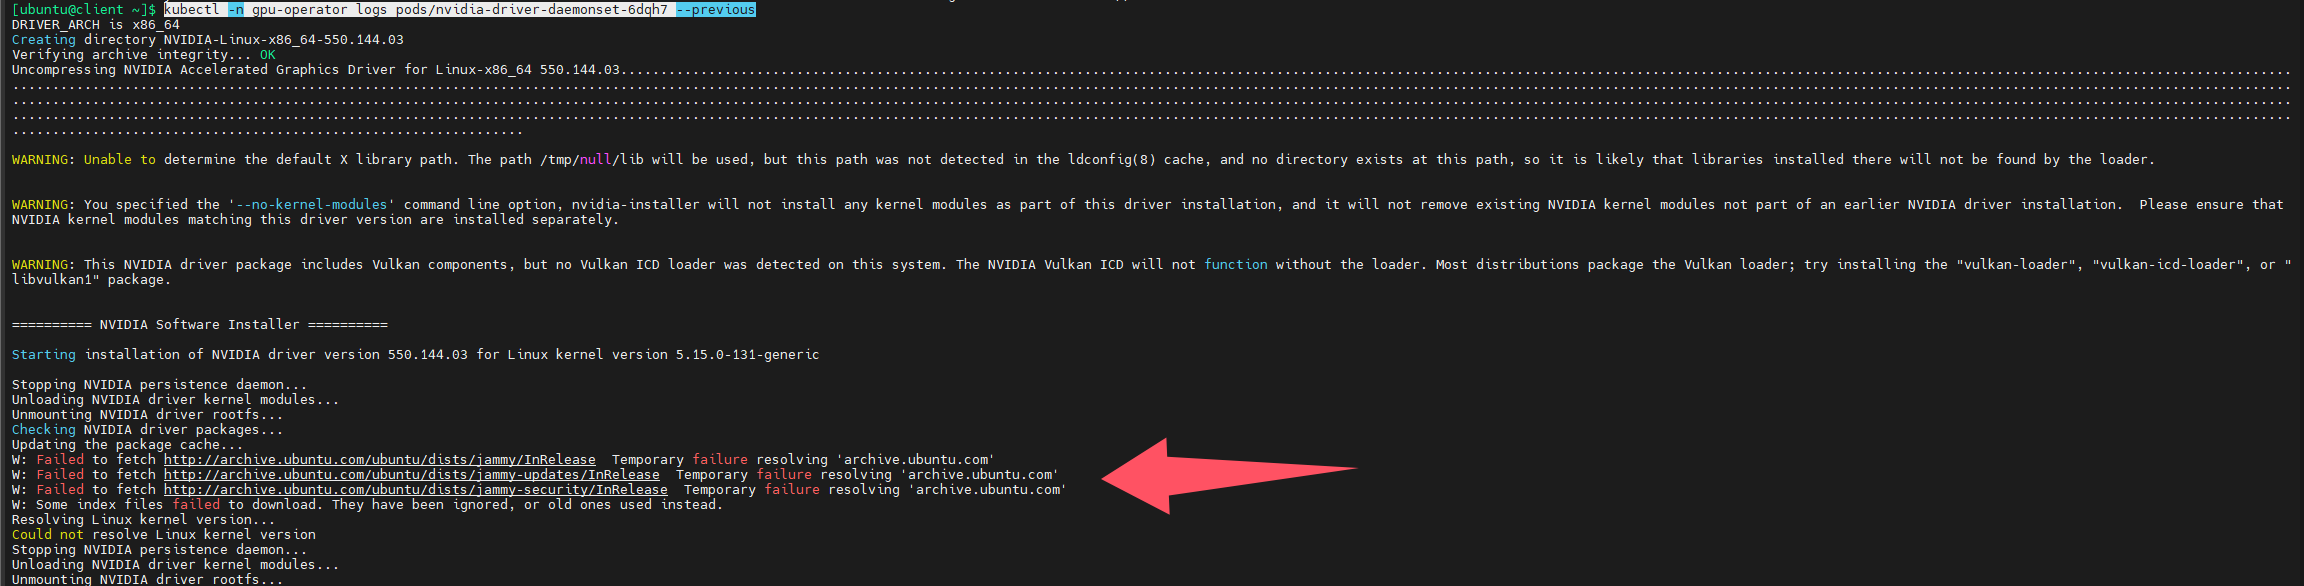
所以要从dns解析上入手,k8s是通过coredns进行域名解析的,而且默认是将自己无法解析的域名转发给所在节点配置的dns服务器,我查看了节点配置的dns,首选dns是172.16.0.2,这是maas服务器的ip地址,所以无法解析域名,解决方法就是修改dns,将192.168.124.7配置为首选dns,修改完成后,我重启了此节点(理论上可以不用重启,立即生效的)
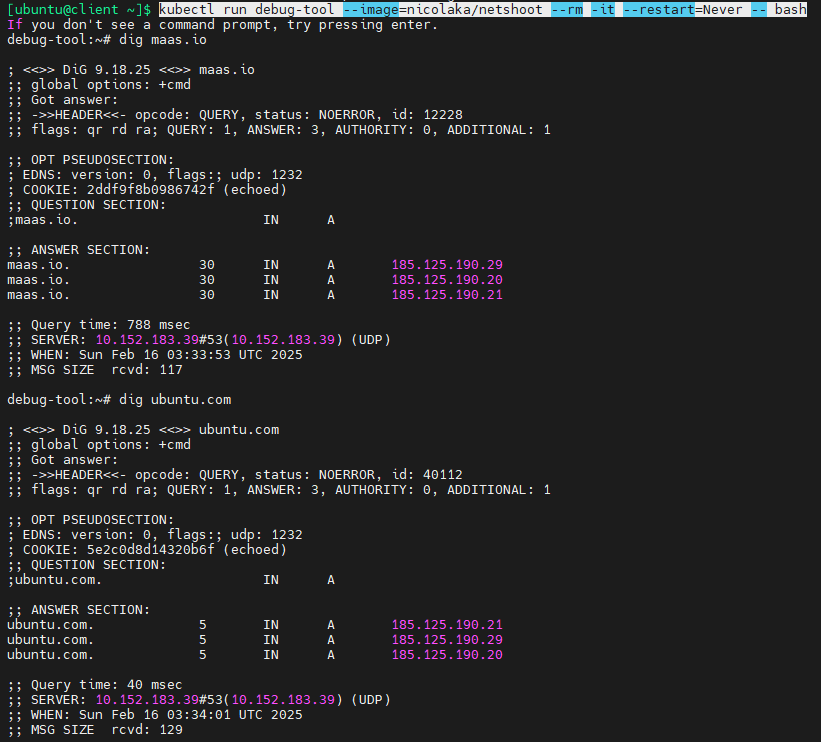
然后再次查看,发现nvidia-driver pod处于running状态了,我们还可以运行一个pod进行网络诊断:
#netshoot是专门用于在k8s进行网络诊断的pod,内置了很多常用网络诊断工具,如dig,nslookup,tcpdump等等
kubectl run debug-tool --image=nicolaka/netshoot --rm -it --restart=Never -- bash
dig ubuntu.com
可以看到可以解析外部域名
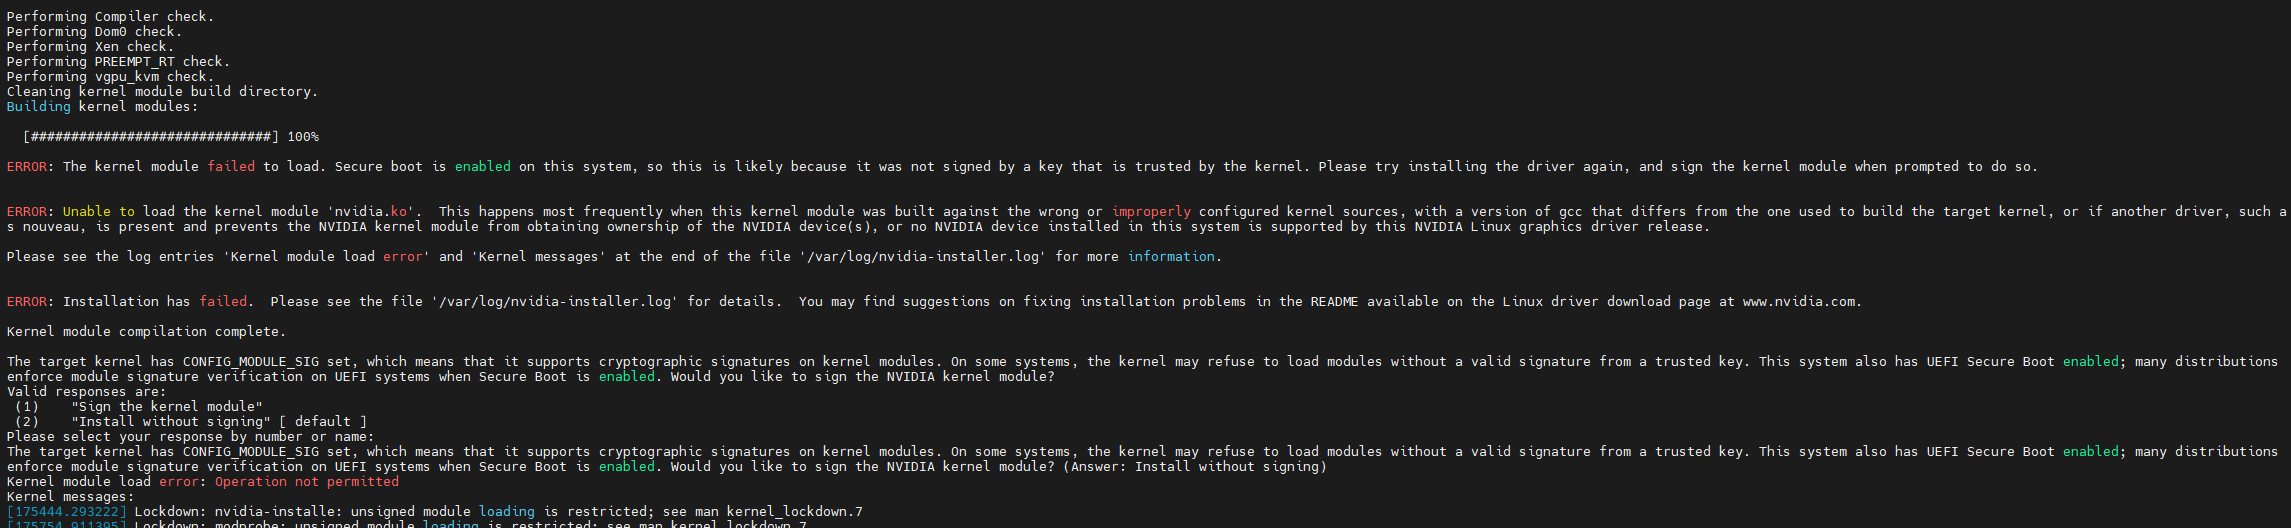
另外一种情况:secure boot
kubectl -n gpu-operator logs pods/nvidia-driver-daemonset-nwvj7 --previous
从日志可以看出是因为节点启用了secure boot,导致未签名的NVIDIA驱动无法安装,需要禁用secure boot,在我写作本文时,NVIDIA GPU operator还不支持secure boot,官方文档明确写明了Troubleshooting the NVIDIA GPU Operator — NVIDIA GPU Operator
DRIVER_ARCH is x86_64
Creating directory NVIDIA-Linux-x86_64-550.144.03
Verifying archive integrity... OK
Uncompressing NVIDIA Accelerated Graphics Driver for Linux-x86_64 550.144.03........................................................................................................................................................................................................................................................................................................................................................................................................................................................................................................................................................................................................................................................................................................................................................................................................................................................................................................................................................................................................................................................................................................................................................................

WARNING: Unable to determine the default X library path. The path /tmp/null/lib will be used, but this path was not detected in the ldconfig(8) cache, and no directory exists at this path, so it is likely that libraries installed there will not be found by the loader.


WARNING: You specified the '--no-kernel-modules' command line option, nvidia-installer will not install any kernel modules as part of this driver installation, and it will not remove existing NVIDIA kernel modules not part of an earlier NVIDIA driver installation.  Please ensure that NVIDIA kernel modules matching this driver version are installed separately.


WARNING: This NVIDIA driver package includes Vulkan components, but no Vulkan ICD loader was detected on this system. The NVIDIA Vulkan ICD will not function without the loader. Most distributions package the Vulkan loader; try installing the "vulkan-loader", "vulkan-icd-loader", or "libvulkan1" package.


========== NVIDIA Software Installer ==========

Starting installation of NVIDIA driver version 550.144.03 for Linux kernel version 5.15.0-131-generic

Stopping NVIDIA persistence daemon...
Unloading NVIDIA driver kernel modules...
Unmounting NVIDIA driver rootfs...
Checking NVIDIA driver packages...
Updating the package cache...
Resolving Linux kernel version...
Proceeding with Linux kernel version 5.15.0-131-generic
Installing Linux kernel headers...
Installing Linux kernel module files...
Generating Linux kernel version string...
Compiling NVIDIA driver kernel modules...
warning: the compiler differs from the one used to build the kernel
  The kernel was built by: gcc (Ubuntu 11.4.0-1ubuntu1~22.04) 11.4.0
  You are using:           gcc (Ubuntu 12.3.0-1ubuntu1~22.04) 12.3.0
/usr/src/nvidia-550.144.03/kernel/nvidia-drm/nvidia-drm-drv.c: In function 'nv_drm_register_drm_device':
/usr/src/nvidia-550.144.03/kernel/nvidia-drm/nvidia-drm-drv.c:1817:5: warning: ISO C90 forbids mixed declarations and code [-Wdeclaration-after-statement]
 1817 |     bool bus_is_pci =
      |     ^~~~
Skipping BTF generation for /usr/src/nvidia-550.144.03/kernel/nvidia-modeset.ko due to unavailability of vmlinux
Skipping BTF generation for /usr/src/nvidia-550.144.03/kernel/nvidia-peermem.ko due to unavailability of vmlinux
Skipping BTF generation for /usr/src/nvidia-550.144.03/kernel/nvidia-drm.ko due to unavailability of vmlinux
Skipping BTF generation for /usr/src/nvidia-550.144.03/kernel/nvidia-uvm.ko due to unavailability of vmlinux
Skipping BTF generation for /usr/src/nvidia-550.144.03/kernel/nvidia.ko due to unavailability of vmlinux
Relinking NVIDIA driver kernel modules...
Building NVIDIA driver package nvidia-modules-5.15.0-131...
Installing NVIDIA driver kernel modules...

WARNING: The nvidia-drm module will not be installed. As a result, DRM-KMS will not function with this installation of the NVIDIA driver.


ERROR: Unable to open 'kernel/dkms.conf' for copying (No such file or directory)


Welcome to the NVIDIA Software Installer for Unix/Linux

Detected 8 CPUs online; setting concurrency level to 8.
Unable to locate any tools for listing initramfs contents.
Unable to scan initramfs: no tool found
Installing NVIDIA driver version 550.144.03.
Performing CC sanity check with CC="/usr/bin/cc".
Performing CC check.
Kernel source path: '/lib/modules/5.15.0-131-generic/build'

Kernel output path: '/lib/modules/5.15.0-131-generic/build'

Performing Compiler check.
Performing Dom0 check.
Performing Xen check.
Performing PREEMPT_RT check.
Performing vgpu_kvm check.
Cleaning kernel module build directory.
Building kernel modules:

  [##############################] 100%

ERROR: The kernel module failed to load. Secure boot is enabled on this system, so this is likely because it was not signed by a key that is trusted by the kernel. Please try installing the driver again, and sign the kernel module when prompted to do so.


ERROR: Unable to load the kernel module 'nvidia.ko'.  This happens most frequently when this kernel module was built against the wrong or improperly configured kernel sources, with a version of gcc that differs from the one used to build the target kernel, or if another driver, such as nouveau, is present and prevents the NVIDIA kernel module from obtaining ownership of the NVIDIA device(s), or no NVIDIA device installed in this system is supported by this NVIDIA Linux graphics driver release.

Please see the log entries 'Kernel module load error' and 'Kernel messages' at the end of the file '/var/log/nvidia-installer.log' for more information.


ERROR: Installation has failed.  Please see the file '/var/log/nvidia-installer.log' for details.  You may find suggestions on fixing installation problems in the README available on the Linux driver download page at www.nvidia.com.

Kernel module compilation complete.

The target kernel has CONFIG_MODULE_SIG set, which means that it supports cryptographic signatures on kernel modules. On some systems, the kernel may refuse to load modules without a valid signature from a trusted key. This system also has UEFI Secure Boot enabled; many distributions enforce module signature verification on UEFI systems when Secure Boot is enabled. Would you like to sign the NVIDIA kernel module?
Valid responses are:
 (1)    "Sign the kernel module"
 (2)    "Install without signing" [ default ]
Please select your response by number or name:
The target kernel has CONFIG_MODULE_SIG set, which means that it supports cryptographic signatures on kernel modules. On some systems, the kernel may refuse to load modules without a valid signature from a trusted key. This system also has UEFI Secure Boot enabled; many distributions enforce module signature verification on UEFI systems when Secure Boot is enabled. Would you like to sign the NVIDIA kernel module? (Answer: Install without signing)
Kernel module load error: Operation not permitted
Kernel messages:
[175444.293222] Lockdown: nvidia-installe: unsigned module loading is restricted; see man kernel_lockdown.7
[175754.911395] Lockdown: modprobe: unsigned module loading is restricted; see man kernel_lockdown.7
[175816.021475] Lockdown: modprobe: unsigned module loading is restricted; see man kernel_lockdown.7
[175816.772945] Lockdown: modprobe: unsigned module loading is restricted; see man kernel_lockdown.7
[175826.253934] Lockdown: modprobe: unsigned module loading is restricted; see man kernel_lockdown.7
[175827.512775] Lockdown: modprobe: unsigned module loading is restricted; see man kernel_lockdown.7
[175836.436402] Lockdown: modprobe: unsigned module loading is restricted; see man kernel_lockdown.7
[175837.699633] Lockdown: modprobe: unsigned module loading is restricted; see man kernel_lockdown.7
[175846.558090] Lockdown: modprobe: unsigned module loading is restricted; see man kernel_lockdown.7
[175847.797583] Lockdown: modprobe: unsigned module loading is restricted; see man kernel_lockdown.7
[175856.503291] Lockdown: modprobe: unsigned module loading is restricted; see man kernel_lockdown.7
[175857.772986] Lockdown: modprobe: unsigned module loading is restricted; see man kernel_lockdown.7
[175865.838000] Lockdown: modprobe: unsigned module loading is restricted; see man kernel_lockdown.7
[175866.536829] Lockdown: modprobe: unsigned module loading is restricted; see man kernel_lockdown.7
[175875.865878] Lockdown: modprobe: unsigned module loading is restricted; see man kernel_lockdown.7
[175876.550465] Lockdown: modprobe: unsigned module loading is restricted; see man kernel_lockdown.7
[175886.068335] Lockdown: modprobe: unsigned module loading is restricted; see man kernel_lockdown.7
[175887.193894] Lockdown: modprobe: unsigned module loading is restricted; see man kernel_lockdown.7
[175896.422361] Lockdown: modprobe: unsigned module loading is restricted; see man kernel_lockdown.7
[175897.575308] Lockdown: modprobe: unsigned module loading is restricted; see man kernel_lockdown.7
[175906.200031] Lockdown: modprobe: unsigned module loading is restricted; see man kernel_lockdown.7
[175907.407931] Lockdown: modprobe: unsigned module loading is restricted; see man kernel_lockdown.7
[175916.384652] Lockdown: modprobe: unsigned module loading is restricted; see man kernel_lockdown.7
[175917.574073] Lockdown: modprobe: unsigned module loading is restricted; see man kernel_lockdown.7
[175920.521158] Lockdown: nvidia-installe: unsigned module loading is restricted; see man kernel_lockdown.7
Stopping NVIDIA persistence daemon...
Unloading NVIDIA driver kernel modules...
Unmounting NVIDIA driver rootfs...
我禁用secure boot后问题解决,pod正常运行
nvidia-driver-daemonset pod反复重启,状态信息是CrashLoopBackOff
如下图所示,有两个k8s节点反复重启
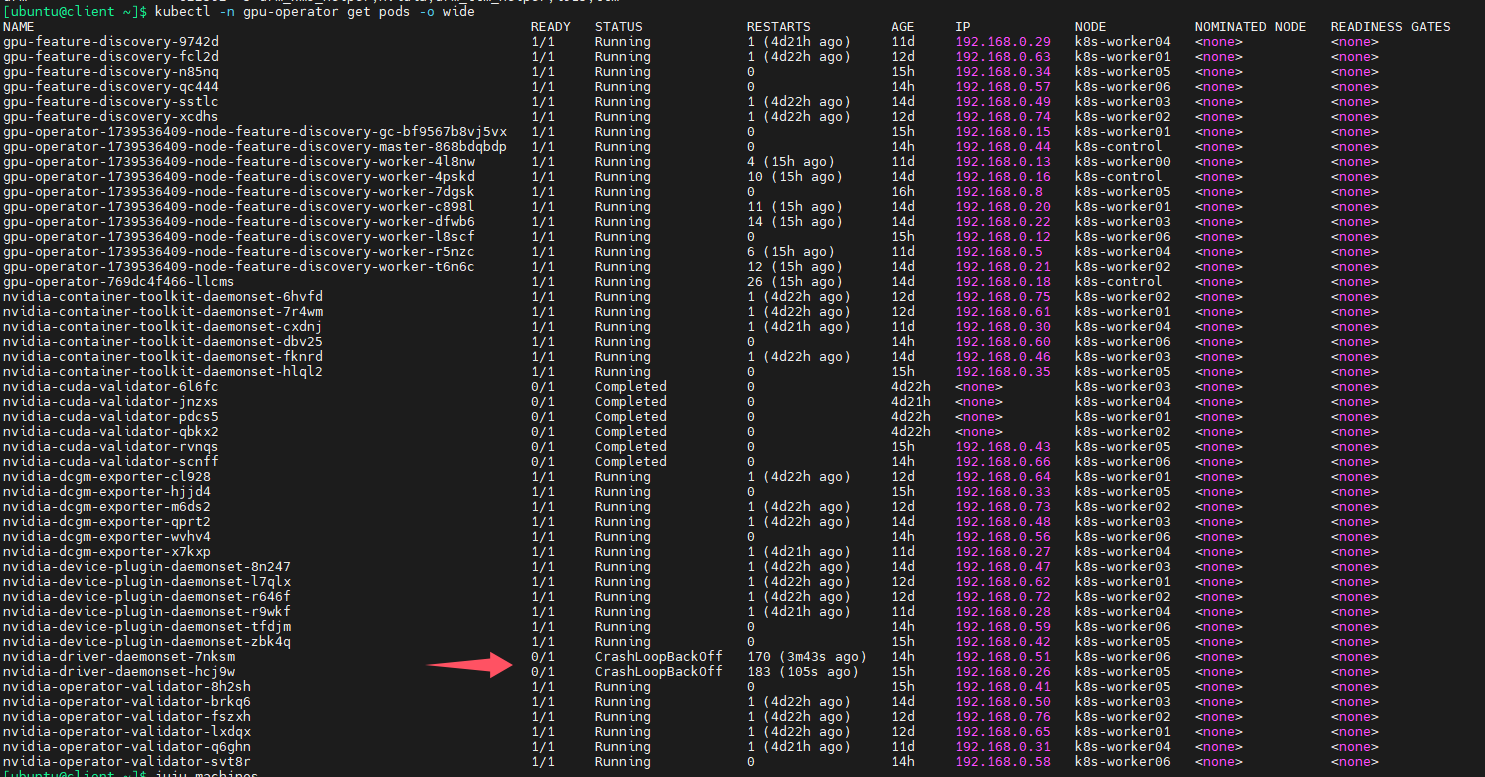
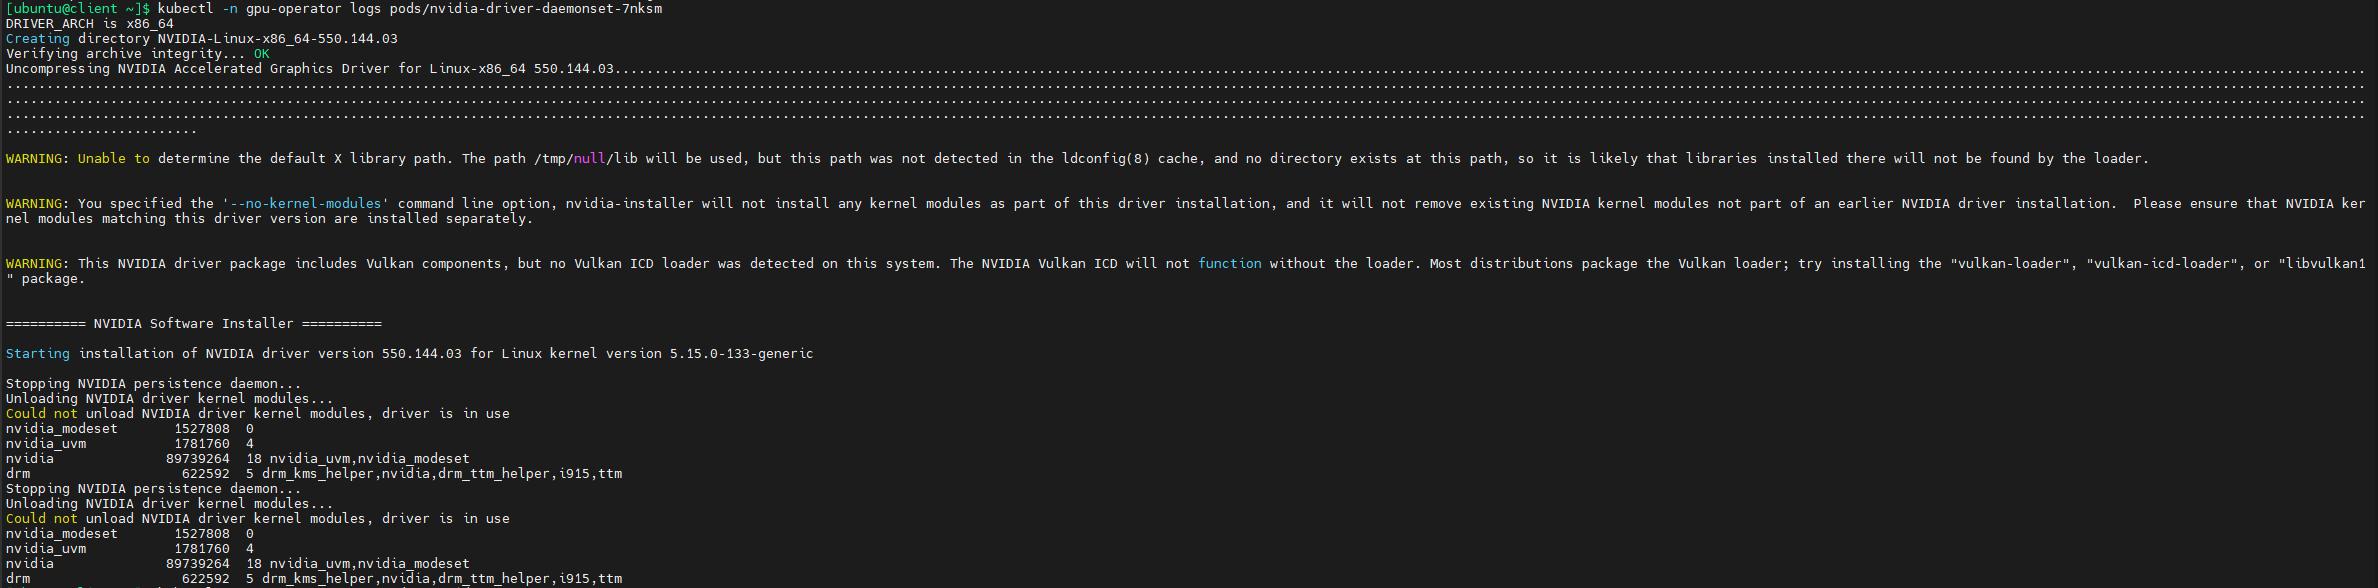
查询pod日志,发现警告信息,如下图,提示无法卸载NVIDIA driver kernel modules,driver is in use
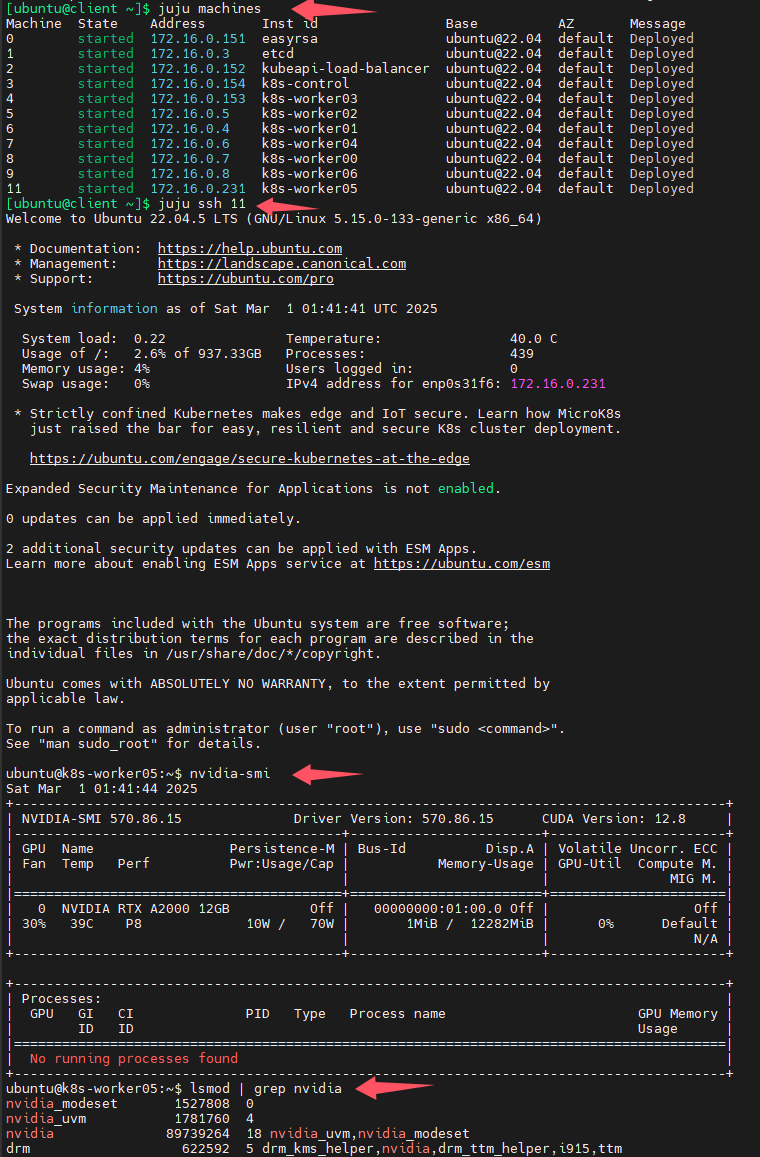
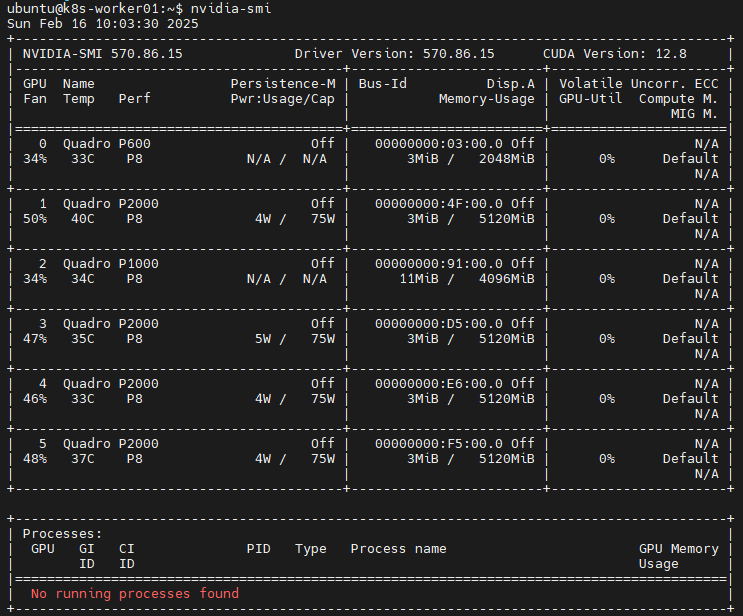
然后我ssh连接到有问题的k8s节点,输入nvidia-smi命令查询此节点是否已经正常安装了NVIDIA驱动,从下图可以看出k8s节点已经正常安装了NVIDIA驱动,于是我重启了有问题的k8s节点,问题解决。
验证
参考资料:Installing the NVIDIA GPU Operator — NVIDIA GPU Operator
创建一个yaml文件
cat <<EOF > cuda-vectoradd.yaml
apiVersion: v1
kind: Pod
metadata:
  name: cuda-vectoradd
spec:
  restartPolicy: OnFailure
  containers:
  - name: cuda-vectoradd
    image: "nvcr.io/nvidia/k8s/cuda-sample:vectoradd-cuda11.7.1-ubuntu20.04"
    resources:
      limits:
        nvidia.com/gpu: 1
EOF
运行pod
kubectl apply -f cuda-vectoradd.yaml
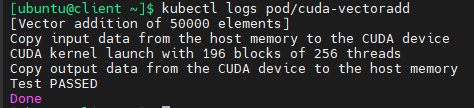
查看pod日志
kubectl logs pod/cuda-vectoradd
检查安装的驱动程序版本
将COS与charmed kubernetes集成
参考资料:How to integrate with COS Lite
COS(Canonical Observability Stack)可提供日志、监控和告警服务,其利用的是开源的Prometheus、grafana和ELK
添加一个新的model
juju add-model --config logging-config='<root>=DEBUG' cos-cluster
用juju部署k8s
参考资料:Charmhub | Deploy Kubernetes using Charmhub - The Open Operator Collection
juju deploy k8s --constraints="tags=charmed-k8s-node" --base=ubuntu@24.04 --config load-balancer-enabled=true containerd-custom-registries='[{"host": "docker.io", "url": "https://registry.dockermirror.com"}]'
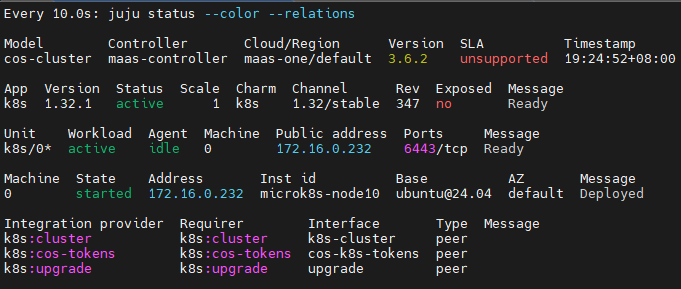
查看部署状态
watch -n 10 -c juju status --color --relations
如果部署k8s时,忘记设置config,部署后还可以再更改,如:
juju config k8s load-balancer-enabled=true containerd-custom-registries='[{"host": "docker.io", "url": "https://registry.dockermirror.com"}]'
等到上图中的k8s app处于ready状态后,再执行下面的命令
sudo apt install yq -y #安装yg
juju run k8s/leader get-kubeconfig | yq eval '.kubeconfig' > k8s-kubeconfig #注意这条命令可能会报错,如果报错可以先
#输入juju run k8s/leader get-kubeconfig 此命令会输出一个yaml文件内容,然后用nano命令手动创建k8s-kubeconfig文件
k8s-kubeconfig文件内容如下所示,这其实是一个yaml格式的文件,所以缩进千万不能错误,否则之后的命令会报错,提示ERROR failed to open kubernetes client: unable to determine legacy status for namespace "cos-lite": Unauthorized
apiVersion: v1
clusters:
- cluster:
    certificate-authority-data: LS0tLS1CRUdJTiBDRVJUSUZJQ0FURS0tLS0tCk1JSURIRENDQWdTZ0F3SUJBZ0lSQUlJdTFBWmVsbkdNN1RUYkh1dW1yNnN3RFFZSktvWklodmNOQVFFTEJRQXcKR0RFV01CUUdBMVVFQXhNTmEzVmlaWEp1WlhSbGN5MWpZVEFlRncweU5UQXpNREV4TURVd01ERmFGdzAwTlRBegpNREV4TURVd01ERmFNQmd4RmpBVUJnTlZCQU1URFd0MVltVnlibVYwWlhNdFkyRXdnZ0VpTUEwR0NTcUdTSWIzCkRRRUJBUVVBQTRJQkR3QXdnZ0VLQW9JQkFRQ3lRRlFWaTljUUFTNWJyS3pQYWxCOE5FUHBOVVliRlJ6MkYvTVQKRWJiOU1VNDI2L3VDUXVuZWYwQUNLQUdTZm9vcFJ0eEdSRFNYcFFxeHBYMzB3TkFmdTR1MTVMSWpURlJxNzhCTApRU1BiSktRMzdOZWVCU2xpQm5zVUl1cE5SMlpLQVhZNmh3MFVCdmNEdG9aNkR3YjU2NnFTUFk4akNNUzhUclpRClp1aElSN2g4U3lZMm56Ulc1amFzTTJTM0dsc0ZSbWNnMmFnbHFHRWZ6QjhVWityRTlJbW5YbDBBYllGejU1aU4KVHhpSFpQM2U0a29xSUdNSDFZZUdVemM5RUhPaVBmRFJnTFN0NG53aENzV2RwTnpiNnRaNzdYZVpBbFl1ZXBTSQovU3YvS3RSN2xuWlFucXZ6c0ZXRWRldW5Zdm95MFE4bW1LNlkwWk05ME90OFNKV1BBZ01CQUFHallUQmZNQTRHCkExVWREd0VCL3dRRUF3SUNoREFkQmdOVkhTVUVGakFVQmdnckJnRUZCUWNEQWdZSUt3WUJCUVVIQXdFd0R3WUQKVlIwVEFRSC9CQVV3QXdFQi96QWRCZ05WSFE0RUZnUVVRTjF0dk9LNVpyRXlsMkl4Q0VrMHRBaUI5YjR3RFFZSgpLb1pJaHZjTkFRRUxCUUFEZ2dFQkFEc0d4MG45ZzRPOUd6K3VzWHhoNk5FL2M2aCt4Y1JsV05KakU0UlpDcFBhCndmMUJMNWxnZTJENStOSHdMampEUU5IcDQ0aTBFUHdUOTk4Vko2REh2eHBzYnBMdkhTbDZrbDNNd3N4ajNZUFcKaHV6UDArVW1qMkdYL2J2M0IvTmROUlFNbU5ycEo4SXEvTEs1dFlnUkZrdjgrZDNmQkRSVkhUK3NvZEJhMSt4QwpkeW1mZGM5bFE5K1BPb2xaZzZHRWRMYldkYzlvNEEvaGx4aGtKNXdVL2FXSVNFTndQbDU0NURkSlVDZkEvbGVECnBIYU
最低0.47元/天 解锁文章


 509
509

 被折叠的 条评论
为什么被折叠?
被折叠的 条评论
为什么被折叠?
 到【灌水乐园】发言


