


V1.0
1.需要准备两台服务器并关闭防火墙
1️⃣.10.0.0.3 Master   #当做主数据库
2️⃣.10.0.0.8 Slave    #当做从数据库
[root@localhost ~]# systemctl stop firewalld.service
2.安装 MariaDB
[root@localhost ~]# yum install mariadb mariadb-devel mariadb-server -y
3.配置两台 MariaDB 数据库服务器配置文件/etc/my.cnf
1️⃣.10.0.0.3 Master 主数据库
[mysqld]
server-id = 1
log-bin = mysql-bin
datadir=/var/lib/mysql
socket=/var/lib/mysql/mysql.sock
# Disabling symbolic-links is recommended to prevent assorted security risks
symbolic-links=0
# Settings user and group are ignored when systemd is used.
# If you need to run mysqld under a different user or group,
# customize your systemd unit file for mariadb according to the
# instructions in http://fedoraproject.org/wiki/Systemd

[mysqld_safe]
log-error=/var/log/mariadb/mariadb.log
pid-file=/var/run/mariadb/mariadb.pid

#
# include all files from the config directory
#
!includedir /etc/my.cnf.d

~
~
~
~
~
~
~
-- 插入 --                                                      3,20         全部
2️⃣.10.0.0.8 Slave  从数据库
[mysqld]
server-id = 2
log-bin = mysql-bin
datadir=/var/lib/mysql
socket=/var/lib/mysql/mysql.sock
# Disabling symbolic-links is recommended to prevent assorted security risks
symbolic-links=0
# Settings user and group are ignored when systemd is used.
# If you need to run mysqld under a different user or group,
# customize your systemd unit file for mariadb according to the
# instructions in http://fedoraproject.org/wiki/Systemd

[mysqld_safe]
log-error=/var/log/mariadb/mariadb.log
pid-file=/var/run/mariadb/mariadb.pid

#
# include all files from the config directory
#
!includedir /etc/my.cnf.d

~
~
~
~
~
~
~
-- 插入 --                                                      3,20         全部
4.重启 MariaDB
[root@www ~]# systemctl restart mariadb
5.在创建主从集群时数据库需要保持无数据写入的状态
MariaDB [(none)]> flush tables with read lock; #可以使用此命令锁定主数据库
6.配置主数据库
①.创建主数据库连接账户
MariaDB [(none)]> grant replication slave on *.* to 'tongbu'@'10.0.0.8' identified by '123456';
Query OK, 0 rows affected (0.00 sec)   #代表创建成功
②.查看 bin-log 文件
MariaDB [(none)]> show master status;
+------------------+----------+--------------+------------------+
| File             | Position | Binlog_Do_DB | Binlog_Ignore_DB |
+------------------+----------+--------------+------------------+
| mysql-bin.000001 |      396 |              |                  |
+------------------+----------+--------------+------------------+
1 row in set (0.00 sec)
7.配置从数据库
①连接主数据库
MariaDB [(none)]> change master to master_host='10.0.0.3',master_user='tongbu',master_password='123456',master_log_file='mysql-bin.000001',master_log_pos=396;
Query OK, 0 rows affected (0.27 sec)
②开始启动同步
MariaDB [(none)]> slave start;
Query OK, 0 rows affected (0.00 sec)
8.在从数据库查看主从集群是否创建完成
MariaDB [(none)]> show slave status \G
*************************** 1. row ***************************
               Slave_IO_State: Waiting for master to send event
                  Master_Host: 10.0.0.3
                  Master_User: tongbu
                  Master_Port: 3306
                Connect_Retry: 60
              Master_Log_File: mysql-bin.000001
          Read_Master_Log_Pos: 396
               Relay_Log_File: mariadb-relay-bin.000002
                Relay_Log_Pos: 529
        Relay_Master_Log_File: mysql-bin.000001
             Slave_IO_Running: Yes
            Slave_SQL_Running: Yes
              Replicate_Do_DB:
          Replicate_Ignore_DB:
           Replicate_Do_Table:
       Replicate_Ignore_Table:
      Replicate_Wild_Do_Table:
  Replicate_Wild_Ignore_Table:
                   Last_Errno: 0
                   Last_Error:
                 Skip_Counter: 0
          Exec_Master_Log_Pos: 396
              Relay_Log_Space: 825
              Until_Condition: None
               Until_Log_File:
                Until_Log_Pos: 0
           Master_SSL_Allowed: No
           Master_SSL_CA_File:
           Master_SSL_CA_Path:
              Master_SSL_Cert:
            Master_SSL_Cipher:
               Master_SSL_Key:
        Seconds_Behind_Master: 0
Master_SSL_Verify_Server_Cert: No
                Last_IO_Errno: 0
                Last_IO_Error:
               Last_SQL_Errno: 0
               Last_SQL_Error:
  Replicate_Ignore_Server_Ids:
             Master_Server_Id: 1
1 row in set (0.00 sec)
当前如果 Slave_IO_Running 进程和 Slave_SQL_Running 进程都是yes,就代表主从同步就建立成功了。
9.测试在主库上面创建数据库和表,主库和从库之间会不会形成主从同步关系
①在主数据库创建数据库
MariaDB [(none)]> create database TIAOCHUN;   #创建名为TIAOCHUN的数据库
Query OK, 1 row affected (0.00 sec)

MariaDB [(none)]> show databases;
+--------------------+
| Database           |
+--------------------+
| information_schema |
| TIAOCHUN           |
| mysql              |
| performance_schema |
| test               |
+--------------------+
5 rows in set (0.00 sec)
②在从数据库查看是否同步名为TIAOCHUN的数据库
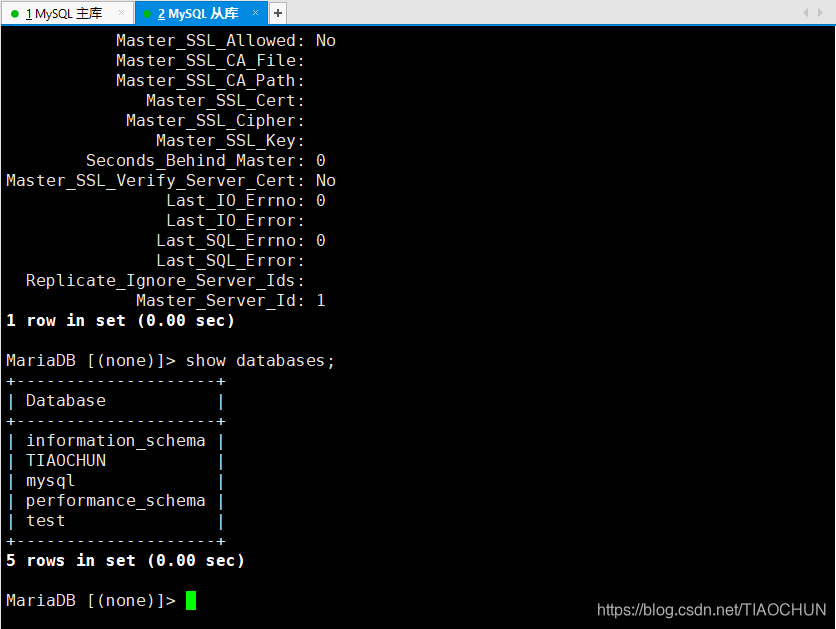
可以从上图看到从数据库可以正常同步主数据库的数据
10.到此一个简单的主从集群就创建完成了


 423
423

 被折叠的 条评论
为什么被折叠?
被折叠的 条评论
为什么被折叠?
 到【灌水乐园】发言


