


How to: Customize Vertical Appointment Template (ASP.NET Core Blazor)(如何:自定义垂直显示预约模板(ASP.NET Core Blazor))
This article explains how to implement a custom VerticalAppointmentTemplate in your ASP.NET Core Blazor application.
本文介绍如何在ASP.NET Core Blazor应用程序中实现自定义的VerticalAppointmentTemplate。
Note
For the purposes of this article, you can use the MainDemo application installed as a part of the XAF package. The default location of the application is %PUBLIC%\Documents\DevExpress Demos 24.1\Components\XAF.
在本文中,您可以使用作为XAF包一部分安装的MainDemo应用程序。该应用程序的默认位置是%PUBLIC%\Documents\DevExpress Demos 24.1\Components\XAF。
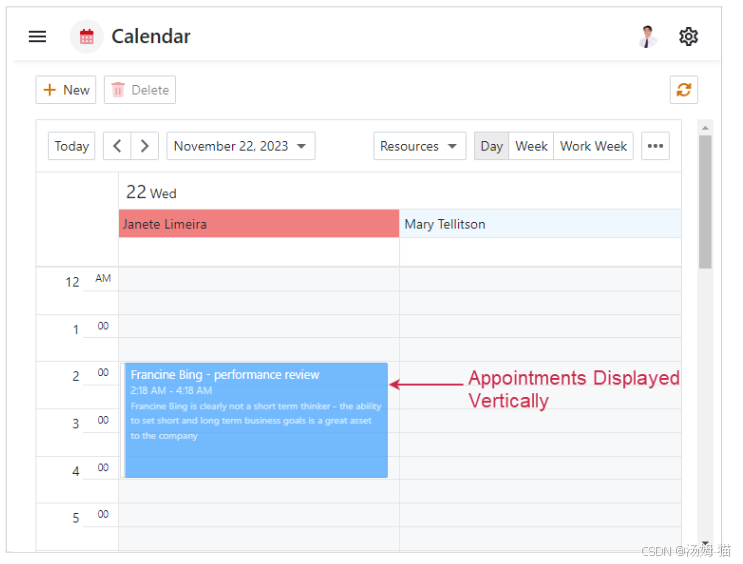
The default VerticalAppointmentTemplate has the following look:
默认的VerticalAppointmentTemplate外观如下:
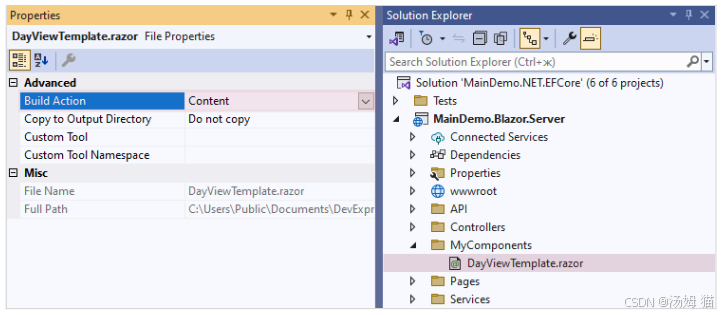
1.In the Solution Explorer, navigate to the MainDemo.Blazor.Server project, create a new folder, and name it MyComponents.
在解决方案资源管理器中,导航到MainDemo.Blazor.Server项目,创建一个新文件夹,并将其命名为MyComponents。
2.In the MyComponents folder, create a new Razor component and name it DayViewTemplate.razor. Replace the auto-generated content with the following code:
在MyComponents文件夹中,创建一个新的Razor组件并命名为DayViewTemplate.razor。将自动生成的内容替换为以下代码:
*razor
@using DevExpress.Blazor
@namespace MyComponents
<div class="card shadow-sm bg-white p-2" style="overflow: hidden; height: 100%;box-shadow: .125rem .25rem rgba(34,34,34,0.15)">
    <span class="text-dark ps-0 mb-1" style="font-weight:600; font-size: .925em;">@Context.Appointment.Subject</span>
</div>


@code {
    [Parameter]
    public DxSchedulerAppointmentView Context { get; set; } = default!;
    public static RenderFragment Create(DxSchedulerAppointmentView appointmentView) =>
        @<DayViewTemplate Context=@appointmentView />;
}
3.Navigate to the properties of the DayViewTemplate.razor file and set the Build Action property to Content.
导航到DayViewTemplate.razor文件的属性,将“生成操作”(Build Action)属性设置为“内容”(Content)。
4.In the MainDemo.Blazor.Server\Controllers folder, create a View Controller and name it SchedulerTemplateCustomizationController.cs. Replace the auto-generated content with the following code:
在MainDemo.Blazor.Server\Controllers文件夹中,创建一个视图控制器并命名为SchedulerTemplateCustomizationController.cs。将自动生成的内容替换为以下代码:
C#
using DevExpress.ExpressApp;
using DevExpress.ExpressApp.Scheduler.Blazor.Controllers;
using DevExpress.ExpressApp.Scheduler.Blazor.Editors;
using DevExpress.Persistent.Base.General;
using Microsoft.AspNetCore.Components;
using MyComponents;


namespace MainDemo.Blazor.Server.Controllers {
    public class SchedulerTemplateCustomizationController : ObjectViewController<ListView, IEvent> {
        protected override void OnActivated() {
            base.OnActivated();
            //  Deactivate SchedulerAppointmentTemplatesController because it assigns the VerticalAppointmentTemplate property and can override your customization.
            Frame.GetController<SchedulerAppointmentTemplatesController>().Active["ByDesign"] = false;
        }
        protected override void OnViewControlsCreated() {
            base.OnViewControlsCreated();
            if(View.Editor is SchedulerListEditor schedulerListEditor) {
                schedulerListEditor.DayViewModel.VerticalAppointmentTemplate = appointmentView => DayViewTemplate.Create(appointmentView);
            }
        }
        protected override void OnDeactivated() {
            Frame.GetController<SchedulerAppointmentTemplatesController>().Active.RemoveItem("ByDesign");
            base.OnDeactivated();
        }
    }
}
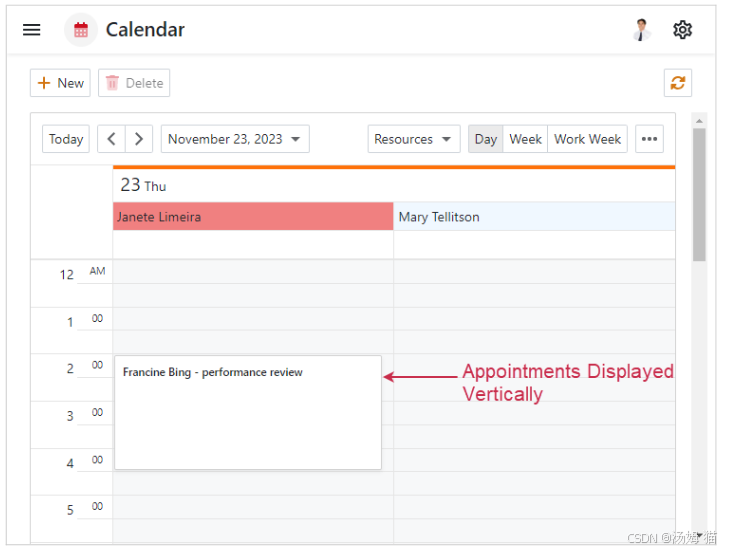
5.Build the project and run the application. Navigate to the Calendar List View. The customized VerticalAppointmentTemplate should look like this:
生成项目并运行应用程序。导航到日历列表视图。自定义的VerticalAppointmentTemplate外观应如下所示:
Tip
- This example demonstrates the customized Day View, but the same technique is applicable to other View types as well.
本示例演示了自定义的日视图,但相同的方法也适用于其他视图类型。- You can use this technique to customize HorizontalAppointmentTemplate.
您可以使用此方法自定义HorizontalAppointmentTemplate。


 被折叠的 条评论
为什么被折叠?
被折叠的 条评论
为什么被折叠?
 到【灌水乐园】发言


