


线程安全问题的主要诱因:
- 存在共享数据(也称临界资源)
- 存在多条线程共同操作这些共享数据
解决问题的根本方法:
同一时刻有且只有一个线程在操作共享数据,其他线程必须等到该线程处理完数据后,再对共享数据进行操作。
互斥锁的特性:
- 互斥性:即在同一时间只允许一个线程持有某个对象锁,通过这种特性来实现多线程的协调机制,这样在同一时间只有一个线程对需要同步的代码块(复合操作)进行访问。互斥性也称为操作的原子性。
- 可见性:必须确保在锁被释放之前,对共享变量所做的修改,对于随后获得该锁的另一个线程是可见的(即,在获得锁时,应获得最新共享变量的值),否则另一个线程可能是在本地缓存的某个副本上继续进行操作,从而引起不一致。
synchronized锁的不是代码,锁的都是对象。
根据获取的锁的分类,分为:获取对象锁和获取类锁。
1,获取对象锁的两种用法
- 同步代码块(synchronized(this),synchronized(类实例对象)),锁是小括号()中的实例对象;
- 同步非静态方法(synchronized method),锁是当前对象的实例对象。
现在测试一下锁的特性
(1)先写一个多线程类
package threadprinciple;

import java.text.SimpleDateFormat;
import java.util.Date;

public class SynThread implements Runnable{

	@Override
	public void run() {
		String threadName = Thread.currentThread().getName();
		if (threadName.startsWith("A")) {
			async();
		} else if (threadName.startsWith("B")) {
			syncObjectBlock1();
		} else if (threadName.startsWith("C")) {
			syncObjectMethod1();
		}
	}

	/**
	 * 异步方法
	 */
	private void async() {
		try {
			System.out.println(Thread.currentThread().getName() + "_Async_Start:" + new SimpleDateFormat("HH:mm:ss").format(new Date()));
			Thread.sleep(1000);
			System.out.println(Thread.currentThread().getName() + "_Async_End:" + new SimpleDateFormat("HH:mm:ss").format(new Date()));
		} catch (Exception e) {

		}
	}

	/**
	 *
	 * 方法中有synchronized(this/object){} 同步代码块
	 */
	private void syncObjectBlock1() {
		System.out.println(Thread.currentThread().getName() + "_SyncObjectBlock1:" + new SimpleDateFormat("HH:mm:ss").format(new Date()));
		synchronized (this) {
			try {
				System.out.println(Thread.currentThread().getName() + "_SyncObjectBlock1_Start:" + new SimpleDateFormat("HH:mm:ss").format(new Date()));
				Thread.sleep(1000);
				System.out.println(Thread.currentThread().getName() + "_SyncObjectBlock1_End:" + new SimpleDateFormat("HH:mm:ss").format(new Date()));
			} catch (Exception e) {
				e.printStackTrace();
			}
		}
	}

	/**
	 * synchronized修饰非静态方法
	 */
	private synchronized void syncObjectMethod1() {
		System.out.println(Thread.currentThread().getName() + "_SyncObjectMethod1:" + new SimpleDateFormat("HH:mm:ss").format(new Date()));
		try {
			System.out.println(Thread.currentThread().getName() + "_SyncObjectMethod1_Start:" + new SimpleDateFormat("HH:mm:ss").format(new Date()));
			Thread.sleep(1000);
			System.out.println(Thread.currentThread().getName() + "_SyncObjectMethod1_End:" + new SimpleDateFormat("HH:mm:ss").format(new Date()));
		} catch (Exception e) {
			e.printStackTrace();
		}
	}
}
(2)然后写一个测试类,去锁同一个实例
package threadprinciple;

public class SyncDemo {

	public static void main(String[] args) {
		SynThread synThread = new SynThread();
		Thread A_thread1 = new Thread(synThread,"A_thread1");
		Thread A_thread2 = new Thread(synThread,"A_thread2");
		Thread B_thread1 = new Thread(synThread,"B_thread1");
		Thread B_thread2 = new Thread(synThread,"B_thread2");
		Thread C_thread1 = new Thread(synThread,"C_thread1");
		Thread C_thread2 = new Thread(synThread,"C_thread2");
		A_thread1.start();
		A_thread2.start();
		B_thread1.start();
		B_thread2.start();
		C_thread1.start();
		C_thread2.start();
	}
}
结果如下
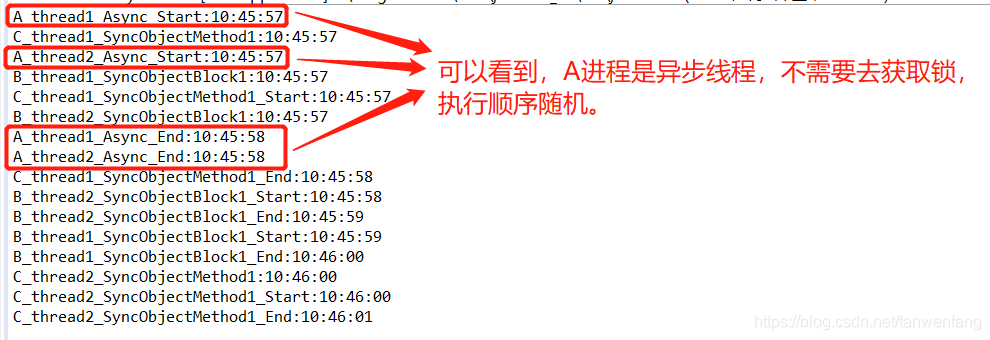
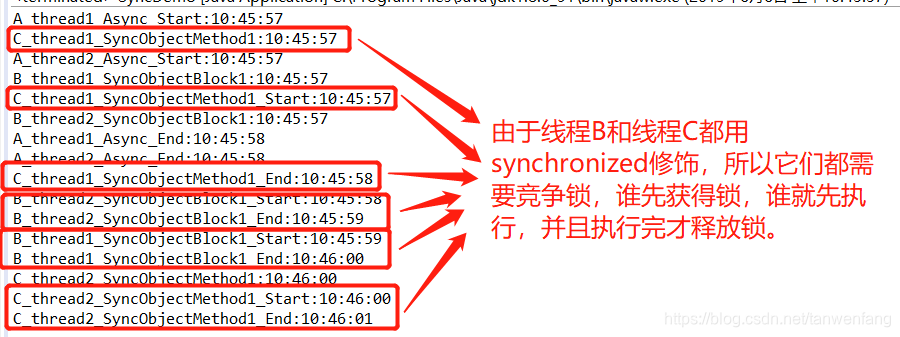
(3)然后测试一下锁不同实例
package threadprinciple;

public class SyncDemo {

	public static void main(String[] args) {
//		SynThread synThread = new SynThread();
		Thread A_thread1 = new Thread(new SynThread(),"A_thread1");
		Thread A_thread2 = new Thread(new SynThread(),"A_thread2");
		Thread B_thread1 = new Thread(new SynThread(),"B_thread1");
		Thread B_thread2 = new Thread(new SynThread(),"B_thread2");
		Thread C_thread1 = new Thread(new SynThread(),"C_thread1");
		Thread C_thread2 = new Thread(new SynThread(),"C_thread2");
		A_thread1.start();
		A_thread2.start();
		B_thread1.start();
		B_thread2.start();
		C_thread1.start();
		C_thread2.start();
	}
}
结果如下:

2,获取类锁的两种用法
- 同步代码块(synchronized(类.class)),锁是小括号()中的类对象(Class对象);
- 同步静态方法(synchronized static method),锁是当前对象的类对象(Class对象)。
(1)我们在原来的SynThread类中,添加两个方法:
private void syncClassBlock1() {
	System.out.println(Thread.currentThread().getName() + "_SyncClassMethod1:" + new SimpleDateFormat("HH:mm:ss").format(new Date()));
	synchronized (SynThread.class) {
		try {
			System.out.println(Thread.currentThread().getName() + "_SyncClassMethod1_Start:" + new SimpleDateFormat("HH:mm:ss").format(new Date()));
			Thread.sleep(1000);
			System.out.println(Thread.currentThread().getName() + "_SyncClassMethod1_End:" + new SimpleDateFormat("HH:mm:ss").format(new Date()));
		} catch (Exception e) {
			e.printStackTrace();
		}
	}
}

private synchronized static void syncClassMethod1() {
	System.out.println(Thread.currentThread().getName() + "_SyncClassMethod1:" + new SimpleDateFormat("HH:mm:ss").format(new Date()));
	try {
		System.out.println(Thread.currentThread().getName() + "_SyncClassMethod1_Start:" + new SimpleDateFormat("HH:mm:ss").format(new Date()));
		Thread.sleep(1000);
		System.out.println(Thread.currentThread().getName() + "_SyncClassMethod1_End:" + new SimpleDateFormat("HH:mm:ss").format(new Date()));
	} catch (Exception e) {
		e.printStackTrace();
	}
}
(2)然后修改run方法:
@Override
	public void run() {
		String threadName = Thread.currentThread().getName();
		if (threadName.startsWith("A")) {
			async();
		} else if (threadName.startsWith("B")) {
			syncObjectBlock1();
		} else if (threadName.startsWith("C")) {
			syncObjectMethod1();
		} else if (threadName.startsWith("D")) {
			syncClassBlock1();
		} else if (threadName.startsWith("E")) {
			syncClassMethod1();
		}
}
(3)先测试锁一个对象,测试类改为:
package threadprinciple;

public class SyncDemo {

	public static void main(String[] args) {
		SynThread synThread = new SynThread();
		Thread A_thread1 = new Thread(synThread,"A_thread1");
		Thread A_thread2 = new Thread(synThread,"A_thread2");
		Thread D_thread1 = new Thread(synThread,"D_thread1");
		Thread D_thread2 = new Thread(synThread,"D_thread2");
		Thread E_thread1 = new Thread(synThread,"E_thread1");
		Thread E_thread2 = new Thread(synThread,"E_thread2");
		A_thread1.start();
		A_thread2.start();
		D_thread1.start();
		D_thread2.start();
		E_thread1.start();
		E_thread2.start();
	}
}
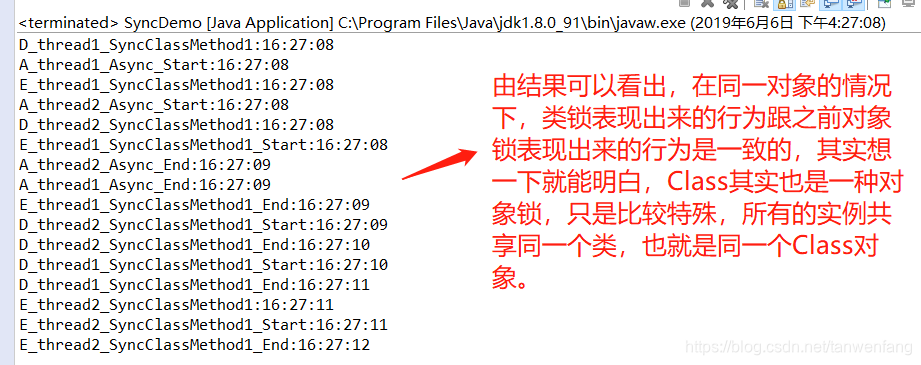
结果如下:
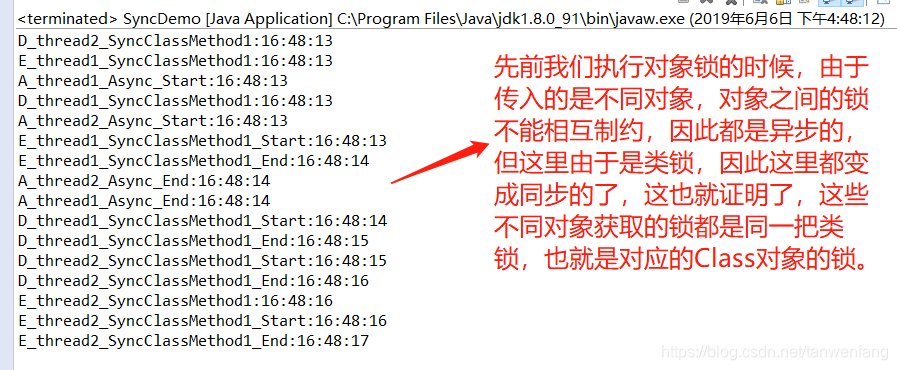
(4)再测试锁不同的对象,测试类改为:
package threadprinciple;
public class SyncDemo {
	public static void main(String[] args) {
		Thread A_thread1 = new Thread(new SynThread(),"A_thread1");
		Thread A_thread2 = new Thread(new SynThread(),"A_thread2");
		Thread D_thread1 = new Thread(new SynThread(),"D_thread1");
		Thread D_thread2 = new Thread(new SynThread(),"D_thread2");
		Thread E_thread1 = new Thread(new SynThread(),"E_thread1");
		Thread E_thread2 = new Thread(new SynThread(),"E_thread2");
		A_thread1.start();
		A_thread2.start();
		D_thread1.start();
		D_thread2.start();
		E_thread1.start();
		E_thread2.start();
	}
}
对象锁和类锁的关系如何呢?
我们修改一下测试类,如下:
package threadprinciple;

public class SyncDemo {

	public static void main(String[] args) {
		SynThread synThread = new SynThread();
		Thread A_thread1 = new Thread(synThread,"A_thread1");
		Thread A_thread2 = new Thread(synThread,"A_thread2");
		Thread B_thread1 = new Thread(synThread,"B_thread1");
		Thread B_thread2 = new Thread(synThread,"B_thread2");
		Thread C_thread1 = new Thread(synThread,"C_thread1");
		Thread C_thread2 = new Thread(synThread,"C_thread2");
		Thread D_thread1 = new Thread(synThread,"D_thread1");
		Thread D_thread2 = new Thread(synThread,"D_thread2");
		Thread E_thread1 = new Thread(synThread,"E_thread1");
		Thread E_thread2 = new Thread(synThread,"E_thread2");
		A_thread1.start();
		A_thread2.start();
		B_thread1.start();
		B_thread2.start();
		C_thread1.start();
		C_thread2.start();
		D_thread1.start();
		D_thread2.start();
		E_thread1.start();
		E_thread2.start();
	}
}
运行结果如下:
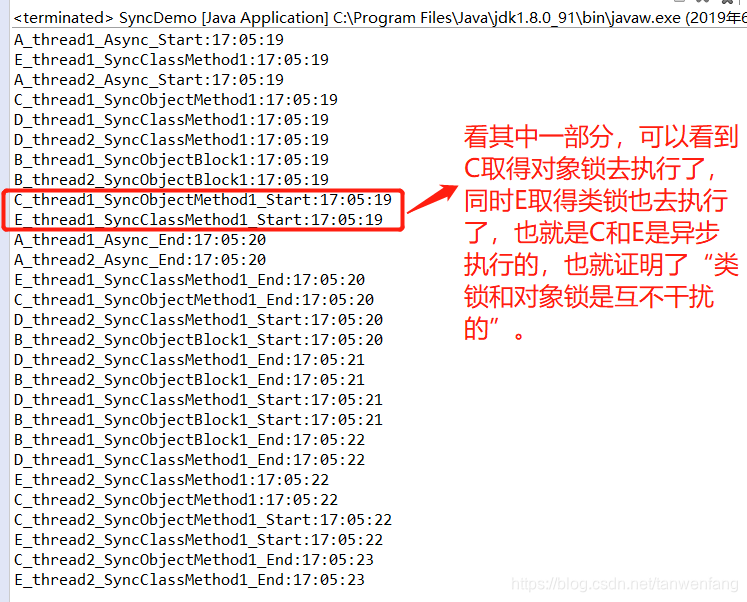
对象锁和类锁的总结:
- 有线程访问对象的同步代码块时,另外的线程可以访问该对象的非同步代码块;
- 若锁住的是同一个对象,一个线程在访问对象的同步代码块时,另一个访问对象的同步代码块的线程会被阻塞;
- 若锁住的是同一个对象,一个线程在访问对象的同步方法时,另一个访问对象同步方法的线程会被阻塞;
- 若锁住的是同一个对象,一个线程在访问对象的同步代码块时,另一个访问对象同步方法的线程会被阻塞,反之亦然;
- 同一个类的不同对象的对象锁互不干扰;
- 类锁由于也是一种特殊的对象锁,因此表现和上述1,2,3,4一致,而由于一个类只有一把类锁,所以同一个类的不同对象使用类锁将会是同步的;
- 类锁和对象锁互不干扰。


 被折叠的 条评论
为什么被折叠?
被折叠的 条评论
为什么被折叠?
 到【灌水乐园】发言


