


 本文介绍如何在CentOS环境下配置PyCharm与Docker的集成,包括Docker镜像的拉取、启动,Dockerfile的编写,以及通过PyCharm连接Docker容器进行开发。特别关注了Selenium与Chrome、Appium与Android应用的自动化测试环境搭建。
-
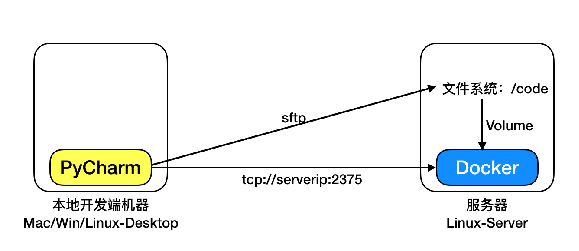
开发环境图示:
-
Centos防火墙
CentOS7查看端口开放情况:firewall-cmd --list-ports
CentOS7开放端口:firewall-cmd --zone=public --add-port=80/tcp --permanent
CentOS7关闭端口:firewall-cmd --remove-port=80/tcp --permanent -
配置Pycharm连接Docker:
在/etc/docker/daemon.json中写入hosts配置{ "registry-mirrors": ["https://fo7bca6n.mirror.aliyuncs.com"], "insecure-registries": ["192.168.33.6:8000", "192.168.33.6:9000"], "hosts": [ "tcp://0.0.0.0:2375", "unix:///var/run/docker.sock" ] }▲ 启动异常查看详细日志:
journalctl -amu docker
报错:unable to configure the Docker daemon with file /etc/docker/daemon.json: the following directives are specified both as a flag and in the configuration file: hosts
解决:查看docker启动脚本/usr/lib/systemd/system/docker.service中的启动语句
ExecStart=/usr/bin/dockerd -H fd:// --containerd=/run/containerd/containerd.sock
这里有指定-H参数,即–host参数,将
-H fd://删除重新启动即可:
systemctl daemon-reload
systemctl restart docker -
Pycharm中配置:View - Tool Windows - Docker配置中选择TCP socket -> URL填tcp://192.168.33.6:2375
注意:配置完以后要修改传到服务器的路径需要添加mappings -
Dockerfile配置:创建目录 -> 新建Dockerfile -> 写入内容 右击文件执行 -> 生成无命名的镜像 -> 编辑Image tag再执行一次可对镜像进行命名
-
指定运行程序的镜像:File -> Settings -> Project:xxx - Interpreter- Show All -> 选中对应docker环境进行编辑Image name
-
docker-compose配置:Pycharm可以编辑docker-compose,但是只能在服务器中执行
-
启动容器的参数配置: docker-library - 搜索对应镜像进入查看
在pycharm中容器启动配置页中Environment variables添加
- 饭粒1:Docker中selenium与chrome爬虫开发环境搭建与使用
- 拉取selenium镜像并启动容器:docker-selenium
docker pull selenium/standalone-chrome:3.141.59-titanium
docker run -d -p 4444:4444 -v /dev/shm:/dev/shm selenium/standalone-chrome:3.141.59-titanium - 编写Dockerfile并执行构建
FROM python:latest # 安装支持http/https协议客户端请求的库 RUN pip install requests && \ pip install aiohttp && \ pip install tornado && \ pip install selenium && \ pip install appium-python-client # 安装gcc编译环境 RUN yum install -y gcc gcc-c++ # 下列模块的安装需要gcc编译环境 RUN pip install twisted && \ pip install gevent # 安装scrapy RUN yum install -y libffi-devel openssl-devel libxml2 libxslt-devel libxml2-devel python-devel && \ RUN pip install scrapy # 安装pyspider RUN yum install -y curl libcurl4-openssl-dev libxml2-dev libxslt-dev zlib && \ RUN pip install pyspider - 测试安装的环境
command_executor中IP使用第1步启动的容器IPfrom selenium import webdriver from selenium.webdriver.common.desired_capabilities import DesiredCapabilities driver = webdriver.Remote( command_executor="http://172.17.0.2:4444/wd/hub", desired_capabilities=DesiredCapabilities.CHROME ) driver.get("http://www.baidu.com") print(driver.title) print(driver.page_source) driver.close() - 进阶:
baidu_spider.py
docker-compose.ymlfrom selenium import webdriver from selenium.webdriver.common.desired_capabilities import DesiredCapabilities import requests def test_chrome_server(): while True: i = 0 try: res = requests.get("http://chrome:4444/wd/hub/status", timeout=0.3) except Exception as e: i += 1 if i > 10: raise else: print(res.status_code) break test_chrome_server() driver = webdriver.Remote( command_executor="http://chrome:4444/wd/hub", desired_capabilities=DesiredCapabilities.CHROME ) driver.get("http://www.baidu.com") print(driver.title) with open('/data/baidu.html', 'w') as f: f.write(driver.page_source) driver.close()version: "3" services: spider: image: spider-dev volumes: - ./baidu_spider.py:/code/baidu_spider.py - ./data:/data command: python /code/baidu_spider.py depends_on: - chrome chrome: image: selenium/standalone-chrome:3.141.59-titanium ports: - "4444:4444" shm_size: 2g
- 配置docker连接手机 appium
- 拉取镜像并启动容器
加上docker run --privileged -d -p 4723:4723 -v ~/.android:/root/.android -v /dev/bus/usb:/dev/bus/usb --name container-appium appium/appium-v ~/.android:/root/.android可以避免重复授权 - 数据线连接手机,进行授权
docker exec -it container-appium adb devices - 尝试操作app
查找appPackage和appActivity:执行命令docker exec -it container-appium adb shell进入shell环境,执行logcat | grep ActivityManager后点击APP查看cmp内容 \ 之前即为appPackage,之后为appActivityimport time from appium import webdriver desired_caps = {} desired_caps["platformName"] = "Android" desired_caps["platformVersion"] = "8.0.0" desired_caps["deviceName"] = "Honor V10" desired_caps["appPackage"] = "com.ted.android" desired_caps["appActivity"] = ".view.splash.SplashActivity" print("尝试连接") driver = webdriver.Remote( command_executor="http://172.17.0.2:4723/wd/hub", desired_capabilities=desired_caps ) print("连接成功") time.sleep(3) driver.find_element_by_android_uiautomator('text(\"热门\")').click() driver.quit() - 进阶:
appium_android.py
docker-compose.ymlimport time import requests from appium import webdriver desired_caps = {} desired_caps["platformName"] = "Android" desired_caps["platformVersion"] = "8.0.0" desired_caps["deviceName"] = "Honor V10" desired_caps["appPackage"] = "com.ted.android" desired_caps["appActivity"] = ".view.splash.SplashActivity" def test_chrome_server(): while True: i = 0 try: res = requests.get("http://appium:4723/wd/hub/status", timeout=0.3) except Exception as e: i += 1 if i > 10: raise else: print(res.status_code) break test_chrome_server() print("尝试连接") driver = webdriver.Remote( command_executor="http://appium:4723/wd/hub", desired_capabilities=desired_caps ) print("连接成功") time.sleep(3) driver.find_element_by_android_uiautomator('text(\"热门\")').click() driver.quit()version: "3" services: spider: image: spider-dev volumes: - ./appium_android.py:/code/appium_android.py command: python /code/appium_android.py depends_on: - appium appium: image: appium/appium ports: - "4723:4723" privileged: true volumes: - ~/.android:/root/.android - /dev/bus/usb:/dev/bus/usb


 424
424

 被折叠的 条评论
为什么被折叠?
被折叠的 条评论
为什么被折叠?
 到【灌水乐园】发言


