


 本文介绍SpringBoot框架的特点,包括简化配置、微服务入门等,并通过图书管理系统实例演示如何搭建环境、编写第一个Rest接口及自定义属性配置。
Spring Boot简介、特点
- 化繁为简,简化配置
- 企业中应用最为广泛的框架
- 微服务入门级框架
注意:具备必要的前置知识, Java基础、MySQL操作、 JDK1.8、Maven 3.x
开发环境准备
1.Java和Maven版本
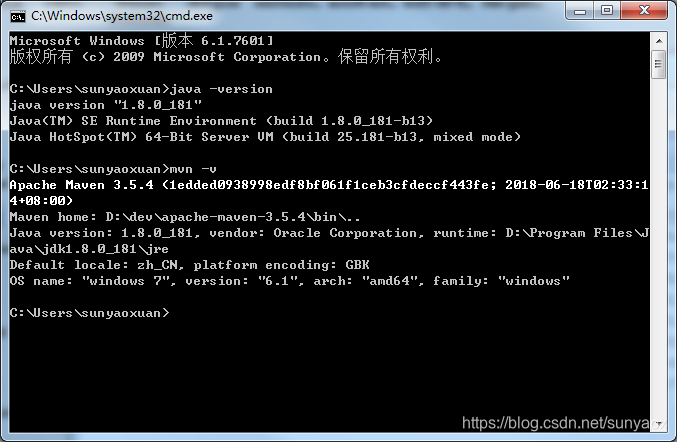
2.开发工具IDEA,Eclipse都可以,可根据个人喜好自行选择。本人使用Eclipse并集成了STS插件。
下面以一个图书管理系统为例子,对开发中常用的知识点进行讲解。
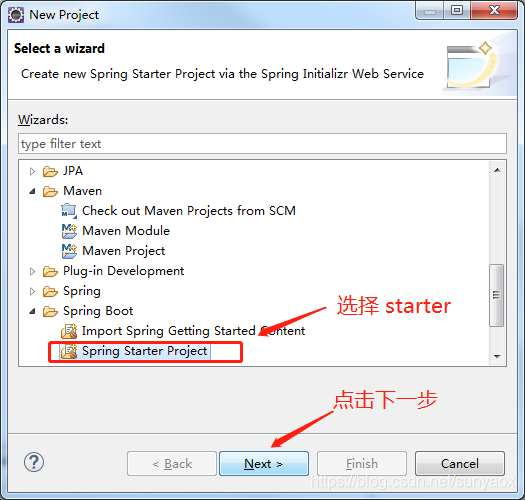
第一个Spring Boot程序
1.新建工程-选择Spring
2.输入工程信息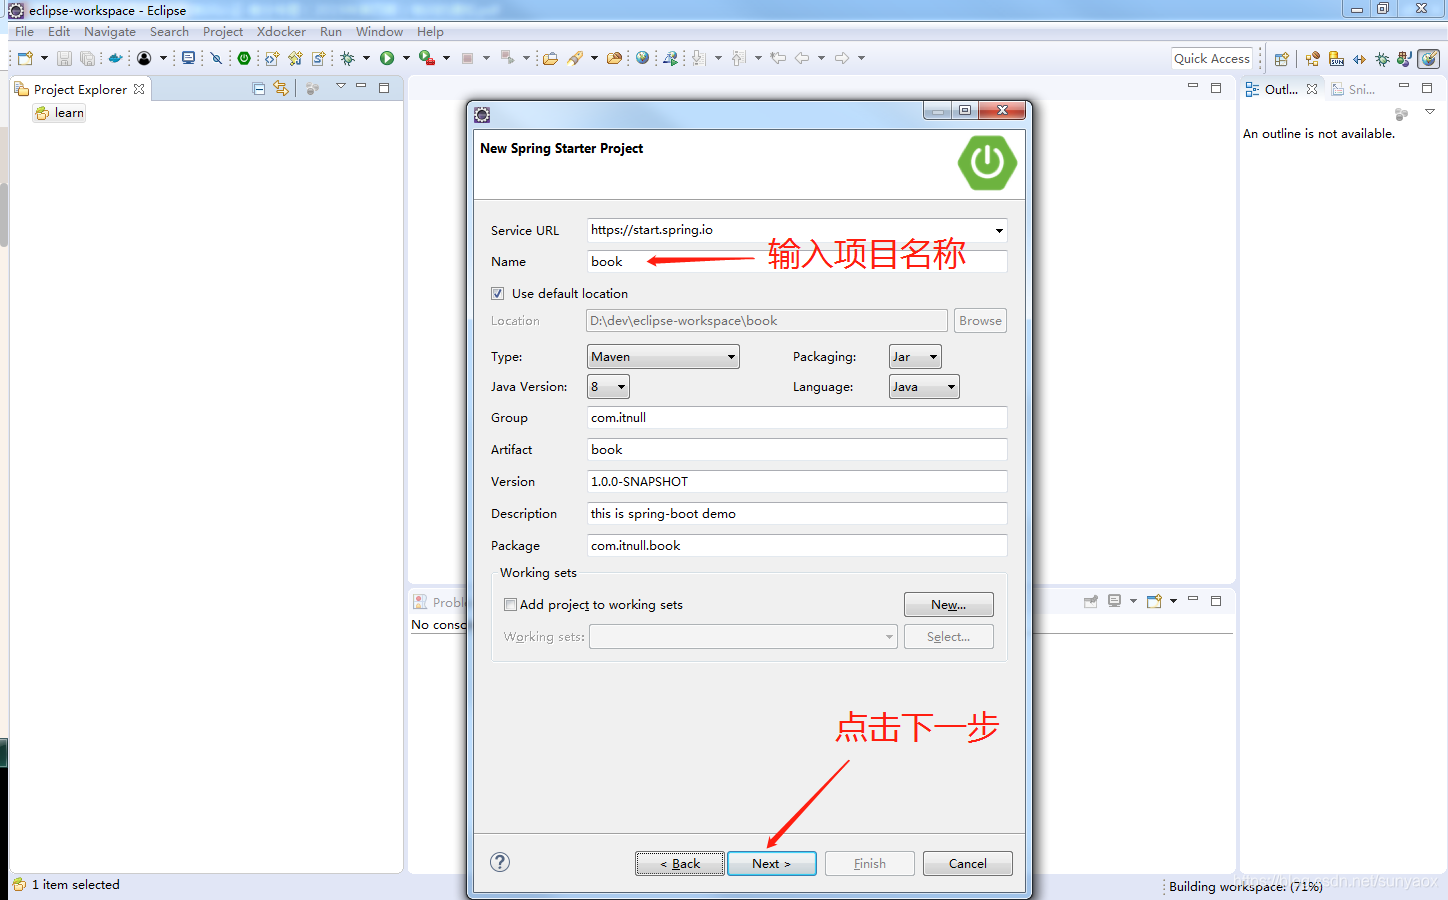
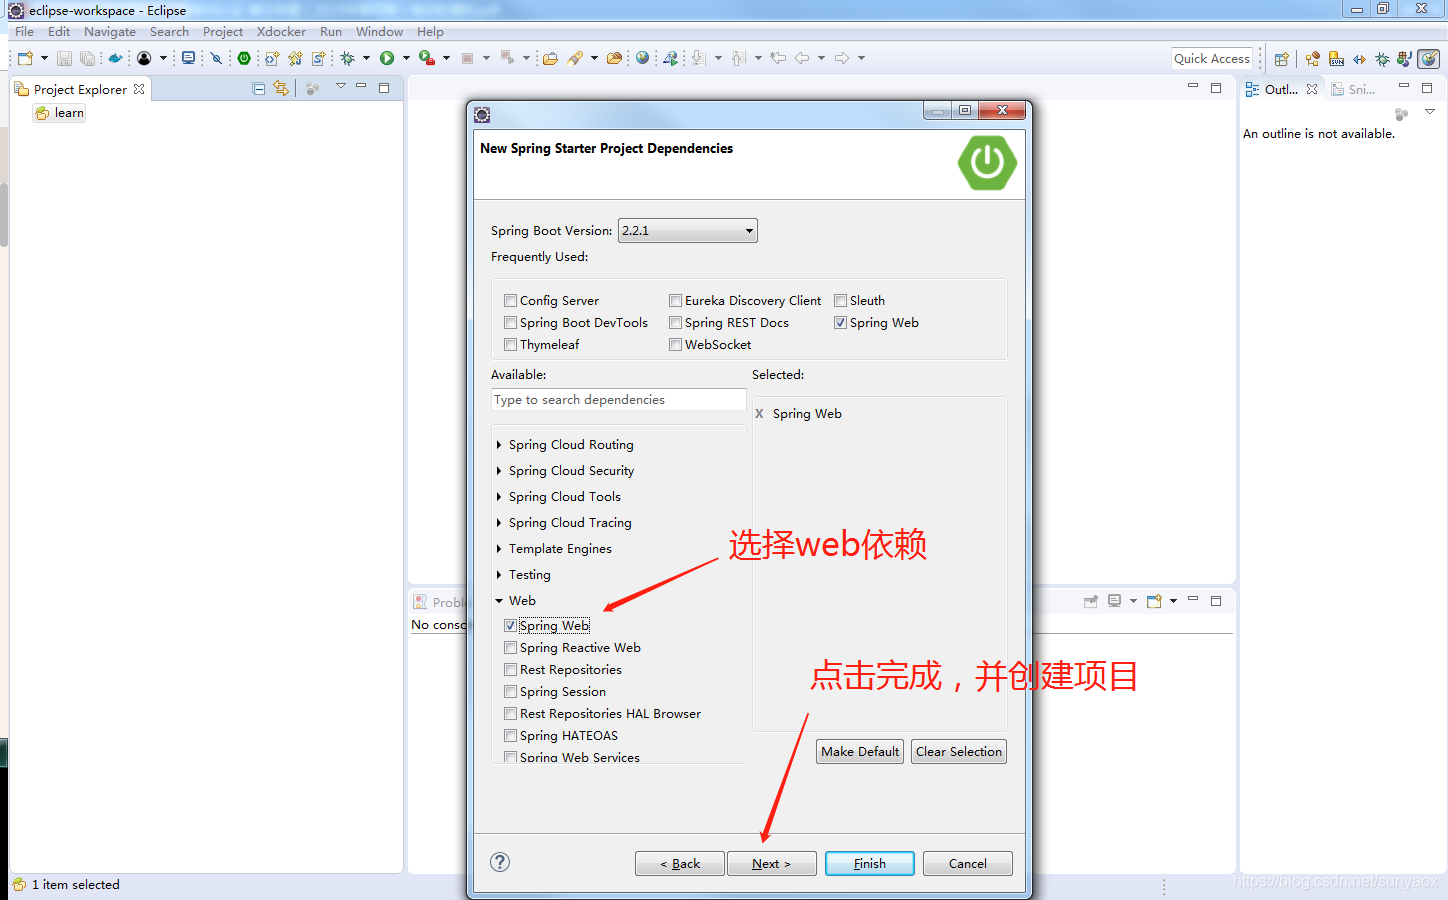
3.选择项目依赖,完成工程创建
4. 工程结构
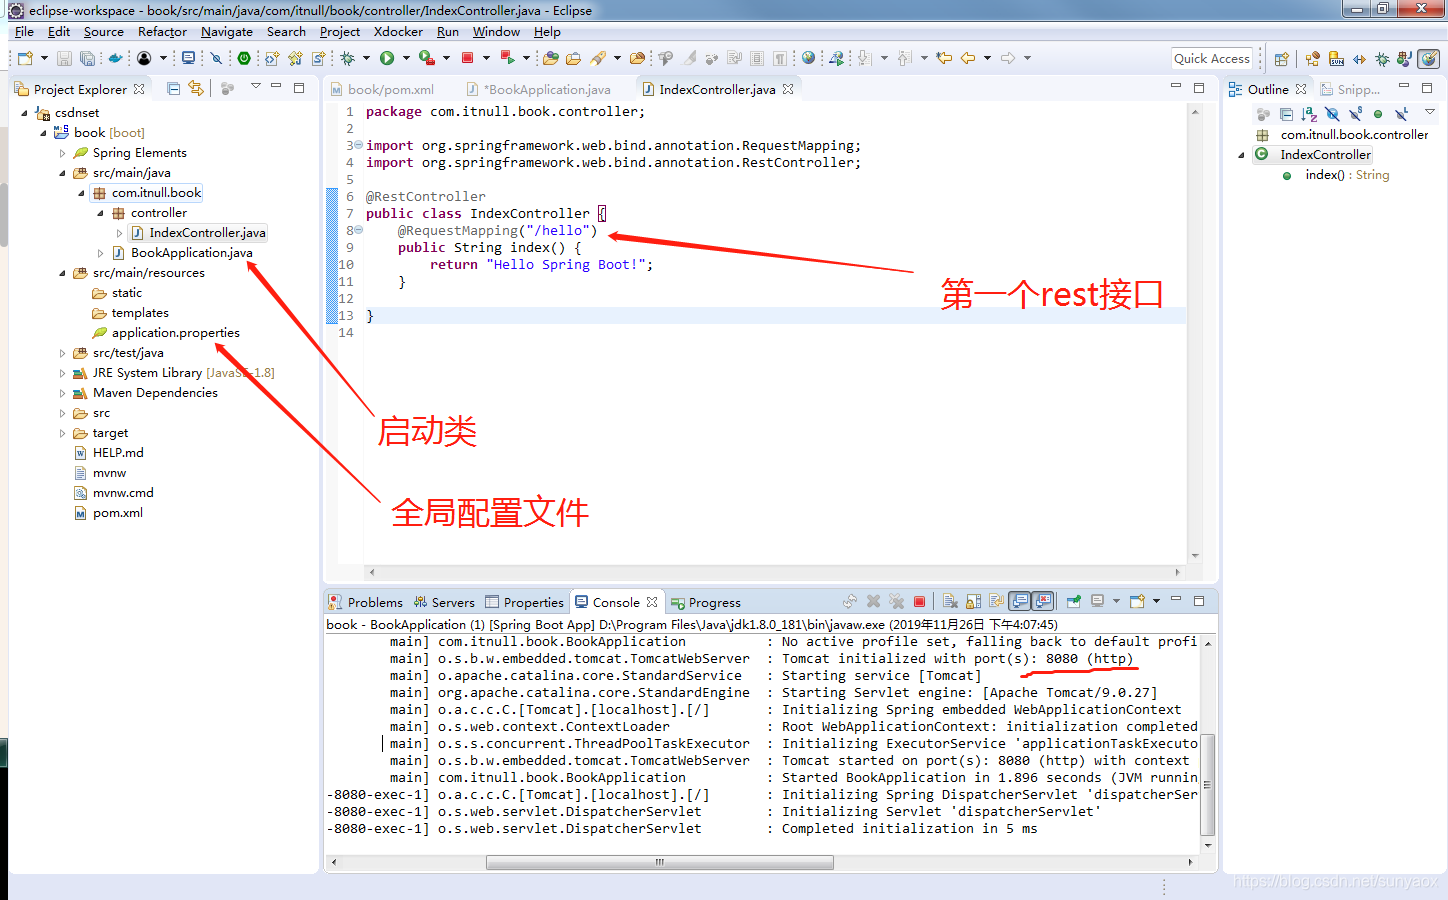
5. 编写第一个Rest接口
package com.itnull.book.controller;

import org.springframework.web.bind.annotation.RequestMapping;
import org.springframework.web.bind.annotation.RestController;

@RestController
public class IndexController {
	@RequestMapping("/hello")
	public String index() {
		return "Hello Spring Boot!";
	}

}
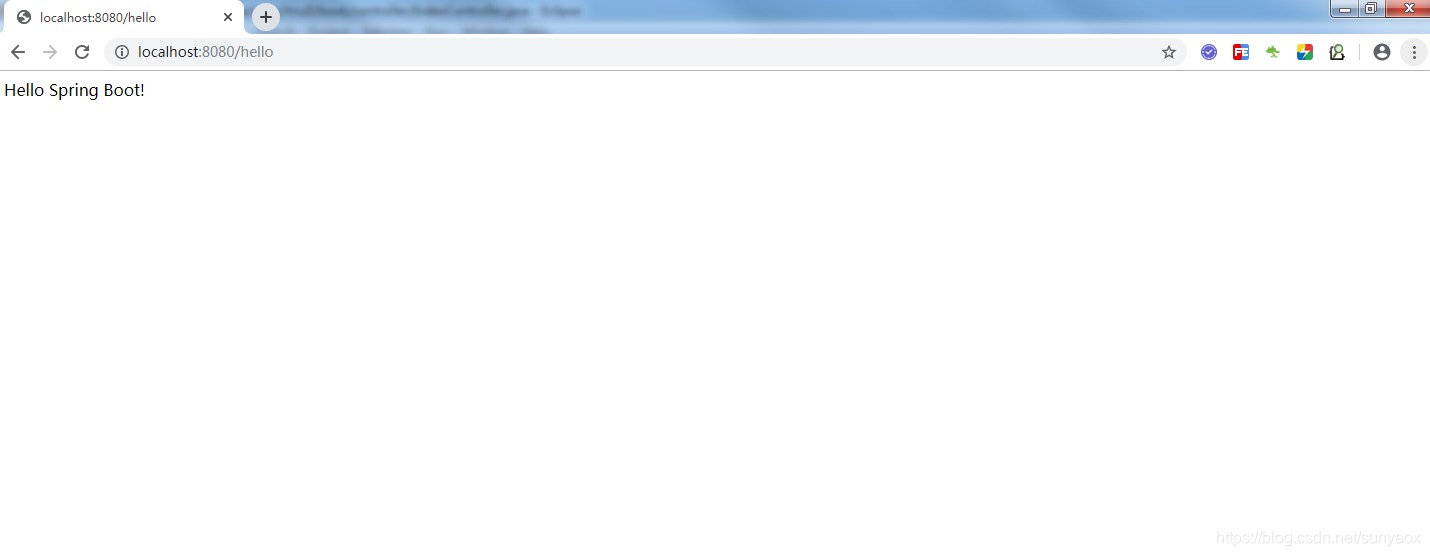
6.打开浏览器 访问url: http://localhost:8080/hello
自定义属性配置
application.properties
#工程启动使用端口
server.port=8080
#工程名
spring.application.name=book-service
#工程使用配置文件激活dev,工程会加载application-dev.properties
spring.profiles.active=dev
application-dev.properties
author=wali
book.author=wali
book.count=200000
book.publishdate=2019-09-09
属性配置
- @Value 获取配置文件中配置信息
package com.itnull.book.controller;
import org.springframework.beans.factory.annotation.Autowired;
import org.springframework.beans.factory.annotation.Value;
import org.springframework.web.bind.annotation.RequestMapping;
import org.springframework.web.bind.annotation.RestController;
import com.itnull.book.properties.BookProperties;

@RestController
public class IndexController {
	@Autowired
	private BookProperties bookProperties;

	@Value("${author}")
	private String author;

	@RequestMapping("/hello")
	public String index() {
		return "Hello Spring Boot! "+author+bookProperties.getCount();
	}

}
- @Component 声明式注解,作用于类,表明该类可以被注入到spring容器。
- @ConfigurationProperties 配置文件映射注解,先简单理解。
package com.itnull.book.properties;

import org.springframework.boot.context.properties.ConfigurationProperties;
import org.springframework.stereotype.Component;

@Component
@ConfigurationProperties(prefix = "book")
public class BookProperties {
	private String author;
	private Long count;
	private String publishdate;
	public String getAuthor() {
		return author;
	}
	public void setAuthor(String author) {
		this.author = author;
	}
	public Long getCount() {
		return count;
	}
	public void setCount(Long count) {
		this.count = count;
	}
	public String getPublishdate() {
		return publishdate;
	}
	public void setPublishdate(String publishdate) {
		this.publishdate = publishdate;
	}
}
Controller的使用
@Controller 处理http请求
@RestController Spring4之后新加得注解,原来返回json需要@ResponseBody配合Controller
@RequestMapping 配置url映射
@PathVariable 获取url中的数据
@RequestParam 获取请求参数的值
@GetMapping 组合注解
package com.itnull.book.controller;

import org.springframework.web.bind.annotation.GetMapping;
import org.springframework.web.bind.annotation.PathVariable;
import org.springframework.web.bind.annotation.RequestMapping;
import org.springframework.web.bind.annotation.RequestParam;
import org.springframework.web.bind.annotation.RestController;
/**
 * 该类包含了以上注解的使用 方式,编写RestFul API
 * @author sunyaoxuan
 *
 */
@RestController
@RequestMapping("/books")
public class BookController {

	/**
	 * 浏览器访问:http://localhost:8080/books/1
	 * @param id
	 * @return
	 */
	@GetMapping("/{id}")
	public String book(@PathVariable("id") Integer id) {
		return "id:"+id;
	}
	/**
	 * 浏览器访问:http://localhost:8080/books/book/id?id=1
	 * @param id
	 * @return
	 */
	@GetMapping("/book/id")
	public String books(@RequestParam("id") Integer id) {
		return "id:"+id;
	}
}
Spring-data-jpa
集成数据库依赖,这里使用jpa
- pom.xml添加数据库和jpa依赖
<dependency>
	<groupId>org.springframework.boot</groupId>
	<artifactId>spring-boot-starter-data-jpa</artifactId>
</dependency>
<dependency>
	<groupId>mysql</groupId>
	<artifactId>mysql-connector-java</artifactId>
	<scope>runtime</scope>
</dependency>
- application.properties 添加数据库和JPA相关配置
#mysql
spring.datasource.username=root
spring.datasource.password=123456
spring.datasource.driver-class-name=com.mysql.cj.jdbc.Driver
spring.datasource.url=jdbc:mysql://127.0.0.1:3306/test?serverTimezone=GMT%2B8
spring.datasource.platform=org.hibernate.dialect.MySQLDialect
spring.datasource.hikari.maximum-pool-size=20
spring.datasource.hikari.minimum-idle=5
spring.jpa.show-sql=true
spring.jpa.hibernate.ddl-auto=create
- 创建图书实体
package com.itnull.book.entity;
import java.util.Date;
import javax.persistence.*;
/**
 * 图书实体类
 * @author sunyaoxuan
 *
 */
@Entity
public class Book {

	@Id
	@GeneratedValue(strategy = GenerationType.IDENTITY)
	private Long Id;
	private String author;
	private String wordCount;
	private Date publisTime;
	public Long getId() {
		return Id;
	}
	public void setId(Long id) {
		Id = id;
	}
	public String getAuthor() {
		return author;
	}
	public void setAuthor(String author) {
		this.author = author;
	}
	public String getWordCount() {
		return wordCount;
	}
	public void setWordCount(String wordCount) {
		this.wordCount = wordCount;
	}
	public Date getPublisTime() {
		return publisTime;
	}
	public void setPublisTime(Date publisTime) {
		this.publisTime = publisTime;
	}
}
事务管理
源代码同步更新gitee
所有代码将同步更新到gitee,大家可进行下载,下载地址https://gitee.com/itnull/springboot.git


 1367
1367

 被折叠的 条评论
为什么被折叠?
被折叠的 条评论
为什么被折叠?
 到【灌水乐园】发言


