


ps auxf|grep redis |grep -v grep|xargs kill -9 杀死所有redis的进程
看这篇之前可以先看一主多从的配置 https://mp.youkuaiyun.com/console/editor/html/107734048
1:/usr/local/redis/sentinel_conf (不存在就创建) 在此目录下创建3个节点(1主2从) 6379端口为主节点
把masterslave目录下的3个redis*.conf文件,复制到/usr/local/redis/sentinel_conf下.

解压之后的也有,复制过去改名字改配置.
注:记得 redis6379.conf 配置文件中的masterauth 123456 也配置上,其它的不用动。

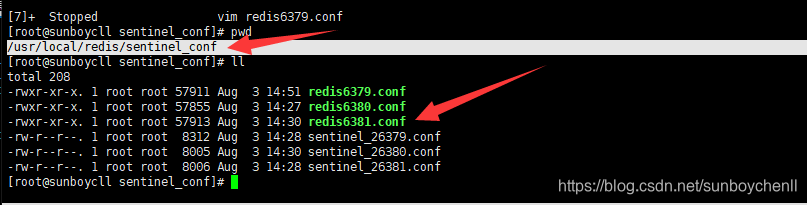
第2步:sentinel_26379.conf sentinel_26380.conf sentinel_26381.conf 这3个哨兵文件
将三个文件的端口改成: 26379 26380 26381
26379的监听端口号是6379
26380 的监听端口号是6380
26381 的监听端口号是6381
然后:sentinel monitor mymaster 127.0.0.1 6379 2 //监听主节点6379,127.0.0.1改成自己的ip(sentinel_26379.conf 中)
然后:sentinel monitor mymaster 127.0.0.1 6380 2 //监听主节点6379,127.0.0.1改成自己的ip(sentinel_26380.conf 中)
然后:sentinel monitor mymaster 127.0.0.1 6381 2 //监听主节点6379,127.0.0.1改成自己的ip(sentinel_26381.conf 中)
sentinel auth-pass mymaster 123456 //连接主节点时的密码
三个配置除端口外,其它一样。
如下
redis*.conf 内容如下:
sentinel_2*.conf 内容如下:
# Example sentinel.conf
# *** IMPORTANT ***
#
# By default Sentinel will not be reachable from interfaces different than
# localhost, either use the 'bind' directive to bind to a list of network
# interfaces, or disable protected mode with "protected-mode no" by
# adding it to this configuration file.
#
# Before doing that MAKE SURE the instance is protected from the outside
# world via firewalling or other means.
#
# For example you may use one of the following:
#
# bind 127.0.0.1 192.168.1.1
#
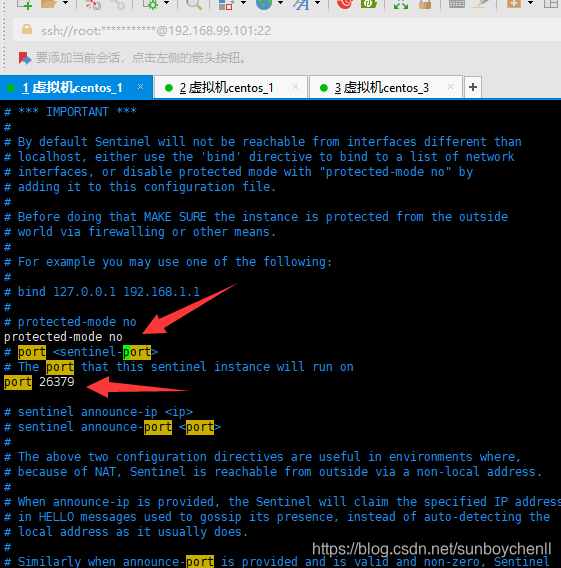
# protected-mode no
protected-mode no
# port <sentinel-port>
# The port that this sentinel instance will run on
port 26379
# sentinel announce-ip <ip>
# sentinel announce-port <port>
#
# The above two configuration directives are useful in environments where,
# because of NAT, Sentinel is reachable from outside via a non-local address.
#
# When announce-ip is provided, the Sentinel will claim the specified IP address
# in HELLO messages used to gossip its presence, instead of auto-detecting the
# local address as it usually does.
#
# Similarly when announce-port is provided and is valid and non-zero, Sentinel
# will announce the specified TCP port.
#
# The two options don't need to be used together, if only announce-ip is
# provided, the Sentinel will announce the specified IP and the server port
# as specified by the "port" option. If only announce-port is provided, the
# Sentinel will announce the auto-detected local IP and the specified port.
#
# Example:
#
# sentinel announce-ip 1.2.3.4
# dir <working-directory>
# Every long running process should have a well-defined working directory.
# For Redis Sentinel to chdir to /tmp at startup is the simplest thing
# for the process to don't interfere with administrative tasks such as
# unmounting filesystems.
dir "/tmp"
# sentinel monitor <master-name> <ip> <redis-port> <quorum>
#
# Tells Sentinel to monitor this master, and to consider it in O_DOWN
# (Objectively Down) state only if at least <quorum> sentinels agree.
#
# Note that whatever is the ODOWN quorum, a Sentinel will require to
# be elected by the majority of the known Sentinels in order to
# start a failover, so no failover can be performed in minority.
#
# Slaves are auto-discovered, so you don't need to specify slaves in
# any way. Sentinel itself will rewrite this configuration file adding
# the slaves using additional configuration options.
# Also note that the configuration file is rewritten when a
# slave is promoted to master.
#
# Note: master name should not include special characters or spaces.
# The valid charset is A-z 0-9 and the three characters ".-_".
sentinel myid bafea08b7619f55966fd8479e77ae7d4ffa82eb5
# sentinel auth-pass <master-name> <password>
#
# Set the password to use to authenticate with the master and slaves.
# Useful if there is a password set in the Redis instances to monitor.
#
# Note that the master password is also used for slaves, so it is not
# possible to set a different password in masters and slaves instances
# if you want to be able to monitor these instances with Sentinel.
#
# However you can have Redis instances without the authentication enabled
# mixed with Redis instances requiring the authentication (as long as the
# password set is the same for all the instances requiring the password) as
# the AUTH command will have no effect in Redis instances with authentication
# switched off.
#
# Example:
#
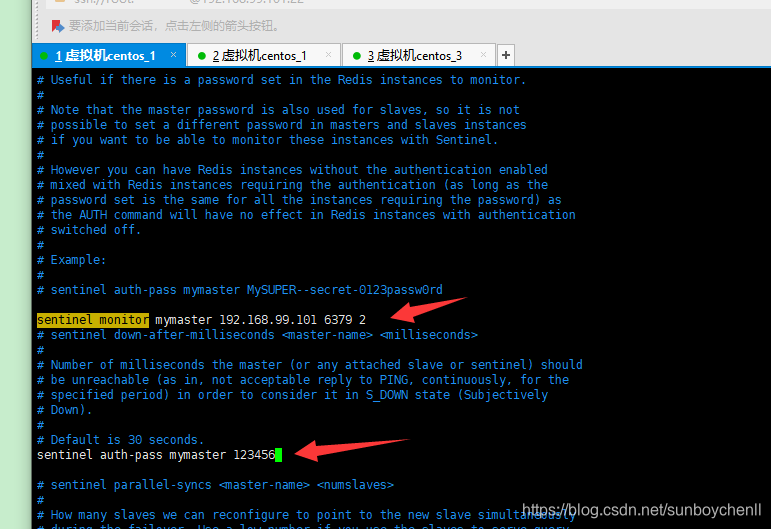
# sentinel auth-pass mymaster MySUPER--secret-0123passw0rd
sentinel monitor mymaster 192.168.245.129 6379 2
# sentinel down-after-milliseconds <master-name> <milliseconds>
#
# Number of milliseconds the master (or any attached slave or sentinel) should
# be unreachable (as in, not acceptable reply to PING, continuously, for the
# specified period) in order to consider it in S_DOWN state (Subjectively
# Down).
#
# Default is 30 seconds.
sentinel auth-pass mymaster 12345678
# sentinel parallel-syncs <master-name> <numslaves>
#
# How many slaves we can reconfigure to point to the new slave simultaneously
# during the failover. Use a low number if you use the slaves to serve query
# to avoid that all the slaves will be unreachable at about the same
# time while performing the synchronization with the master.
sentinel config-epoch mymaster 43
# sentinel failover-timeout <master-name> <milliseconds>
#
# Specifies the failover timeout in milliseconds. It is used in many ways:
#
# - The time needed to re-start a failover after a previous failover was
# already tried against the same master by a given Sentinel, is two
# times the failover timeout.
#
# - The time needed for a slave replicating to a wrong master according
# to a Sentinel current configuration, to be forced to replicate
# with the right master, is exactly the failover timeout (counting since
# the moment a Sentinel detected the misconfiguration).
#
# - The time needed to cancel a failover that is already in progress but
# did not produced any configuration change (SLAVEOF NO ONE yet not
# acknowledged by the promoted slave).
#
# - The maximum time a failover in progress waits for all the slaves to be
# reconfigured as slaves of the new master. However even after this time
# the slaves will be reconfigured by the Sentinels anyway, but not with
# the exact parallel-syncs progression as specified.
#
# Default is 3 minutes.
sentinel leader-epoch mymaster 43
# SCRIPTS EXECUTION
#
# sentinel notification-script and sentinel reconfig-script are used in order
# to configure scripts that are called to notify the system administrator
# or to reconfigure clients after a failover. The scripts are executed
# with the following rules for error handling:
#
# If script exits with "1" the execution is retried later (up to a maximum
# number of times currently set to 10).
#
# If script exits with "2" (or an higher value) the script execution is
# not retried.
#
# If script terminates because it receives a signal the behavior is the same
# as exit code 1.
#
# A script has a maximum running time of 60 seconds. After this limit is
# reached the script is terminated with a SIGKILL and the execution retried.
# NOTIFICATION SCRIPT
#
# sentinel notification-script <master-name> <script-path>
#
# Call the specified notification script for any sentinel event that is
# generated in the WARNING level (for instance -sdown, -odown, and so forth).
# This script should notify the system administrator via email, SMS, or any
# other messaging system, that there is something wrong with the monitored
# Redis systems.
#
# The script is called with just two arguments: the first is the event type
# and the second the event description.
#
# The script must exist and be executable in order for sentinel to start if
# this option is provided.
#
# Example:
#
# sentinel notification-script mymaster /var/redis/notify.sh
# CLIENTS RECONFIGURATION SCRIPT
#
# sentinel client-reconfig-script <master-name> <script-path>
#
# When the master changed because of a failover a script can be called in
# order to perform application-specific tasks to notify the clients that the
# configuration has changed and the master is at a different address.
#
# The following arguments are passed to the script:
#
# <master-name> <role> <state> <from-ip> <from-port> <to-ip> <to-port>
#
# <state> is currently always "failover"
# <role> is either "leader" or "observer"
#
# The arguments from-ip, from-port, to-ip, to-port are used to communicate
# the old address of the master and the new address of the elected slave
# (now a master).
#
# This script should be resistant to multiple invocations.
#
# Example:
#
# sentinel client-reconfig-script mymaster /var/redis/reconfig.sh
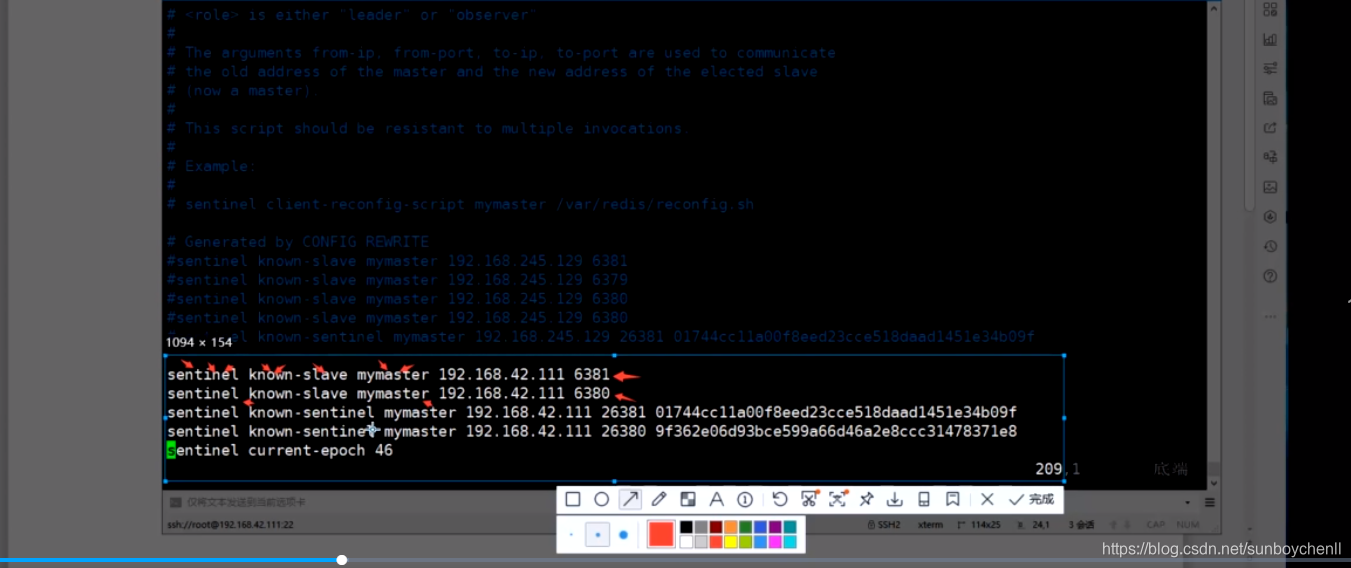
# Generated by CONFIG REWRITE
#sentinel known-slave mymaster 192.168.245.129 6381
#sentinel known-slave mymaster 192.168.245.129 6379
#sentinel known-slave mymaster 192.168.245.129 6380
#sentinel known-slave mymaster 192.168.245.129 6380
#sentinel known-sentinel mymaster 192.168.245.129 26381 01744cc11a00f8eed23cce518daad1451e34b09f
自动生成的:
先启动主从节点:
./redis-server sentinel_conf/redis6379.conf &
./redis-server sentinel_conf/redis6380.conf &
./redis-server sentinel_conf/redis6381.conf &
再启动sentinel服务:
./redis-sentinel sentinel_conf/sentinel_26379.conf &
./redis-sentinel sentinel_conf/sentinel_26380.conf &
./redis-sentinel sentinel_conf/sentinel_26381.conf &
java测试代码:
import java.util.HashSet;
import java.util.Set;

import org.junit.Test;

import redis.clients.jedis.Jedis;
import redis.clients.jedis.JedisSentinelPool;

public class JedisSentinel {

   @Test
   public void testJedis() throws InterruptedException {
      Set<String> sentinels = new HashSet<String>();
      String hostAndPort1 = "192.168.99.101:26379";
      String hostAndPort2 = "192.168.99.101:26380";
      String hostAndPort3 = "192.168.99.101:26381";
      sentinels.add(hostAndPort1);
      sentinels.add(hostAndPort2);
      sentinels.add(hostAndPort3);

      String clusterName = "mymaster";
      String password = "123456";

      JedisSentinelPool redisSentinelJedisPool = new JedisSentinelPool(clusterName, sentinels, password);

      Jedis jedis = null;
      try {
         jedis = redisSentinelJedisPool.getResource();

         jedis.set("name", "helloWold");
         System.out.println(jedis.get("name"));
      } catch (Exception e) {
         e.printStackTrace();
      } finally {
         redisSentinelJedisPool.returnBrokenResource(jedis);
      }

      redisSentinelJedisPool.close();
   }

}
在springboot中的application.yml配置下如下:
包含分片集群 可参考:https://www.imooc.com/article/302524
#启动: nohup java  -jar  xxx.jar >  log.admin 2>&1 &
server:
  port: 8090
  compression:
    enabled: true
  connection-timeout: 3000
spring:
  redis:
    # 单机
    # host: 192.168.99.101
    #  port: 6380
      password: 123456
    # 哨兵模式
      sentinel:
        master: mymaster
        nodes: 192.168.99.101:26381,192.168.99.101:26380,192.168.99.101:26379
  datasource:
      url: jdbc:mysql://192.168.99.101:3306/enjoy?useUnicode=true&characterEncoding=utf8&autoReconnect=true&allowMultiQueries=true&zeroDateTimeBehavior=convertToNull
      username: root
      password: root1234
      driverClassName : com.mysql.jdbc.Driver
      test-on-borrow: false
      test-while-idle: true
      time-between-eviction-runs-millis: 3600000
mybatis:
  mapperLocations: classpath:mapper/*.xml
#logging:
#  level:
#    com:
#      enjoy:
#        dao:  debug


 538
538

 被折叠的 条评论
为什么被折叠?
被折叠的 条评论
为什么被折叠?
 到【灌水乐园】发言


