


 本文详细介绍如何整合Struts2、Spring和Hibernate(SSH)三大框架,包括配置文件设置、数据库连接配置、日志记录等关键步骤。
1.引入必要的jar文件
2.引入配置文件
2.1配置Struts2的配置文件web.xml
 <!-- 配置struct2核心过滤器 -->
  <filter>
        <filter-name>struts2</filter-name>
        <filter-class>org.apache.struts2.dispatcher.ng.filter.StrutsPrepareAndExecuteFilter</filter-class>
  </filter>
  <filter-mapping>
        <filter-name>struts2</filter-name>
        <url-pattern>/*</url-pattern>
  </filter-mapping>
2.2struts2.xml配置文件
<struts>
	<!-- 配置Struts2的常量 -->
	<constant name="struts.action.extension" value="action"/>

	<!-- 配置Action -->
	<package name="ssh1" extends="struts-default" namespace="/">
		<action name="customer_*" class="customerAction" method="{1}">

		</action>
	</package>
</struts>
2.3hibernate.cfg.xml配置文件
<hibernate-configuration>
	<session-factory>
		<!-- 连接数据库的基本参数 -->
		<property name="hibernate.connection.driver_class">com.mysql.jdbc.Driver</property>
		<property name="hibernate.connection.url">jdbc:mysql:///ssh1</property>
		<property name="hibernate.connection.username">root</property>
		<property name="hibernate.connection.password">123456</property>
		<!-- 配置Hibernate的方言 -->
		<property name="hibernate.dialect">org.hibernate.dialect.MySQLDialect</property>

		<!-- 可选配置================ -->
		<!-- 打印SQL -->
		<property name="hibernate.show_sql">true</property>
		<!-- 格式化SQL -->
		<property name="hibernate.format_sql">true</property>
		<!-- 自动创建表 -->
		<property name="hibernate.hbm2ddl.auto">update</property>

		<!-- 配置C3P0连接池 -->
		<property name="connection.provider_class">org.hibernate.connection.C3P0ConnectionProvider</property>
		<!--在连接池中可用的数据库连接的最少数目 -->
		<property name="c3p0.min_size">5</property>
		<!--在连接池中所有数据库连接的最大数目  -->
		<property name="c3p0.max_size">20</property>
		<!--设定数据库连接的过期时间,以秒为单位,
		如果连接池中的某个数据库连接处于空闲状态的时间超过了timeout时间,就会从连接池中清除 -->
		<property name="c3p0.timeout">120</property>
		 <!--每3000秒检查所有连接池中的空闲连接 以秒为单位-->
		<property name="c3p0.idle_test_period">3000</property>

		<!-- 引入映射 -->
	</session-factory>
</hibernate-configuration>
2.4Spring配置web.xml
 <!-- Spring核心监听器 -->
  <listener>
        <listener-class>org.springframework.web.context.ContextLoaderListener</listener-class>
  </listener>
  <!-- 加载Spring配置文件 -->
  <context-param>
    <param-name>contextConfigLocation</param-name>
    <param-value>classpath:applicationContext.xml</param-value>
  </context-param>
2.5配置applicationContext.xml
2.6日志记录文件
log4j.properties
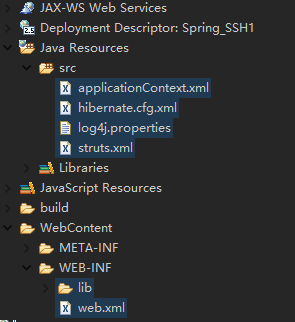
2.7整体配置结构如下
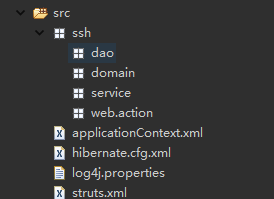
3.创建包结构
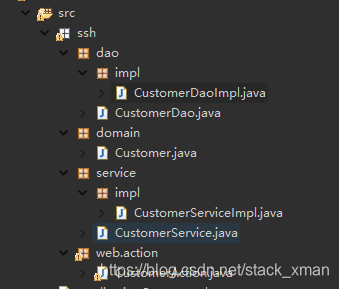
4.创建相关的类
5.引入相关页面
6.Spring整合Structs2:将Action交给Spring管理(推荐)
6.1引入插件包
struts-spring-plugin.jar
6.2将Action交给Spring
applicationContext.xml
<!-- 配置Service -->
	<bean id="customerServcie" class="ssh.service.impl.CustomerServiceImpl">

	</bean>
	<!-- 配置Action -->
	<bean id="customerAction" class="ssh.web.action.CustomerAction" scope="prototype">
	   <property name="customerServcie" ref="customerService"/>
	</bean>
struts.xml
<struts>
	<!-- 配置Struts2的常量 -->
	<constant name="struts.action.extension" value="action"/>
	<!-- 配置Action -->
	<package name="ssh1" extends="struts-default" namespace="/">
	<!-- class为Spring中配置Action的id -->
		<action name="customer_*" class="customerAction" method="{1}">
		</action>
	</package>
</struts>


 3万+
3万+

 被折叠的 条评论
为什么被折叠?
被折叠的 条评论
为什么被折叠?
 到【灌水乐园】发言


