


 本文详细介绍了如何使用Spring Boot构建一个微服务消费者,通过`cloud-consumer-order80`模块实践RESTful调用,涉及POM配置、YAML设置、主启动类和业务逻辑,包括RestTemplate的使用。特别提到了与提供者服务的接口交互注意事项。
一、前言
本文通过实现简单的订单支付业务,来对微服务架构的构建进行练习。本文是对微服务架构编码构建(一)的完善,上一篇文章构建了微服务的提供者,接下来构建微服务的消费者。
二、微服务工程构建
cloud-consumer-order80微服务消费者订单Module模块
(1) 创建cloud-consumer-order80模块
(2) 改写pom.xml
<?xml version="1.0" encoding="UTF-8"?>
<project xmlns="http://maven.apache.org/POM/4.0.0"
         xmlns:xsi="http://www.w3.org/2001/XMLSchema-instance"
         xsi:schemaLocation="http://maven.apache.org/POM/4.0.0 http://maven.apache.org/xsd/maven-4.0.0.xsd">
    <parent>
        <artifactId>cloud2020</artifactId>
        <groupId>com.exercise.springcloud</groupId>
        <version>1.0-SNAPSHOT</version>
    </parent>
    <modelVersion>4.0.0</modelVersion>

    <artifactId>cloud-consumer-order80</artifactId>

    <dependencies>
        <!-- https://mvnrepository.com/artifact/org.springframework.boot/spring-boot-starter-web -->
        <dependency>
            <groupId>org.springframework.boot</groupId>
            <artifactId>spring-boot-starter-web</artifactId>
        </dependency>

        <!-- https://mvnrepository.com/artifact/org.springframework.boot/spring-boot-starter-web  -->
        <dependency>
            <groupId>org.springframework.boot</groupId>
            <artifactId>spring-boot-starter-actuator</artifactId>
        </dependency>

        <!-- https://mvnrepository.com/artifact/org.springframework.boot/spring-boot-devtools -->
        <dependency>
            <groupId>org.springframework.boot</groupId>
            <artifactId>spring-boot-devtools</artifactId>
            <scope>runtime</scope>
            <optional>true</optional>
        </dependency>

        <!-- https://mvnrepository.com/artifact/org.projectlombok/lombok -->
        <dependency>
            <groupId>org.projectlombok</groupId>
            <artifactId>lombok</artifactId>
            <optional>true</optional>
        </dependency>

        <!-- https://mvnrepository.com/artifact/org.springframework.boot/spring-boot-starter-test -->
        <dependency>
            <groupId>org.springframework.boot</groupId>
            <artifactId>spring-boot-starter-test</artifactId>
            <scope>test</scope>
        </dependency>
    </dependencies>
</project>
(3) 写application.yml
server:
  port: 80
(4) 写主启动类
package com.exercise.springcloud;

import org.springframework.boot.SpringApplication;
import org.springframework.boot.autoconfigure.SpringBootApplication;

@SpringBootApplication
public class OrderMain80 {
    public static void main(String[] args) {
        SpringApplication.run(OrderMain80.class,args);
    }
}
(5) 写业务
这边目前使用RestTemplate来进行远程访问。
RestTemplate是什么?
提供了多种便捷访问远程Http服务的方法,是一种简单便捷的访问restful服务模板类,是spring提供的用于访问rest服务的客户端模板工具集。使用restTemplate访问restful接口(url,requestMap,ResponseBean.class)三个参数:rest请求地址、请求参数、http响应转换被转换成的对象类型。在此我向大家推荐一个架构学习交流圈。交流学习伪鑫:1253431195(里面有大量的面试题及答案)里面会分享一些资深架构师录制的视频录像:有Spring,MyBatis,Netty源码分析,高并发、高性能、分布式、微服务架构的原理,JVM性能优化、分布式架构等这些成为架构师必备的知识体系。还能领取免费的学习资源,目前受益良多
官网地址:
https://docs.spring.io/spring-framework/docs/5.2.2.RELEASE/javadoc-api/org/springframework/web/client/RestTemplate.html
1、Config配置类
package com.exercise.springcloud.config;

import org.springframework.context.annotation.Bean;
import org.springframework.context.annotation.Configuration;
import org.springframework.web.client.RestTemplate;

@Configuration
public class ApplicationContextConfig {

    @Bean
    public RestTemplate getRestTemplate(){
        return new RestTemplate();
    }
}
2、创建controller
package com.exercise.springcloud.controller;

import com.exercise.springcloud.entities.CommonResult;
import com.exercise.springcloud.entities.Payment;
import lombok.extern.slf4j.Slf4j;
import org.springframework.web.bind.annotation.GetMapping;
import org.springframework.web.bind.annotation.PathVariable;
import org.springframework.web.bind.annotation.RestController;
import org.springframework.web.client.RestTemplate;

import javax.annotation.Resource;

@RestController
@Slf4j
public class OrderController {

    public static final String PAYMENT_URL = "http://localhost:8001";

    @Resource
    private RestTemplate restTemplate;

    @GetMapping("/consumer/payment/create")
    public CommonResult<Payment>   create(Payment payment){
        return restTemplate.postForObject(PAYMENT_URL+"/payment/create",payment,CommonResult.class);  //写操作
    }

    @GetMapping("/consumer/payment/get/{id}")
    public CommonResult<Payment> getPayment(@PathVariable("id") Long id){
        return restTemplate.getForObject(PAYMENT_URL+"/payment/get/"+id,CommonResult.class);
    }
}
(6) 测试
查询数据:

插入数据:

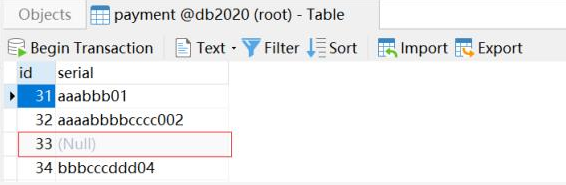
注意:在cloud-provider-payment8001微服务提供者支付模块的controller中的create方法参数中要加上@RequestBody注解,不然这边通过浏览器插入数据虽然提示200,但数据库会出现键插入成功,值为空的情况。如下图所示:


 302
302

 被折叠的 条评论
为什么被折叠?
被折叠的 条评论
为什么被折叠?
 到【灌水乐园】发言


